1
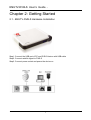
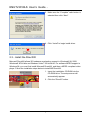
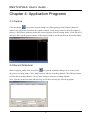
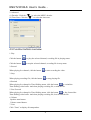
ENUTV-DVB-S DVB-S USB TV Tuner (USB DVB-S Video Capture Box / Personal Video Recorder) ENUTV-DVB-S Series User’s Guide Version 1.0 ENUTV-DVB-S User’s Guide - User’s Notice This manual is provided “as is” without warranty of any kind, either express or implied, including but not limited to the implied warranties or conditions of merchantability or fitness for a particular purpose. In no event shall we, its directors, officers, employees or agents be liable for any indirect, special, incidental, or consequential damages (including damages for loss of profits, loss of business, loss of use or data, interruption of business), even if we have been advised of the possibility of such damages arising from any defect or error in this manual or product. Specifications and information contained in this manual are furnished for information use only, and are subject to change at any time without notice, and should not be construed as a commitment by us. We assume no responsibility or liability for any errors or inaccuracies that may appear in this manual, including the products and software described in it. No part of this manual, including the products and software described in it, may be reproduced, transmitted, transcribed, stored in a retrieval system, or translated into any language in any form or by any means, except documentation kept by the purchaser for backup purposes, without the express written permission of us. Product warranty or service will not be extended if: (1) the product is repaired, modified or altered, unless such repair, modification of alteration is authorized in writing by us; or (2) the serial number of the product is defaced or missing. Products and corporate names appearing in this manual may or may not be registered trademarks or copyrights of their respective companies, and are used only for identification or explanation and to the owners’ benefit, without intent to infringe. Windows, MS-DOS, and DirectX are registered trademarks of Microsoft Corporation. Adobe and Acrobat are registered trademarks of Adobe Systems Incorporated. The product name and revision number are both printed on the product itself. Manual revisions are released for each product design represented by the digit before and after the period of the manual revision number. Manual updates are represented by the third digit in the manual revision number. Copyright © 2008 ENCORE ELECTRONICS, INC. All Rights Reserved. 2 ENUTV-DVB-S User’s Guide - Contents: Chapter 1: Introduction ..................................................................................................................4 1.1 - Package Contents ...........................................................................................................4 1.2 - System Requirements .....................................................................................................4 Chapter 2: Getting Started..............................................................................................................5 2.1 - ENUTV-DVB-S Hardware Installation...........................................................................5 2.2 - Device Driver Installation ..............................................................................................6 2.3 - Install the DirectX® .......................................................................................................7 2.4 - Install the ENUTV-DVB-S Application. .........................................................................8 Chapter 3: Launch the ENUTV-DVB-S Program .........................................................................10 3.1 LNB Setting ...................................................................................................................11 3.1.1 Load Satellite ..............................................................................................................11 3.1.2 Add Satellite ................................................................................................................13 3.1.3 Modify Satellite...........................................................................................................13 3.1.4 Delete Satellite ............................................................................................................14 3.1.5 DiSEqC Setting ...........................................................................................................14 3.2 Channel Scanning...........................................................................................................15 3.3 Transponder Parameters..................................................................................................16 3.4 IP Receiver .....................................................................................................................17 Chapter 4: Application Programs..................................................................................................19 4.1 Capture...........................................................................................................................19 4.2 Record Scheduler ...........................................................................................................19 4.3 EPG................................................................................................................................20 4.4 System Setting................................................................................................................20 4.5 Function buttons overview..............................................................................................21 Chapter 5: Using the Remote Control...........................................................................................22 Chapter 6: Trouble Shooting ........................................................................................................23 6.1 Hardware trouble shooting:.............................................................................................23 6.2 Software trouble shooting: ..............................................................................................23 Chapter 7: Technical Support .......................................................................................................23 3 ENUTV-DVB-S User’s Guide - Chapter 1: Introduction 1.1 - Package Contents The following items are included in the ENUTV-DVB-S package. CD Setup Disc (includes Software Driver and Utility Software) ENUTV-DVB-S device Remote Controller Power adapter User’s Guide or Quick Installation Guide 1.2 - System Requirements IBM PC or compatible USB2.0 compliant interface Intel Pentium IV 2.0GHz CPU or higher processor (Recommended) Minimum 256 MB memory Minimum 1GB hard disk space available VGA card supports DirectX 9.0c or above SoundBlaster compatible sound card One free USB host Microsoft Windows XP Home or Professional with Service Pack 2 CD-ROM drive for driver and software installation 4 ENUTV-DVB-S User’s Guide - Chapter 2: Getting Started 2.1 - ENUTV-DVB-S Hardware Installation Step1: Connect the USB port of PC and DVB-S device with USB cable Step2: Connect satellite signal to DVB-S Step3: Connect power socket and power the device on 5 ENUTV-DVB-S User’s Guide 2.2 - Device Driver Installation Before You Begin Make sure that the product is actually installed. (For more information, please refer to Hardware Installation in the previous section.) Turn on or restart your computer. Place the software CD-ROM that comes with the ENUTV-DVB-S in the CD-ROM drive. Then follow the on-screen installation guide below. Device driver installation for Windows® XP Home/Professional Edition 1. When the computer has been powered on for the very first time during the setup, a message “Found New Hardware Wizard” dialogue box will appear on the screen. Click “Cancel” button to close “Found New Hardware Wizard” window. 2. Insert the ENUTV-DVB-S setup CD-ROM into the CD-ROM or DVD-ROM drive, the “Driver & Utilities” setup screen will appear. Click “Install Driver” button. 6 ENUTV-DVB-S User’s Guide 3. Make sure the “Complete” radio button is selected then click “Next” 4. Click “Install” to begin install driver. 2.3 - Install the DirectX® Microsoft DirectX® allows 3D hardware acceleration support in Windows® 98, 2000, Windows® XP/64 bits and Windows Vista™ 32-bit/64-bit. For software MPEG support in Windows 98, you must first install Microsoft DirectX®, and then a MPEG compliant video player. Follow the installation steps below to install MS DirectX®. 1. Insert the installation CD-ROM into the CD-ROM drive. The setup screen will automatically appear. 2. Click the “DirectX” button. 7 ENUTV-DVB-S User’s Guide 3. Click “Accept the agreement” radio button then click “Next” 4. Click “Next” to confirm the installation of DirectX 5. Click “Finish” NOTE: The computer will automatically restart. Please close all programs if any and save files if needed before hitting the “Finish” button. 2.4 - Install the ENUTV-DVB-S Application. 1. Install TV application on Windows XP Home/Professional Edition 1. Insert the installation CD-ROM into the CD-ROM drive. The setup screen should automatically appear. 2. Click the “Setup Utility” 8 ENUTV-DVB-S User’s Guide 3. Click “Next” button to start the ENUTV-DVB-S Installation 4. Click “Next” button to accept the default location or choose a different folder Note: We recommend you not to change the default location. 5. Install wizard will configure your new software installation. 6. Click “Finish” button. Note: We recommend restarting your computer right after the Installation Wizard. 9 ENUTV-DVB-S User’s Guide - Chapter 3: Launch the ENUTV-DVB-S Program First you open the software through double clicking the icon of “DVBPlayer” desktop. By this time, you will see a window such as the following display. 10 on the ENUTV-DVB-S User’s Guide 3.1 LNB Setting In the main menu, click the right key on the mouse to display a list, and select “LNB Setting”. You can also click the button on the bottom-right of main menu to display the LNB Setting window. 3.1.1 Load Satellite In the above figure, click [Load] button to enter into Satellite loading window. 11 ENUTV-DVB-S User’s Guide There are many different satellites, load a default satellite in the transponder list. Click [Load] button under the satellite item. The following picture will display on the screen. Or, you can choose the satellite you need. a) [Name] Press to display the drop-down list, and select the desired satellite from the list. Input the satellite name you want to add. b) [DiSEqC] The item is used to select the DiSEqC port. This is compatible with the DiSEqC 1.0 protocol. c) [Dual Oscillator] The Low Noise Block (LNB) is a combination of a low noise amplifier (LNA) and down converter which built them into one device. As one LNB has limited bandwidth, so we need two LNBs, low and high LNB. Select C band, Single or Double according to the type of dish you have. If you have select C Band, the frequency values of low LNB is 5150. If you have single LNB mode, the frequency values of low LNB is 11300. If you have dual LNB mode, to change the default value, click in the [Low LNB] and [High LNB], select needed frequencies from them. In this case, [22K] is inactive. d) [ToneBurst] Select [OFF] or [ON] in this column. 12 ENUTV-DVB-S User’s Guide 3.1.2 Add Satellite Add a new satellite in the transponder list. Click [Add] button under the Satellite item and select New again in the next submenu. 3.1.3 Modify Satellite Click [Modify] button in the [satellite] column. The satellite parameters dialog box will appear again. 13 ENUTV-DVB-S User’s Guide 3.1.4 Delete Satellite Delete a satellite in the transponder list. First select the satellite and press the Del button to delete it. 3.1.5 DiSEqC Setting DiSEqC1.2 is a special protocol for dish motor which drives the dish to aim the satellite. a) [East/West] Drive the motor turn to East or West direction until unclench it or reach the limit. b) [Software Limits] Set the east or west limit to ensure the motor will not reach the real limit. If not set a limit, the motor will continue to drive the dish to East or West although it can not turn east or west too much, the load of motor will be so large that it possibly will be damaged. c) [Position] Input the satellite position. d) [Angle] Degree: Enter the degree of the satellite position on the sky. e) [Reset] Click the [Reset] button to drive the dish to zero position. f) [Stop] Click the [Stop] button to stop the motor. g) [Close] Click the [Close] button to exit the window. 14 ENUTV-DVB-S User’s Guide 3.2 Channel Scanning Click the [Scan] button to display the Program Scan menu. In the menu, you can click the small pane to select transponder under the current satellite to search channels. You can also click the [Select All] button to select all transponder to scan channel. All the searched channels will be displayed in the bottom of the menu. 15 ENUTV-DVB-S User’s Guide 3.3 Transponder Parameters 1. Add transponder Add a new transponder in the transponder list. The following figure is transponder parameter dialog box. a) Name: Enter the new name of the TP. b) [Frequency (MHz)] This box indicates the down link frequency of the current transponder. c) [Symbol Rate (KS/s)] This box indicates the symbol rate of the current transponder. d) [Polarity] This box shows the LNB power supply mode. There are [Vertical], [Horizontal] polarization and [Disable] for your choice. 16 ENUTV-DVB-S User’s Guide 2. Modify transponder Click the [Modify] button in the [transponder] item. The transponder parameters dialog box will pop up again. 3. Delete transponder Delete a transponder in the transponder list. Select one transponder and press Del. 4. Scan Auto search all the programs. 3.4 IP Receiver This page shows the program table of the current transponder. You can setup the PID parameters which the satellite service provider offers. If there is no any setting about current transponder in transponder parameters item, all operations in this page are prohibited. Please add new transponder before you enter the following page. You can also double click the icon on the desktop to display the IP Receiver window. 1. Transponder The box shows all of the TPs under the current satellite. You can choose them. 2. Satellite The box shows all of the selected satellites. 17 ENUTV-DVB-S User’s Guide 3. Available PID Show searched data PID under the current transponder in the table. (Standard PID) 4. Active PID This item shows the current active PID. 5. PID (Hex) Input the PID provided by your service provider. 6. Add PID Add PID value in [PID] and in Available PID table into active PID table. It can be added to 64 PIDs at the most. 7. Delete PID Delete the selected PID in the active PID table. 8. Filter Type Two filter types are available: MAC filter and Dial IP filter. MAC Filter: Filter data packets per the receiving box’s MAC address. If the destination address in the data packet is as the same as MAC address of the box, the packets will be received. If not, the packets won’t be received. Dial IP Filter: Filter data packets per the IP address assigned by server. 9. Unicast and Multicast MAC: To show the MAC address of the receiver box. Data Rate: To show unicast and multicast data rate in unit time. NOTE: In any circumstance the broadcast and multicast data will pass it. 18 ENUTV-DVB-S User’s Guide - Chapter 4: Application Programs 4.1 Capture Click the button to open the capture dialog box. When playing, click [Capture] button to capture one still picture and add to the capture window. Click [Save] button to store the captured picture. Click [Delete] button to delete the selected picture from the storing folder. Click [Del ALL] button to delete all the pictures shown on the capture window, and delete them in the storing folder. 4.2 Record Scheduler When in playing status, click the button to open the scheduler dialog box to create or edit the pre-set recording tasks. Click [Add] button to add one recording channel. Click [Delete] button to delete the recording channel. Click [Clear] button to clear the recording channel. Note: You can set the start time and how long you want to record your favorite programs. 19 ENUTV-DVB-S User’s Guide When the program broadcasts to the starting time that you have established just now, the state appears of recording and producing the button. If you want to watch programs that you record button, it will broadcast from TV window switch over to record programs and produce, click window, then select the recording program that you want to watch from right column, pressing the right key can be loaded and recorded the file. 4.3 EPG Just activate in playing channel status, click the button to get EPG information of channel. 4.4 System Setting In the main menu, click the right key on the mouse to display the system setting menu. You can also click the “setting” on the file bar on the top of menu. 1. Path (1) Click the Browse button to select the path of the recording file to be saved. (2) Click the Browse button to select the path of the capturing picture to be saved. 20 ENUTV-DVB-S User’s Guide 2. Advanced (1) Decoder: Click the “ ” to select the MPEG decoder. (2) Time Zone: Click the “ ” to select the time zone. 4.5 Function buttons overview 1. Play Click the button Click the button to play the selected channel, recording file in playing status. to stop the selected channel, recording file in stop status. 2. Record When playing live channel, click the button to start recording the video. 3. Stop When playing recording file, click the button to stop playing file. 4. Rewind to rewind the When playing live channel in Time-Shifting status, click the button Time-Shifting video buffer. And when playing recording file, rewind the file. 5. Fast Forward When playing live channel in Time-Shifting status, click the button to fast forward the Time-Shifting video buffer. And when playing recording file, fast forward the file. 6. Volume Speaker mute button. Volume control button. 7. Lists Click “Trans” to display all transponders. 21 ENUTV-DVB-S User’s Guide Click “Sat” to display all satellites. Click “Fav” to display all the favorite channels. Click “All” to display all channels. Click “V” to display all TV programs. Click “R” to display all Radio programs. Chapter 5: Using the Remote Control CH: Press to adjust the channel TAB: Press to switch among windows in the IP Data menu VOL: Press to adjust the volume PLAY/OK: Press to confirm the operation or show the program list ZOOM: Press to magnify the video from the current program MUTE: Press to suspend sound temporarily : Press to switch between operating and stand by modes EXIT: Return to the previous menu or escape item CAPTURE: Press to capture one still picture and add to the capture window : Switch back to previous channel PAUSE: Pause/Play A/V STOP: Press to stop recording or playing REC: Press to start record the video TV/F: Press to switch between playing and recording file mode 22 ENUTV-DVB-S User’s Guide - Chapter 6: Trouble Shooting If any trouble in installation and operation of the DVB-S, please refer to this section or contact the after-sales service department. 6.1 Hardware trouble shooting: If the DVB-S device can not be detected by Windows XP Home/Pro SP2 during the installation, please check the following items: (1) Check whether the USB jack of the PC and the USB cable is OK. (2) Check whether the power supply is OK. (3) Check whether the insertion of the box is OK. (4) Check whether the golden finger of the box is clean. If not, please clean them with alcohol or rubber in the safe condition when the power has been removed and all connections have been unplugged. If the playing is not normally, please check whether the USB jack on PC support the USB 2.0 HI-SPEED. If the device does not receive signal, please check the following: (1) Check whether the signal cable connect to the LNB IN jack. (2) Check whether the satellite parameter is properly. 6.2 Software trouble shooting: If the display is not playing normally, please install the USB 2.0 HI-SPEED drive. If the display does not show the information of the current channel in the EPG window, or does not search or play channel, please install the DirectX 8.1 or the higher versions. Chapter 7: Technical Support For Technical Support, Installation Hotline or Contacts, please visit our web site at http://www.encore-usa.com 23 2008/06/30 Version: 1.01