1
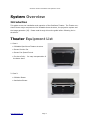
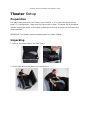
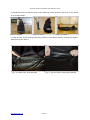
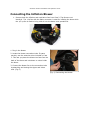
GeoDome Theater Installation and Operation Guide
www.elumenati.com
[email protected]
GeoDome Theater
Installation and Operation Guide
Last Updated: November 2010
GeoDome Theater......................................................................................................1
Installation and Operation Guide..................................................................................1
System Overview.......................................................................................................2
Theater Equipment List...............................................................................................2
Theater Setup............................................................................................................3
Projection System Equipment List.................................................................................9
Projection System Setup1............................................................................................0
Projection System First Light......................................................................................13
Projection System Teardown......................................................................................13
Theater Teardown.....................................................................................................14
Theater Information..................................................................................................17
Theater Specifications...............................................................................................18
Projection System Specifications.................................................................................20
www.elumenati.com
Page 1
GeoDome Theater Installation and Operation Guide
System Overview
Introduction
This guide covers the installation and operation of the GeoDome Theater. The Theater consists of three major components: the inflatable dome structure, the projection system and
the image generator (IG). Please read through this entire guide before following the instructions.
Theater Equipment List
1. Case 1:
● Inflatable OpenDome Theater structure
● Screen Suction Fan
● Screen Fan Speed Control
● Furniture Dolly - for easy transportation of
the dome alone
2. Case 2:
● Inflation Blower
● Ventilation Blower
www.elumenati.com
Page 2
GeoDome Theater Installation and Operation Guide
Theater Setup
Preparation
The space requirements for the Theater are at least 25' x 25' in clear floor space and at
least 13' in ceiling height. Make sure the floor surface is clean. The dome will be unpacked
with the screen face-down, so the setup surface should be free of debris that may mark the
screen material.
IMPORTANT: The Theater requires constant power to remain inflated.
Unpacking
1. Remove the screen suction fan from Case 1.
2. Tilt the case and roll the dome out onto the floor.
GeoDome Theater Installation and Operation Guide
3. Unfold the dome so that the light screen material is face-down on the floor. It will unfold
to a circular shape.
(Fig. 1) Unpack
(Fig. 2) Unroll
(Fig. 3) Unfold
4. Close all four of the vents around the periphery of the dome base by closing the zippers
and securing the Velcro.
(Fig. 4) Locate four vent openings
www.elumenati.com
(Fig. 5) Zip and Velcro close each opening
Page 4
GeoDome Theater Installation and Operation Guide
Connecting the Inflation Blower
1. Remove both the inflation and ventilation fans from Case 2. The fans are not
identical. The 1 hp fan with the fabric connector is used for inflating the dome while
the 1/3 hp fan is used to bring cold air into the dome once operational.
1. Plug in the blower.
2. Locate the blower connection tube. If space
permits, use the extension tube included in Case
1. This lets you place the blower ten feet from the
back of the dome and cuts down on noise inside
the dome.
3. Connect the blower fan to the connection tube
by attaching and closing the zipper and Velcro
seal. (Fig. 6)
(Fig. 6) Connecting the blower.
GeoDome Theater Installation and Operation Guide
Connecting the Screen Suction Fan
1. Locate the hole at the top of the dome
surrounded by Velcro. Position the suction fan on
top of this hole so that the Velcro on the fan
bottom secures to the dome. Secure the safety
locking straps on the dome to the latches to the
suction fan. (Fig. 7)
● Important: Remove all footwear before
stepping on dome material.
2. Plug the suction fan into the fan speed control
accessory. (Fig. 8)
(Fig. 7) Attaching the suction fan.
(Fig. 8) Connecting the speed control
www.elumenati.com
Page 6
GeoDome Theater Installation and Operation Guide
Inflating
1. Turn the blower on high.
2. Let the Theater structure inflate. This should take about 5 minutes. (Figs 9, 10, 12, 13)
3. Plug the suction fan speed control into a 120V outlet. It will turn on automatically, but
make sure that the control dial is turned to the inflation mark (roughly 3 o’clock position).
This will set the correct amount of suction for the screen.
4. The internal screen should become taut. The amount of suction behind the screen can be
adjusted with the fan speed control. Make sure that the support structure does not show
through the screen after manually adjusting the speed control. (Fig. 11)
(Fig. 9) Blower Speed Control
(Fig. 10) Inflating the Theat- (Fig. 11) Setting screen tener
sion
(Fig. 12) Dome begins to inflate
www.elumenati.com
(Fig. 13) Fully inflated Theater
Page 7
GeoDome Theater Installation and Operation Guide
Using the OpenDome
Place the ventilation fan near the opening at the back of the dome (next to the vent where
the inflation fan attaches), and adjust as needed for temperature. The Theater is now ready
for use. Install the provided audio/video equipment and enjoy the show!
(Fig. 14) OpenDome Theater in action
www.elumenati.com
Page 8
GeoDome Theater Installation and Operation Guide
Projection System Equipment List
In Case
1. GeoDome Projector Housing with OmniFocus SX3 projection and Bose audio systems.
2. Spare SX3 lamp (in foam cavity)
3. Legs for Theater stand (in foam cavity)
4. Remote control for projector with batteries
5. GeoDome snake cable: 1/8” Audio, HDMI with DVI adapters, USB and Power (underneath
projector housing)
(Fig. 21) Projection system in case
www.elumenati.com
Page 9
GeoDome Theater Installation and Operation Guide
Projection System Setup
Unpacking
1. Unfasten the locks to open the protective case.
2. Remove remote control.
3. Carefully lift the projection housing out of the case.
NOTE: The projection system weighs 45 lbs. PLEASE LIFT WITH CAUTION.
www.elumenati.com
Page 10
GeoDome Theater Installation and Operation Guide
Setting up the Stand
1. Lift the protective foam at the bottom of the case and remove the cable snake and the
base of the stand.
2. From the foam cavities in the lid, remove all four legs of the stand.
3. With the stand on the floor and the mounts facing up, place the leg over the mount and
align the set screw. Tighten with the Allen wrench. Repeat for all four legs.
www.elumenati.com
Page 11
GeoDome Theater Installation and Operation Guide
4. Turn the stand upright and place the projection system on top of the stand so that it is
solidly mounted on all four sides.
5. Place the stand in the center of the dome with the lens oriented toward the back of
the dome, away from the door.
6. Note the outlets (HDMI, USB, Audio and Power) on the back of the housing. Find the
appropriate end of the snake and plug the cables in. USB is for optional equipment.
7. Remove the lens cap by pulling it straight up. CAUTION: Do not attempt to unscrew
the cap, as this may damage the lens.
www.elumenati.com
Page 12
GeoDome Theater Installation and Operation Guide
Projection System First Light
1. Turn the on projector using the remote control.
2. You should see the projector startup screen.
3. The projector zoom should already be at the default setting.
4. Should you need to make adjustments, use the projector remote control to adjust the
zoom to the desired amount. Figures 34 and 35 show the proper Display and Zoom
settings.
5. Adjust focus and zoom using the remote control.
● Coarse adjustment of both zoom and focus is achieved using up and down arrows.
● Fine adjustment of both zoom and focus is achieved using left and right arrows.
(Fig. 34) Default Display Settings.
(Fig. 35) Default zoom settings
Projection System Teardown
1. Teardown of the projection system is simply the reverse of the above 3 steps.
www.elumenati.com
Page 13
GeoDome Theater Installation and Operation Guide
Theater Teardown
Deflating
1. Once you are finished using your Theater, remove all equipment from the inside.
2. Turn off the inflation blower.
3. The structure will begin deflating.
● Tip: If two or more people are deflating the dome, it's helpful to fold the dome along
the line between the door and the blower tube. The dome then collapses onto one side.
This folding method is known as “the taco” and provides better protection for the screen.
4. As it deflates, open the deflation vents by opening the Velcro and zippers around the
perimeter of the OpenDome to allow the air to freely escape.
5. Unplug the fan speed control from the power outlet and disconnect it from the suction
fan’s power cord.
(Fig. 14) Dome begins to deflate
(Fig. 15) Open all four vents
(Fig. 16) Remove suction fan. Shoes off please!
www.elumenati.com
Page 14
GeoDome Theater Installation and Operation Guide
Packing Up
1. Drag dome by suction fan hole until it folds in half along a line between the doorway and
the inflation tube. This sandwiches the screen completely inside the outer shell, protecting
it from dirt.
2. Once deflated, flip the dome so that the light screen surface is up (away from dirt and
debris).
3. Orient the dome with doorway and inflation tube opposite each other and fold one side
(90 degrees from the door or inflation tube) over the other making a half circular shape.
4. Fold in half again from the opposite direction so that the width is again decreased.
5. Begin “tightly” and “slowly” rolling the dome from the doorway end toward the inflation
tube end taking time to let air escape as you roll.
6. Place the dome in the transport bag and tighten the bag straps before transport.
(Fig. 17) Drag dome by suction fan hole
(Fig. 18) Folding dome to proper width
(Fig. 19) Folding dome to proper width
(Fig. 20) Dome cinched into protective bad
www.elumenati.com
Page 15
GeoDome Theater Installation and Operation Guide
Alternate Packing Method
After following steps 1-4 above, some customers prefer to “stuff” the OpenDome directly
into the shipping container. This method has three advantages 1) stuffing allows for a more
efficient use of space; 2) there is a more random distribution of wrinkles in the dome fabric
and 3) it's quicker. The disadvantage is that there is an increased risk of tearing the dome
fabric.
www.elumenati.com
Page 16
GeoDome Theater Installation and Operation Guide
Theater Information
This section contains product specifications, troubleshooting tips, and support information.
Troubleshooting
The Inflatable Is ‘Soft’
Make sure all the zippers are closed. Check the inflation tube for twisting or obstructions.
Make sure the blower intake is clear.
The Inflatable is Too Firm
Switch the external blower to #2 or #3 setting.
Tears and Rips – Inflatable Repairs
The Theater comes with a one-year warranty on workmanship and materials. If the damaged inflatable is a result of workmanship, contact The Elumenati to arrange for repair. If a
small tear occurs in your inflatable during an event, you may repair it yourself using a sewing kit with a “C-hook”-shaped needle and mono-filament thread. Local upholstery and tent
& awning shops may be able to complete emergency repairs if needed.
Important Advisories
ALWAYS remove footwear before walking on dome material.
NEVER pack your Theater wet. Inflatables may be used in all types of weather, including rain
and snow, but they must be completely dry before packing or storing. If inflatables are
stored wet, mildew damage can occur within days. Mildew not only voids your warranty, but
also will rot your inflatable.
PLEASE NOTE - Elumenati OpenDomes are not intended for outdoor use. Please contact us
to discuss outdoor use domes.
Product Support
Please contact us with your questions via email at [email protected] or by phone at
1-888-384-3826 then press 2.
www.elumenati.com
Page 17
GeoDome Theater Installation and Operation Guide
Theater Specifications
OPENDOME ADVANTAGES
MATERIALS
• Fully open doorway with no airlock
• 200 Denier Nylon Oxford
• No rigid supports
• No complex assembly
CUSTOM COLORS & BRANDS
• Available in a wide range of colors
DIMENSIONS
• 7.62m (25’) Outside Diameter
• Custom graphics can be printed directly on the
dome
• 6.5m (21.3’) Internal Screen Diameter
• Custom removable wraps available
• Power Requirements
• 4.1m (13.5’) Maximum Height
• Blower fan requires (1) 110V AC outlet during inflation period
CAPACITY
• Screen fan requires (1) 110V AC outlet while in use
• Maximum capacity depends on age/size of audience and
seating arrangement.
• Adult Capacity: 20
STANDARD ACCESSORIES
• Shipping case
• Typical Student Capacity: 25-30
• Two Blower Fans and Extension Tube
• Screen Fan and Rheostat
Minimum Setup Area
• Patch Kit
• 9m x 9m (30’ x 30’)
OPTIONAL ACCESSORIES
MINIMUM SETUP CREW
• Recommended 2 people, though can be setup by 1 person
• Bag and dolly
OPERATING ENVIRONMENT
MINIMUM SETUP TIME
• Indoors or under cover
• Less than 5 mph wind untethered
• Approximately 20 minutes
LIMITED WARRANTY
WEIGHT
• 1 years part and labor
• 140 lbs
CARE
PACKED SIZE
• Spot clean with water and cloth
• 1.07m x 0.86m x 1.07m (42” x 34” x 42”)
• Screen is machine washable and replaceable
FLOORING
• No special flooring is provided. The floor of the setup
area is usually sufficient.
www.elumenati.com
Page 18
GeoDome Theater Installation and Operation Guide
www.elumenati.com
Page 19
GeoDome Theater Installation and Operation Guide
Projection System Specifications
OMNIFOCUS PROJECTION
•
•
•
•
DIMENSIONS
Infinite depth of focus
Optimized pixel placement
Continuously adjustable from
180° x 135° to 180° x 180° projection
• Weight: 15.5 lbs / 7.03 kg
• Size: 578 mm L x 266 mm W x 145 mm H
LAMP
IMAGE
• 270W NSH lamp
• Lamp life: 1500 hours (normal); 2000 hours (quiet)
• 3500 ANSI lumens
• 90% brightness uniformity across the screen
• Contrast ratio: variable, 1000:1
POWER REQUIREMENTS
DISPLAY TECHNOLOGY AND RESOLUTION
• 0.7” reflective LCD panels (LCoS) x 3
• True SXGA+ 1400 x 1050 resolution
• Significantly higher pixel fill factor (>90%) than DLP
(reduces “screen door” effect)
• Line voltage 100-240 VAC ± 10% @ 50/60 HZ
• Power consumption: 355W/290W/7W
(normal/quiet/standby)
STANDARD ACCESSORIES
•
•
•
•
•
INPUT SIGNAL COMPATIBILITY
• Analog PC: VGA through UXGA (1600 x 1200)
• Digital PC: VGA through SXGA+ (1400 x 1050)
• Horizontal and vertical scaling, all inputs
Shipping case
USB, power, audio, and video cables
Wireless remote unit
Omnimap Software API
Stand with legs
OPERATING ENVIRONMENT
INPUTS, CONTROL, & NETWORKING
•
•
•
•
•
•
•
•
DVI-I 29 pin: Digital PC / Analog PC / Digital Video
Mini D-Sub 15 pin: Analog PC / Component / SCART
1 composite video, 1 S-video
Stereo mini jack: Stereo audio input
Wireless IR remote control and built-in keypad
Mouse Control Receiver (USB)
RS-232C Control Terminal
Optional LAN Adaptor
www.elumenati.com
•
•
•
•
Operating temp: 41˚ to 95˚ F (5˚ to 35˚ C)
Storage temp: -22˚ to 140˚ F (-30˚ to 60˚ C)
Storage humidity: 5% - 90%
Audible noise: 35/31dB (normal/quiet mode)
LIMITED WARRANTY
• 1 year parts and labor
• Lamp: 120 days or 500 hrs, whichever comes first
Page 20