1
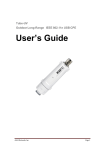
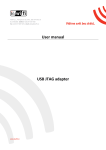
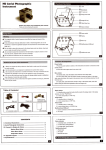
Wireless USB 150
802.11n Wireless USB Key
USER MANUAL
HNWU150N
www.hamletcom.com
Table of Contents
INTRODUCTION ................................................................................................................................4
PACKAGE CONTENTS.....................................................................................................................4
WIRELESS USB ADAPTER OVERVIEW........................................................................................4
WIRELESS USB ADAPTER INSTALLATION ................................................................................5
WINDOWS 7.............................................................................................................................5
WINDOWS VISTA ......................................................................................................................8
WINDOWS 2000/XP ..............................................................................................................11
MAKING A BASIC WIRELESS NETWORK CONNECTION .......................................................14
INTRODUCTION TO THE WIRELESS LAN UTILITY ..................................................................18
GENERAL ...............................................................................................................................18
PROFILE ................................................................................................................................19
AVAILABLE NETWORK ............................................................................................................20
STATUS .................................................................................................................................21
STATISTICS ............................................................................................................................21
WI-FI PROTECTED SETUP (WPS) .........................................................................................22
UNINSTALL ......................................................................................................................................26
TROUBLESHOOTING.....................................................................................................................27
SESSION OVERLAP ................................................................................................................27
TIMEOUT ...............................................................................................................................27
NO REALTEK 11N USB WIRELESS LAN ................................................................................27
REALTEK 11N USB W IRELESS LAN IS DISCONNECTED ........................................................27
CANNOT GET IP ADDRESS FROM W IRELESS AP....................................................................28
2
Dear Customer,
thanks for choosing an Hamlet product. Please carefully follow the instructions for its use and
maintenance and, once this item has run its life span, we kindly ask You to dispose of it in an
environmentally friendly way, by putting it in the separate bin for electrical/electronic waste, or to
bring it back to your retailer who will collect it for free.
Responsibility Statement
The European importer declares that this product is compliant with CE standards. Importer
references and contact details available on www.hamletcom.com in the “About Us” section.
The importer for Italy is:
Careca Italia S.p.A.
VAT number 02078660350
www.careca.com
In order to reduce paper consumption we only printed a concise version of CE declaration of
conformity and Quick installation guide.
Full compliance declaration and product documentation will be available contacting us at
[email protected] specifying product code and documentation required.
We inform You this product is manufactured with materials and components in compliance with
RoHS directive 2002/95/CE, with RAEE directive 2003/96/CE, Italian Legislative Decree
2005/151 and following EEC Directives: IEC 60950-1: 2005 (2nd Edition), EN 60950-1: 2006, EN
300328: V1.7.1 (2006-10), EN 301489-17: V1.3.2 (2008-04), EN 301489-1: V1.8.1 (2008-04).
CE Mark Warning
This is a Class B product. In a domestic environment, this product may cause radio interference,
in which case the user may be required to take adequate measures.
3
Introduction
The Wireless N 150 USB Adapter is based on 802.11n technology to greatly improve the speed
and range of your wireless signal and to deliver high performance wireless connectivity with
better wireless reception over standard 802.11g adapters. It is also backward compatible with
your existing 802.11g wireless devices. Utilizing the benefits of 802.11n technology, the
HNWU150N supports data throughput up to 150 Mbps providing optimal wireless performance
and faster file transfer.
The security of your wireless network is ensured with the support of 64/128-bit WEP data
encryption and WPA/WPA2 wireless security protocol which combines IEEE 802.1x and TKIP
technologies. Besides, Wireless USB Adapter supports WPS function which provides an easy
way to configure security on wireless local area networks.
Package Contents
The Wireless USB Adapter package includes the following.
! Wireless USB Adapter
! Quick Installation Guide
! Autorun CD
Wireless USB Adapter Overview
Wireless USB Adapter has the USB interface, LED and WPS button below.
! USB Interface: Connect the USB Interface to a USB port on your computer.
! LED: The LED stays lighted to indicate WLAN link established and active.
! WPS Button: Press this button to do WPS with AP.
4
Wireless USB Adapter Installation
The following instructions will guide you through the installation process of the Wireless USB
Adapter in different Windows operating systems.
Windows 7
1. Once USB dongle connected to computer and the following will appear on screen.
2. Please insert the autorun CD into your CD-ROM drive. The CD should auto-start, displaying
the following window. If it does not start, click on Start > Run and type in CD:\autorun.exe
(where CD is the drive letter of your CD-ROM drive.) Click "Driver Installation".
3. For security reasons Windows 7 requires the installer program to have administrator
privileges so the new policy called "User Account Control" has been introduced in
Windows 7. If UAC is enabled the "User Account Control" window pops up asking your
permission to continue. User needs to Click "Yes" to proceed with the installation.
5
4. Choose the language for the installation and click "Next".
5. Click "Next".
6
6. Click "Install".
7. Click "Finish" to complete installation and restart the computer.
7
Windows Vista
1. As Windows starts it will detect that new hardware has been added, and start the "Found
New Hardware Wizard". Click on "Cancel".
2. Please insert the autorun CD into your CD-ROM drive. The CD should auto-start, displaying
the following window. If it does not start, click on Start > Run and type in CD:\autorun.exe
(where CD is the drive letter of your CD-ROM drive.) Click "Driver Installation".
8
3. For security reasons Vista requires the installer program to have administrator privileges so
the new policy called "User Account Control" has been introduced in Windows Vista. If
UAC is enabled Windows pops up a "User Account Control" window asking your
permission to continue. User needs to Click "Allow" to proceed with the installation.
4. Choose the language for the installation and click "Next".
5. Click "Next".
9
6. Click "Install".
7. When the installation is completed, click "Finish".
10
Windows 2000/XP
1. As Windows starts it will detect that new hardware has been added, and start the "Found
New Hardware Wizard". Click on "Cancel".
2. Please insert the autorun CD into your CD-ROM drive. The CD should auto-start, displaying
the following window. If it does not start, click on Start > Run and type in CD:\autorun.exe
(where CD is the drive letter of your CD-ROM drive). Click "Driver Installation".
11
3. Click "Next".
4. Click "Next".
12
5. Click "Install".
6. Click "Finish".
13
Making a Basic Wireless Network Connection
For Windows XP/Vista/7 users, your native Windows XP/Vista/7 wireless support (Wireless Zero
Configuration Service) has been disabled by default.
Infrastructure mode
An Infrastructure Mode network contains at least one wireless client and one wireless AP or
router. This client connects to Internet or intranet by communicating with this wireless AP or
router.
1. Double click the
icon on your desktop to start the utility or
14
in the task bar.
2. Click the "Available Network" button to scan available access points.
3. Double click on the SSID of AP that you are going to connect to and create profile that you
are connecting to an open (Encryption is None) wireless network for example the SSID is
11n_AP_Router.
15
4. Click the "OK" to proceed.
5. Click "OK".
6. Now you are ready to use the Wireless Network to Internet or intranet.
16
Note: This example is an open wireless network. If you are going to connect to a Wireless
adapter with security protection, you will have to configure the encryption settings in this profile to
be corresponding to the other wireless adapter. Please click on the "Network Authentication"
drop-down list to select an authentication method, and then select a "Data encryption" type. Fill
in each required blanks and click "OK".
17
Introduction to the Wireless LAN Utility
There are two ways to run REALTEK 11n USB Wireless LAN Utility as follows:
1. Click Start > Programs > REALTEK 11n USB Wireless LAN Utility > REALTEK 11n USB
Wireless LAN Utility to run the utility.
2. Double click REALTEK 11n USB Wireless LAN Utility icon
on your desktop.
General
After starting the utility, the General tab pops up showing detailed information about current
connection. You may click the Renew IP button to refresh those listed information.
Status
Speed
Type
Encryption
SSID
Signal Strength
Link Quality
Network Address
Functions
Check if the device associated to target network.
The current connection speed
Infrastructure or Ad-Hoc mode.
The encryption mode for connecting to current network profile.
The SSID (network name) of the connected wireless network.
Indicates the signal strength.
Indicates the link quality.
Shows the current IP addresses settings.
18
Checkboxes
Functions
Show Tray Icon
To disable or enable to show the utility icon on your system tray, which is
in the notification area at the lower-right corner of the windows desktop.
Radio Off
To disable or enable this adapter form transmitting or receiving signals.
Disable Adapter To disable or enable the wireless adapter.
Windows Zero
To disable or enable to use the native Windows XP/Vista/7 wireless
Config
support (Wireless Zero Configuration Service).
Profile
The Profile tab lists the preferred connections. You can click the buttons beside to configure
each connection.
Add
Remove
Edit
Duplicate
Set Default
Functions
To add a connection profile.
To remove a connection profile.
To modify the configurations for a profile.
To make a copy of a profile.
To select a profile as your default wireless connection.
19
Available Network
This Available Network tab lists the reachable wireless network.
Refresh
Add to Profile
Functions
To rescan available Wireless Networks.
To add an available Wireless Network to your profile list.
20
Status
The Status tab shows the current connection status.
Statistics
The Statistics tab shows the transmission activity record. Clicking the "Reset" button recounts
the values from zero.
21
Wi-Fi Protected Setup (WPS)
Wi-Fi Protected Setup (WPS) is the latest wireless network technology that offers an easy way to
create secure wireless networks. If you have a WPS-enabled wireless access point and you
want to establish a secure connection to it, you can open this window and use the “PBC” or “PIN”
method of the WPS function.
22
PIN Method
1. Enter the PIN code of your wireless adapter (displayed right above the “PIN” button — see
image below) on the wireless access point you want to connect to. If necessary, refer to the
user manual of the wireless AP for instructions.
2. Click on "Pin Input Config (PIN)" button and the
prompt window will display. Click on "Yes" button to
select a specific access point to start the PIN method of
WPS.
3. Select the desired WPS AP Name and then click on "Select" button.
23
4. A status screen will display the progress of the procedure, which can take up to two minutes
or so. If a wireless access point with the correct PIN code is found, you’ll be connected to it.
5. Once a successful WPS connection has been estabilished between the wireless adapter and
the access point, details about the connection will be displayed in the General tab window
(as shown below).
Now you are ready to use the Wireless Network to Internet or intranet.
24
Push Button Config (PBC) Method
If both AP and users’ Wireless LAN Utility has the physical button or visual button of Push Button
Config (PBC), please follow steps below to complete the WPS.
1. Press the physical or visual button of the AP you want to connect to.
2. Click on "Push Button Config (PBC)" button on the Wi-Fi Protected Setup screen to begin
the wireless connection using WPS.
3. Once the WPS procedure is completed, you will see the details of the connection status in the
General tab of the wireless utility.
25
Uninstall
1. Click "Start > All Programs > REALTEK 11n USB Wireless LAN Utility > Uninstall".
2. Click "Yes".
3. Click "Finish".
26
Troubleshooting
Session Overlap
When using the PBC method, if there is more then one AP, there will be Session Overlap.
Please try using PIN method or wait for a while and push the button again.
TimeOut
If you see the message below while doing WPS, please retry again.
No Realtek 11n USB Wireless LAN
If you see the message below, please plug in the REALTEK 11n USB Wireless LAN to the USB
port of your PC.
Realtek 11n USB Wireless LAN is Disconnected
If you see the message below, please refer to the chapter Making a Basic Wireless Network
Connection to make a Wireless Network Connection.
27
Cannot get IP Address from Wireless AP
If the Wireless LAN Utility cannot get any IP Address from AP, please click on ReNew IP button
to request IP Address again or configure a static IP Address.
Trademarks and Changes
All trademarks and company names mentioned in this document are used for description purpose only and remain property of
their respective owners. The material in this document is for information only and subject to change without notice. While
reasonable efforts have been made in the preparation of this document to assure its accuracy, Hamlet assumes no liability
resulting from errors or omissions in this document, or from the use of the information contained herein. Hamlet reserves the right
to make changes or revisions in the product design or the product manual without reservation and without obligation to notify any
person of such revisions and changes.
28