1
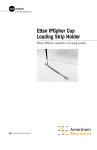
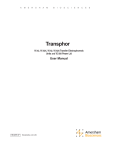
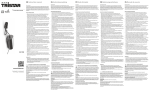
user manual TE70 and TE77 Hoefer TE 70 and TE 77 semi-dry transfer units um TE70&77-IM/Rev. H0/06-04 Page finder Semi-dry Transfer Unit function and description ...............................1 Unpacking ...............................................2 Specifications ..........................................2 Important information...............................3 Operating instructions ..................................4 Care and maintenance ................................10 Troubleshooting ..........................................11 Electrotransfer notes...................................13 Bibliography ..............................................15 Ordering information ..................................16 • pi Safety warnings and precautions Important user information English m c Please read this entire manual to fully understand the safe and effective use of this product. The exclamation mark within an equilateral triangle is intended to alert the user to the presence of important operating and maintenance instructions in the literature accompanying the instrument. The lightning symbol within an equilateral triangle is intended to alert the user to the risk of exposure to high voltages. Hoefer, Inc. reserves the right to make changes in the specifications without prior notice. Warranty and liability Hoefer, Inc. guarantees that the product delivered has been thoroughly tested to ensure that it meets its published specifications. The warranty included in the conditions of delivery is valid only if the product has been installed and used according to the instructions supplied by Hoefer, Inc. Hoefer, Inc. shall in no event be liable for incidental or consequential damages, including without limitation, lost profits, loss of income, loss of business opportunities, loss of use and other related exposures, however caused, arising from the faulty and incorrect use of the product. Renseignements importants d’utilization Pour une bonne compréhension et une utilisation en sécurité maximale, il convient de lire entièrement ce manuel. Français m c Dans la documentation qui accompagne l’instrument un point d’exclamation dans un triangle équilatéral a pour but d’attirer l’attention de l’utilisateur sur des instructions importantes de fonctionnement ou de maintenance. Le symbole de l’éclair dans un triangle équilatéral a pour objet d’attirer l’attention de l’utilisateur sur un danger d’exposition à la haute tension. Garantie et responsabilité Hoefer, Inc. garantit à l’utilisateur que le produit livré a subi avec succès tous les essais prévus pour s’assurer qu’il est conforme aux spécifications et normes en vigueur. La garantie incluse dans les conditions de livraison n’est valable que si le produit a été installé et utilisé conformément aux instructions fournies par Hoefer, Inc. La société Hoefer, Inc. ne sera en aucun cas responsable de tout dommage causé directement ou indirectement par toute utilisation incorrecte ou non approuvée du produit ou découlant de cette utilisation, y compris toute perte de bénéfice ou • pii de recettes, toute perte de perspectives commerciales, tout empêchement d’utilisation et tout autre risques ayant un rapport avec l’utilisation du produit, mais sans aucune limitation quant à la nature de ces dommages. Wichtige benutzerinformationen Deutsch m c Für ein vollständiges Verständnis und eine sichere Handhabung dieses Produktes ist es notwendig, daß der Benutzer dieses Handbuch vollständig durchliest. Ein Ausrufezeichen in einem gleichseitigen Dreieck soll den Benutzer auf die Anwesenheit wichtiger Betriebs- und Wartungsanweisungen in der dem Gerät beiliegenden Dokumentation hinweisen. Ein Blitzsymbol in einem gleichseitigen Dreieck soll den Benutzer auf die Gefahr anliegender Hochspannungen hinweisen. Hoefer, Inc. behält sich das Recht vor, die Spezifikationen ohne vorhergehende Ankündigung zu ändern. Gewährleistung and haftung Hoefer, Inc. garantiert, daß das gelieferte Produkt sorgfältig auf die Einhaltung der veröffentlichten Spezifikationen getestet wurde. Die in den Lieferbedingungen näher erläuterten Gewährleistungsansprüche gelten nur dann, wenn das Produkt gemäß den von Hoefer, Inc. gelieferten Anweisungen installiert und benutzt wurde. Hoefer, Inc. übernimmt keinerlei Haftung für Schäden oder Folgeschäden, einschließlich, aber nicht begrenzt auf Gewinneinbußen, Einkommensverluste, entgangene Geschäftsabschlüsse, Verlust der Gebrauchsfähigkeit oder andere Verluste, die wie auch immer durch eine fehlerhafte oder unsachgemäße Verwendung des Produkts verursacht wurden. • piii Información importante para el usuario Español m c Para comprender el producto y utilizarlo con seguridad es necesario leer este manual en su totalidad. El signo de admiración en un triángulo equilátero en el manual, advierte al usuario sobre la presencia de instrucciones importantes de operación y mantenimiento del aparato. El símbolo del rayo en un triángulo equilátero alerta al usuario sobre el riesgo de exposición a altas tensiones. Hoefer, Inc. se reserva el derecho a modificar las especificaciones sin previo aviso. Garantía y responsabilidad Hoefer, Inc. garantiza que el producto entregado ha sido probado a fondo para comprobar el cumplimiento de las especificaciones publicadas. La garantía incluida en las condiciones de entrega sólo es válida si el producto se ha instalado y utilizado de acuerdo con las instrucciones entregadas por Hoefer, Inc. Hoefer, Inc. no será responsable, bajo ningún concepto, de daños directos o indirectos, incluyendo sin limitación la pérdida de beneficios, la pérdida de ingresos, la pérdida de oportunidades de negocio, la pérdida de utilización y otras consecuencias relacionadas, cualquiera que sea la causa, que se deban a la utilización defectuosa e incorrecta del producto. Informazioni importanti per l’operatore Italiano m c Per un utilizzo sicuro del prodotto, leggere attentamente l’intero contenuto del presente manuale. Il punto esclamativo all’interno di un triangolo equilatero indica all’operatore la presenza di importanti istruzioni di funzionamento e manutenzione nella documentazione allegata al prodotto. Il simbolo del fulmine all’interno di un triangolo equilatero indica all’utente la presenza di un rischio di esposizione ad alte tensioni. Hoefer, Inc. si riserva il diritto di apportare modifiche ai dati tecnici senza preavviso. Garanzia e responsabilitá Hoefer, Inc. garantisce che prima della consegna il prodotto è stato collaudato a fondo per soddisfare i requisiti specificati. La garanzia inclusa nelle condizioni di consegna risulta valida solamente se il prodotto è stato installato ed utilizzato nel rispetto delle istruzioni fornite da Hoefer, Inc. Hoefer, Inc. non potrà essere ritenuta responsabile di incidenti o danni consequenziali, inclusi’ma non limitati’a perdite di profitti, mancato guadagno, perdite di affari, difetti di funzionamento e relative esposizioni, dovuti ad un utilizzo non corretto del prodotto. • piv Semi-dry Transfer Unit function and description The TE 70 and TE 77 semi-dry transfer units rapidly transfer proteins from polyacrylamide gels onto a membrane by means of a low current and low voltage electrotransfer with minimal Joule heating. Most transfers are complete in one hour or less. Fig 1. Semi-dry transfer unit main components. A power supply with the following rating is required but not included: TE 70: up to 200 mA, 50 V TE 77: up to 450 mA, 50 V The smaller TE 70 unit transfer surface is 14 × 16 cm, and the larger TE 77 transfer surface is 21 × 26 cm. Several small gels of the same thickness can be laid side-by-side or two larger gels can be stacked into a carefully constructed multi-layered transfer stack. A plastic mask may be used to prevent current from bypassing the gel stack. The base and cover body are made of inert Noryl® plastic. The base acts as a reservoir for buffer that may leak during the transfer. The anode in the base is platinum coated and the cathode in the cover is stainless steel. A safety interlock switch breaks the circuit when the cover is removed. Cover (contains the cathode) Safety-interlock lead Guides, (3) Mask Safety-interlock housing Color-coded leads Base (contains the anode) • p1 Unpacking This declaration of conformity is only valid for the instrument when it is: • used in laboratory locations. • used as delivered from Hoefer, Inc. except for alterations described in the user manual. • connected to other CE labeled instruments or products recommended or approved by Hoefer, Inc. Unwrap all packages carefully and compare contents with the packing list, making sure all items arrived. If any part is missing, contact Hoefer, Inc. Inspect all components for damage that may have occurred while the unit was in transit. If any part appears damaged, contact the carrier immediately. Be sure to keep all packing material for damage claims or to use should it become necessary to return the unit. Specifications TE 70 Max. wattage 10 W Max. voltage 50 V~ Max. amperage 200 mA Gel size up to 14 × 16 cm TE 77 Max. wattage 22.5 W Max. voltage 50 V~ Max. amperage 450 mA Gel size up to 21 × 26 cm Environmental operating conditions • p2 Indoor use: 4–40 °C Humidity up to 80% Altitude up to: 2000 m Installation category: II Pollution degree: 2 Dimensions (w × d × h) 32 × 25 × 9 cm (12.6 × 9.9 × 3.6 in.) Product certifications EN61010–1, UL3101–1, CSA C22.2 1010.1, CE Important information English c m • The electric components in the safety interlock housing of the transfer unit base must not become wet. Do not immerse any part of the unit in water. Rinse only the electrodes with distilled water before use. (Refer to the Care and maintenance section for cleaning instructions.) • Be sure to apply enough buffer-soaked sheets of blotting paper under the membrane and over the gel to prevent the stack from drying out. Irreparable damage to the unit will result if the stack dries out and the unit is allowed to overheat. • If this equipment is used in a manner not specified by the manufacturer, the protection provided by the equipment may be impaired. • Only accessories and parts approved or supplied by Hoefer, Inc. may be used for operating, maintaining, and servicing this product. Informations importantes Français c m • Les piéces électriques contenues dans la chambre de sécurité, à la base du unité de transfert semi-sec, ne doivent pas être mouillées. Ne submerger aucune piéce de l’instrument. Rincer seulement les électrodes avec de l’eau distillée avant l’utilisation. (Voir la section Care and maintenance pour l’entretien). • Appliquer du buvard suffisamment saturé de tampon sous la membrane et sur le gel afin d’éviter à la pile de buvards de se dessécher. Des dommages irréparables à l’appareil peuvent résulter si la pile de buvards est séche et l’instrument surchauffe. • Si l’instrument n’est pas utilisé en conformité avec les recommandations du fabriquant, les dispositifs de sécurité de cet appareil pourraient être inéfficaces si l’instrument n’est pas utilisée. • Seulement les accessoires et piéces détachées approuvés ou fornis par Hoefer, Inc. sont recommandés pour l’utilisation, l’entretien et réparation de cet appareil. • p3 Operating instructions Note: See Electrotransfer notes on page 11 for transfer tips as well as two buffer recipes and references. To transfer proteins, prepare the unit and transfer stack components, assemble the stack, and connect the leads to a power supply. Then run the transfer for the required amount of time. Each step is described below. Assemble the transfer stack Prepare the unit by rinsing the anode and cathode with distilled water, taking great care to keep water away from the safety interlock housing and leads. Prepare the gel Cut away the wells and/or stacking gel section. Equilibrate the gel in transfer buffer if required. Measure the gel. Cut a mask to the proper size Cut an opening in the solid mask to a size slightly smaller than the gel. Note: Always wear gloves when handling membranes to avoid leaving fingerprints. The required opening is centered and 2 mm smaller than the gel on all sides. Because the surface is slick and hard, take care when cutting mask with a tool such as a mat knife. Place the mask in the base of the unit, centering the opening. Prepare the blotting paper For each gel, cut at least 6 pieces of blotting paper the same size as the gel or slightly smaller. • p4 Gauge the thickness or number of blotting paper layers according to the amount of buffer required; up to 250 ml of buffer may be required for larger gels or for transfers of 60 minutes in order to prevent the stack from drying out or the buffer from becoming depleted. Saturate at least 3 pieces of the blotting paper with transfer buffer. One by one, center each sheet over the cutout on the mask and remove all trapped air by rolling a clean pipet from the center toward the edges. Check that the blotting paper completely covers the mask cutout and slightly overlaps the mask edges on all sides. Prepare the membrane For each gel, cut 1 membrane the same size as the gel or slightly smaller. (A larger membrane may contact an electrode panel, creating a pathway by which current can bypass the gel.) Pre-wet nitrocellulose or nylon membranes with distilled water. Pre-wet PVDF or other hydrophobic membranes with methanol. Then soak all membrane types in transfer buffer for 2–5 minutes. • p5 Important! Stack each layer with care, with edges parallel. As each layer is added, remove all air pockets by rolling a clean pipet from the center to the edges. Add a few drops of buffer to trouble areas to help remove air pockets. Complete the stack a) Place the pre-wet membrane onto the stack of blotting paper. b) Place the gel on the membrane. Note: Proteins bind to the membrane as soon as contact occurs, so it is important to place the gel correctly on the first try. c) Cover the gel with several layers of saturated blotting paper. Multiple gels: Either lay gels of the same thickness side-by-side (the position of the gels must coincide with cutouts in the mask), or stack 2 sandwiches layered as shown on the next page. Fig 2. Transfer stack for a single gel. These stack components are the same size as the gel or slightly smaller Blotting paper (2–3 sheets) Gel Membrane Blotting paper (2–3 sheets) Mask (opening approx. 2 mm smaller than the gel on all sides) Note: Take care to place the gel correctly on the first try because proteins begin to transfer immediately; once transfer has begun, moving the gel will distort results or cause “shadow” bands on the blot. • p6 Fig 3. Transfer stacks for gels placed side-by-side. Check electrical continuity within each stack: several sheets of buffer-soaked blotting paper must cover each gel, and each stack must fully contact both electrodes. Note: There must be no electrical contact between the two stacks. Blotting paper, (2–3 sheets) Gel Membrane Blotting paper, (2–3 sheets) Mask If two gels are stacked, separate them with porous cellophane — not plastic wrap! (Cellophane permits electric current to pass but stops proteins.) Cut the cellophane slightly smaller than the gel and wet with transfer buffer. Several sheets of buffer-soaked blotting paper on each gel provides electrical continuity. Fig 4. Transfer stack for stacked gels. Separate the stack for each gel with a sheet of cellophane. Blotting paper, (2–3 sheets) Gel Membrane Blotting paper, (1 sheet) Note: When transferring multiple gels, transfer efficiency depends on such factors as gel thickness, gel position in the stack, transfer buffer, membrane type, and, most importantly, the characteristics of the protein. The gel closest to the anode generally transfers the most completely, so it is preferable to lay gels side-by-side rather than stacking them. Cellophane Gel Membrane Blotting paper, (2–3 sheets) Mask • p7 Slide the 3 guides on the cover into the 3 grooves in the transfer unit base. Do not remove the cover until after the transfer is complete in order to prevent stack components from sliding out of alignment. If transferring more than one gel, place a 1 kg weight on the cover to improve the electrical continuity of the stack. Note: A weight of more than 1 kg may press too much buffer out of the blotting paper, which will adversely affect the transfer efficiency. Transfer Note: Staining the gel(s) for residual protein gives an indication of the completeness of transfer. Set the power supply high voltage limit to 50 V If possible, set the voltage limit before connecting the transfer unit. Use only an approved power supply such as the Hoefer PS2A200. Note: Rewet dried membranes in the appropriate wetting buffer prior to processing. The power supply should be switched off and both the current and voltage controls turned to zero Plug the short safety-interlock lead from the cover into the jack on the base. Then plug the color-coded leads from the base of the transfer unit into the power supply jacks, matching red to red and black to black. Do not reverse polarity. (Red is positive [+] and black is negative [– ].) Set the power supply current The maximum current setting must not exceed 0.8 mA/cm2 of the gel surface. If transferring several layers of gels, a longer transfer time may be required. Use the graph to quickly find the maximum current setting for your gel size, or calculate the gel area (cm2) and multiply it by 0.8 mA/cm2. • p8 If available, set the power supply timer Most transfers are complete within one hour, but larger proteins, proteins from native gels, and thicker gels may require an additional 1 hour of transfer time. The optimum transfer time for each protein and gel system must be determined empirically. When developing a new protocol, it is important to monitor the voltage closely. It should not exceed 50 V. High initial voltage (20 V or more) indicates inappropriate ionic strength; check the buffer concentration and quality. If the voltage increases more than 10 V during the run, the stack may be drying out and scorching may result, which can damage the sample or the transfer unit. Another indicator of buffer depletion is increasing temperature; feel the top of the cover for excessive heat periodically, especially after one hour. If drying is indicated by either high voltage or increased temperature, stop the transfer and add more layers of buffer-saturated blotting paper. Fig 5. Recommended maximum current settings for different gel sizes. cm2 Gel Size Note: Generally, smaller fragments transfer more quickly than larger ones. Note: After 1 hour of transfer time, switch off the power supply and re-wet the stack. Transfer can then proceed for an additional hour. 14 × 24 14 × 16 8 × 10 8×7 maximum mA • p9 After the transfer is complete Turn off the power supply and disconnect the leads from the power supply. Unplug the safety-interlock lead between the cover and the base of the unit. Remove the cover slowly because the stack may adhere to it. Remove and dispose of the blotter paper. Remove the gel(s). Optional: Stain for residual protein. If desired, label the gel contact side of the membrane with a soft pencil. Remove the membrane(s) from the stack with blunt forceps. Process the membrane following instructions accompanying your protocol or allow the membrane to air dry prior to storage. Remove the remaining blotter papers and dispose. Remove the mask. Rinse the unit according to the Care and maintenance instructions. Care and maintenance • Do not autoclave or wash the unit in a dishwasher. • Do not wet the safety-interlock housing or leads. • Do not immerse the unit in water! • p10 Rinse the cathode in the cover and the anode in the base with distilled water. Let the unit air dry completely. If using radioactive reagents, decontaminate the unit with a cleaning agent such as Decon™ 90 or Contrad™ 70. Never use abrasive cleansers. Troubleshooting problem solution Incomplete transfer Blank or faint areas on the membrane Remove trapped air pockets between the gel and membrane during stack assembly. Reduce the current setting to minimize the amount of gas produced by the electrolysis of buffer. Use buffer with a lower ionic strength. Molecules do not migrate out of gel Check all electrical connections. Check that current is flowing by plugging a multi-meter into the circuit and comparing the meter reading with the power supply reading. Check that the buffer pH is close to the intended pH. Most buffers should not be titrated; make fresh buffer. Use 3.5 mM SDS (0.1%) in the transfer buffer. Add several more sheets of buffer-saturated blotting paper to each side of the gel sandwich so that more buffer is present during the transfer. Do not use staining or fixing agents on the gel before transfer. Use a thinner gel. Reduce the gel acrylamide concentration. Increase the transfer period. Large fragments may require an additional hour. If using a non-nitrocellulose membrane, avoid including methanol in the transfer buffer or reduce the amount to the minimum possible. Use reagent-grade chemicals. Increase the net charge on the protein by using a transfer buffer with a different pH. Lower pH (<6–7) increases the positive charge on proteins; higher pH (>6–7) increases the negative charge on proteins. • p11 Smeared or diffuse band patterns If equilibrating before the transfer, shorten or eliminate the equilibration time and/or equilibrate under coldroom conditions. If the transfer buffer contains ≥10% methanol, equilibrate the gel in transfer buffer for 30 minutes to allow it to shrink before assembling the stack. Note: Large proteins may not migrate as readily once the pore size is slightly reduced. Take care that the gel does not shift once it contacts the membrane. If excess heating occurs during the transfer, note if the stack is drying out. On subsequent transfers, either shorten the transfer time, reduce the current, or increase the number of buffer-soaked blotting papers in the stack. Check that the preferred binding surface of the membrane (if any) contacts the gel. Uneven band transfer The blotting paper and membrane must be the same size as the gel or 1–2 mm smaller. Larger sizes will provide an electrical path for current to bypass the gel. Inefficient binding to membrane Chemical parameters Fix or crosslink the molecule onto the membrane according to the requirements of the nucleic acid, protein, or membrane type. Prepare transfer buffer without SDS. (SDS can improve transfer efficiency but can interfere with protein binding to a PVDF membrane.) Add 10–20% methanol to the transfer buffer to enhance binding to nitrocellulose. Membrane parameters Use a membrane with a smaller pore size (0.10–0.20 µm) if proteins pass through the membrane. Place a membrane both over and under the gel to capture any proteins migrating in the opposite direction. Check if too much sample is available for the binding surface area by placing two membranes instead of one. If “blow through” occurs, reduce the sample load. Wear gloves when handling membranes. Store membranes at ambient temperature and out of direct sunlight. • p12 Electrotransfer notes • Run the transfer as soon as possible after electrophoresis to minimize protein diffusion within the gel. • Stacked gels must all be the same size. • Limit transfers to two hours or less, rewetting the stack after 1 hour. • The recommended methanol concentration for different membrane types are: membrane type methanol % Charged nylon 0 Nitrocellulose 20 PVDF 15 • Use a buffer with low ionic strength such as one of the two listed below to prevent overheating. Use the CAPS buffer when Tris cannot be used (e.g. peptide sequencing). CAPS can improve transfer because of its effect on the charge of the protein (see Matsudaira, 1987). Towbin buffer (25 mM Tris, 192 mM glycine, 20% v/v methanol, pH 8.3, 1 liter) Tris (FW 121.1) Glycine (FW 75.07) SDS* (FW 288.4) 25 mM 3.0 g 192 mM 14.4 g 0.1% (3.5 mM) 1.0 g Dissolve in 600 ml distilled water. Add methanol as required†. Bring to 1 liter with distilled water. Do not adjust the pH, which should be between 8.2 and 8.4. Optional: Chill before use. *Optional: Adding SDS can improve transfer efficiency. †Depending on the membrane type selected (see table above), adding methanol can improve transfer results. Note: Buffers containing methanol may deteriorate if stored for long periods —add methanol just prior to transfer. • p13 CAPS buffer, 1X (10 mM CAPS, pH 11.0, 1 liter) CAPS (FW 221.3) 10 mM 2.2 g [3-(cyclohexylamino)-1-propanesulfonic acid] Dissolve in 600 ml distilled water, adjust to pH 11.0 with conc. NaOH. Adjust volume to 1.0 liter. • For a 3-buffer system, refer to Kyhse-Anderson, J. (1984). • Transfer efficiency varies depending on the gel concentration, which can be optimized. For more information, refer to Smejkal and Gallagher (1994). • p14 Bibliography Bjerrum, O.J., Larsen, K., and Heegaard, N., CRC Handbook of Immunoblotting of Proteins 1, Section 7. CRC Press (1988). Gallagher, S., Winston, S.E., Fuller, S.A. and Hurrell, J.G.R., Immunoblotting and Immunodetection. In Current Protocols in Molecular Biology. 10.8.1–10.8.17. Greene Publishing and Wiley-Interscience, NY (1993). Hancock, K. and Tsang, V., India ink staining of proteins on nitrocellulose paper. Anal. Biochem. 133, 157–162 (1983). Kyhse-Anderson, J., Electroblotting of multiple gels: A simple apparatus without buffer tank for rapid transfer of proteins from polyacrylamide to nitrocellulose. J. Biochem. and Biophys. Meth. 10, 203–209 (1984). Matsudaira, P., Sequence from Picomole Quantities of Proteins Electroblotted onto Polyvinylidene Difluoride Membranes. J. Biol. Chem. 262, 10035 (1987). Sasse, J. and Gallagher, S., Detection of Proteins on Blot Transfer Membranes. In Current Protocols in Molecular Biology. 10.7.1–10.7.3. Greene Publishing and Wiley-Interscience, NY (1991). Smejkal, G., and Gallagher, S., Determination of Semidry Protein Transfer Efficiency with Transverse Gradient Gel Electrophoresis. Biotechniques. 16, 196–202 (1994). Tovey, E. and Baldo, B., Comparison of semi-dry and conventional tank-buffer electrotransfer of proteins from polyacrylamide gels to nitrocellulose membranes. Electrophoresis 8, 384–387 (1987). • p15 Ordering information product TE 70 Semi-dry Transfer Unit, 14 × 16 cm Includes 25 sheets of blotter paper, 50 sheets of cellophane, 2 uncut masks, precut mylar mask for 7 × 8 cm gels and for 14 × 16 cm gels. quantity code number 1 TE70 50 TE73 Uncut mask, 16.5 × 18.5 cm 4 TE74 TE 77 Semi-dry Transfer Unit, 21 × 26 cm Includes 25 sheets of blotter paper, uncut mask and cellophane. (Gels 20 × 25 cm do not require a precut mask.) 1 TE77 Mask and Cellophane for the TE 70 Porous cellophane, 20 × 35.5 cm Mask and Cellophane for the TE 77 Porous cellophane, 35 × 44 cm Uncut mask, 23 × 28 cm 50 4 SE1142 TE78 Blotter Paper Blotter paper, precut, 14 × 16 cm 25 TE76-1146 Blotter paper, precut, 20 × 25 cm, for TE 77 25 TE76 Power Supply EPS 2A200 • p16 1 PS2A200 • p17 Noryl is a registered trademark of General Electric Company. Conrad 70, Decon and Neutrad are trademarks of Decon Laboratories, Inc. Printed in the USA Hoefer, Inc. 953 Indiana Street San Francisco, CA 94107 USA www.hoeferinc.com • p1