1
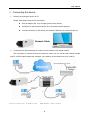
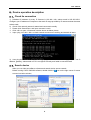
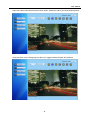
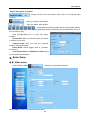
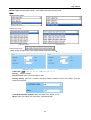
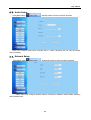
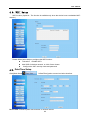
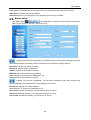
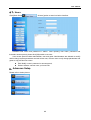
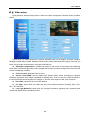
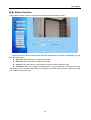
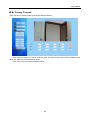
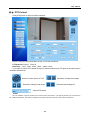
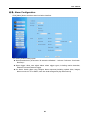
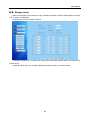
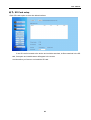
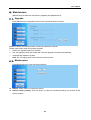
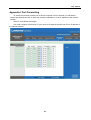
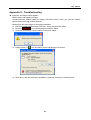
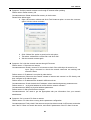
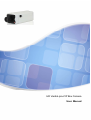
HD Vandal-proof IP Box Camera User Manual User Manual Contents Overview ...................................................................................................................................................... 2 1、Product Introduction ............................................................................................................................. 3 1.1、Application ...................................................................................................................................... 3 1.2、Introduction..................................................................................................................................... 3 1.3、Product Feature ............................................................................................................................... 4 1.4、Recommended system requirement............................................................................................... 4 3、Device operation description .............................................................................................................. 6 3.1、Check its connection ....................................................................................................................... 6 3.2、Search device .................................................................................................................................. 6 3.3、OCX! Controls installation and System Log‐in ................................................................................. 8 3.3.1、Live Video Preview ............................................................................................................... 8 4、Basic Setup ......................................................................................................................................... 10 4.1、Video setup ................................................................................................................................... 10 4.2、Audio Setup ................................................................................................................................... 12 4.3、Network Setup .............................................................................................................................. 12 4.4、WIFI Setup ................................................................................................................................... 13 4.5、Date/Time Setup ........................................................................................................................... 13 4.6、Server setup .................................................................................................................................. 14 4.7、Users .............................................................................................................................................. 15 5、Advances Setup .................................................................................................................................. 15 5.1、Video setup ................................................................................................................................... 16 5.2、Motion Detection .......................................................................................................................... 17 5.3、Privacy Covered ............................................................................................................................. 18 5.4、PTZ Control .................................................................................................................................... 19 5.5、Alarm Configuration ...................................................................................................................... 20 5.6、Storage setup ................................................................................................................................ 21 5.7、SD Card setup ................................................................................................................................ 22 6、Maintenance ........................................................................................................................................ 23 6.1、Upgrade ......................................................................................................................................... 23 6.2、Maintenance ................................................................................................................................. 23 Appendix I Port Forwarding .................................................................................................................... 24 Appendix II - Troubleshooting ................................................................................................................. 25 1 User Manual Overview Thank you for purchasing our company’s camera series. The camera provides high picture quality and resolution with highly sensitive progressive scan CMOS image sensor, and incorporates sophisticated, on-chip camera function. Its embedded web server allows user perform real-time surveillance and remote control The camera series is widely applied in large and medium-sized enterprises, mall, supermarket, business building, hotel, hospital and education center etc. and the product is easy to install and operate. Please check if your camera and accessories are all included in the product package. If any missing, please immediately contact us. The package list will include: 1 PCS 1 PCS (Optional) 1 PCS 1 PCS 1 PCS 1 PCS 1. IP Dome Camera 2. Power Adapter (DC12V) 3. L-Wrench 4. Quick Start Guide 5. Software & Manual CD 6. Qualification certificate Description: z z z z z z IP Camera involved herein indicated network camera. Click: indicate clicking the left mouse Double click: indicate double clicking the left mouse. Defaulted IP address is 192.168.1.168 Defaulted administrator’s user name and password for the IP camera is “admin” and “admin” respectively Defaulted web port is 80 (TCP) and communication port is 554 (TCP、UDP). Important Statement: The product is under continual improvement, and we have tried our best to ensure the information contained herein is accurate, complete and up‐to‐date. If you encounter any question you can’t deal with according to this manual, please consult with our technology support department timely. We also reserve the right to make changes without notice. 2 User Manual 1、Product Introduction 1.1、Application The networt camera is widely applied in many public places, such as mall, supermarket, school and workshop etc. its powerful image processing technology also makes the IP camera apply in Bank and traffic crossing which require higher image resolution. Take below as sample: 1.2、Introduction The network camera provides high pi cture quality remote video surveillance over a network connection for customer around the world. The network camera, based on latest TI Davinci Solution, has integrated A/V sampling, embedded digital compression algorithm and network transmission together, and can realize high-profile streaming H.264 codec standard, also allow remote user preview live screen and monitor real-time images via IP address and domain name. The solution is widely applied for business offices and housing. The product allows you configure multiple users and distinct access. And easy to install and operate. The network camera has motion detection. When any alarm is triggered, system will automatically send captured images and alarm notification/record to you , to facilitate user for search. Moreover, the network camera provides a full set of network video surveillance software used in Windows system, make user monitor multiple video images simultaneously through one PC. 3 User Manual 1.3、Product Feature z Adopt high-performance and powerful TI Davinci solution; z Progressive Scan CMOS sensor; z high-profile streaming H.264 video compression algorithm, and support multiple stream transmission; z Allow up to twelve users preview live images simultaneously; z Embedded web server, to be a great convenience for users to perform real-time surveillance and management; z Support system remote upgrade; z Connect to the IP camera through LAN and Internet; z Support multiple network protocol: TCP/UDP,IP,HTTP,DHCP,RTP,RTSP,FTP,SMTP,DNS,DDNS,NTP,ICMP,IGMP,ARP; z Support motion detection function (allow user configure alarm area and sensitivity); z Privacy masking function; z PoE (IEEE 802.3 af) power input (Optional) z Support snapshot function and allow you upload the captured images to FTP or email; z Auto connect to network after abnormal disconnect Note: The specification may differ from model number. 1.4、Recommended system requirement Computers with a lower specification than the recommended below may not fully support its high-speed playback. ¾ Operation System: Microsoft window 7 / Windows 2008 or higher (32-bit and 64-bit). Windows 2003 / Windows XP / Windows 2000 (32-bit) ¾ CPU: Intel Core2Q or higher ¾ RAM: 1G or higher ¾ Graphics Adapter: 256M or higher; minimum 1024X768 IE Version: IE 6.0 or higher. 4 User Manual 2、Connecting the device a) Directly connecting the device to PC Please follow below steps for the connection: z Use an adaptor (DC 12V) to supply power to the camera; z Configure PC and network camera IP in the same network segment; z Connect the device to PC directly via Network Cable after one minute power on. Network Cable b) Connecting the camera directly to a DHCP server based on DSL/Cable modem. This connection to internet is the most commonly used. You can connect the network camera and PC to DSL/Cable modem and configure your Gateway of the camera into your router IP. Internet Connection Telephone Line ADSL Modern Router Switch 5 User Manual 3、Device operation description 3.1、Check its connection 1) Defaulted IP address for every IP Camera is 192.168.1.168, subnet mask is 255.255.255.0. Configure your IP address of Computer to the static IP range provided by IP camera and set the same subnet mask. 2) Check if the network camera is started and connected normally. Please click <StartÆRun> and input command <cmd> Click <Ok> to open <Command> window shown as below picture Input <ping 192.168.1.168> to check network resources are working and network is intact 3) User ping-link the network camera through ping command, if disconnecting, please check IP address, gateway, subnet mask of PC is configured correctly and cable is connected well. 3.2、Search device Allow you use video surveillance software and search device across network Before running CAIPC-CMS100 software, double-click the [ to enter into below window, 6 ]icon on the right corner of screen User Manual And then Tick-select [Internet protocol(TCP/IP) option and add IP address you desired Note: The CAIPC-CMS100 use multicasting overlay IP to search device network information. But firewall not allows multicasting data parcels passing. So please firstly close your firewall to capture your device network information. Please follow below steps for on-line device search: 1. Double-click the < > icon to run the software; 2. Click <Search> button; 3. Then all the devices, which has been connected to PC and at the same network segment, have been searched. 7 User Manual 3.3、OCX! Controls installation and System Log-in When visit the network camera firstly through IE browser, please do install OCX! Controls and follow below steps: Please follow the below steps for the OCX! Controls installation: a. Visit the IP camera address-http://192.168.1.168 to download the controls; b. Click the < >icon to download and install the controls; c. Close the <IE browser> window before running the WEBOCX controls; d. Double click the < > icon and below picture will appear in the screen; e. Click <Run> and system will remind you “install success” after ending the installation. 3.3.1、Live Video Preview Open your Internet Explorer and input IP address (:192.168.1.168) of the network camera, and then below dialog window will appear in the screen: 8 User Manual Input user name and password (user name: admin; password: admin) and click [Submit] button Click pull-down menu of language and allow you toggle between English and Chinese. 9 User Manual Button description as follows: :display current user in the screen, Click <Exit> to turn back [Login] interface; : Allow you preview live images : Allow you adjust video stream :herein indicate preview control buttons, include [Alarm status], [Play/Stop], [Snapshot], [Audio on/Off], [Start/Stop record], [Talk-back] and [Configuration] button in turn from left to right. Click [Configuration] icon to enter into below interface. Record disk: allow you select any disk you desire to restore your record Captured Path: allow you save any captured image to the specified path Video Buffer: Herein bigger value is, smoother the video is Color Enhancement / Simultaneous Flash: allow you tick-select these options. 4、Basic Setup 4.1、Video setup Click the [Basic Setup ÆVideo] to go into below interface. Device name: indicate the network camera name 10 User Manual Stream Type: include single stream,dual stream and triple stream mode Codec Single stream mode: 720P Network Camera 1080P Network Camera Dual Stream mode: 1080P Network Camera 720P Network Camera Triple Stream mode: Video stream configuration (Take single stream mode as sample): 30 3072 1080P Network Camera 720P Network Camera ;720P(25、12、8、4) Frame rate: 1080P(30、15、10、5) Bit rate: 64kbps-12Mbps Bit rate control: allow you select CBR or VBR. Overlay Setting: allow you configure overlaying display date/time format and position, also text contents and position Local Display Video system: allow you select OFF, NTSC or PAL. Mirror: allow you select Off, Horizontal, Vertical and Both. 11 User Manual 4.2、Audio Setup Click [Basic Setup ÆAudio] option to enter into below interface. Allow you configure Audio Input (including Mic In, Codec, sampling rate, bit rate) and audio output (Volume). 4.3、Network Setup Click [Basic Setup ÆNetwork] option to enter into below interface. Herein allow user configure network options, including IP address, subnet Mask, Gateway and Preferred DNS. 12 User Manual 4.4、WIFI Setup WIFI function (Optional – The function is available only when the device have a embedded WIFI module.) Please follow below steps to configure the WIFI function: z Tick-select <Enable WIFI> z Add SSID of wireless network, or click <Scan> button z Configure the WIFI security mode and password. 4.5、Date/Time Setup Click [Basic Setup ÆDate/Time] option to enter into below interface. Device time: indicate system date and time of network camera 13 User Manual Time setup: include [Manual], [Synchronous with PC] and [Synchronous with SNTP server] SNTP Server: indicate time server address. Time Zone: allow you configure time zone according to the area you located. 4.6、Server setup Click [Basic Setup ÆServer] option to enter into below interface and system allow you configure two servers – SMTP and FTP. :Indicate email service configuration. The SMTP function accompanies with alarm function and captured images occurred by alarm could be sent to email server through network. A/C name: indicate user name of sender; Password: indicate sender’s password; Sender: indicate email address of sender; SMTP Server: indicate email server address; Port: indicate email service port (defaulted to 25) Email: indicate email address of receiver. :Indicate FTP Service configuration. The function accompanies with alarm function and captured images occurred by alarm could be upload to FTP server. FTP Server: indicate FTP server address; Port: indicate FTP service port (defaulted to 21) User name: indicate user name you used when visiting FTP server; Password: indicated password you used when visiting FTP server; File Unload: indicate the directory you stored to FTP server. 14 User Manual 4.7、Users Click [Basic Setup ÆUsers] option to enter into below interface. Defaulted user name and password is “admin”. After inputting user name, password and tick-select access permit, please click [Ok] to add a new user. User access permit include Administrator, user and guest. Administrators are allowed to modify and/or change system parameters and add a new user; common user to only change parameters and guest to only preview live screen. z Edit: Modify a user’s password or access permit; z Delete: delete a common user you have built. 5、Advances Setup Please refer to below picture. 15 User Manual 5.1、Video setup Click [Advance SetupÆVideo] option to enter into video configuration interface shown as below picture. Herein allow you adjust brightness, contrast, saturation and hue of images, and also configure backlight compensation enable, backlight, Flash control, WDR (Wide Dynamic Range), Iris mode, Iris Open, IRCut mode, low illumination, auto gain and DNR etc. z Backlight Compensation: Presents the object in the center of the image from darkening when there is excessive light from behind. Enable this function to control the light level and overcome severe backlighting condition. z Flicker Control: defaulted value is 50Hz. z Sensor Linear WDR: Use the digital Pixel System (DPS) sensor technology to produce extremely sharp and clear images regardless of lighting level. That is to say, the wider the WDR is, the stronger depth and arrangement of images is, and the more expansive the color contained. z Iris mode: include DC-Auto and DC-Manual z Iris Open: herein allow you select iris level of the network camera, including 100%, 80%, 60%, 40% and 20%. z Low Light Behavior: herein allow you configure maximum exposure time, automatic gain control and Spatial Filter (3D DNR) function. 16 User Manual 5.2、Motion Detection Click <Motion Detect> button to enter into the interface shown as below picture. Move the cursor to Preview area, which has been separated into 3x4 grids, and highlight any grid and click and select it z Select all: Click this button to select all the grids. z Delete all: Click this button to delete all the grids z Original: Click this button to return back to previous motions detection area. z Sensitivity: allow you configure sensitivity level of motion detection from high to low with high being the most sensitive (Also allow you configure a specified value (0~99), the higher the value is, the higher the sensitivity is). 17 User Manual 5.3、Privacy Covered Click <Privacy Covered> button to enter into below interface. Then move the cursor to Preview area and click any area to select one Privacy Masking area. Allow you select up to three Masking areas. Click <Ok> to save the above masking areas. 18 User Manual 5.4、PTZ Control Click [PTZ] button to enter into below interface. Please configure below parameters as per your actual conditions: PTZ protocol: Pelco-P、Pelco-D Baud rate:(1200、2400、4800、9600、19200)bits/s If you want to control PTZ camera through IE, please make sure its PTZ protocol and baud rate is consistent with devices 基本功能: :Direction control button of PTZ :Decrease / enlarge live images :Decrease / enlarge focal length :Decrease and enlarge iris :Adjust PTZ speed Preset You can establish a preset position for the PTZ camera and store it. The preset position you saved can be set, called and deleted. The function allows you quickly move PTZ cameras to your desired positions. 19 User Manual 5.5、Alarm Configuration Click [Alarm] button and then enter into below interface. Tick-select [Enable Alarm] option z Alarm duration time:(10 seconds、30 seconds(defaulted)、1 minute、5 minutes、10 minutes、 Non-Stop) z Alarm trigger: allow user select below alarm trigger types, including motion detection, Ethernet Lost and External Trigger. z On Alarm: Herein allow user configure alarm response.(including upload video, images, alarm record via FTP or SMTP, save into local storage and play alarm sound) 20 User Manual 5.6、Storage setup Allow users perform record storage as per schedule arranged, and also upload relative record to FTP or store it to SD/MMAC. Click [Save] to enter into below interface. Schedule expires after: configure one fixed value as schedule expires date or tick-select [Run Infinite times]. Schedule: herein allow you configure detailed schedule as per your actual request. 21 User Manual 5.7、SD Card setup Click <SD card> option to enter into below interface. If one SD card is inserted to the device and could be searched, its files contained in the SD card, free space and useable status will appear in the screen. And also allow you format or un-install the SD card. 22 User Manual 6、Maintenance [Maintenance] include two sub-options: [Upgrade] and [Maintenance]. 6.1、Upgrade Click [MaintenanceÆUpgrade] to enter into the interface shown as below: [Release version] includes [Firmware version] and [Software version]. Please follow below steps for firmware upgrade: 1. Select one upgrade packs from Internet 2. Run the upgrade packs and system will finish the upgrade processing automatically. 3. Automatically restart the system. Note: Do not unplug power lord or disconnect the internet. 6.2、Maintenance Click [Maintenance] to enter into below interface. z z Reboot: Herein allow you reboot the device; Restore factory setting: Click this button to clear all customized setting and restore all the factory settings. 23 User Manual Appendix I Port Forwarding To access the network camera from a remote computer over the internet you will need to forward port 80 and port 554 of router the camera is attached to, to the IP address of the network camera. Take TP-LINK Router as sample: You need configure virtual server of your router to forward the port 80 and 554 to IP address of the network camera. 24 User Manual Appendix II - Troubleshooting ◆ Symptom: No widget control appears Failure reason: Not install the widget. Countermeasures: Please install the widget <Download OCX!> when you visit the network camera first time through Internet Explorer Please follow the below steps for the widget installation: a) Visit the IP camera address-http://192.168.1.168 to download the widget; b) Click the < >icon to download and install the widget; c) Close the <IE browser> window before running the widget; d) Double click the < > icon and below picture will appear in the screen; e) Click <Run> and after ending the installation system will remind you “install success”. 25 User Manual ◆ Symptom: Visit the network camera error through IE browser after updating Failure reason: Buffer memory full Countermeasures: Delete all the buffer memory in the browser. Please follow below steps: a. Open <IE browser> window and click <ToolÆInternet option> to enter into <Internet option> window shown as below b. Click <Delete file> option to enter into its sub-option; c. Tick-select <delete all the off-line file> and click <Ok> d. Visit the network camera again. ◆ Symptom: Can’t visit the network camera through IE browser Failure reason 1: Disconnect to internet Countermeasures: Directly connect PC to internet to check if the cable input is normal or not; Input <ping> command to check the network resources are working and network is intact. Failure reason 2: IP address is occupied by other device. Countermeasures: Disconnect the network camera to internet and connect it to PC directly, and then configure its IP address again. Failure reason 3: IP addresses are located in different sub-net Countermeasures: Check the device’s IP address, subnet mask and gateway parameters etc Failure reason 4: Its physical address is conflict with the network camera’s Countermeasures: Modify its physical address parameters. Failure reason 5: Web port has been changed Countermeasures: You need to get the appropriate web port information from your network administrator. ◆ Symptom: Can’t connect PC client to camera Failure reason: PC client have a wrong device parameter configuration Countermeasures: Firstly check if the camera can preview video normal via IE browser, and make sure if the PC Client can search the device, and check if parameters of the PC client is correct 26