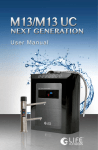
1
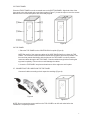
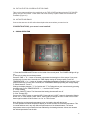
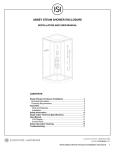
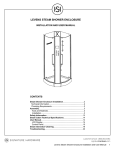
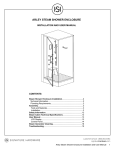
User Manual
Thank you for choosing our far infrared sauna!
1-PERSON SAUNA VTW-16
2-PERSON SAUNA VTW-17
Thank you for purchasing this product. Please read this instruction manual carefully before operating
this sauna.
Please pay attention to the important safety warnings and keep this manual for future use.
1
CONTENTS
1. Safety Warnings
2. Environment
3. Safety Guidelines
4. Components
5. Installation
5.1 Bottom panel
5.2 Back panel
5.3 Left/right panel
5.4 Sitting baffle and bench
5.5 Front panel
5.6 Top panel
5.7 Connecting the cables on the top panel
5.8 Put on the top cover on the top panel
5.9 Activate and enjoy
6. Sauna Operation
7. Troubleshooting
8. Warranty
2
2
3
4
4
5
5
5
6
7
7
7
8
8
8
9
9
1. SAFETY WARNINGS
• This product is not recommended for children.
• Please operate the sauna according to the instructions in this manual.
• The sauna is designed for indoor use only.
• Recommended use time is 60 minutes or less.
• Be careful with what you take inside of FIR sauna with you. Some metals absorb infrared rays
and can become extremely hot during a sauna session.
• Please avoid use if the sauna is damaged and call T-Zone at 416-285-6055.
• Use of this sauna under the influence of drugs or alcohol is not recommended.
• Do not use wet hands to pull the AC cord.
• Disconnect the sauna in the event of a power failure.
2. ENVIRONMENT
This sauna should be used indoors in a well ventilated, normally dry and dust free environment.
2
3. SAFETY GUIDELINES
READ AND FOLLOW ALL INSTRUCTIONS
A) Before using your far infrared sauna, please read carefully the below guidelines.
B) Do not use any electronic device (such as a MP3 player etc) or bring any metal objects into the
sauna with you. Check your pockets carefully before entering.
C) Any lock or latch system must not be fixed to the door of the sauna.
D) Do not modify the sauna in any way.
E) Warning: To avoid electric shock or burns, do not operate the sauna unless the heating safety
guard is properly installed.
F) Do not take any flammable materials into the sauna at any time to avoid fire.
G) Do not operate the sauna if you experience any electrical problems. Disconnect sauna from
power supply and contact T-Zone Health immediately.
H) Disconnect sauna from power supply before performing any cleaning or routine maintenance.
HEALTH WARNINGS
Be aware of the signs of hyperthermia. If you feel any of these symptoms, exit the sauna
immediately if you feel stable enough to do so, or open the air ventilation trap until you feel safe
to exit.
Hyperthermia occurs when the internal temperature of the body reaches a level several
degrees above normal body temperature of 98.6°F (37°).
The symptoms of hyperthermia
The symptoms of hyperthermia include an increase in the internal temperature of the body,
dizziness, lethargy, drowsiness and fainting.
The effects of hyperthermia
Failure to perceive heat. Failure to recognize the need to exit the sauna. Unawareness of
impending hazard. Fetal damage to pregnant women. Physical inability to exit the sauna.
WARNING: The use of alcohol, drugs, or medication may lead to fatal hyperthermia.
Persons with the following health conditions should avoid using the sauna:
Heart disease
High blood pressure
Asthma
Skin disease
Pregnant women should also avoid using the sauna.
Do not use the sauna if you are running a fever, or have any inflammatory disease or injuries.
People under the influence of alcohol or drugs should not use the sauna, nor is there any evidence the use of a
sauna helps with a hangover.
Keep well hydrated at all times and use caution and common sense.
3
4. COMPONENTS
1. Floor panel
2. Sitting baffle
3. Bench
4. Back panel heater
5. Back panel
6. Right panel
7. Roof panel
8. Top cover
9. Air ventilation trap
10. Top panel control box
11. Left panel
12. Main control panel
13. Front panel
14. Door handle
15. Glass door
5. INSTALLATION
Make sure all parts are present before installing the unit.
Choose a good location to install the sauna and assemble the sauna near where it will be used.
1. The AC WALL OUTLET must be easily accessible.
2. The location must be dry and levelled.
3. Take all the panels and sauna components out of the boxes.
4. Tools Required: Screwdriver
4
5.1. BOTTOM (floor) PANEL
Place the bottom panel on the floor; make sure the bottom panel front side is facing outward.
5.2. BACK PANEL
Place the BACK PANEL with the heating elements facing inward on the bottom panel (Figure1). Have
someone to hold it.
Figure 1
5.3 LEFT/RIGHT PANEL
Place the left panel on top of the bottom panel on its left side (Figure 2). Align the left side panel to
the back panel and insert them together. Insert the screws and screw the panels together. Insert the
caps to cover the screws. Place the right panel on top of the bottom panel on its right side (Figure 3).
Align the grooves of the right side panel to the back panel and insert them together. Insert the screws
and screw the panels together. Insert the caps to cover the screws. Make sure the left and right
panels are horizontally aligned with the back panel.
Figure 2
Figure 3
5
5.4 SITTING BAFFLE AND BENCH
1) Sitting baffle
Slide the sitting baffle down vertically into the slot within left and right panel (Figure 4).
Figure 4
2) Connectors
Connect the bench’s heater element wire to corresponding wire from the back wall, then
locate sitting baffle and slide into place (Figure 5). Make sure the wires are connected tightly;
otherwise, the heater will not work.
Figure 5
Figure 6
3) Bench
Slide the bench panel over and between the side panels towards the back panel (Figure 6).
6
5.5 FRONT PANEL
Place the FRONT PANEL onto the recessed area on the BOTTOM PANEL. Align both sides of the
front panel to the side panels and screw them together (Figure 7). Insert the caps to cover the screws.
Make sure the front and side panels are horizontally aligned.
Figure 7
Figure 8
5.6 TOP PANEL
1. Place the TOP PANEL so the CONTROL BOX is upside (Figure 8).
NOTE: Be careful of the connector cables of the SIDE PANELS while you place the TOP
PANEL. The connector cables should be inserted into the panels as much as possible. The
front and rear panels should align with the holes of the TOP PANEL in order to pass the
connector cables through to the TOP PANEL. Pass the cables through before lowering the
top panel completely. Failure to do so could damage the cables.
2. Lower the TOP PANEL into place and make sure all the edges are well in place.
5.7. CONNECTING THE CABLES ON THE TOP PANEL
Connect all cables according to their respective markings (Figure 9).
Figure 9
Figure 10
NOTE: Do not connect the power cord from the TOP COVER to an AC wall outlet before the
installation is completely finished.
7
5.8. PUT ON THE TOP COVER ON THE TOP PANEL
Take out the power cord from the round hole on the TOP COVER and then place the TOP COVER
gently onto the TOP PANEL. Lower down and screw securely in place. Make sure the antenna is
reachable (Figure 10).
5.9. ACTIVATE AND ENJOY
Connect the sauna to the AC wall outlet and place the sauna where you want it to be.
CONGRATULATIONS, your sauna is now installed!
6. SAUNA OPERATION
1. Press the POWER ON/OFF button on the inside of the control panel. The POWER ON light will go
on.
2. Set up the heating time and temperature
Press the TIME “+” or “-“ button to increase or decrease the heating time of the sauna. If you press
continuously for more than 2 seconds, the TIME display setting will change rapidly. Press the
TEMPERATURE “+” or “-“ button to increase or decrease the desired temperature of the sauna. If you
press continuously for more than 2 seconds, the TEMPERATURE display setting will change rapidly.
3. Switch between °F and °C
Change the display between “°C” for Celsius and “°F” for Fahrenheit at your convenience by pressing
simultaneously on the TEMPERATURE “+”, “-“ and the “LIGHT” button
4. To stop heating
Press the “ON/OFF” button. The Sauna and the heating elements will turn off.
5. Color Therapy LED
Press on the “LIGHT” button to open the LED. Press and hold “LIGHT” button for 3 seconds. When it
shows “2n” on Timer Screen, press “LIGHT” button again to change the color of LED. Press “LIGHT”
button again to switch off when there is no “2n” on Timer Screen.
Note: When the environmental temperature is low, the heating time will take longer.
It is also possible the sauna temperature display is not able to reach its maximum temperature. This
is normal and does not in any way affect the performance of the infrared heaters. The sauna
temperature sensor only measures the heat radiated by the heating elements. It does not measure
the infrared penetration into the skin.
8
7. TROUBLESHOOTING
a. if you press the “LIGHT” button on the control panel and the reading lamp does not come on.
1. Disconnect the sauna.
2. Before you check the light, please feel if the light cover is hot,
• Remove the TOP COVER of the sauna.
• Release the lamp cover.
• Remove the lamp holder.
• Unscrew the bulb gently.
• Replace a new bulb with the same voltage and wattage.
• Put the TOP COVER back on and fasten the clamps.
b. Control Panel
The Control panel does not display anything.
- Check if the AC connector is properly connected to the wall outlet and that the POWER switch is
turned on.
The Control panel display works, but nothing happens when you press any buttons.
- Signal cable may be disconnected.
Sauna temperature is rising, but the temperature display does not change.
- The temperature sensor may be damaged.
The temperature display shows "EP".
- The connector of temperature sensor is loose or sensor damaged. Tighten the connector of
temperature sensor.
The temperature display shows "H".
- The temperature inside the sauna is too high.
8. WARRANTY
5 Year limited warranty
Your T-Zone Health sauna is under warranty for a period of 5 years for parts only. Electronic
components and accessories, such as lights and oxygen ionizers are warranted for one year. Labour
is not under warranty.
During your first year of ownership, T-Zone Health will ship all replacement parts at its expense.
Customer must ship original parts back to T-Zone Health, if requested, at customer’s expense. After
the first year, all parts shipped will be at the customer’s expense. A Return Authorization number (RA
number) is required.
A certain amount of expansion and contraction is to be expected in sauna environments; therefore
minor cracks may appear in the wood. This is considered normal and will therefore not be covered by
warranty.
Shipping damage must be noted on the Bill of Lading and reported within 3 business days to T-Zone
Health. Failure to do so will result in the owner taking full responsibility for any costs associated
including parts, labour, and shipping.
T-Zone Health reserves the option to repair or replace. This warranty is limited to the original retail
purchaser only and is not transferable. The sauna is designed for home use only and there is no
warranty on units used for commercial purposes. This warranty will be voided by damage attributed
(but not limited) to: misuse, improper maintenance or installation, alteration in any way, outdoor use,
commercial, club, or group use, water damage, or electrical damage.
Under no circumstances will T-Zone Health or its representatives by held liable for personal injury or
property damage arising from use of the sauna.
9
T-Zone Health Inc.
25 Curity Avenue, Unit 2A
Toronto ON M4B 3M2
Canada
416-285-6055
www.t-zonehealth.com