1
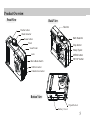
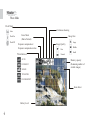
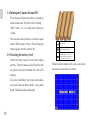
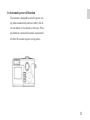
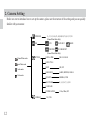
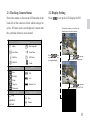
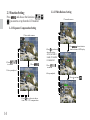
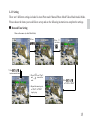
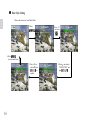
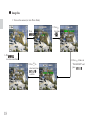
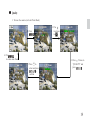
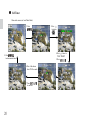
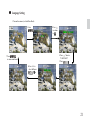
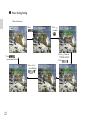
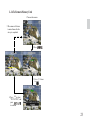
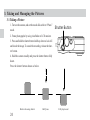
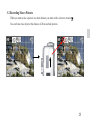
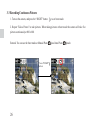
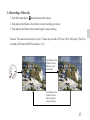
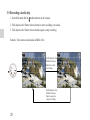
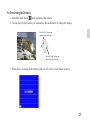
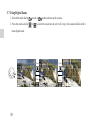
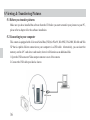
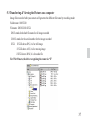
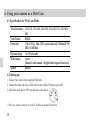
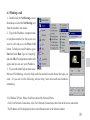
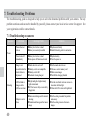
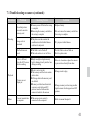
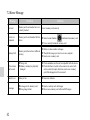
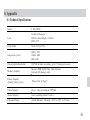
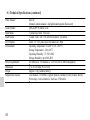
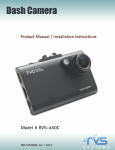
Table of Content
Product Overview ..................................................................................................................................... 5
Front View ........................................................................................................................................... 5
Back View ........................................................................................................................................... 5
Side View ............................................................................................................................................. 5
Bottom View ....................................................................................................................................... 5
Top View .............................................................................................................................................. 5
Monitor ............................................................................................................................................... 6
1. Getting Started ..................................................................................................................................... 8
1-1 Check List ................................................................................................................................... 8
1-2 Installing the Batteries .............................................................................................................. 8
1-3 Installing the memory card ....................................................................................................... 9
1-4 Turning the Camera On and Off ............................................................................................. 10
1-5 Checking the battery level ...................................................................................................... 10
1-6 Automatic power off function .................................................................................................. 11
2. Camera Setting .................................................................................................................................. 12
2-1 Checking Camera Status ......................................................................................................... 13
1
2-2 Display Setting .......................................................................................................................... 13
2-3 Function Setting ........................................................................................................................ 14
2-3-1 Exposure Compensation Setting ................................................................................ 14
2-3-2 White Balance Setting .................................................................................................. 14
2-3-3 Setting ............................................................................................................................. 15
2-3-4 To Format a Memory Card .......................................................................................... 23
3. Taking and Managing the Pictures .................................................................................................. 24
3-1 Taking a Picture ........................................................................................................................ 24
3-2 Recording Macro Pictures ...................................................................................................... 25
3-3 Recording Continuous Pictures ............................................................................................. 26
3-4 Recording a Video clip ............................................................................................................. 27
3-5 Recording a Audio clip ............................................................................................................ 28
3-6 Previewing the Pictures ........................................................................................................... 29
3-7 Using Digital Zoom ................................................................................................................... 30
3-8 Protect Picture(s) Against Deletion ...................................................................................... 31
3-9 Deleting Picture(s) from the Camera .................................................................................... 32
4. Installing the Software onto a Computer ....................................................................................... 33
4-1 Installing the Software ............................................................................................................. 33
2
4-2 Computer system requirements ............................................................................................ 35
5.Viewing & Transferring Pictures ...................................................................................................... 36
5-1 Before you transfer pictures ................................................................................................... 36
5-2 Connecting to your computer ................................................................................................. 36
5-3 Transferring & Viewing the Pictures on a computer .......................................................... 37
6. Using your camera as a Web Cam ................................................................................................... 38
6-1 Specification for Web Cam Mode ........................................................................................... 38
6-2 Setting up ................................................................................................................................... 38
6-3 Making a call ............................................................................................................................. 39
7. Troubleshooting Problems ................................................................................................................ 40
7-1 Troubleshooting on camera: ................................................................................................... 40
7-2 Error Message .......................................................................................................................... 42
8. Appendix .............................................................................................................................................. 43
8-1 Technical Specifications ........................................................................................................... 43
8-2 Operation, Safety and Maintenance ....................................................................................... 45
8-2-1 Operation ....................................................................................................................... 45
8-2-2 Safety ............................................................................................................................... 45
8-2-3 Maintenance .................................................................................................................. 45
3
8-3 Using Your Batteries ................................................................................................................ 46
8-4 Regulatory Information ............................................................................................................ 46
8-4-1 Federal Communications Commission (FCC) Radio Frequency Interference
Statement: ........................................................................................................................... 47
8-4-2 Attention ........................................................................................................................ 47
4
Product Overview
Front View
Back View
Monitor
Shutter button
Mode Selector
Multi Selector
Power button
Flash
Disp button
View Finder
Strap Eyelet
Lens
MENU button
SETUP button
Marco Mode Switch
USB connector
VideoOut connector
Bottom View
Tripod Socket
Battery Cover
5
12345678901234567890
12345678901234567890
12345678901234567890
12345678901234567890
12345678901234567890
12345678901234567890
Monitor
Photo Mode
F la s h M od e
Con ti nuous shoot ing
A uto
F l as h O n
F l a s h O ff
F oc u s M o de
( M a c r o /N o r m a l )
Exp o su re compen sati on /
Exp o su re compen sati on val ue
W h i t e Ba la n ce
A UT O
D AY L IG HT
SH AD E
I m a ge S ize
I m a ge Qu a li t y
Fi n e
N orm al
La rge
Middl e
S mal l
M e m o r y c a pa c i t y
( R e m a i n in g n u m b e r o f
stora ble i mages )
TU NG ST EN
FLU OR ESCE N T
Z oom fact or
B a tte r y L e v e l
6
Video Mode
Audio Mode
Fo cus M od e (Ma cro /No rm al)
Me mo ry cap aci ty - Re ma inin g tim e(s eco nd) o f s torable v ide o
- Depen d on ca me ra' s stor age mem ory
Audio Mode
Memory capacity (Remaining
time (second) of storable audio).
Battery Level
7
Playback Mode
1. Getting Started
1-1 Check List
P rotect
Z oom factor
100M E D IA
Camera
User Manual
CD-ROM
USB Cable
Wrist Strap
4x AAA
Batteries
Soft Case
1-2 Installing the Batteries
4 x AAA Alkaline batteries are supplied with the
camera. Please insert the batteries according to
the following steps:
8
1. Open the camera battery door by pushing it
toward the OPEN direction.
2. Insert the batteries as shown, ensuring you
follow the +/- signs correctly.
3.Close the battery door by pushing it
backwards.
gently insert the memory card into the bottom
until it is fully seated.
The label on the
memory card should
face the back side of
the camera and make
sure the card edge is
inside the slot.
The 8M onboard
memory and estimated capacities (Recordable
Images, Audio and Video) shown as below:
Use 8M Onboard Memory
+ - + -
- + -
+
1-3 Installing the memory card
Turn the camera off, open the battery cover, and
Fine
Normal
2048 x 1536
9
12
1600 x 1200
12
16
800 x 600
37
51
Video
63 sec. at 320 x 240
Audio
about 29 min.
9
1-4 Turning the Camera On and Off
Press the power button for about 3 seconds to
turn the camera on. The Power LED will keep
“Red” about for 3 seconds then change to
“Green”.
You can start to take pictues or set up the camera
when LED becomes “Green”. Press the power
button again to turn the camera off.
1-5 Checking the battery level
Check the battery power level before taking
pictures. Turn the camera on and check the battery power level on the bottom left of the LCD
monitor.
You can see the battery level sign on the following mode: Manual photo mode, Auto photo
mode, Video mode and Audio mode.
10
B attery is full
B attery pow er is low
(Please change b atteries)
B attery is extrem e low
(C hange battery as soon as
possible. A nd the cam era w ill
show it the under screen)
When the battery power level is low, you will see
the camera screen shows as below.
1-6 Automatic power off function
Your camera is designed to switch to power saving status automatically and save battery life after one minute or two minutes of non use. Press
any button to reactivate the camera or power turn
off after 60 seconds in power saving status.
11
2. Camera Setting
Before we start to introduce how to set up the camera, please see the structure of the setting and you can quickly
familier with your camera:
EXPOSURE
WB
-2,-1.7,-1.3,-1.0,-0.7,-0.3,0.0,0.3,0.7,1.0,1.3,1.7,2.0
(Manual Photo Mode Only)
AUTO
DAYLIGHT
TUNGSTEN
FLUORESCENT
SHADE
(Manual Photo Mode Only)
Manual Photo mode
SETTING
DATE & TIME
2001.01.01.00:00
DATE STYLE
Auto Photo mode
BEEP
Audio mode
Video mode
ON, OFF
IMAGE SIZE
LARGE, MIDDLE, SMALL
QUALITY
NORMAL, FINE
SELF TIMER
2, 3, 4, 5, 6, 7, 8, 9, 10
LANGUAGE
POWER SAVING
FORMAT
12
NO, YES
1 Min, 2 Min, OFF
2-1 Checking Camera Status
2-2 Display Setting
Power the camera on, browse the LCD monitor in the
back side of the camera to check which settings are
active. If feature icon is not displayed, it means that
the particular feature is not activated.
Press
to set up the LCD display On/Off
1.Turn on the camera, you will see the
display shows the active features
LCD Display Features
Macro
Burst Sanpshot
Auto Flash
Zoom factor
Flash On
Self-Timer
Flash Off
Audio
White Balance
Auto
Daylight
Shade
Full
Low
Extreme Low
Fluorescent
Image Size
Image Quality
Middle
Small
2.Press
one time
to clean the feature icons
Battery
Tungsten
Large
3.Press
one
more time to return to
the original display
3.Press
one more
time to change to LCD off
Fine
Normal
13
2-3-2 White Balance Setting
2-3 Function Setting
Press
, and choose the functions ( ,
) you want to set up from the LCD monitor
,
,
1.Turn on the camera.
2-3-1 Exposure Compensation Setting
1.Turn on the camera.
4.Press
to confirm.
4.Press
up or down to
choose the setting:
AUTO, DAYLIGHT,
SHADE, TUNGSTEN,
FLUORESCENT.
2.Press
5.Set up completed.
2.Press
,choose function
from the bottom of LCD display
5.Press
to confirm.
6.Set up completed.
3.Press
3.Press
up or down to choose
from -2 to +2 EV compensation.
14
one time to
2-3-3 Setting
There are 8 different settings included in Auto Phot mode/ Manual Photo Mode/Video Mode/Audio Mode.
Please choose the items you would like to set up and see the following instruction to complete the settings.
z Date and Time Setting
1.Turn on the camera. (in Auto Photo Mode)
2.Press
7. Press
to return main frame
5. Press / to set "Year",
and / to move to the
next.
3.Press
two times
to
4.Press
to "DATE & TIME"
6. Repeat the same steps to
set "DAY" & "TIME"
step by step.
15
z Date Style Setting
1.Turn on the camera. (in Auto Photo Mode)
2.Press
3.Press
two times
to
6. Press
to return main frame
5.Press
to
select and press
to
confirm
16
4.Press
one time to
" DATE STYLE" and
press
z Beep Setting
1.Turn on the camera. (in Auto Photo Mode)
2.Press
3.Press
two times
to
6. Press
to return main frame
5.Press
to
select and press
to
confirm
4.Press
two times
to " BEEP" and
press
17
z Image Size
1. Turn on the camera (in Auto Photo Mode)
3. Press
two times
to
.
2. Press
6. Prss
to reture main frame.
5. Press
to
select and press
to
confirm.
18
4. Press
4 times to
“IMAGE SIZE” and
press
.
z Quality
1. Turn on the camera (in Auto Photo Mode)
3. Press
two times
to
.
2. Press
6. Prss
to reture main frame.
5. Press
to
select and press
to
confirm.
4. Press
5 times to
“QUALITY” and
press
.
19
z Self Timer
1.Turn on the camera. (in Auto Photo Mode)
2.Press
4.Press
6 times to
"SELF TIMER"
5.Press
8. Press
to return main frame
6.Press
to choose
from 2 to 10 seconds.
7.Press
to confirm.
20
3.Press
two times
to
z Language Setting
1.Turn on the camera. (in Auto Photo Mode)
2.Press
3.Press
two times
to
4.Press
7 times to
"LANGUAGE"
5.Press
7. Press
to return main frame
6.Press
to
select and press
to
confirm
21
z Power Saving Setting
1.Turn on the camera.
2.Press
4.Press
8 times to
"POWER SAVING"
5.Press
7. Press
to return main frame
6.Press
to
select and press
to
confirm
22
3.Press
two times
to
2-3-4 To Format a Memory Card
1.Turn on the camera.
5.The camera will return
to main frame after the
set up is completed.
2.Press
3.Press
to
3 times
4.Press
to select
"YES" or "NO", and
press
to confirm
23
3. Taking and Managing the Pictures
3-1 Taking a Picture
1. Turn on the camera, and set the mode dial switch to “Photo”
mode.
2. Frame photographs by using viewfinder or LCD monitor.
3. Press and hold the shutter button halfway down to lock AE
and check the image. To cancel the recording, release the shutter button.
4. Hold the camera steadily and press the shutter button fully
down.
Press the shutter button shown as below.
Before releasing shutter
24
Half press
Shutter Button
Fully depressed
3-2 Recording Macro Pictures
When you want to take a picture in a short distance you must set the selector to marcro
.
You can frame close object at the distance of 20cm and take pictures.
25
3-3 Recording Continuous Pictures
1. Turn on the camera, and press the “RIGHT” button
to set burst mode.
2. Repeat “Take a Picture” to take pictures. When taking pictures at burst mode the camera will take five
pictures continuously at 800 x 600.
Remark: You can use the burst mode at Manual Photo
Presss "RIGHT"
button
26
and Auto Photo
mode.
3-4 Recording a Video clip
1. Switch the mode dial to
mode and turn on the camera.
2. Fully depress the Shutter release button to start recording your movie.
3. Fully depress the Shutter release button again to stop recording.
Remark : The camera records movies up to 15 frames per seconds in CIF size (320 X 240 pixels). The file is
recorded in AVI format (DOS file extension “.avi”).
Fully depress the
Shutter release
button to start
recording.
Rec
Fully depress the
Shutter release
button again to
stop recording.
27
3-5 Recording a Audio clip
1. Switch the mode dial to
mode and turn on the camera.
2. Fully depress the Shutter release button to start recording your audio.
3. Fully depress the Shutter release button again to stop recording.
Remark : The camera records audio at 8KHz, 4 bit.
Fully depress the
Shutter release
button to start
recording.
Rec
Fully depress the
Shutter release
button again to
stop recording.
28
3-6 Previewing the Pictures
1. Switch the mode dial to
mode and turn on the camera.
2. You can preview the pictures you took and use the multiselector to change the images.
Press the "Left" button and
move the picture forward
Press the "Right" button and
move the picture backward
3. When there is no image in the memory card you will see the screen shown as below.
29
3-7 Using Digital Zoom
1. Switch the mode dial to
2. Press the multi-selector
mode or
or
mode and turn on the camera.
to select the zoom rate up to 4.0x (0.2 step), this camera build in with 4
times digital zoom.
3
x 2.4
Press
Press
30
3
x 2.8
Press
Press
3
x 3.0
3-8 Protect Picture(s) Against Deletion
1. Switch the mode dial to
mode and turn on the camera.
2. Press
button and then press
2 times to select
function.
3. After setting this image will not be deleted from camera.
Press
1/31 /100V2210
3
100V2210
1/3
100V2210
Press two times
to
, and press
to confirm.
1/3
100V2210
31
3-9 Deleting Picture(s) from the Camera
1. Swtich the mode dial to
2. Press
mode and turn on the camera.
button and then use
to select
or
to delete one picture or all pictures.
Press
1/3
100V2210
This "Printing Setting"
function will be available
only for images storaged
in SD card.
Press
to confirm
Press
to delete all pictures
32
4. Installing the Software onto a Computer
4-1 Installing the Software
z Before you installing the software, remember to close all other software applications
you are using on your computer.
z
Insert the CD supplied into the CD-ROM
driver of your computer
z
The user interface screen of the CD will automatically be launched.
z
Please follow the instructions to complete
the installation
1.Choose the language you
want to use for the
installaion, then click
2.The driver will automatically start to run the setup
3.Make sure your USB port on
the computer is enable
4.Make sure your camera is
not connected to the computer
5.Prepare the Windows installation CD on hand in case
needed while the installation
“yes”
33
6.The system is ready to start setup, click “ next” if you want
to complete the installation, click “cancel” if you want to
abort
7.Start to install, please wait
34
8.Installtion completed.
4-2 Computer system requirements
We recommend the following minimum requirements for transferring and editing the images from camera to
personal computer:
Co mputer
PC/AT co mpatible
CPU
Pentium III 500M Hz, AMD K7-550 or equivalent processor
OS
Windows98/98SE, Windows ME, Windows2000 o r XP
RAM
64M B o r more
Hard Disk Space
200M B free d isk space
Monitor
640 x 480 pixels or greater with 16-bit RGB or mo re, co lor
(800 x 600 p ixels or more, fu ll color monitor recommended)
CD-ROM Driver
Required for installation
Interface
USB interface
Accessories
Standard mouse, keyboard and stereo speakers
35
5.Viewing & Transferring Pictures
5-1 Before you transfer pictures
Make sure you have installed the software from the CD before you start to transfer your pictures to your PC,
please refer to chapter 4 for the software installation.
5-2 Connecting to your computer
This camera is equipped with a Universal Serial Bus (USB) for Win 98, Win 98SE, Win 2000, Win Me and Win
XP that is capable of direct connection to your computer via a USB cable. Alternatively, you can insert the
memory card in a PC card slot or card reader, where it will function as an additional disk
1.Open the USB connector/Video output connector cover of the camera
2.Connect the USB cable provided as shown
USB Connector
36
5-3 Transferring & Viewing the Pictures on a computer
Image files recorded with your camera will generate the different file name by recording mode:
Folder name : 100V2210
File name: DSCIOOOO.XXX
DSCI stands for default file name for all image recorded
OOOO stands for the serial number for the image recorded
XXX if XXX shows JPG, it is for still image
if XXX shows AVI, it is for moving image
if XXX shows WAV, it is for audio file
For Win 98 users, the drive recognizing the camera is “E”
37
6. Using your camera as a Web Cam
6-1 Specification for Web Cam Mode
Video Resolution 160 x 120, 176 x 144, 240 x 180, 320 x 240, 352 x 288, 640 x
480
Video Format
RGB24,
Frame Rate
15 fps (VGA), 30fps (CIF), can be achieved by Pentium III 500
MHz, 64 MB Ram
Exposure Range On / Off selectable
White balance
Auto or
Manual (4-mode manual : daylight/shade/tungsten/fluorescent)
Speaker
Build-in
6-2 Setting up
1. Connect your camera to the supplied USB cable.
2. Connect the other end of your USB cable to an available USB port on your PC.
3. Switch the mode dial to "PCCam"and turn on the camera.
4. Put your camera on the top of your PC monitor or another flat surface.
38
6-3 Making a call
1. . Double click the NetMeeting icon on
the desktop or select the NetMeeting icon
from the windows start manu.
2. . Type in the IP address, computer name
or telephone number for the person you
want to call and press the Place Call
button. To find your own IP address, go to
Start and click Run, Type in “winipcfg”
and click OK, IP configuration window will
appear and you can see your IP address.
3. . If you need further help on how to use
Microsoft NetMeeting, select the help under the manual bar and choose the topic you
need. Or you can visit the following website: http://www.microsoft.com/windows/
netmeeting
For Window XP User, Please click Start, choose My Network Places,
click View Network Connections, click View Network Connections, then click on the active connection.
The IP address will be displayed in the lower left hand corner in the Details window.
39
7. Troubleshooting Problems
The troubleshooting guide is designed to help you to solve the abnormal problems with your camera. For any
problem continues and can not be handled by yourself, please contact your local service center for support. See
your registration card for contact details.
7-1 Troubleshooting on camera:
Operation
Power
Shooting
40
Problem
Checking Points
Solution
Power does not
turn on
zBattery level is low or dead
zBattery is incorrectly installed
zReplace new battery
zInstall the battery prefer to instruction
Power turns off
immediately
zBattery level is low or dead
zAuto power-off function activated
zReplace battery
zTurn the power on
Image is not
recorded when the
shutter button is
depressed
zMode selector is set to off
zMemory card is not compatible
zMemory card is full
zFlash unit is being charged
zSet the mode selector to on
zChoose a correct memory card
zDelete some images
zWait till the charging finished
LCD is blank or
images on the
LCD are not clear
zBright sunlight or high-intensity
light environment
zLCD or Lens is dirty or covered by
fingerprints
zUse the view finder to shoot or move to
a location with less light
zClean the LCD or Lens with light cloth
Subject is not in
focus
zMacro mode being used for normal
shooting
zNormal mode being used for macro
image
zSet the setting to normal for portraits
and scenery
zSet the setting to macro for macro
images
7-1 Troubleshooting on camera (continued):
Operation
Shooting
Problem
Solution
zReplace battery
Recorded pictures
can not be saved in
memory card
Image color is
unnatural
zThe photo was taken under the
conditions in which white balance
could not be adjusted.
zTry to preset white balance
The flash does not
work
zThe flash is set to flash-off
zThe mode selector is set to Video
zSet the flash to auto or flash on
zSet it to photo mode
Color is different
from the LCD screen
while recording
zBright sunlight or high-intensity
light is shining directly into the lens
during recording
zMove to a location or place the camera
to prevent lens directly from shine
Pictures are not
displayed
zMode is not set to play
zThe memory card does not contain
picture data
zAll image data in the memory card
are deleted
zMemory card has been formatted
a memory card with non-DCF
pictures recorded with another
camera is loaded in the camera
Playback
Others
Checking Points
zCamera power off before the saving
is complete
zRemoving the memory card before
the saving is complete
Can not transmit data
to computer
zThe camera is not correctly
connected to the computer
zDo not remove the memory card before
the saving is complete
zChange mode to play
zChange memory card or using another
digital camera which support non-DCF
pictures
zRefer to manual chapter 4.1
41
7-2 Error Message
Message
Problem
No Card
Memory card is not inserted or is not
correctly inserted
Card is not
formatted
Memory card is not formatted for this
device
Memory Full
Memory card does not have sufficient
memory
Solution
Insert memory card correctly
z Select Format function (
)and format the memory card
z Use a correctly formatted memory card
z Delete or reduce number of images
z Transfer the images you want to save to a computer
z Insert a new memory card
This card can
not be used
z Wrong card
z Memory card may be physically
damaged
z Check and make sure the card is compatible with this device
z Check that there is no dirt in the connector or contact with
service center for repair, otherwise, insert a new memory
card if the damaged can’t be recovered.
Battery Low
Battery is low
z Insert new batteries
No image
zNo images in the memory card
zWrong image format
z Insert a memory card with images
z Do not use a memory card with non-DCF images
42
8. Appendix
8-1 Technical Specifications
S enso r
2 .1 M C M O S
L e ns
5 G lens w ith m acro
E ffective fo cal len gth : 8 .4 7 m m
F N O : F 2 .8
Vie w F ind er
F ield o f Vie w : 8 5 %
Im age S ize (p ixel)
2 0 4 8 x 15 3 6
1 6 0 0 x 12 0 0
8 0 0 x 6 00
Vid eo C ap ture R esolutio n
3 2 0 *2 4 0 w /a ud io reco rd ing, u p to 1 5 fra m es p er seco nd
M e m o ry C ap acity
Internal: 8 M B N A N D G ate F lash M e m o ry
E xternal: S D m e m ory card
P icture C ap acity
(Q uality settin g : F ine)
Vid eo C ap acity
P lease refer to P age 9
6 3 sec. vid eo recording at 3 2 0*2 4 0
A ud io C ap acity
vo ice reco rd ing (abo ut 2 9 m in .)
E xp o sure R a n ge
A uto & M a n ual : A E ran ge, -2 E V to + 2 E V in 1 /3 step s
43
8-1 Technical Specifications (continued)
White balance
Audio Format
Burst Mode
Flash Strobe
LCD Display
Environment
Power requirements
Dimension
Weight
Supplied Accessories
44
Auto or
Manual (4-mode manual : daylight/shade/tungsten/fluorescent)
IMA-ADPCM, 8KHz, 4 bit
5 pictures per shot, VGA size
3-mode: Auto / On / Off, effective distance: 2.0 meters
Color, 1.5” TFT panel, preview frame rate: 30fps
Operating Temperature: 0 to 40 oC (30 –104 oF)
Storage Temperature: -20 to 60 oC
Operating Humidity: 15 –90 % RH
Storage Humidity: up to 90% RH
4 x batteries (1.5V Alkaline or 1.2V NiCd or Ni-MH rechargeable)
97 x 28 x 63 mm (W x D x H)
Approx. 110g (without battery)
User manual / CD ROM ( English, Spanish, German, French, Italian, Dutch),
Wrist strap, 4 x AAA batteries, Soft case, USB cable
8-2 Operation, Safety and Maintenance
8-2-1 Operation
Operating your camera within the following environmental conditions, otherwise, the battery life or
image quality may be affected:
0-40 oC ( 32-104 oF)
15-90% relative humidity
8-2-2 Safety
z
z
z
z
Do not look at the sun through the viewfinder, this could cause permanent visual impairment.
z
Do not disassemble by yourself to prevent any injury by the internal parts. Turn off and remove
the batteries and ask service center for inspection if you have problem.
z
z
Do not place camera strap around neck
z
Keep dry, never immerse any part of the camera or its accessories into any fluid or liquid.
Do not walk while looking through the viewfinder, this could result in a fall or other injury.
Do not use in the presence of flammable gas to prevent explosion or fire.
Turn off immediately in the even of malfunction, such as smoke or unusual smell from the camera
or adaptor. Turn off and remove the batteries and ask service center for inspection.
Keep out of reach of children
8-2-3 Maintenance
45
z
z
z
z
Keep clean, wipe off any sand, salt, dust or stains with a a soft dampened cloth.
Do not drop and prevent strong shocks or vibration.
Keep away from strong magnetic fields, such as TV or radios.
Always disconnect the camera from your PC or TV before cleaning it. Do not unplug the device or
remove the battery while camera is on.
8-3 Using Your Batteries
z Batteries should be replaced by an adult or under adult supervision,
z Rechargeable batteries are only to be charged under adult supervision.
z Non-rechargeable batteries are not to be recharged.
z Insert the batteries with the right instruction or polarity.
z Do not mix up the different types of batteries or new and used batteries
z Do not dispose the batteries in fire
z Remove the batteries from the camera if they are exhausted or not in use.
These instructions should be retained for future reference
8-4 Regulatory Information
This device complies with Part 15 of the FCC rules. Operation is subject to the following two conditions:
z
46
This device may not cause harmful interference
z
This device must accept any interference received, including interference that may cause undesired
operation.
8-4-1 Federal Communications Commission (FCC) Radio Frequency Interference Statement:
This equipment has been tested and found to comply with the limits for a Class B digital device, pursuant
to part 15 of the FCC rules.
These limits are designed to provide reasonable protection against harmful interference in a residential
installation. This equipment generates, uses, and can radiate radio frequency energy and, if not installed
and used in accordance with the instructions, may cause harmful interference to radio communications.
However, there is no guarantee that interference will not occur in a particular installation. If this equipment does cause harmful interference to radio or television reception, which can be determined by
turning the equipment off and on, the user is encouraged to try to correct the interference by one or more
of the following measures:
Reorient or relocate the receiving antenna.
Increase the separation between the equipment and receiver.
Connect the equipment into an outlet on a circuit different from that to which the receiver is connected.
Consult the dealer or an experienced radio/television technician for help.
8-4-2 Attention
Any change or modification made to this unit that are not expressly approved by the party responsible
for compliance could void the user’s authority to operate the equipment.
47
Limited warranty:
This product is warranted against manufacturing defects for the period of one year. The
warranty period commences on the date of purchase from the authorized reseller/retailer.
Your original purchase invoice, showing the date of purchase of the product is your proof
of the date of purchase.
During the warranty period, defective parts will be repaired or replaced. There will be no
charge for labor or parts during the one-year warranty period from the date of purchase.
Any shipping or other cost such as customs incurred costs, etc...from or to outside the
continental U.S.A. is the customers’responsibility.
This warranty does not cover any failure resulting in loss to software, data, lost profits, lost
savings, any incidental damages due to accident, abuse, misuse, negligence and acts of
God.
All inquiries with regards to the product warranty may be directed to 905-948-9967 x 231 or
1-888-4KOBIAN.