1
Instructions For Use
·
Seal the plate with MicroAmp® Optical Adhesive Film.
·
Briefly spin down the plate with a plate centrifuge for 1 min at 1000 ± 100 rcf.
Note: The filled PCR plate can be stored in a refrigerator at 2 to 8 °C for up to 4 hours.
10.3. Plate Loading (Applied Biosystems 7500 Fast / Fast Dx)
Note: The PCR Master Mix does not contain ROX or any other reference dye. Accordingly, the passive
reference setting must be set to “none”.
Note: It is recommended to save a template file (*.sdt) with the defined cycling and analysis settings.
·
Start the Software version SDS v1.4.
·
Load the specified experiment template file or create a new plate document.
·
Click “Create New Document”.
·
Define the following plate document:
o
Assay:
Standard Curve (Absolute Quantification)
o
Container:
96-Well Clear
o
Template:
Blank Document (or select respective Epi proColon 2.0 CE Template file)
o
Run Mode:
Standard 7500.
·
Click “Next”.
·
Click “New Detector…”.
·
Create a new detector using following properties:
·
o
Name:
Septin9
o
Description:
Epi proColon 2.0 CE
o
Reporter dye:
FAM
o
Quencher dye:
(none)
o
Color:
Red.
Click “Create Another” and define following properties:
o
Name:
ACTB
o
Description:
Epi proColon 2.0 CE
o
Reporter dye:
JOE
o
Quencher dye:
(none)
o
Color:
Green.
·
Click “ok”.
·
Select both detectors and click “Add >>” to assign the detectors to the plate document.
·
Select “(none)” in the drop down menu of “Passive Reference”.
·
Click “Done”.
·
Go to the tab “Setup” and “Plate”.
·
Select all 96 wells of the plate.
·
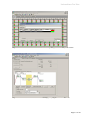
Go to the menu point “View” and open the “Well Inspector”.
·
Select detector “Septin9” and “ACTB”.
·
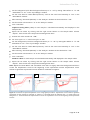
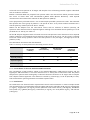
Check the Passive Reference setting to be “(none)” (see Figure 1).
·
Click “Close”.
·
Go to tab “Instrument” to program the cycling conditions as described in Table 7
·
Change the following settings:
o
Sample Volume:
30 µl,
o
Run Mode:
Standard 7500,
Page 15 of 30