1
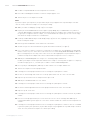
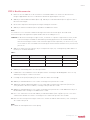
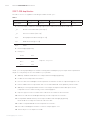
Premium WGBS Kit
Whole Genome Bisulfite Sequencing
Cat. No. C02030034 (8 rxns)
Version 1 I 07.15
Contacts
DIAGENODE HEADQUARTERS
Diagenode s.a. BELGIUM | EUROPE
LIEGE SCIENCE PARK
Rue Bois Saint-Jean, 3
4102 Seraing - Belgium
Tel: +32 4 364 20 50
Fax: +32 4 364 20 51
[email protected]
[email protected]
Diagenode Inc. USA | NORTH AMERICA
400 Morris Avenue, Suite #101
Denville, NJ 07834
Tel: +1 862 209-4680
Fax: +1 862 209-4681
[email protected]
[email protected]
For a complete listing of Diagenode’s international distributors visit:
http://www.diagenode.com/company/distributors.php
For rest of the world, please contact Diagenode sa.
Diagenode website: www.diagenode.com
PAGE 3
Content
Introduction. . . . . . . . . . . . . . . . . . . . . . . . . . . . . . . . . . . . . . . . . . . . . . . . . . . . . . . . . . . . . . . . . . . . . . . . . . . . . . . . . . . . . . . . . . . . . . . . . . . . . . . . . . . . . . . . . . . . . . . . . . . . . . . . . . . 4
Kit Method Overview and Time Table. . . . . . . . . . . . . . . . . . . . . . . . . . . . . . . . . . . . . . . . . . . . . . . . . . . . . . . . . . . . . . . . . . . . . . . . . . . . . . . . . . . . . . . . . . . . . 5
Kit Materials. . . . . . . . . . . . . . . . . . . . . . . . . . . . . . . . . . . . . . . . . . . . . . . . . . . . . . . . . . . . . . . . . . . . . . . . . . . . . . . . . . . . . . . . . . . . . . . . . . . . . . . . . . . . . . . . . . . . . . . . . . . . . . . . . . 6
Required materials not provided. . . . . . . . . . . . . . . . . . . . . . . . . . . . . . . . . . . . . . . . . . . . . . . . . . . . . . . . . . . . . . . . . . . . . . . . . . . . . . . . . . . . . . . . . . . . . . . . . . . 7
Remarks before starting . . . . . . . . . . . . . . . . . . . . . . . . . . . . . . . . . . . . . . . . . . . . . . . . . . . . . . . . . . . . . . . . . . . . . . . . . . . . . . . . . . . . . . . . . . . . . . . . . . . . . . . . . . . . . . . 8
Protocol. . . . . . . . . . . . . . . . . . . . . . . . . . . . . . . . . . . . . . . . . . . . . . . . . . . . . . . . . . . . . . . . . . . . . . . . . . . . . . . . . . . . . . . . . . . . . . . . . . . . . . . . . . . . . . . . . . . . . . . . . . . . . . . . . . . . . . . . . 9
Step 1. End Repair . . . . . . . . . . . . . . . . . . . . . . . . . . . . . . . . . . . . . . . . . . . . . . . . . . . . . . . . . . . . . . . . . . . . . . . . . . . . . . . . . . . . . . . . . . . . . . . . . . . . . . . . . . . . . . . . . . . 9
Step 2. Clean-Up. . . . . . . . . . . . . . . . . . . . . . . . . . . . . . . . . . . . . . . . . . . . . . . . . . . . . . . . . . . . . . . . . . . . . . . . . . . . . . . . . . . . . . . . . . . . . . . . . . . . . . . . . . . . . . . . . . . . . . 9
Step 3. Adenylation. . . . . . . . . . . . . . . . . . . . . . . . . . . . . . . . . . . . . . . . . . . . . . . . . . . . . . . . . . . . . . . . . . . . . . . . . . . . . . . . . . . . . . . . . . . . . . . . . . . . . . . . . . . . . . . . . . . 9
Step 4. Adapter Ligation . . . . . . . . . . . . . . . . . . . . . . . . . . . . . . . . . . . . . . . . . . . . . . . . . . . . . . . . . . . . . . . . . . . . . . . . . . . . . . . . . . . . . . . . . . . . . . . . . . . . . . . . . 10
Step 5. Clean-Up and Size Selection . . . . . . . . . . . . . . . . . . . . . . . . . . . . . . . . . . . . . . . . . . . . . . . . . . . . . . . . . . . . . . . . . . . . . . . . . . . . . . . . . . . . . . . 12
Step 6. Bisulfite Conversion. . . . . . . . . . . . . . . . . . . . . . . . . . . . . . . . . . . . . . . . . . . . . . . . . . . . . . . . . . . . . . . . . . . . . . . . . . . . . . . . . . . . . . . . . . . . . . . . . . . . 15
Step 7. PCR Amplification. . . . . . . . . . . . . . . . . . . . . . . . . . . . . . . . . . . . . . . . . . . . . . . . . . . . . . . . . . . . . . . . . . . . . . . . . . . . . . . . . . . . . . . . . . . . . . . . . . . . . . . 16
www.diagenode.com |
PAGE 4
DIAGENODE PREMIUM WGBS KIT USER MANUAL
Introduction
Whole Genome Bisulfite Sequencing (WGBS) is a single nucleotide resolution technique that allows the user to study
DNA methylation sites and their role in gene regulation. The Diagenode’s Premium WGBS Kit is designed to prepare
single and paired-end bisulfite converted DNA libraries for sequencing using Illumina® platforms. It has also been
validated for the preparation of bisulfite converted library from ChIP’d samples in order to perform ChIP-Bis-Sequencing.
For Reduced Representation Bisulfite Sequencing (RRBS) experiments use the Diagenode’s Premium RRBS Kit (Cat.
No.C02030032 and C02030033).
The Diagenode’s Premium WGBS Kit contains specially designed enzymes and buffers needed for genome wide bisulfite
sequencing. This kit includes:
• a highly efficient adapter ligation step which results in superior library preparations and a maximum number of
unique sequencing reads
• a specially designed WGBS enzymatic ligation mix which allows users to perform ligations with longer adapters and
better ligation efficiencies
•
the MethylTaq Plus 2X Master Mix, a robust polymerase designed to handle bisulfite converted DNA.
These optimizations permit to start a WGBS experiment with amounts of DNA as low as 5 ng.
Moreover, the Premium WGBS Kit simplifies the workflow by using master mixed reagents and magnetic bead based
cleanup, reducing pipetting and eliminating time consuming steps in library preparation.
Innovating Epigenetic Solutions
PAGE 5
Kit Method Overview and Time Table
=N
=A
GENOMIC DNA
=T
= Adapters with
Cluster Sequence
FRAGMENT
END-REPAIR
ADD 'A'
30 Minutes
(Optional Stop Point)
30 Minutes
ADD METHYLATED ADAPTERS
LIGATION OF METHYLATED ADAPTERS
15 Minutes
(Optional Stop Point)
SIZE SELECTION
1-2 Hours
(Optional Stop Point)
BISULFITE CONVERSION
PCR
4 Hours
1 Hour
(Optional Stop Point)
BEAD CLEANUP
READY FOR SEQUENCING
Figure 1: Flow chart for sample preparation
www.diagenode.com |
PAGE 6
DIAGENODE PREMIUM WGBS KIT USER MANUAL
Kit Materials
The Premium WGBS Kit contains enough material to prepare 8 genomic DNA samples for Illumina® compatible
sequencing. The shelf life of all reagents is 6 months when stored properly.
Store the components at the indicated temperature upon receipt.
Table 1. Components supplied with the Premium WGBS Kit
Description
Quantity
Storage
Water (white)
1.5 mL
-20°C
WGBS End Repair Buffer Mix (clear)
56 µL
-20°C
WGBS End Repair Enzyme Mix (clear)
24 µL
-20°C
WGBS Adenylation Mix (red)
28 µL
-20°C
WGBS Ligation Mix (purple)
252 µL
-20°C
WGBS Adapter (purple)
20 µL
-20°C
WGBS Adapter Dilution Buffer (purple)
500 µL
-20°C
6x Loading Dye (orange)
500 µL
-20°C
MW Ladder Ready-to-Load 100 bp (orange)
80 µL
-20°C
Resuspension Buffer (white)
2 mL
-20°C
Column Elution Buffer (yellow)
1.8 mL
-20°C
DNA Binding Buffer
24 mL
Room temperature
DNA Wash Buffer
3 mL
Room temperature
Clean-Up Spin Columns
8 columns with tubes
Room temperature
BS Conversion reagent
1 tube
Room temperature
BS Dilution Buffer (black)
300 µL
Room temperature
BS Solubilization Buffer (black)
790 µL
Room temperature
BS Reaction Buffer (black)
160 µL
Room temperature
BS Binding Buffer
4.8 mL
Room temperature
BS Wash Buffer
1 mL
Room temperature
BS Desulphonation Buffer
1600 µL
Room temperature
BS Elution Buffer (white)
176 µL
Room temperature
BS Spin Columns
8 columns
Room temperature
BS Collection Tubes
8 tubes
Room temperature
WGBS Primer Mix (green)
16 µL
-20°C
MethylTaq Plus 2X Master Mix (green)
200 µL
-20°C
Innovating Epigenetic Solutions
PAGE 7
Required Materials Not Provided
• Gloves to wear at all steps
• Ethanol 100% (room temperature)
• Nuclease-free water
• 8-tube strips or 0.2 mL PCR tubes
• Agencourt AMPure XP 5 mL (Beckman Coulter Genomics, Cat # A63880))
• DiaMag02 Magnetic Rack (Diagenode, Cat #B04000001)
• Heat block
• Thermocycler
• 2, 10, 20, 200 and 1000 µL pipettes
• Nuclease-free barrier pipette tips
• Microcentrifuge
• 1.5 mL nuclease-free microcentrifuge tubes
• Low melt agarose such as Low Gelling Temperature Agarose with a melt point of 65ºC
(Boston Bioproducts, Cat # P-730)
• 1X TAE buffer
• Clean razor or scalpel
• SYBR Gold (Invitrogen, Cat # S11494)
• UV transilluminator or gel documentation instrument
• Gel electrophoresis apparatus
Equipments required for quality control:
• Fluorescence-based assay for DNA concentration measurement, e.g. the Qubit High Sensitivity assay (Life
Technologies Cat #Q32851)
•Library analysis assay such as Agilent High Sensitivity DNA Kit for BioAnalyzer (Agilent, Cat #5067-4626)
www.diagenode.com |
PAGE 8
DIAGENODE PREMIUM WGBS KIT USER MANUAL
Remarks before starting
Warnings and precautions
• DTT in buffers may precipitate after freezing. If precipitate is seen, vortex buffer for 1-2 minutes or until the
precipitate is in solution. The performance of the buffer is not affected once precipitate is in solution.
• Do not heat the WGBS Adapters above room temperature.
• If starting with a DNA input amount greater than or less than 1 µg, adjust the WGBS Adapter volume to preserve
the insert to adapter ratio.
Starting Material
The Premium WGBS Kit has been optimized using fragmented DNA.
Genomic DNA must be randomly sheared by sonication to generate fragments around 200 bp (see example below). All
the DNA shearing protocols using Diagenode’s sonication devices are available on our website: www.diagenode.com.
Example of shearing using the Bioruptor® Pico for WGBS:
The genomic DNA was diluted in TE buffer to reach a concentration of 100 ng/µL and 100 µL were sheared in a 0.65 mL
Bioruptor® Microtube (Cat. No. C30010011).
The following program was used:
• Cycles: [30 seconds "ON" & 30 seconds "OFF"]
• 13 cycles
1: molecular weight marker
(100 bp)
200 bp >
2: genomic DNA preparation
(not sheared - 300 ng)
3: sheared genomic DNA
(300 ng): average size of 200 bp
Agilent High Sensitivity DNA chip profil of sheared genomic
DNA: smear around 200 bp
Figure 2: DNA shearing using Bioruptor® Pro
The Diagenode’s Premium WGBS Kit has also been validated for ChIP-Bis-sequencing experiments. Thus the starting
material can be some immunoprecipitated DNA after ChIP experiments against histone marks. For ChIP experiments
we recommand the iDeal ChIP-seq kit for Histones (Cat. No. C01010051).
Starting inputs from 5 ng to 1 µg of fragmented genomic DNA or ChIP’d DNA are compatible with this kit.
Reagent Preparation
• Allow Agencourt AMPure XP Beads to come to room temperature and vortex the beads until liquid appears
homogenous before every use.
Innovating Epigenetic Solutions
PAGE 9
Protocol
STEP 1. End Repair
1. For each sample, combine the following reagents on ice in a 8-tube strip or in a 0.2 mL
PCR tube:
_ µL
Nuclease-free Water (white cap)
_ µL
Fragmented or ChIP’d genomic DNA (5 ng - 1 µg)
7 µL
WGBS End Repair Buffer Mix (clear cap)
3 µL
WGBS End Repair Enzyme Mix (clear cap)
50 µL
TOTAL
2. Mix thoroughly by pipetting.
3. Incubate on a thermocycler for 30 minutes at 22°C.
STEP 2. Clean-Up
1. Add 90 µL of AMPure XP Beads to each sample and mix thoroughly by pipetting.
2. Incubate at room temperature for 5 minutes.
3. Place the 8-tube strip on the DiaMag02 at room temperature for 5 minutes or until the supernatant appears
clear.
4. Remove and discard clear supernatant. Take care not to disturb beads. Some liquid may remain in the tube.
5. Add 200 µL of freshly prepared 80% ethanol to each magnetic bead pellet and incubate at room temperature
for 30 seconds. Carefully, remove ethanol by pipette.
6. Repeat step 5, for a total of 2 ethanol washes. Ensure all ethanol has been removed.
7. Remove the tube from the DiaMag02 and let dry at room temperature for 3 minutes.
8. Resuspend dried beads with 17 µL of Resuspension Buffer. Mix thoroughly by pipetting.
Ensure beads are no longer attached to the side of the tube.
9. Incubate resuspended beads at room temperature for 2 minutes.
10. Place tube on DiaMag02 at room temperature for 5 minutes or until the sample appears clear.
11. Transfer 16 µL of clear sample to new tube.
12.If you wish to pause your experiment, the procedure may be safely stopped at this step and samples stored at
-20°C. To restart, thaw frozen samples on ice before proceeding
www.diagenode.com |
PAGE 10
DIAGENODE PREMIUM WGBS KIT USER MANUAL
STEP 3. Adenylation
1. Combine the following reagents in a 0.2 mL tube or 8-tube strip:
16 µL
End-Repaired DNA (from Step 2)
4.5 µL
WGBS Adenylation Mix (red cap)
20.5 µL
TOTAL
2. Mix thoroughly by pipetting.
3. Incubate on a thermocycler for 30 minutes at 37°C.
STEP 4: Adapter Ligation
If starting with less than 1 µg of input DNA, follow the ‘Table 2 below to dilute the methylated adapters. This is
important for retaining the optimal input:adapter ratio.
Table 2. Adapter Dilution
Input DNA
10 ng
100 ng
250 ng
500 ng
WGBS Adapter
1 µL
1 µL
1 µL
2 µL
WGBS Adapter Dilution Buffer
49 µL
9 µL
3 µL
2 µL
Amount per reaction
2.5 µL
2.5 µL
2.5 µL
2.5 µL
1. For each sample, combine the following reagents (in this order) in the PCR tube or 8-tube strip:
20.5 µL 3’
Adenylated DNA (from Step 3)
31.5 µL
WGBS Ligation Mix (purple cap)
2.5 µL
WGBS Adapter (purple cap)
54.5 µL
TOTAL
2. Mix thoroughly by pipetting.
3. Incubate on a thermocycler for 15 minutes at 22°C.
STEP 5. Clean-Up and Size Selection
There are two size selection protocol options to choose from:
•
Option 1 is a completely gel-free protocol that utilizes a magnetic bead based cleanup to size select DNA
insert fragments between 100 – 400 bp. If you would like to avoid gel steps and are interested in an insert size
between 100 – 400 bp, follow option 1.
•
Option 2 utilizes a magnetic bead based clean-up followed by agarose gel size selection and is designed for
users interested in DNA insert fragments >130 bp. The user can size select a specific range of DNA
fragments post-ligation. To follow option 2 go directly to page 13.
Innovating Epigenetic Solutions
PAGE 11
Option 1: Gel-free Size Selection Clean-Up
1. Add 44 µL of AMPure XP Beads to each sample and mix thoroughly by pipetting.
2. Incubate at room temperature for 5 minutes.
3. Place the tube on the DiaMag02 at room temperature for 5 minutes or until the supernatant appears clear.
4. Remove and discard clear supernatant. Take care not to disturb beads.
5. Add 200 µL of freshly prepared 80% ethanol to each sample and incubate plate at room temperature for 30
seconds. Carefully, remove ethanol by pipette.
6. Repeat step 5, for a total of 2 ethanol washes and ensure all ethanol has been removed.
7. Remove the tube from the DiaMag02 and let dry at room temperature for 3 minutes.
NOTE:
Do not over dry the beads.
8. Resuspend dried beads with 52 µL of Resuspension Buffer. Mix thoroughly by pipetting.
Ensure beads are no longer attached to the side of the well.
9. Incubate resuspended beads at room temperature for 2 minutes.
10. Place tube on DiaMag02 at room temperature for 5 minutes or until the sample appears clear.
11. Transfer 50 µL of clear sample to new tube.
12. Add 25 µL of AMPure XP Beads to each sample and mix thoroughly by pipetting.
13. Incubate at room temperature for 5 minutes.
14. Place the tube on the DiaMag02 at room temperature for 5 minutes or until the supernatant appears clear.
15. Do not discard clear sample in this step. Transfer 73 µL of clear sample to a new tube.
16. Add 14 µL of AMPure XP Beads to each sample and mix thoroughly by pipetting
17. Incubate at room temperature for 5 minutes.
18. Place the tube on the DiaMag02 at room temperature for 5 minutes or until the supernatant appears clear.
19. Remove and discard clear supernatant. Take care not to disturb beads.
20.Add 200 µL of freshly prepared 80% ethanol to each sample and incubate at room temperature for 30 seconds.
Carefully, remove ethanol by pipette.
21. Repeat step 20, for a total of 2 ethanol washes and ensure all ethanol has been removed.
22. Remove the tube from the DiaMag02 and let dry at room temperature for 3 minutes
NOTE:
Do not over dry the beads.
23.Resuspend dried beads with 22 µL of Resuspension Buffer. Mix thoroughly by pipetting.
Ensure beads are no longer attached to the side of the tube.
24. Incubate resuspended beads at room temperature for 2 minutes.
www.diagenode.com |
PAGE 12
DIAGENODE PREMIUM WGBS KIT USER MANUAL
25. Place plate on DiaMag02 at room temperature for 5 minutes until the sample appears clear.
26. Transfer 20 µL of clear sample to new tube.
27. If you wish to pause your experiment, the procedure may be safely stopped at this step and samples stored at
-20°C. To restart, always thaw your frozen samples on ice before proceeding.
Innovating Epigenetic Solutions
PAGE 13
Option 2: Clean-Up and Agarose Gel Size Selection
1. Add 55 µL of AMPure XP Beads to each sample and mix thoroughly by pipetting.
2. Incubate at room temperature for 5 minutes.
3. Place the tube on the DiaMag02 at room temperature for 5 minutes or until the supernatant appears clear.
4. Remove and discard clear supernatant. Take care not to disturb beads. Some liquid may remain in tubes.
5. Add 200 µL of freshly prepared 80% ethanol to each magnetic bead pellet and incubate plate at room
temperature for 30 seconds. Carefully, remove ethanol by pipette.
6. Repeat step 5, for a total of 2 ethanol washes and ensure all ethanol has been removed.
7. Remove the plate from the DiaMag02 and let dry at room temperature for 3 minutes.
8. Resuspend dried beads with 52 µL of Resuspension Buffer. Mix thoroughly by pipetting.
Ensure beads are no longer attached to the side of the well.
9. Incubate resuspended beads at room temperature for 2 minutes.
10. Place plate on DiaMag02 for 5 minutes or until the sample appears clear.
11. Transfer 50 µL of clear sample to new tube.
12. Add 55 µL of AMPure XP Beads to each sample and mix thoroughly by pipetting.
13. Incubate at room temperature for 5 minutes.
14. Place the tube on the DiaMag02 at room temperature for 5 minutes or until the supernatant appears clear.
15. Remove and discard clear supernatant. Take care not to disturb beads. Some liquid may remain in tubes.
16. Add 200 µL of freshly prepared 80% ethanol to each magnetic bead pellet and incubate plate at room
temperature for 30 seconds. Carefully, remove ethanol by pipette.
17. Repeat step 16, for a total of 2 ethanol washes and ensure all ethanol has been removed.
18. Remove the tube from the DiaMag02 and let dry at room temperature for 3 minutes.
19. Resuspend dried beads with 22 µL of Resuspension Buffer. Mix thoroughly by pipetting.
Ensure beads are no longer attached to the side of the tube.
Figure 3. MW Ladder Ready-to-Load 100 bp
www.diagenode.com |
PAGE 14
DIAGENODE PREMIUM WGBS KIT USER MANUAL
20. Incubate resuspended beads at room temperature for 2 minutes.
21. Place tube on DiaMag02 for 5 minutes or until the sample appears clear.
22. Transfer 20 µL of clear sample to new tube.
NOTE:
If you wish to pause your experiment, the procedure may be safely stopped at this step and samples stored at
-20°C. To restart, thaw frozen samples on ice before proceeding.
23. Add 6 µL of 6X Gel Loading Dye (orange cap) to each sample.
24. Prepare pre-stained SYBR Gold 2% low melt agarose gel by adding 15 µL of SYBR Gold to every 150 mL of
cooled 1X TAE and agarose gel buffer. Mix and then pour into gel tray. Load the entire sample into one lane of
the gel. If processing more than one sample, it is recommended to run separate gels or leave several empty
wells between samples to avoid cross contamination.
25. Load 4 µL of MW Ladder Ready-to-Load 100 bp (orange cap) into one lane, skipping at least two lanes
between it and your sample.
26. Run the gel with 1X TAE buffer at 100-120V for 60 -120 minutes.
27. Visualize the gel on a UV transilluminator or gel documentation instrument (see figure 2).
28. Use a clean razor or scalpel to cut out a slice of gel from each sample lane corresponding to the 250-300 bp
marker or other reference control. This results in an insert size of130-180 bp (WGBS DNA Adapters add ~120
bp to each fragment). The user may choose other insert sizes when appropriate. Keep in mind that sequence
reads that overlap into the adapter will result in reads that do not map to the reference sequence.
29. Add 400 µL of DNA Binding Buffer to each gel slice containing sample and mix well.
Incubate your sample at room temperature and vortex the sample occasionally until the agarose is completely
melted. For larger gel slices, cut smaller pieces and use 3-5 mL of DNA Binding Buffer.
30. For every 400 µL of binding buffer, add 20 µL of 100% ethanol to each sample and mix well.
31. Transfer the sample to a Clean-Up Spin Column.
32. Centrifuge the Clean-Up Spin Column in a microcentrifuge at 14,000 rpm for 1 minute.
33. Decant the flow through and return the Clean-Up Spin Column into the same collection tube.
34. Repeat steps 31-33 until all of the sample has been processed.
35. Add 700 µL of DNA Wash Buffer to each column.
36. Centrifuge the Clean-Up Spin column in a microcentrifuge at 14,000 rpm for 1 minute.
37. Decant the flow through and return the Clean Up Spin Column into the same collection tube
38. Repeat steps 35 -37 one time.
39. Centrifuge the Clean-Up Spin column in a microcentrifuge at 14,000 rpm for 1 minute to remove any residual
ethanol.
40. Place the Clean-Up Spin Column into a clean 1.5 mL nuclease-free microcentrifuge tube. Add 22 µL of
Column Elution Buffer (yellow cap) to the center of the column. Incubate the column at room temperature for
1 minute.
41. Centrifuge the Clean-Up Spin Column in a microcentrifuge at 14,000 rpm for 1 minute to elute the clean DNA.
If you wish to pause your experiment, the procedure may be safely stopped at this step and samples stored at
-20°C. To restart, thaw frozen samples on ice before proceeding.
Innovating Epigenetic Solutions
PAGE 15
STEP 6. Bisulfite conversion
1. Before the first use add 4 mL of 100 % ethanol to 1 mL BS Wash Buffer concentrate. The BS Conversion
Reagent supplied within this kit is a solid mixture and must be prepared prior to first use.
2. Add 790 μL of BS Solubilization Buffer (black cap) and 300 μL of BS Dilution Buffer (black cap) to the tube of
BS Conversion Reagent.
3. Mix at room temperature with frequent vortexing or shaking for 10 minutes.
4. Add 160 μL of BS Reaction Buffer (black cap) and mix an additional 1 minute.
NOTE:
It is normal to see trace amounts of undissolved reagent in the BS Conversion Reagent. Each tube of BS
Conversion Reagent is designed for 8 separate DNA treatments including an excess.
STORAGE: The BS Conversion Reagent is light sensitive, so minimize its exposure to light. For best results, the BS
Conversion Reagent should be used immediately following preparation. If not used immediately, the
BS Conversion Reagent solution can be stored overnight at room temperature, one week at 4°C, or up
to one month at -20°C. Stored BS Conversion Reagent solution must be warmed to 37°C, then vortexed
prior to use.
5. Add 117 µL of BS Conversion reagent to 20 µL of sample from step 5, mix, centrifuge briefly and incubate in a
thermocycler as indicated in Table 3.
Table 3
Cycle Step
Temperature
Time
Cycles
Denaturation
95°C
1 minute
20
Conversion
60°C
10 minutes
Hold
4°C
∞
6. Place BS Spin columns into the provided BS Collection Tubes.
7. Add 600 μL of BS Binding Buffer into a BS Spin Column.
8. Load bisulfite-converted libraries into the BS Spin Columns containing the BS Binding Buffer. Close the cap
and mix by inverting the column several times.
9. Centrifuge at full speed (›10,000 x g) for 30 seconds. Discard the flow-through.
10. Add 100 μL of BS Wash Buffer to each column. Centrifuge at full speed for 30 seconds.
11. Add 200 μL of BS Desulphonation Buffer to each column and let stand at room temperature (20-30°C) for
exactly 30 minutes. After the incubation, centrifuge at full speed for 30 seconds.
12. Add 200 μL of BS Wash Buffer to each column. Centrifuge at full speed for 30 seconds. Add another 200 μL of
BS Wash Buffer and centrifuge for an additional 30 seconds.
13. Place each column into a 1.5 mL tube. Add 17 μL of BS Elution Buffer (white cap) directly to the center of the
column matrix and wait for 2 minutes. Centrifuge for 30 seconds at full speed to elute the DNA.
14. Elute one more time by transferring the eluate to the column’s membrane. Wait 2 minutes, then centrifuge for
30 seconds at full speed.
NOTE:
Proceed with the PCR amplification reaction quickly.
www.diagenode.com |
PAGE 16
DIAGENODE PREMIUM WGBS KIT USER MANUAL
STEP 7: PCR Amplification
The table 4 can serve as a guideline in deciding the number of PCR cycles.
Table 4
Input DNA
5-10 ng
100 ng
250 ng
500 ng
1 µg
Fragmented DNA
18 cycles
14-17 cycles
14-17 cycles
11-14 cycles
9-11 cycles
1. For each sample, combine the following reagents (in this order) in the PCR tube or 8-tube strip:
_ µL
Bisulfite Converted Product (from Step 6)
_ µL
Nuclease free Water (white cap)
25 µL
MethylTaq Plus 2X Master Mix (green cap)
2 µL
WGBS Primer Mix (green cap)
50 µL
TOTAL
2. Mix thoroughly by pipetting.
3. PCR Cycles
10 min
95°C
30 sec
98°C
30 sec
65°C
45 sec
72°C
7 min
72°C
Repeat 9 - 18 cycles**
**PCR cycles will vary depending on the amount of starting material and quality of your sample. Further optimization
may be necessary. Always use the least number of cycles possible.
4. Add 55 µL of AMPure XP Beads to each sample and mix thoroughly by pipetting.
5. Incubate at room temperature for 5 minutes.
6. Place the tube on the DiaMag02 at room temperature for 5 minutes or until the supernatant appears clear.
7. Remove and discard clear supernatant. Take care not to disturb beads. Some liquid may remain in tubes.
8. Add 200 µL of freshly prepared 80% ethanol to each magnetic bead pellet and incubate plate at room
temperature for 30 seconds. Carefully, remove ethanol by pipette.
9. Repeat step 8, for a total of 2 ethanol washes and ensure all ethanol has been removed.
10. Remove the tube from the DiaMag02 and let dry at room temperature for 3 minutes.
11. Resuspend dried beads with 52 µL of Resuspension Buffer. Mix thoroughly by pipetting.
Ensure beads are no longer attached to the side of the tube.
12. Incubate resuspended beads at room temperature for 2 minutes.
13. Place tube on DiaMag02 for 5 minutes or until the sample appears clear.
14. Transfer 50 µL of clear sample to new tube.
Innovating Epigenetic Solutions
PAGE 17
15. Add 55 µL of AMPure XP Beads to each sample and mix thoroughly by pipetting.
16. Incubate at room temperature for 5 minutes.
17. Place the tube on the DiaMag02 at room temperature for 5 minutes or until the supernatant appears clear.
18. Remove and discard clear supernatant. Take care not to disturb beads. Some liquid may remain in tubes.
19. Add 200 µL of freshly prepared 80% ethanol to each magnetic bead pellet and incubate at room temperature
for 30 seconds. Carefully, remove ethanol by pipette.
20. Repeat step 19, for a total of 2 ethanol washes and ensure all ethanol has been removed.
21. Remove the tube from the DiaMag02 and let dry at room temperature for 3 minutes.
22. Resuspend dried beads with 11.5 µL of Resuspension Buffer. Mix thoroughly by pipetting. Ensure beads are no
longer attached to the side of the well.
23. Incubate resuspended beads at room temperature for 2 minutes.
24. Place tube on DiaMag02 for 5 minutes or until the sample appears clear.
25. Transfer 10 µL of clear sample to a new tube.
26. Examine your library with a fluorometer and check the size using an Agilent Bioanalyzer or 2% agarose gel
(See Examples in Figure 4).
www.diagenode.com |
PAGE 18
DIAGENODE PREMIUM WGBS KIT USER MANUAL
Figure 4. Bioanalyzer profile of different libraries obtained with the Premium WGBS Kit.
A. 50 ng of fragmented genomic DNA was used. A total of 18 cycles of PCR were performed after bisulfite conversion.
1 µL of the resulting library was diluted 5-fold and run on an Agilent High Sensitivity DNA chip.
B. 5 ng of fragmented genomic DNA was used. A total of 18 cycles of PCR were performed after bisulfite conversion.
1 µL of the resulting library was run on an Agilent High Sensitivity DNA chip.
C. 50 ng of ChIP’ed DNA was used. The Chromatin Immunoprecipitation was performed against the H3K27me3 histone
mark, using the Diagenode’s iDeal ChIP-seq Kit for Histones (Cat #C01010050 and C01010051). A total of 18 cycles
of PCR were performed after bisulfite conversion. 1 µL of the resulting library was diluted 2.5-fold and run on an
Agilent High Sensitivity DNA chip.
Innovating Epigenetic Solutions
PAGE 19
FOR RESEARCH USE ONLY.
Not intended for any animal or human therapeutic or diagnostic use.
© 2015 Diagenode SA. All rights reserved. No part of this publication may be reproduced, transmitted, transcribed,
stored in retrieval systems, or translated into any language or computer language, in any form or by any means:
electronic, mechanical, magnetic, optical, chemical, manual, or otherwise, without prior written permission from
Diagenode SA (hereinafter, "Diagenode”) . The information in this guide is subject to change without notice. Diagenode
and/or its affiliates reserve the right to change products and services at any time to incorporate the latest technological
developments. Although this guide has been prepared with every precaution to ensure accuracy, Diagenode and/or its
affiliates assume no liability for any errors or omissions, nor for any damages resulting from the application or use of this
information. Diagenode welcomes customer input on corrections and suggestions for improvement.
NOTICE TO PURCHASER
LIMITED LICENSE
The information provided herein is owned by Diagenode and/or its affiliates. Subject to the terms and conditions that govern
your use of such products and information, Diagenode and/or its affiliates grant you a nonexclusive, nontransferable, nonsublicensable license to use such products and information only in accordance with the manuals and written instructions
provided by Diagenode and/or its affiliates. You understand and agree that except as expressly set forth in the terms and
conditions governing your use of such products, that no right or license to any patent or other intellectual property owned
or licensable by Diagenode and/or its affiliates is conveyed or implied by providing these products. In particular, no right
or license is conveyed or implied to use these products in combination with any product not provided or licensed to you
by Diagenode and/or its affiliates for such use.
Limited Use Label License: Research Use Only The purchase of this product conveys to the purchaser the limited, nontransferable right to use the product only to perform internal research for the sole benefit of the purchaser. No right
to resell this product or any of its components is conveyed expressly, by implication, or by estoppel. This product is for
internal research purposes only and is not for use in commercial applications of any kind, including, without limitation,
quality control and commercial services such as reporting the results of purchaser's activities for a fee or other form of
consideration. For information on obtaining additional rights, please contact [email protected].
TRADEMARKS
The trademarks mentioned herein are the property of Diagenode or their respective owners. Bioruptor is a registered
trademark of Diagenode SA.
Bioanalyzer is a trademark of Agilent Technologies, Inc. Agencourt and AMPure are registered trademarks of Beckman
Coulter, Inc. Microcon is a registered trademark of Millipore Inc. Illumina is a registered trademark of Illumina Inc. Ion
Torrent and Personal Genome Machine are trademarks of Life Technologies Corporation. Qubit is a registered trademark
of Life Technologies Corporation.
www.diagenode.com |