1
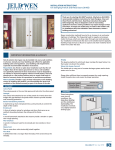
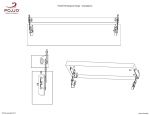
Hinge Replacement & Hinge and Hardware Adjustment Guide
Hinge Replacement & Hinge and Hardware
Adjustment Guide
for Andersen® Frenchwood® Hinged Patio Doors Manufactured Before
November 2005
For ease of installation and continued enjoyment of your Andersen® product, please read and follow this Instruction
Guide completely. You may direct any questions about this or other products to your local Andersen dealer, found
in the Yellow Pages under “Windows”, or call Andersen WindowCare® service center at 1-888-888-7020 Monday
through Friday, 7 a.m. to 7 p.m. Central Time and Saturday, 8 a.m. to 4 p.m. Central Time. Assembly and
installation of Andersen products is the sole responsibility of the architect, building owner, contractor and/or
consumer and Andersen has no responsibility in this regard. Thank you for choosing Andersen.
Use of ladders and/or scaffolding and
working at elevated levels may be
hazardous. Follow equipment
manufacturer's instructions for safe
operation. Use extreme caution when
working around window and door
openings. Falling from opening may
result in personal injury or death.
Parts Included
(1) Instruction Guide
(1) Hinge
(2) #10 x 1" Screws
(2) #10 x 3" Screws
(4) #10 x 1-3/4" Screws
Improper use of hand or
power tools could result in
personal injury and/or
product damage. Follow
equipment manufacturer's
instructions for safe
operation. Always wear
safety glasses.
Weight of window and door
unit(s) and accessories will vary.
Use a reasonable number of
people with sufficient strength to
lift, carry, and install window and
door unit(s) and accessories.
Always use appropriate lifting
techniques.
Position Fixing Screw
Horizontal Adjusting Screw
Position Fixing Screw
Tools & Supplies
• Safety Glasses
• 5/32" Hex Wrench (Included with Unit)
• Flat Blade Screwdriver
• Phillips Screwdriver
Vertical Adjustment Screw
Hinge
#10 x 1" Screws
#10 x 1-3/4" Screws
• Hinge Replacement section starts on Page 2.
• Hinge and Hardware Adjustment section starts
on Page 3.
#10 x 3" Screws
“Andersen” and “Andersen WindowCare” are registered trademarks of Andersen Corporation. All other marks where denoted are marks of Andersen Corporation.
© 1998-2005 Andersen Corporation. All rights reserved.
1
Instruction Guide 0005105
Revised 10/06/05
Hinge Replacement & Hinge and Hardware Adjustment Guide
Hinge Replacement
for Andersen® Frenchwood® Hinged Patio Doors
1. Remove Hinge
A W
Remove and replace only one Hinge at a time.
Removal of more than one Hinge may result in
personal injury, product, and/or property damage.
• Remove screws from Hinge being replaced using a
Phillips screwdriver.
• Remove Hinge.
Door Panel
Frame
Interior View
2. Apply New Hinge To Frame
• Apply replacement Hinge to Frame and fasten using
two #10 x 1" Screws through top and bottom holes
and two #10 x 3" Screws through center holes.
1" Screws
A W
• Steel fasteners will corrode when used with ACQ
Pressure Treated Lumber.
• Obtain and use the appropriate size stainless steel
fastener, as called out in this installation guide to
fasten unit to any rough opening made from ACQ
Pressure Treated Lumber.
Door Panel
3" Screws
Frame
A W
• Failure to use stainless steel fasteners may result
in fastener corrosion causing product damage.
Door Panel
Frame
Interior View
2
Hinge Replacement & Hinge and Hardware Adjustment Guide
3. Apply New Hinge To Door
• Apply replacement Hinge to Door Panel and fasten
using four #10 x 1-3/4" Screws.
• Proceed to Hinge and Hardware Adjustment, below, for
operation check and hinge adjustment instructions.
A W
• Repeat Steps 1-3 for all hinges being replaced.
1-3/4" Screws
Door Panel
Frame
Interior View
Hinge and Hardware Adjustment
for Andersen® Frenchwood® Hinged Patio Doors
1. Operational Check
• Open and close door several times.
• Check clearance between Panel and Frame. Panel
should not rub Frame or Sill. Panel should be square
to Frame and Sill.
• Check for smooth Hinge operation. Panel should ride
equally on all Hinges.
• The Hinge used on the Andersen® Frenchwood® Hinged
Patio Door can be adjusted to overcome operational
problems caused by normal building settlement.
2. Tighten Position Fixing and Horizontal Adjusting Screws
Position
Fixing
Screws
A W
Some adjustment problems may be corrected by
simply tightening Hinge Position Fixing Screws.
Interior Views
• Tighten the two Position Fixing Screws on all hinges by
turning clockwise until snug.
A W
• Check tightness of Horizontal Adjusting Screws on all
Hinges by turning counterclockwise until snug.
Horizontal
Adjusting
Screw
3
Hinge Replacement & Hinge and Hardware Adjustment Guide
3. Identify Hinges for Horizontal Adjustment
Horizontal adjustments are made by using one of
the hinges as a pivot point. Pivot point should be
horizontal part of the door that is most centered
in opening.
• If panel is square in frame, then all hinges will be
adjusted equally to center door in opening (see chart).
Pivot
+1
Pivot
-1/2
+1/2
+1
-1/2
-1
Pivot
+1/2
Pivot
Square Panel
• If panel is not square, determine at which hinge panel
is most horizontally centered in opening. This point
will be used as a pivot and other hinges will be
adjusted in proportional distances to make panel
square and center in frame (see chart). Determine
from chart the number of rotations each hinge
requires to stay proportional.
Turn clockwise to narrow gap between door and
frame, clockwise = (-).
Square Panel Square Panel
+1
-1
-1
+1
Pivot
Pivot
-1
+1
-1
+1
-1
+1
Square Panel
Center Panel
Center Panel
Square Panel
Turn counterclockwise to increase gap between door
and frame, counterclockwise = (+).
Square Panel
-1
Frenchwood® Hinged Door 6'8" or 6'11" Adjustments
Interior Views
Pivot
-1
Pivot
+1
-1
+1/3
-2/3
-1/3
+2/3
-1
+2/3
-1/3
-2/3
+1/3
-1
-1
Pivot
-1
Pivot
+1
Square Panel
Square Panel
Square Panel
Square Panel
Center Panel
+1/2
+1
-1/2
-1
+1
Pivot
+1/2
Pivot
-1/2
+1
-1/2
Pivot
+1/2
Pivot
+1
-1
-1/2
+1
+1/2
+1
Square Panel
Square Panel
Square Panel
Square Panel
Frenchwood Hinged Door 8'0" Adjustments
4
Center Panel
Interior Views
Hinge Replacement & Hinge and Hardware Adjustment Guide
AW
Make all horizontal adjustments first.
Horizontal adjustments correct most
problems. Vertical adjustments are rarely
needed.
AW
7. Determine Required Adjustments
• Horizontal adjustments move panel side to side
to square and center panel in opening.
• Vertical adjustments move panel up and down to
center panel in opening.
Vertical Adjustments
Horizontal Adjustments
Interior Views
8. Prepare Hinges for Horizontal Adjustment
Position Fixing Screws
Interior View
9. Adjust Gap Between Panel and Frame ((+) or (-) in Chart)
A W
Make all adjustments in proper proportion
and direction in relation to other hinges.
Refer to charts on opposite page.
Horizontal Adjusting Screw
A W
• Loosen Position Fixing Screws on each hinge by
turning counterclockwise 1/2 turn.
A W
DO NOT remove hinge Position Fixing
Screw(s). Removal of these screws can cause
door to drop or fall causing personal injury,
product, and/or property damage.
• Turn Horizontal Adjusting Screw
counterclockwise to push (increase gap) door
away from frame.
• Turn Horizontal Adjusting Screw clockwise to
pull (decrease gap) door closer to frame.
Decrease Gap
Increase Gap
Interior Views
10. Tighten All Hinges
Horizontal
Adjusting
Screw
• Tighten Position Fixing Screws on all hinges by
turning them clockwise until snug.
A W
• Check tightness of all Horizontal Adjusting
Screws by turning them counterclockwise until
snug.
Position
Fixing
Screws
Interior View
5
Hinge Replacement & Hinge and Hardware Adjustment Guide
11. Vertical Adjustment
AW
• Adjust hinges with door slightly open. Door
should be supported by all hinges to make sure of
maximum hinge performance.
• Adjust bottom hinge first and work upward.
• Turn bottom hinge Vertical Adjustment Screw clockwise
1/2 turn and then continue turning until door is centered
vertically in opening.
Vertical Adjustment Screw
• Turn next hinge Vertical Adjustment Screw clockwise until
door moves slightly, then turn counterclockwise 1/4" turn.
Repeat for remaining hinges working upward.
12. Blocker Adjustment
Interior View
Latch
Receiver
• Make a pencil mark where top of Latch Bolt strikes
Latch Receiver.
• Loosen Blocker Adjustment Screw.
Blocker
• Slide Blocker up or down so Lower Surface of Blocker
lines up with pencil mark.
• Tighten Blocker Adjustment Screw.
Pencil mark,
showing top
of Latch
Lower
Surface
• Close and lock both panels.
Latch Bolt
Blocker
Adjustment
Screw
13. Tab Adjustments
• Adjust tab in Latch Receiver, Hook Bolt
Receivers, and Flush Bolt Receivers in or
out to achieve adequate weatherstrip
compression using a flat blade screwdriver.
Tab
• Adjust tab on Hook Bolt Receivers if Hook
Bolts do not stay engaged.
Tabs
Tab
Tab
Flush Bolt Receiver
Head AP/Sill PA
Tab
(Astragal)
Tab
Tab
Tab
Tabs
Flush Bolt Receiver
Head PA/Sill AP
(Astragal)
Latch Receiver/Trim
AP/PA
(Astragal)
6
Latch Receiver/Trim
AR/AL
(Jamb)
Hook Bolt Receiver
AL/AR
(Jamb)
Hook Bolt Receiver
AP/PA
(Astragal)