1
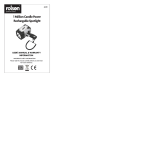
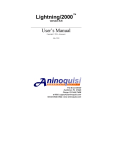
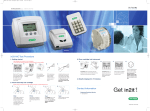
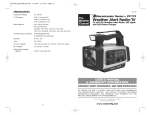
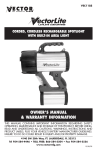
VEC191_Manual_041806_R
4/18/06
6:16 PM
Page 8
SPECIFICATIONS
VEC191
Spotlight:
12 volt, H4, dual-filament, quartz halogen 100 watt bulb
Batteries:
Two maintenance-free, sealed lead acid,
6 volt, 6.0 Ah
AC Adapter:
500mA, 12 volt
External DC Adapters:
DC 12V input,
120 VAC, 500 mA
Radio Bands:
AM (520 ~ 1710 kHz)
Stormtracker Series
by
Weather Alert Radio-Flashlight
AM/FM Weather Alert Radio, Flashlight
and Cell Phone Charger
FM (88 ~ 108 MHz)
Weather: 162.400, 162.425, 162.450
162.475, 162.500,162.525 and 162.550 MHz
Speaker:
8 ohms, 1W
Operating Voltage:
12 volts DC
USER’S MANUAL
& WARRANTY INFORMATION
IMPORTANT SAFETY INFORMATION, SAVE THESE INSTRUCTIONS
TO REDUCE THE RISK OF INJURY, USER MUST READ AND UNDERSTAND
THIS INSTRUCTIONAL MANUAL. THIS MANUAL CONTAINS IMPORTANT
INFORMATION REGARDING THE OPERATION AND WARRANTY OF THIS
PRODUCT. PLEASE RETAIN FOR FUTURE REFERENCE.
4140 S.W. 30th Ave., Ft. Lauderdale, FL 33312
Toll Free: (866) 584-5504
8
www.vectormfg.com
VEC191_Manual_041806_R
4/18/06
6:16 PM
Page ii
IMPORTANT SAFETY INFORMATION
ONE YEAR LIMITED WARRANTY PROGRAM
This limited warranty program is the only one that applies to this product, and it sets forth all the
responsibilities of Vector Products, Inc., regarding this product. There is no other warranty, other than those
described herein. Any implied warranty of merchantability or fitness for a particular purpose on this product
is limited in duration to the duration of this warranty.
This Vector Products, Inc. product is warranted, to the original purchaser only, to be free of defects in
materials and workmanship for one year from the date of purchase without additional charge. The
warranty does not extend to subsequent purchasers or users. Manufacturer will not be responsible for any
amount of damage in excess of the retail purchase price of the product under any circumstances. Incidental
and consequential damages are specifically excluded from coverage under this warranty.
This product is not intended for commercial use. This warranty does not apply to damage to units from
misuse or incorrect installation/connection. Misuse includes wiring or connecting to improper polarity
power sources.
RETURN/REPAIR POLICY: Defective products may be returned to manufacturer. Any defective product that
is returned to manufacturer within 30 days of the date of purchase will be replaced free of charge. If such
a product is returned more than 30 days but less than one year from the purchase date, manufacturer will
repair the unit or, at its option, replace it, free of charge.
If the unit is repaired, new or reconditioned replacement parts may be used, at manufacturer’s option. A
unit may be replaced with a new or reconditioned unit of the same or comparable design. The repaired or
replaced unit will then be warranted under the terms of the remainder of the warranty period. The customer
is responsible for the shipping charges on all returned items. During the warranty period, manufacturer will
be responsible for the return shipping charges to the customer in the United States.
LIMITATIONS: This warranty does not cover accessories, such as charging adapters, bulbs, fuses and
batteries, damage or defects resulting from normal wear and tear (including chips, scratches, abrasions,
discoloration or fading due to usage or exposure to sunlight), accidents, damage during shipping to our
service facility, alterations, unauthorized use or repair, neglect, misuse, abuse, failure to follow instructions
for care and maintenance, fire, flood and Acts of God.
If your problem is not covered by this warranty, call our Technical Support Department at (954) 584-4446
or toll free at (866) 584-5504 for general repair information and charges if applicable. You may also
contact us through our website at www.vectormfg.com.
STATE LAW RIGHTS: This warranty gives you specific legal rights. Some states do not allow limitations on
how long an implied warranty lasts or the exclusion or limitation of incidental or consequential damages,
so the exclusions or limitations stated herein may not apply. This warranty gives the purchaser specific legal
rights; other rights, which vary from state to state, may apply.
TO REQUEST WARRANTY SERVICE FOR THIS PRODUCT: Contact Technical Support by telephone, fax or
mail (see below). We suggest that you keep the original packaging in case you need to ship the unit. When
returning a product, include your name, address, phone number, dated sales receipt (or copy) and a
description of the reason for return and product serial number. After repairing or replacing the unit, we will
make every effort to return it to you within four weeks.
WARRANTY ACTIVATION: Please complete Warranty Activation Card and mail to Vector Products, Inc..
Enter “VEC191” as Model and “Storm Tracker™ ” as Product Type. All Vector products must be registered
within 30 days of purchase to activate this warranty. Mail the completed registration form, along with a
copy of the original sales receipt, to:
ATTN.: CUSTOMER SERVICE
4140 SW 30th Ave., Ft. Lauderdale, FL 33312
• TOLL FREE: (866 ) 584-5504 • FAX: (954) 584-5556 •
WARRANTY IS NON-TRANSFERABLE.
BD041806
© 2006 VECTOR PRODUCTS, INC.
MADE IN CHINA
WARNINGS
• Contains non-spillable sealed lead acid batteries. They must be recycled or disposed
of properly.
• DO NOT dispose of batteries in fire, as this may result in an explosion. DO NOT open
battery or short circuit, this may cause the battery to leak or get hot causing
personal injury. Any disposal questions call toll-free (877) 288-7722.
CAUTIONS
1. All halogen lights give off heat. Never place the light face-down on any surface when lit.
2. Lens gets very hot when spotlight is operating. Do not touch lens while operating.
3. Do not look directly into spotlight or shine the light into another person’s eyes.
4. Replace bulb with type indicated in specifications or a 12 volt H4 quartz halogen 100 watt bulb.
5. Do not immerse this spotlight in water. This unit is not waterproof – it is water-resistant.
6. Keep combustibles away from spotlight lens – extreme heat can cause fires.
7. Keep sharp objects away from lens – it is glass and can break.
8. Do not drop or throw spotlight. It contains glass and a sealed lead acid battery.
9. Dispose of unusable batteries in a responsible manner. See “Battery Disposal.”
10. Do not crush, cut, pull or expose charging adapter cords to extreme heat.
11. Position charging adapter cords so that they do not become entangled or become a safety hazard.
12. Keep charging adapter cords away from sharp edges.
13. Do not substitute power cords or charging adapters. Only charge with supplied AC and DC
charging adapters. Charging adapters for this unit supply 12 volts DC.
14. Always charge in a dry location.
15. Plug in the charging adapter at the spotlight first, then plug into the charging source.
16. Do not overcharge:
– AC recharge up to 35 hours maximum.
– DC recharge up to 6 hours maximum.
17. After recharge, disconnect charging adapter and wait 5 minutes before use.
18. Do not open unit casing. There are no user serviceable parts other than spotlight bulb and batteries.
Contact manufacturer for service toll-free at (866) 584-5504.
19. Keep children away from spotlight. This is not a toy!
Read This User’s Manual Before Using This Unit.
SAVE THESE INSTRUCTIONS
This device complies with part 15 of the FCC rules. Operation is subject to the following two
conditions: (1) this device may not cause harmful interference, and (2) this device must accept any
interference received, including interference that may cause undesired operation.
This equipment has been tested and found to comply with the limits for a Class B digital device,
pursuant to part 15 of the FCC Rules. These limits are designed to provide reasonable protection
against harmful interference in a residential installation. This equipment generates, uses and can
radiate radio frequency energy and, if not installed and used in accordance with the instructions, may
cause harmful interference to radio communications. However, there is no guarantee that interference
will not occur in a particular installation. If equipment does cause harmful interference to radio or
television reception, which can be determined by turning the equipment off and on, the user is
encouraged to try to correct the interference by one or more of the following measures:
• Reorient or relocate the receiving antenna.
• Increase the separation between equipment and receiver.
• Connect the equipment into an outlet on a circuit different from that to which the receiver is connected.
• Consult the dealer or an experienced radio/TV technician for help.
VEC191_Manual_041806_R
4/18/06
6:16 PM
Page iv
TABLE OF CONTENTS
Introduction . . . . . . . . . . . . . . . . . . . . .
Features . . . . . . . . . . . . . . . . . . . . . . .
Main Fuse . . . . . . . . . . . . . . . . . . . . . .
Charging the Battery . . . . . . . . . . . . . .
120 Volt AC Charging/Recharging . .
12 Volt DC Charging/Recharging . . .
Operating Instructions . . . . . . . . . . . . . .
Powering the Unit . . . . . . . . . . . . . . .
Using the Spotlight . . . . . . . . . . . . . .
Using the 3-LED Auxiliary Light . . . . .
Using the AM/FM Radio . . . . . . . . . .
Using the Weather/Emergency Radio .
Using the 12 Volt DC Accessory Outlet
Using the Adjustable Workstand . . . .
Care and Maintenance . . . . . . . . . . . . .
Replacement Parts . . . . . . . . . . . . . .
Bulb Replacement . . . . . . . . . . . . . . .
Battery Replacement . . . . . . . . . . . . .
Safe Battery Disposal . . . . . . . . . . . .
DC Plug Fuse Replacement . . . . . . . .
Troubleshooting . . . . . . . . . . . . . . . . . .
Specifications . . . . . . . . . . . . . . . . . . . .
.
.
.
.
.
.
.
.
.
.
.
.
.
.
.
.
.
.
.
.
.
.
.
.
.
.
.
.
.
.
.
.
.
.
.
.
.
.
.
.
.
.
.
.
.
.
.
.
.
.
.
.
.
.
.
.
.
.
.
.
.
.
.
.
.
.
.
.
.
.
.
.
.
.
.
.
.
.
.
.
.
.
.
.
.
.
.
.
.
.
.
.
.
.
.
.
.
.
.
.
.
.
.
.
.
.
.
.
.
.
.
.
.
.
.
.
.
.
.
.
.
.
.
.
.
.
.
.
.
.
.
.
.
.
.
.
.
.
.
.
.
.
.
.
.
.
.
.
.
.
.
.
.
.
.
.
.
.
.
.
.
.
.
.
.
.
.
.
.
.
.
.
.
.
.
.
.
.
.
.
.
.
.
.
.
.
.
.
.
.
.
.
.
.
.
.
.
.
.
.
.
.
.
.
.
.
.
.
.
.
.
.
.
.
.
.
.
.
.
.
.
.
.
.
.
.
.
.
.
.
.
.
.
.
.
.
.
.
.
.
.
.
.
.
.
.
.
.
.
.
.
.
.
.
.
.
.
.
.
.
.
.
.
.
.
.
.
.
.
.
.
.
.
.
.
.
.
.
.
.
.
.
.
.
.
.
.
.
.
.
.
.
.
.
.
.
.
.
.
.
.
.
.
.
.
.
.
.
.
.
.
.
.
.
.
.
.
.
.
.
.
.
.
.
.
.
.
.
.
.
.
.
.
.
.
.
.
.
.
.
.
.
.
.
.
.
.
.
.
.
.
.
.
.
.
.
.
.
.
.
.
.
.
.
.
.
.
.
.
.
.
.
.
.
.
.
.
.
.
.
.
.
.
.
.
.
.
.
.
.
.
.
.
.
.
.
.
.
.
.
.
.
.
.
.
.
.
.
.
.
.
.
.
.
.
.
.
.
.
.
.
.
.
.
.
.
.
.
.
.
.
.
.
.
.
.
.
.
.
.
.
.
.
.
.
.
.
.
.
.
.
.
.
.
.
.
.
.
.
.
.
.
.
.
.
.
.
.
.
.
.
.
.
.
.
.
.
.
.
.
.
.
.
.
.
.
.
.
.
.
.
.
.
.
.
.
.
.
.
.
.
.
.
.
.
.
.
.
.
.
.
.
.
.
.
.
.
.
.
.
.
.
.
.
.
.
.
.
.
.
.
.
.
.
.
.
.
.
.
.
.
.
.
.
.
.
.
.
.
.
.
.
.
.
.
.
.
.
.
.
.
.
.
.
.
.
.
.
.
.
.
.
.
.
.
.
.
.
.
.
.
.
.
.
.
.
.
.
.
.
.
.
.
.
.
.
.
.
.
.
.
.
.
.
.
.
.
.
.
.
.
.
.
.
.
.
.
.
.
.
.
.
.
.
.
.
.
.
.
.
.
.
.
.
.
.
.
.
.
.
.
.
.
.
.
.
.
.
.
.
.
.
.
.
.
.
.
.
.
.
1
1
2
3
3
3
4
4
4
4
4
4
5
5
5
5
6
6
7
7
7
8
INTRODUCTION
Congratulations on purchasing the Storm Tracker™ 10,000,000 Power
Series™ All Weather AM/FM Radio/Spotlight. Please read this manual
carefully before use to ensure optimum performance and avoid damage to the unit
itself or power sources from which it operates.
FEATURES
•
•
•
•
•
•
•
•
•
•
•
•
Powerful, pre-focused, replaceable quartz halogen bulb
High and low main beam spotlight settings
Long-life, 3-LED, ultra bright auxiliary light
All Weather/AM/FM radio with automatic NOAA, National Weather Service
and emergency alerts, and Homeland Security warning system
Headphone jack for privacy
12 volt DC accessory outlet
Replaceable, sealed lead acid battery
LED charging indicator
Includes 120 volt AC charging adapter and fuse-protected 12 volt DC
power/charging adapter
Removable carry strap and easy grip handle
Protective rubber safety guard (bezel) around lens
Hands-free adjustable workstand with position locks
1
VEC191_Manual_041806_R
4/18/06
6:17 PM
LED AUXILIARY LIGHT
ON/OFF PUSHBUTTON
Page 2
LED CHARGING
INDICATOR
EASY GRIP HANDLE
3-LED AUXILIARY
LIGHT
12 VOLT DC
ACCESSORY OUTLET
RUBBER
BEZEL
BATTERY
COMPARTMENT
COVER LOCK
QUARTZ
HALOGEN
SPOTLIGHT
(ONE ON EACH SIDE)
BATTERY
COMPARTMENT
ON/OFF HIGH BEAM
SPOTLIGHT SWITCH
ON/OFF LOW BEAM
SPOTLIGHT SWITCH
CHARGING THE BATTERY
AC RECHARGE PORT
WORKSTAND
POSITION LOCK
KNOBS
The unit is delivered in a partially charged state. It must be fully charged prior to first
use by either the 120 volt AC method (preferred) or the 12 volt DC method.
After initial charging, the unit can be simultaneously recharged and operated (using
the 12 Volt DC method only). Make sure the 12 volt DC power source can supply
minimum 15 amperes of current if the Spotlight is to be operated while the batteries
are being charged.
After charging, disconnect the Adapter from the external power source, then
disconnect the Adapter from the AC Recharge Port or 12 Volt DC Accessory Outlet.
12 VOLT DC
ADAPTER
ADJUSTABLE
WORKSTAND
120 VOLT AC
ADAPTER
(ONE ON EACH SIDE)
Radio Control Panel Detail
120 Volt AC Charging/Recharging
BUILT-IN RADIO
ANTENNA
ALERT ON/OFF
PUSHBUTTON
ALARM LOCK
ON/OFF
PUSHBUTTON
RADIO POWER
INDICATOR
RADIO
TUNER DIAL
CHANNEL
INDICATOR
12 Volt DC Charging/Recharging
SPEAKER
ON/OFF AM/FM
WEATHER/EMERGENCY
Plug the supplied 120 Volt AC Adapter’s plug into a
standard North American outlet. Connect the
adapter’s barrel connector to the AC Recharge Port
located on the top/rear of the grip handle. The LED
will light to indicate that the unit is charging. Time
required to initially charge the unit using this method
is approximately 30 to 35 hours. The LED Charging
Indicator will blink when the unit is fully charged. The
Auxiliary Light and radio can be operated during
120 Volt AC charging. The Spotlight cannot be
used while recharging using this method.
VOLUME KNOB
HEADPHONE JACK
RADIO BAND SELECTOR SWITCH
MAIN FUSE
The fuse configuration may vary based on the unit purchased.
Some Spotlights are delivered with the main fuse taped to the bottom
of the unit. It must be inserted as indicated in the
compartment shown in Figure 1 prior to operation.
Other units are shipped with the fuse installed inside the Battery
Compartment (as shown in Figure 2). Units with this configuration
feature a convenient storage shelf for a spare fuse.
If you suspect this main fuse is blown, check it and, if necessary,
replace it with a new 20 amp spade fuse.
FIGURE 1
SPARE
FUSE
STORAGE
The DC recharging method will NOT recharge the
unit as effectively as the 120 volt AC method. The 12
volt DC recharging procedure is recommended
only when it is necessary, since frequent use of the
12 volt DC recharging procedure may shorten the
battery system’s life.
1. Insert the gold-tipped end plug of the 12 Volt DC
Power/Charging Adapter plug into the vehicle’s
12 volt DC accessory outlet.
2. Insert the silver-tipped end plug into the 12 Volt DC Accessory Outlet on the back
of the handle of the unit.
3. Charging time using this method is approximately 5 to 6 hours.
4. When charging is complete, remove the power cord and return it to the storage
compartment.
Note: When using a vehicle’s 12 volt DC accessory outlet as a charging/power
FUSE
source, be aware that some vehicles require the ignition be turned on to power
the accessory outlet.
FIGURE 2
2
3
VEC191_Manual_041806_R
4/18/06
6:17 PM
Page 4
CAUTION
Before charging/recharging the unit’s battery, make sure all power
switches are in the OFF position.
OPERATING INSTRUCTIONS
• Using the Radio Tuner Dial, select the desired weather station.
• Press the Alert ON/OFF pushbutton located on the top of the unit (see Figure 1).
• The green Alert ON/OFF LED will light, indicating this function is operating. The
weather station will remain muted until a weather alert is detected and then an
alarm siren will sound briefly.
Powering the Unit
The Storm Tracker™ can be operated using either the internal rechargeable batteries
(for cordless use) or the 12 Volt DC Power/Charging Adapter. See the “Charging the
Battery” section before using the unit in cordless mode.
Using the Spotlight
The quartz halogen Spotlight is operated by the two
switches located on the side of the unit. The top
ON/OFF Switch controls the high beam (100 watt)
function; the bottom ON/OFF Switch controls the low
beam (approx. 50 watt) function.
The Spotlight will run for 60 minutes on low beam setting and 35-40 minutes on high
beam setting on a single charge.
Using the 3-LED Auxiliary Light
The 3-LED Auxiliary Light is operated by the LED Auxiliary Light ON/OFF Pushbutton
located on the top of the grip handle. The LED Auxiliary Light will run for 250 hours
on a single charge.
ALERT ON/OFF LED
ALARM/LOCK LED
ALERT ON/OFF
PUSHBUTTON
ALARM/LOCK
PUSHBUTTON
Alarm Function
The Alarm function is only available when “Weather” on the Radio Band Selector
Switch and “Alert” mode have been selected
• Using the Radio Tuner Dial, select the desired weather station.
• Press the Alert ON/OFF pushbutton and Alarm/Lock pushbutton located on the
top of the unit (see page 2).
• The green Alert ON/OFF LED and green Alarm/Lock LED will light, indicating this
function is operating. The weather station will remain muted until a weather alert
is detected and then an alarm siren will sound continuously until the Alert
ON/OFF or Alarm/Lock pushbutton is pushed again.
Using the 12 Volt DC Accessory Outlet
Using the AM/FM Radio
The Radio Band Selector Switch (see “Radio Control Panel Detail” on page 2)
controls the radio’s ON/OFF function and allows the user to select AM, FM or
“Weather” frequency.
• After sliding the Radio Band Selector Switch to desired frequency, rotate the Radio
Tuner Dial to search for a station.
• Adjust volume using the Volume Knob.
• Insert the headphones (not supplied) into the Headphone Jack if private listening
is desired.
Using the Weather/Emergency Radio
The Storm Tracker™ 10,000,000 Power Series™ All Weather AM/FM
Radio/Spotlight receives all of the National Oceanic and Atmospheric
Administration (NOAA) weather channels, plus National Weather Service
warnings, watches and forecasts, and other non-weather related emergency
warning system broadcasts.
• Slide the Radio Band Selector Switch to “Weather.”
• Rotate the Radio Tuner Dial to search for a station.
• Adjust volume using the Volume Control Knob.
• Insert headphones into the Headphone jack if private listening is desired.
Alert Function
The Alert function is only available when “Weather” has been selected on the Radio
Band Selector Switch.
4
The 12 volt DC accessory outlet powers any DC appliance that does not exceed
5 amps. Flip up the accessory outlet cover and insert the appliance’s DC plug. Close
the cover after use.
Using the Adjustable Workstand
Set the hands-free adjustable workstand to the desired position; then turn the knobs
on either side of the unit to lock in position.
CARE AND MAINTENANCE
All batteries lose charge with time. AC recharge is recommended after each use or
every two months when not in frequent use. Use the supplied 120 Volt AC Charging
Adapter and charge for the recommended time.
If the unit gets dirty, gently clean the outer surfaces of the Spotlight with a soft cloth
moistened with a mild solution of water and detergent. Periodically inspect the
condition of charging adapters, connectors, and cords. Replace any components
that may have become worn or broken.
Replacement Parts
The quartz halogen bulb and sealed lead acid batteries are available through Vector
Manufacturing. A comparable (12 volt H4 100 watt) bulb may be substituted. These
can also be purchased from popular automotive parts suppliers nationwide. Contact
Vector Manufacturing’s Technical Support Department for replacement parts
(including replacement adapters and cords) and any additional information that you
may need. They may be reached at (954) 584-4446 or toll free at (866) 584-5504.
5
VEC191_Manual_041806_R
4/18/06
6:17 PM
Page 6
Safe Battery Disposal
WARNING
To reduce the risk of shocks or burns and avoid damage to the unit,
make sure all power switches are in the OFF position, all adapters are
unplugged and the unit has been allowed to cool down before
performing any cleaning or parts replacement.
Bulb Replacement
1. Remove the rubber bezel on the rim of the Spotlight to reveal eight small Phillips
screws in the retaining ring.
2. Using a screwdriver, remove (counterclockwise) the screws and set them aside.
3. Lift off the retaining ring, glass lens and rubber “O” ring and set them aside.
4. Carefully remove the reflector and bulb assembly.
5. Disconnect the bulb from the guarding wires and replace the burned out bulb
with one of the same type listed in the Specifications section of this manual.
6. Reassemble the guarding wires, put back the reflector, rubber “O” ring and
the lens.
7. Replace rubber bezel by sliding forward to the front of the spotlight.
8. Turn one of the Spotlight’s ON/OFF switches to the ON position to ensure
proper operation.
Contains a maintenance-free, sealed, non-spillable, lead acid battery,
which must be disposed of properly. Recycling is required, contact your
local authority for information. Failure to comply with local, state and
federal regulations can result in fines, or imprisonment. For more
information on recycling this battery, call toll-free (877) 288-7722.
DC Plug Fuse Replacement
The fuse in the DC plug protects the charging circuit of the 12 Volt DC Power/
Charging Adapter. If AC recharging works, but the DC charging does not, then the
fuse may be opened (blown).
To replace the fuse:
1. Unscrew the end cap of the DC plug (counterclockwise).
2. Remove spring center contact and fuse.
3. Check fuse with a continuity checker.
4. If blown, locate replacement fuse with same type and rating.
5. Replace the fuse, spring, contact and end cap.
6. Screw end cap clockwise until it is finger tight – DO NOT OVER-TIGHTEN.
7. Test for proper operation of the 12 Volt DC Power/Charging Adapter.
TROUBLESHOOTING
Battery Replacement
1. Release the battery compartment cover locks on either side of the unit and
remove the cover.
2. Pull out the (two) batteries.
3. Disconnect the terminals and replace the batteries with the same type listed in
the Specifications section of this manual.
4. Replace the battery compartment cover and engage the locks.
5. Turn one of the Spotlight’s ON/OFF switches to the ON position to ensure
proper operation.
6
No Charge Indicator Light When Charging
1. Check connection to the AC Recharge Port
2. Check connection to AC adapter
3. Confirm there is a functioning AC or DC current
Spotlight Will Not Operate
1. When charging using the 120 volt AC method, the Spotlight will not operate.
Be sure all adapters are disconnected before Spotlight usage.
2. If you suspect the bulb is blown, check the filament. If the filament is coiled and
unbroken, the bulb is not blown. If filament is blown, replace bulb as directed
on page 6.
Unit Will Not Operate
1. If the unit does not operate, the battery may be completely discharged. Charge
the unit following the directions on page 3.
2. If the unit does not operate after recharging as directed:
• Replace the two 6 volt, 6.0 Ah batteries as directed on page 6.
• Check the main fuse and, if necessary, replace it with a new 20 amp spade
fuse (see page 2 for illustration).
7