1
9
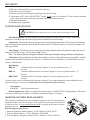
CALIBRATION PROCEDURE
Do not use inert gases to zero the monitor. This will cause premature failure of the sensor.
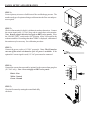
CO Zero Adjustment
To zero the instrument, follow the steps below. Zero calibration gas should be used to properly “zero” the instrument and assure that a valid calibration is achieved. If zero adjustment cannot be made as indicated, sensor replacement
may be necessary. After each monitor adjustment outlined in the following steps, allow time for the changes to
stabilize.
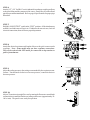
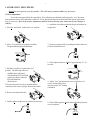
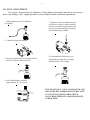
6. Attach the clear tubing with male plug to the monitor air
sample inlet.
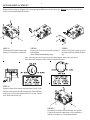
1. Place the “on/off/test” switch to the “on” position.
2. Allow 30 seconds for the readout to stabilize.
The green indicator light will illuminate.
7. Open gas regulator fully by turning the knob at least two
(2) turns counterclockwise.
8. Allow digital readout to stabilize approximately 15 - 30
seconds.
3. Hold the “on/off/test” switch in the “test”
position. The following will occur:
• Audible alarm will sound
• Green indicator LED will flash
• Amber low battery indicator
LED will illuminate
• Red lamp on
This test ensures the circuitry is operable and the
continuity to the sensor is proper. Release the switch.
9. Adjust "zero" pot adjustment screw (clockwise to increase, counterclockwise to
decrease) until a "00" reading
is obtained.
4. Remove air sample inlet tube.
5. Install regulator on the zero air cylinder reference gas.
10. Turn off the regulator and disconnect the tubing from the
zero air regulator.