1
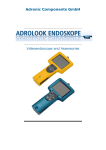
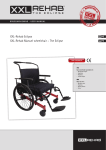
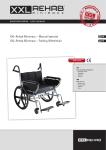
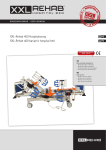
BRUGSANVISNING · USER MANUAL
XXL-Rehab Minimaxx – Push motor
XXL-Rehab Minimaxx – Push motor
MAX 325 KG
Kan med fordel anvendes til:
- Bariatriske brugere.
-Plejeboliger.
-Hospitaler.
-Hjemmet.
Ideal use for:
- Bariatric users.
- Nursing homes.
-Hospitals.
-Home.
BRUGSANVISNING · BRUGSANVISNING · BRUGSANVISNING · BRUGSANVISNING · BRUGSANVISNING ·
Brugsanvisning for XXL-Rehab Minimaxx – Push motor
ADVARSEL
ADVARSEL
– Dette produkt må ikke anvendes uden grundig instruktion fra uddannet
personale.
– Bruges produktet til personer, der vejer mere end den maksimale brugervægt,
er der risiko for at beskadige produktet.
– XXL-Rehab påtager sig intet ansvar for eventuelle skader på produktet eller
personskader forårsaget af forkert installation, forkert montering eller forkert
anvendelse af dette produkt.
– Hvis dele er beskadiget eller mangler, kontakt XXL-Rehab med det samme.
Brug IKKE erstatnings reservedele.
– XXL-Rehab kan ikke holdes ansvarlig for fejl eller ulykker, der opstår efter
reparationer uden skriftlig tilladelse fra XXL-Rehab.
For at sikre korrekt brug af XXL-Rehab Minimaxx Push motor skal
brugsanvisningen læses grundigt før brug. Der skal rettes opmærksomhed
specielt mod advarslerne mærket med .
Desuden må stolen kun betjenes af uddannet personale eller af personer,
der har fået instruktion i dens brug, da der ellers er fare for, at brugeren kan
komme til skade.
ANVENDELSE
XXL-Rehab Minimaxx Push motor er en hjælpemotor til manuel kørestolen
XXL-Rehab Minimaxx. På de følgende sider findes brugervejledningen til
hjælpemotoren, som efterfølgende bliver omtalt som PUSH motor.
Komponentoversigt
På side 3 er en oversigt over de delkomponenter, der følger med den leveret
PUSH motor.
Monteringsvejledning
På siderne 4-7 findes en gennemgang af hvordan PUSH motor monteres på
XXL-Rehab Minimaxx.
Kørevejledning
Side 8 er en vejledning i, hvordan man kommer godt i gang med at køre
PUSH motor.
Ladevejledning
På side 9 slutter brugervejledningen med en instruktion i, hvordan PUSH
motors batteri lades op.
XXL-Rehab Minimaxx – Push motor
Scan koden og få flere
produktinformationer.
2
· BRUGSANVISNING · BRUGSANVISNING · BRUGSANVISNING · BRUGSANVISNING · BRUGSANVISNING
Komponentoversigt
Viser samtlige dele, der er leveret med PUSH motor
FJERNBETJENING
KØRESTOLSBESLAG
PUSH MOTOR
1.Fjernbetjening
2. Fjernbetjening konsol
3.Fingerskrue
4. 2 styk beslag bolte
5. Øvre håndtag beslag
6. 3 styk spacers
7. Speeder
8. Nedre håndtag beslag
9. 2 styk navbøsninger
10. 2 styk kontramøtrikker til bøsninger
11. 2 styk teleskoprør
12. 2 styk løse fingerskruer
13. 2 styk beskyttelseshætter
14. Ledning til fjernbetjening
15.Batterikonsol
16.Løftestrop
17.Skubbestativ
18. 2 styk profildæk
4
FJERNBETJENING
2
3
5
6
1
8
7
10
12
14
20
BATTERILADER
15
11
16
11
17
PUSH MOTOR
19
18
BATTERI
12
13
KØRESTOLSBESLAG
11
10
XXL-Rehab Minimaxx – Push motor
9
9
3
BRUGSANVISNING · BRUGSANVISNING · BRUGSANVISNING · BRUGSANVISNING · BRUGSANVISNING ·
Monteringsvejledning
Monteringsvejledning gennemgår, hvordan PUSH motor bliver korrekt
monteret på XXL-Rehab Minimaxx kørestol.
FIG. 1
Inden PUSH motor benyttes, er det vigtig, at batteriet er ladet op.
Se evt. LADEVEJLEDNING på side 9.
FIG. 1
Start med at montere batteriet (19) på PUSH motor batterikonsollen (15).
Når batteriet er skubbet helt i bund på konsollen er det låst fast.
19
FIG. 2
Før PUSH motor monteres på XXL-Rehab Minimaxx stellet, anbefales det, at
låse parkeringsbremserne på XXL-Rehab Minimaxx.
15
FIG. 3
De to medfølgende navbøsninger (9) og kontramøtrikker (10 ) monteres
på XXL-Rehab Minimaxx. Bøsningerne skrues i det forreste gevind hul på
XXL-Rehab Minimaxx højre og venstre stel. Kontramøtrikkerne monteres på
indersiden af stellene.
FIG. 2
FIG. 3
XXL-Rehab Minimaxx – Push motor
VENSTRE STEL
4
10
9
· BRUGSANVISNING · BRUGSANVISNING · BRUGSANVISNING · BRUGSANVISNING · BRUGSANVISNING
Monteringsvejledning
FIG. 4
FIG. 4
De medfølgende teleskoprør (11) med løse fingerskruer (12) skubbes ind
over skubbestativets tværrør (17) på PUSH motor. Beskyttelseshætterne (13)
fjernes først. PUSH motor placeres under XXL-Rehab Minimaxx, så enderne
af teleskoprørene er ud for navbøsningerne.
12
11
FIG. 5
12
Skub teleskoprørene ud til hver side indtil enderne hviler i navbøsningerne.
Lås teleskoprørene fast på skubbestativet med låse fingerskruerne. PUSH
motoren er nu monteret på XXL-Rehab Minimaxx stellene.
17
FIG. 6
PUSH motor fjernbetjeningen monteres på XXL-Rehab Minimaxx højre skubbehåndtag (23). En passende spacer (6) skubbes ind over skubbehåndtagets
enderør. Øvre (5) og nedre (8) håndtagbeslag spændes omkring spaceren
med de to medfølgende beslag bolte (4).
FIG. 5
FIG. 6
6
5
8
4
XXL-Rehab Minimaxx – Push motor
23
5
BRUGSANVISNING · BRUGSANVISNING · BRUGSANVISNING · BRUGSANVISNING · BRUGSANVISNING ·
Monteringsvejledning
FIG. 7
FIG. 9
PUSH motor speeder (7) skrues på det nedre håndtag beslag med fingerskruen (3). Fjernbetjening konsollen (2) skubbes ind over det øvre håndtag
beslag. Fjernbetjeningen (1) klikkes på konsollen. Stik på speeder og
fjernbetjening kobles sammen.
PUSH motor fjernbetjeningen kobles til PUSH motor. Spiralledningen (14)
på PUSH motor strækkes og kobles sammen med PUSH motor stikket på
fjernbetjeningen. Fjernbetjening og PUSH motor er nu klar til brug.
FIG. 8
Fjernbetjeningen er samlet. Med højre hånd på skubbehåndtaget, er
det muligt at nå speederen og samtidig have et godt greb i XXL-Rehab
Minimaxx.
FIG. 7
FIG. 9
7
3
STIK TIL
FJERNBETJENING
2
1
STIK TIL
PUSH MOTOR
STIK TIL
SPEEDER
STIK TIL
PUSH MOTOR
XXL-Rehab Minimaxx – Push motor
FIG. 8
6
STIK TIL
PUSH MOTOR
· BRUGSANVISNING · BRUGSANVISNING · BRUGSANVISNING · BRUGSANVISNING · BRUGSANVISNING
Monteringsvejledning
FIG. 10
FIG. 10
PUSH motor kan løftes fra køreunderlaget, når den ikke skal bruges. En
løftestropkrog (21) er monteret på XXL-Rehab Minimaxx venstre skubbehåndtag (24).
24
FIG. 11
Løftestroppen (16) er monteret på PUSH motor. Længden af stroppen indstilles, så hjulene på PUSH motor er løftet ca. 2-3 cm. over køreunderlaget,
når løftestroppen hænger på løftekrogen.
21
FIG. 12
XXL-Rehab Minimaxx parkeringsbremser løsnes og løftestroppen tages af
løftestropkrogen - nu er PUSH motoren klar til brug.
For at få den den bedste start med PUSH motor anbefales det, at
læse KØREVEJLEDNINGEN på side 8.
FIG. 11
16
XXL-Rehab Minimaxx – Push motor
FIG. 12
7
BRUGSANVISNING · BRUGSANVISNING · BRUGSANVISNING · BRUGSANVISNING · BRUGSANVISNING ·
Kørevejledning
Det anbefales, at den første køretur med PUSH motor foregår et sted med
god plads, jævnt køreunderlag og uden passager i XXL-Rehab Minimaxx
kørestolen.
FIG. 1
FIG. 1
Inden PUSH motor batteriet tages ud af batteriladeren, bør det checkes, at
batteriet er ladet helt op. Hvis ladelampen på batteriladeren lyser grøn, er
batteriet ladet op. Lyser lampen derimod rød, er opladningen stadig i gang
og køreturen skal måske overvejes.
Sænk PUSH motor ned på køreunderlaget og placer løftestroppen, så den
ikke har mulighed for at blive viklet ind i hjulene.
FIG. 2
På PUSH motor fjernbetjeningen tændes strømmen på ON/OFF knappen (1).
Fjernbetjeningens batteriindikator (2) viser med en streg af grønt lys hvor
meget strøm, der er tilbage på batteriet. Med knapperne (3) og (4) vælges
om PUSH motor skal køre frem eller tilbage. Blå lamper (5) og (6) indikerer
valgt kørselsretning.
BATTERILADER
FIG. 2
1
På fjernbetjeningens fartregulator (7) indstilles PUSH motors tophastighed.
Vælg skildpadde for lav tophastighed og hare for høj tophastighed. Det
anbefales at starte på skildpadde.
6
4
Løft forsigtigt op i fjernbetjeningsspeederen og PUSH motor begynder at
skubbe kørestolen. Slippes speederen stopper stolen med det samme. Ønskes
mere trækkraft skubbes fartregulatoren over på hare. Ned af bakke bremses
stolen ved at slække lidt på speederen. På meget stejle bakker bør kørestolen
køres baglæns ned af bakken.
ADVARSEL
XXL-Rehab Minimaxx – Push motor
For at undgå uheld skal man huske:
– at slukke ON/OFF knappen, ved længere kørepauser. Derved undgåes
fejlbetjening hvis kørestolen forlades.
– at låse kørestolens parkeringsbremser, når kørestolen forlades.
8
7
2
5
3
· BRUGSANVISNING · BRUGSANVISNING · BRUGSANVISNING · BRUGSANVISNING · BRUGSANVISNING
Ladevejledning
Det anbefales, at PUSH motor sluttes til batteriladeren efter kørsel, så batteriet bliver ladet helt op, og er klar til næste tur.
FIG. 1
Batteriladeren passer til et almindeligt 230V vægstik og ladestikket på PUSH
motor batteriet.
TIL LADESTIK
FIG. 2
Ladelampen på batteriladeren lyser rødt så længe opladningen er igang.
Når batteriet er ladet fuldt op, lyser ladelampen grønt. Vær opmærksom på,
at ladelampen også lyser grønt, hvis laderen får 230V, men er taget ud af
batteriet.
BATTERILADER
TIL 230V VÆGSTIK
Ved normal brug af PUSH motor tager opladningen af batteriet 6-8 timer.
Er batteriet kørt næsten tomt, tager opladningen op til 12 timer.
ADVARSEL
For at undgå uheld og strømsvigt skal man huske:
- at PUSH motor kan køre imens den bliver opladet.
- at PUSH motor skal lades helt op både før og efter en længere
periode, hvor den ikke benyttes.
- at PUSH motor bruger strøm når fjernbetjeningen står tændt.
FIG. 1
BATTERI
LADESTIK
PRODUCENT
XXL-Rehab
Fuglebækvej 1D
DK-2770 Kastrup
Danmark
Tlf.: +45 70 25 25 22
Fax: +45 70 25 25 44
www.xxl-rehab.com
07/2014/JP
XXL-Rehab Minimaxx – Push motor
FIG. 2
9
USER MANUAL · USER MANUAL · USER MANUAL · USER MANUAL · USER MANUAL · USER MANUAL ·
Instructions for XXL-Rehab Minimaxx – Push motor
CAUTION
CAUTION
– This product should not be used without proper instruction from a healthcare
professional.
– Using the product for individuals weighing more than the maximum weightbearing capacity may pose a risk for damaging the product.
– XXL-Rehab assumes no responsibility for any damage or injury caused by
improper installation, assembly or use of this product.
– If components are damaged or missing, contact XXL-Rehab immediately.
Do NOT use substitute parts.
– XXL-Rehab cannot be held liable for faults or accidents occurring after
repairs by service staff without written authorisation from XXL-Rehab.
XXL-Rehab Minimaxx – Push motor
To ensure proper use of the XXL-Rehab Minimaxx Push motor, please
read these instructions thoroughly before using the product. In doing so, pay
particular attention to the warning notes marked with .
Also remember that in order to prevent the risk of injury to the user, the
wheelchair may be operated only by trained caregivers or aides or by individuals who have been instructed in its proper use.
10
USE
XXL-Rehab Minimaxx Push Motor is a PUSH motor which is designed for
XXL-Rehab Minimaxx manual wheelchair. On the following pages you will
find the user manual for the PUSH motor, referred to as PUSH motor.
Component overview
On page 11 there is an overview of the components that have been delivered with PUSH motor.
Assembly instructions
On page 12-15 there is an assembly instruction as to how PUSH motor is
mounted on XXL-Rehab Minimaxx.
Driving instructions
On page 16 there is an instruction as how to drive PUSH motor.
Charging instructions
On page 17 there is an instruction as how to charge the battery of PUSH
motor.
· USER MANUAL · USER MANUAL · USER MANUAL · USER MANUAL · USER MANUAL · USER MANUAL
Component overview
Showing all parts that have been delivered with PUSH motor
REMOTE CONTROL
WHEELCHAIR BRACKET
PUSH MOTOR
1. Remote control
2. Remote console
3.Thumbscrew
4. 2 pcs hardware bolts
5. Upper handle bracket
6. 3 pcs spacers
7.Speeder
8. Lower handle bracket
9. 2 pcs hub bushing
10. 2 pcs locknuts for bush
11. 2 pcs splice
12. 2 pcs thumbscrew
13. 2 pcs protection caps
14. Cord for remote control
15. Battery console
16. Lifting strap
17.Pole
18. Profile tires
4
REMOTE CONTROL
2
3
5
6
1
8
7
10
12
14
20
BATTERYCHARGER
15
11
16
11
17
PUSH MOTOR
19
18
BATTERY
12
13
WHEELCHAIR BRACKET
11
10
XXL-Rehab Minimaxx – Push motor
9
9
11
USER MANUAL · USER MANUAL · USER MANUAL · USER MANUAL · USER MANUAL · USER MANUAL ·
Assembly instructions
Assembly instructions will demonstrate how PUSH motor is mounted correctly on XXL-Rehab Minimaxx.
FIG. 1
Before use of PUSH motor it is important that the battery is charged. See
CHARGING INSTRUCTIONS on page 17.
FIG. 1
Start by mounting the battery (19) on the PUSH motor battery console (15).
When the battery is pushed to the bottom of the console it is locked.
19
FIG. 2
Before PUSH motor is mounted on the XXL-Rehab Minimaxx frame we
recommend to lock the parking brakes on XXL-Rehab Minimaxx.
15
FIG. 3
Mount the two hub bushes (9) and the locknuts (10) on XXL-Rehab
Minimaxx. Screw the hub bushes in the front threaded hole on XXL-Rehab
Minimaxx right and left frame. Mount the locknuts on the inside of the
frames.
FIG. 2
FIG. 3
XXL-Rehab Minimaxx – Push motor
LEFT FRAME
12
10
9
· USER MANUAL · USER MANUAL · USER MANUAL · USER MANUAL · USER MANUAL · USER MANUAL
Assembly instructions
FIG. 4
FIG. 4
First remove the protection caps (13). Then slide the splices (11) with
thumbscrew (12) onto the pole (17). PUSH motor is placed underneath XXLRehab Minimaxx so the ends of the splices are in front of the hub bushes.
12
FIG. 5
11
Slide the splices out to each side until the ends rest in the hub bushes.
Lock the splices onto the pole with the thumbscrews. PUSH motor is now
mounted on the XXL-Rehab Minimaxx frames.
12
FIG. 6
17
Mount the PUSH motor remote control on XXL-Rehab Minimaxx right push
handle (23). Push a suitable spacer into the push handle tailpipe. Upper and
lower handle bracket is tightened around the spacer with the two supplied
mounting bolts (4).
FIG. 5
FIG. 6
6
5
8
4
XXL-Rehab Minimaxx – Push motor
23
13
USER MANUAL · USER MANUAL · USER MANUAL · USER MANUAL · USER MANUAL · USER MANUAL ·
Assembly instructions
FIG. 7
FIG. 9
Screw PUSH motor speeder on the lower handle bracket with the thumbscrew (3). Push the remote console (2) over the upper handle bracket. Click
the remote control (1) on the console. Connect the connectors on the
accelerator and remote control.
Connect PUSH motor remote control to PUSH motor. Stretch the spiral
cord and connect it to the PUSH motor cord of the remote control. Remote
control and PUSH motor is now ready for use.
FIG. 8
The remote control is now assembled. With the right hand on the push
handle it is possible to reach the speeder and at the same time have a
good handle in XXL-Rehab Minimaxx.
FIG. 7
FIG. 9
7
3
CONNECTOR TO
REMOTE CONTROL
2
1
CONNECTOR TO
PUSH MOTOR
CONNECTOR TO
SPEEDER
CONNECTOR TO
PUSH MOTOR
XXL-Rehab Minimaxx – Push motor
FIG. 8
14
CONNECTOR TO
PUSH MOTOR
· USER MANUAL · USER MANUAL · USER MANUAL · USER MANUAL · USER MANUAL · USER MANUAL
Assembly instructions
FIG. 10
FIG. 10
PUSH motor can be lifted from the driving surface when not needed.
A lifting strap hook (21) is mounted on XXL-Rehab Minimaxx left push
handle (24).
24
FIG. 11
The lifting strap (16) is mounted on PUSH motor. Adjust the length of the
strap so the wheels on PUSH motor are lifted approx. 2-3 cm over the
driving surface when the lifting strap hangs on the lifting strap hook.
21
FIG. 12
Release XXL-Rehab Minimaxx parking brakes and take the lifting strap of
the lifting strap hook. Now PUSH motor is ready for use.
For the best possible start we recommend to read DRIVING
INSTRUCTIONS on page 16.
FIG. 11
16
XXL-Rehab Minimaxx – Push motor
FIG. 12
15
USER MANUAL · USER MANUAL · USER MANUAL · USER MANUAL · USER MANUAL · USER MANUAL ·
Driving instructions
We recommend that the first ride with PUSH motor takes place in a location with plenty of room, smooth running surface and no passenger in the
wheelchair.
FIG. 1
FIG. 1
Check that the PUSH motor battery is fully charged before removing from
the battery charger. If the charge lamp on the charger turns green, the
battery is fully charged. However, if the charge lamp is red, charging is
still underway and the drive may need to be considered. See CHARGING
INSTRUCTIONS on page 17.
Lower the PUSH motor onto the driving surface and position the lifting
strap so it cannot be entangled in the wheels.
FIG. 2
Turn on the power on the PUSH motor remote control by using the ON/
OFF button (1). The battery indicator of the remote control (2) shows with a
dash of green light how much power is left on the battery. With the buttons
(3) and (4) you determine whether PUSH motor should drive forward or
backward. The blue lamps (5) and (6) indicate the selected direction.
BATTERYCHARGER
FIG. 2
1
Adjust the PUSH motor top speed on the speed regulator of the remote
control (7). Select “turtle” for low speed and “hare“ for high speed. We
recommend starting with “turtle”.
Carefully lift up the remote control speeder and PUSH motor begins to
push the wheelchair. When you let go of the speeder the wheelchair stops
instantly. Wanting more speed push the speed regulator to “hare”. Going
downhill let slightly go of the speed regulator to reduce speed. On very
steep slopes the wheelchair must be driven backwards down the hill.
6
4
7
2
5
3
WARNING
XXL-Rehab Minimaxx – Push motor
To avoid accidents please remember:
– To turn off the ON/OFF button during longer run breaks. This avoids
errors if the wheelchair is vacated.
– To lock the parking brakes of the wheelchair when the wheelchair is
vacated.
16
· USER MANUAL · USER MANUAL · USER MANUAL · USER MANUAL · USER MANUAL · USER MANUAL
Charging instructions
We recommend that PUSH motor is being charged after each drive so the
battery is fully charged and ready for the next drive.
FIG. 1
The battery charger fits into a standard 230V wall outlet and the charging
connector on the battery.
FOR CHARGING
CONNECTOR
FIG. 2
The light on the charge lamp is red while charging is in progress. When the
battery is fully charged the charge lamp is green. Be aware that the charge
lamp is also green if the charger gets 230V but is taken out of the battery.
With normal use of PUSH motor charging the battery will take 6-8 hours.
If the battery is run almost empty, charging will take up to 12 hours.
BATTERYCHARGER
FOR 230V
WALL OUTLET
WARNING
To avoid accidents and power failures, please remember:
- PUSH motor can drive while being charged.
- PUSH motor must be fully charged both before and after a longer
period of not being used.
- PUSH motor use power when the remote control is ON.
FIG. 1
CHARGING
CONNECTOR
BATTERY
MANUFACTURER
XXL-Rehab
Fuglebækvej 1D
DK-2770 Kastrup
Denmark
Tel.: +45 70 25 25 22
Fax: +45 70 25 25 44
www.xxl-rehab.com
07/2014/JP
XXL-Rehab Minimaxx – Push motor
FIG. 2
17
Strongly engineered and functionally designed exclusively for bariatric users!
18
XXL-Rehab Minimaxx
XXL-Rehab Minimaxx
Push Motor
XXL-Rehab Manual
Wheelchair - The Eclipse
XXL-Rehab Manual
Wheelchair - The Eclipse Tilt
XXL-Rehab
HD Electric Wheelchair
XXL-Rehab Wheelchair Cushions
XXL-Rehab Shower Bench
XXL-Rehab
Bedside commode
XXL-Rehab
Shower Commode
XXL-Rehab
Shower Commode Wheeler
XXL-Rehab
Shower Commode Rise N Recline
XXL-Rehab
Shower Commode Tilt
XXL-Rehab Barton Transferstol
XXL-Rehab Patient/Dinner chair
XXL-Rehab Rollator King
XXL-Rehab Rollator Support
XXL-Rehab Stand Tall
XXL-Rehab Canes
XXL-Rehab Multifunktional Scale
XXL-Rehab Lift and Slings
XXL-Rehab 400 bariatric hospital bed
XXL-Rehab Home Care Bed
XXL-Rehab Floor raiser
XXL-Rehab
Comfort Foam Mattress
XXL-Rehab
Low Air Loss mattress
XXL-Rehab
Alternating mattress
XXL-Rehab Bariatric walking frame
XXL-Rehab Bariatric suit
19
mauryathome.dk
07-2014 XXL-Rehab Minimaxx – Manuel kørestol / XXL-Rehab Minimaxx - Folding Wheelchair
BRUGSANVISNING · USER MANUAL
XXL-Rehab · Fuglebækvej 1D · DK-2770 Kastrup · Denmark
Telephone: +45 7025 2522 · Fax: +45 7025 2544
[email protected] · www.xxl-rehab.com