1
User Manual
pDoc Signer
March 16, 2015
Copyright © 1995 - 2015 Topaz Systems Inc. All rights reserved.
For Topaz Systems, Inc. trademarks, visit www.topazsystems.com/legal.
www.topazsystems.com
pDoc Signer User Manual
Table of Contents
1.0 – Introduction ..................................................................................................................... 4
1.1 – pDoc Forms Designer ............................................................................................................................4
1.2 – pDoc Signer ..............................................................................................................................................4
2.0 – Installing/Uninstalling pDoc Signer .............................................................................. 5
2.1 – Before You Begin.....................................................................................................................................5
2.2 – Installing the Signature Capture Device ............................................................................................5
2.3 – Installing pDoc Signer ............................................................................................................................5
2.4 – Uninstalling pDoc Signer.......................................................................................................................6
2.5 – Silent Installation of pDoc Signer........................................................................................................6
3.0 – Features of pDoc Signer ................................................................................................ 6
3.1 – Basic Operations and PDF File Manipulation ..................................................................................6
3.1.1 – Opening PDF Documents............................................................................................................................................................. 6
3.1.2 – Saving PDF Documents ............................................................................................................................................................... 7
3.1.3 – Closing PDF Documents .............................................................................................................................................................. 7
3.1.4 – Exiting pDoc Signer ...................................................................................................................................................................... 7
3.1.5 – About ........................................................................................................................................................................................... 7
3.2 – Filling in Form Fields ..............................................................................................................................7
3.2.1 – Electronic Signature Box .............................................................................................................................................................. 8
3.2.2 – Text Box ....................................................................................................................................................................................... 8
3.2.3 – Radio Button ................................................................................................................................................................................ 8
3.2.4 – Check Box.................................................................................................................................................................................... 8
3.2.5 – List Box ........................................................................................................................................................................................ 8
3.2.6 – Combo Box .................................................................................................................................................................................. 8
3.2.7 – View Properties of Form Fields..................................................................................................................................................... 9
3.2.8 – Setting the Font Options ............................................................................................................................................................... 9
3.3 – Electronic Signatures .......................................................................................................................... 10
3.3.1 – Insert and Sign ........................................................................................................................................................................... 10
3.3.2 – Signature Capture Process ........................................................................................................................................................ 11
3.3.3 – Validation of Signatures ............................................................................................................................................................. 11
3.3.4 – View Signed and Unsigned Signature Fields .............................................................................................................................. 13
3.3.5 – Viewing Previous Versions of a Signed Document ..................................................................................................................... 14
3.3.6 – Specifying Signature Field Options ............................................................................................................................................. 16
3.3.7 – Signature Capture Options ......................................................................................................................................................... 16
3.3.8 – Signature Information ................................................................................................................................................................. 19
3.3.9 – Automatic Configuration of Certificate ........................................................................................................................................ 20
3.3.10 – Certificate Selection ................................................................................................................................................................. 20
2
www.topazsystems.com
pDoc Signer User Manual
Table of Contents
3.4 – Sticky Note Comments........................................................................................................................ 21
3.4.1 – Adding Sticky Note Comments ................................................................................................................................................... 21
3.4.2 – Viewing Sticky Note Comments.................................................................................................................................................. 22
3.5 – Text Comments ..................................................................................................................................... 23
3.5.1 – Adding Text Comments .............................................................................................................................................................. 23
3.5.2 – Updating Text Comments ........................................................................................................................................................... 24
3.6 – Pencil Tool .............................................................................................................................................. 24
3.6.1 – Draw Pencil Line ........................................................................................................................................................................ 25
3.6.2 – Erase Pencil Line ....................................................................................................................................................................... 25
3.6.3 – Settings For Using the Pencil Tool ............................................................................................................................................. 26
3.7 - Attachments ............................................................................................................................................ 26
3.7.1 – Adding Attachments ................................................................................................................................................................... 27
3.7.2 – Delete Attachments .................................................................................................................................................................... 27
3.7.3 – View Attachments ...................................................................................................................................................................... 27
3.8 – Securing Documents ........................................................................................................................... 28
3.8.1 – Opening Secured Documents .................................................................................................................................................... 30
3.9 – Printing and Print Preview ................................................................................................................. 30
3.10 – Merging and Splitting of PDF Documents ................................................................................... 31
3.10.1 – Extract Pages ........................................................................................................................................................................... 31
3.10.2 – Delete Pages ........................................................................................................................................................................... 32
3.10.3 – Insert Pages ............................................................................................................................................................................. 32
3.10.4 – Replace Pages ......................................................................................................................................................................... 33
3.11 – Command Line Arguments .............................................................................................................. 35
3.12 – Recent File List ................................................................................................................................... 36
4.0 – Appendix ....................................................................................................................... 36
4.1 – pDoc Signer Silent Installation Instructions ................................................................................. 36
4.2 – Making pDoc Signer the Default Program for Opening PDF Documents .............................. 37
3
www.topazsystems.com
pDoc Signer User Manual
1.0 – Introduction
pDoc Signer allows signing of PDF documents in a legally binding and secure manner. One
can embed handwritten signatures into PDF documents using this application. The application
allows one to visualize, fill and sign electronic documents, and create electronic signatures
using your handwritten signature. pDoc Signer also allows creation and filling of form fields. In
addition to digital signatures and form fields, pDoc Signer provides many other features to
manipulate the PDF. The remainder of the document describes the feature set and usage of
the pDoc Signer application. Handwritten signatures in pDoc Signer application are captured
using Topaz Signature Capture devices. See www.topazsystems.com.
pDoc Signer captures the handwritten “biometric” signature. The captured signature is shown
in the corresponding signature field in the document and can be viewed and verified in pDoc
Signer, or by other PDF document rendering applications like Adobe Acrobat or Reader.
pDoc Signer product has two main applications: pDoc Forms Designer and pDoc Signer.
1.1 – pDoc Forms Designer
The pDoc Forms Designer application is intended for people who are designing forms using
PDF documents. It is a graphical form design tool that simplifies the creation of form designs
for distribution as PDFs. Form recipients can fill, sign, print and save the filled-in form onto the
disk.
Using pDoc Forms Designer, form authors can drag-and-drop form fields such as Text Boxes,
Check Boxes, Radio Buttons, List Boxes, Combo Boxes and Electronic Signature fields.
pDoc Forms Designer also allows the designer to move and resize fields as required.
Optionally the forms designer can use features like adding attachments to attach any other
relevant documents to the PDF being designed.
After the PDF form is designed, the form can be secured if required using the Secure
Document feature of the pDoc Forms Designer.
1.2 –pDoc Signer
pDoc Signer is the application designed for the end-users who fill-in and sign the form. In
addition to filling-in and signing, pDoc Signer also provides features like adding comments,
pencil markups, and attachments. If required, you can also insert additional signatures using
the Insert & Sign feature.
After the form is filled in and signed, the form can be secured if required using the Secure
Document feature of the pDoc Signer.
The remainder of this document explains the features of the pDoc Signer application in detail.
4
www.topazsystems.com
pDoc Signer User Manual
2.0 – Installing/Uninstalling pDoc Signer
2.1 – Before You Begin
pDoc Signer runs on Windows operating systems beginning with Windows 2000.
Your system should have a minimum of 30 MB free space on the hard drive, in addition
to the free space requirements for Windows.
Before installing a new version of pDoc Signer, uninstall any older versions of pDoc
Signer on your machine.
2.2 – Installing the Signature Capture Device
pDoc Signer uses the signature pad software drivers that provide communication between
your PC and the signature pad, so the drivers must be installed on your PC before you can
capture signatures with pDoc Signer. If you have not installed the signature capture device,
refer to the manual provided by the signature capture device manufacturer for installation
instructions. Test the operation of the signature pad to insure that your PC can communicate
with it properly.
2.3 – Installing pDoc Signer
Installing pDoc Signer software is accomplished by running the pDoc Signer installation file
provided. During the installation one will be provided with an option to agree or disagree to the
license agreement, prompted to enter user information, and optionally set a different folder for
installation. The sequence of screens displayed guide the user through the installation
process.
During installation of pDoc Signer, an option screen with a check box for installing pDoc Forms
Designer will be provided. If the user checks the pDoc Forms Designer option, the pDoc Forms
Designer will be installed in the PC.
After installing pDoc Signer:
One can access the pDoc Signer application using “Start Programs pDoc Signer
pDoc Signer”.
One can access the pDoc Forms Designer application using “Start Programs
pDoc Signer pDoc Forms Designer”.
5
www.topazsystems.com
pDoc Signer User Manual
2.4 – Uninstalling pDoc Signer
To uninstall pDoc Signer:
Go to Start Settings Control Panel Add/Remove programs.
Select pDoc Signer and click on the “Remove” button. Follow the instructions to
uninstall the software.
Signatures that have been placed into documents are not removed during un-installation.
Note: Deleting the pDoc Signer installation folder directly will not uninstall the software
completely.
2.5 – Silent Installation of pDoc Signer
See the appendix for details on silent installation of pDoc Signer.
3.0 – Features of pDoc Signer
3.1 – Basic Operations and PDF File Manipulation
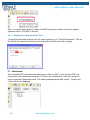
3.1.1 – Opening PDF Documents
PDF documents can be opened in pDoc Signer in two ways: either by using the
“File Open” menu option or by using the “Open File” icon in the toolbar.
When you click on one of the two options above, you will be prompted to select the PDF
document to be opened. If another PDF document is already opened and there are changes to
be saved, pDoc Signer displays a message saying that “Only one document may be open at a
time. Do you want to save changes to the previously opened document?” Click on “Yes” or
“No” to proceed further and select a new document to open.
Once the file is selected, the first page of the PDF file is displayed in pDoc Signer.
If the PDF document that is being opened is secured document, refer to section 3.8.1 for
further explanation.
One can also select a PDF from the list of recently opened file list. Refer to section 3.12 for
more information.
6
www.topazsystems.com
pDoc Signer User Manual
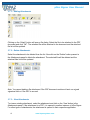
3.1.2 – Saving PDF Documents
The PDF document opened in pDoc Signer can be saved in two ways: either by using the “File
Save” menu option or by using the “Save File” icon in the toolbar. The “Save” option is
enabled only when there are changes that are not yet saved.
You can use the “File Save As” menu option to save the document to a new file.
Also, pDoc Signer prompts you to save the file (if there are any changes that are not yet
saved) when you try to open another PDF document while this document is still open or when
exiting the pDoc Signer application.
3.1.3 – Closing PDF Documents
The PDF document that is currently opened in pDoc Signer can be closed using the “File
Close” menu option. If there are any changes that are not yet saved, pDoc Signer prompts
you to do so before closing.
3.1.4 – Exiting pDoc Signer
To exit completely from pDoc Signer, chose “File Exit” menu option or the Red “X” button on
the top right corner of the pDoc Signer application. If there are any unsaved changes in the
currently opened PDF document, pDoc Signer prompts you to do so before exiting.
3.1.5 – About
The “About” menu in pDoc Signer application contains four menu items: “About pDoc Signer”,
“User Manual”, “What’s New”, and “Introducing pDoc Signer”.
“About pDoc Signer” provides info about the installed version of pDoc Signer. Clicking on the
“User Manual” menu item displays the pDoc Signer User Manual in another instance of pDoc
Signer. Clicking on the “What’s New” menu item displays the “What’s New in pDoc Signer”
PDF document in another instance of pDoc Signer. Clicking on the “Introducing pDoc Signer”
menu item displays the Introducing pDoc Signer PDF document in another instance of pDoc
Signer. This document provides an introductory tutorial on pDoc Signer.
3.2 – Filling in Form Fields
When a PDF containing form fields is opened in pDoc Signer, pDoc Signer displays the form
fields that are available for filling at appropriate locations. The form fields that are supported
are Electronic Signature Box, Text Box, Radio Button, Check Box, and List and Combo Boxes.
Any other types of form fields present in the PDF are not displayed in pDoc Signer.
One can fill values in the displayed form fields and save the PDF to make the changes
permanent.
7
www.topazsystems.com
pDoc Signer User Manual
3.2.1 – Electronic Signature Box
Place the mouse pointer on the electronic signature box. The mouse pointer will change from
default pointer to a hand sign. Now clicking on the electronic signature box will initiate the actof-signing. Once the act-of-signing is complete, the fields that are set to be made read-only
when this field is signed become read-only.
If the Electronic Signature Box was created or the properties were edited in any another PDF
manipulation tools, the only property that is honored by pDoc Signer is the “Mark as Readonly”. Any other properties that have been set are ignored in pDoc Signer.
3.2.2 – Text Box
If the Text Box was created or the properties were edited in any another PDF manipulation
tool, the properties that are honored by pDoc Signer are “Tooltip” and “Multi-line”. Any other
properties that have been set are ignored in pDoc Signer.
3.2.3 – Radio Button
If the Radio Button was created or the properties were edited in any another PDF manipulation
tool, the properties that are honored by pDoc Signer are “Tooltip” and if buttons with same
name and export value are selected in unison or not. Any otherproperties that have been set
are ignored in pDoc Signer. Also, the presence of special characters like "# % ( ) / [ ] { <> ;" in
the export value might lead to unexpected behavior in pDoc Signer.
3.2.4 – Check Box
If the Check Box was created or the properties were edited in any another PDF manipulation
tool, the properties that are honored by pDoc Signer are “Tooltip” and the export value. Any
other properties that have been set are ignored in pDoc Signer. Also, the presence of special
characters like "# % ( ) / [ ] { <> ;" in the export value might lead to unexpected behavior in
pDoc Signer.
3.2.5 – List Box
If the List Box was created or the properties were edited in any another PDF manipulation tool,
the properties that are honored by pDoc Signer are “Tooltip” and if the list box allows multiple
selection or not. Any other properties that have been set are ignored in pDoc Signer.
3.2.6 – Combo Box
If the Combo Box was created or the properties were edited in any another PDF manipulation
tool, the properties that are honored by pDoc Signer are “Tooltip” and if one can enter custom
text into the combo box or not. Any other properties that have been set are ignored in pDoc
Signer.
8
www.topazsystems.com
pDoc Signer User Manual
3.2.7 – View Properties of Form Fields
You can view the properties of the existing form fields by right clicking on them and then by
selecting the properties menu options.
Clicking on “Properties” displays the properties window of the particular form field and
populates the information of the form field in the displayed window. The properties displayed
will depend on the type of the form field being selected. Grayed out boxes imply that the values
cannot be changed.
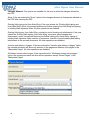
3.2.8 – Setting the Font Options
To set the font options for the entries displayed in form fields and comments, go to
“ToolsPreferences”. Click on the “Font” tab and select the Font options such as Font Name,
Font Style, Font Size, Font Color, and Font Effects such as underline. The selected effects will
be applied to the sample text. Once the desired options are selected, click on ‘Apply’. Note
that the default font settings are Times New Roman, Regular Face, Size 12, No Underline, and
Black.
9
www.topazsystems.com
pDoc Signer User Manual
Note: The font settings apply to the presentation of text in form fields and comments on your
display. When the PDF is rendered (for example when it is printed, opened in Print Preview, or
opened in another PDF application), the PDF default font Helvetica is used, and the font size is
determined by the size of the field and the length of the text.
3.3 – Electronic Signatures
pDoc Signer allows one to insert an electronic signature field and sign it immediately using the
“Insert & Sign” toolbar icon. This toolbar icon is displayed by default.
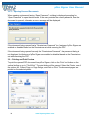
3.3.1 – Insert and Sign
Select the ‘Insert and Sign’ icon on the tool bar. The mouse pointer will change from default to
cross bar.
Now drag the mouse on the document to the required size and location of the signature field.
Upon completion of the selection, the signature field is displayed as shown here and the act-ofsigning is initiated.
If the signature field size selected is less than 15 pixels (for both width and height), the
signature field is treated as invalid and a message is shown saying “You are trying to create a
signature field that is too small. Please create a larger signature field”.
10
www.topazsystems.com
pDoc Signer User Manual
3.3.2 – Signature Capture Process
During the signature capture process, additional information like First Name, Last Name and
Email can optionally be input or one can select a pre created signer from the list of signers
(see Section 3.3.8).
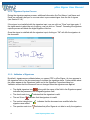
If the signer is not satisfied with the signature input, one can click on “Clear” and sign again. If
the signer wants to abort the act-of-signing, one can click on “Cancel”. Canceling the signature
capture process will delete the digital signature field too.
Once the signer is satisfied with the signature input, clicking on “OK” will affix the signature to
the document.
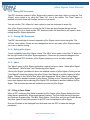
3.3.3 – Validation of Signatures
By default, signatures are validated when you open a PDF in pDoc Signer. An icon appears in
the signature field on the document page to indicate the signature status. Further details about
the status appear in the Signatures panel and in the Signature Properties dialog box.
Validation means that the document has not changed since the signature was applied.
The digital signature icon
along with the name of the field in the Signatures panel
indicates the presence of an unsigned signature field.
The check mark icon
The red X icon
The caution triangle icon
signature was added.
The question mark icon
11
indicates that the signature is valid.
indicates that the signature is invalid.
indicates that the document was modified after the
indicates that pDoc Signer is not able to verify the signature.
www.topazsystems.com
pDoc Signer User Manual
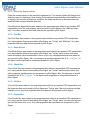
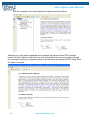
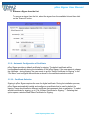
The Signature Properties dialog box can be invoked either by clicking on the Status icon or by
right clicking on the Signature Field and then selecting the “Validate Signature” option. Clicking
on the “Validate Signature” menu validates the signature first and then displays the Signature
Properties dialog box.
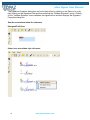
See the screenshots below for reference.
Unsigned Field Icon:
Status icons and validate right click menu:
12
www.topazsystems.com
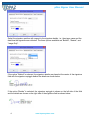
pDoc Signer User Manual
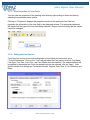
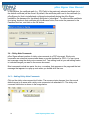
Signature Properties Dialog box:
3.3.4 – View Signed and Unsigned Signature Fields
Click on the ‘Signatures’ tool button in the left pane to open the signature panel. The width of
the signature panel can be increased or decreased as required by using the splitter between
the panel and the document page. The list of signed and unsigned signature fields along with
details is displayed.
13
www.topazsystems.com
pDoc Signer User Manual
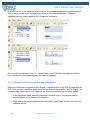
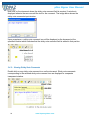
If we click on any of the signature fields in the list, the corresponding blank or signed signature
field in the document will be highlighted as shown in the screenshots below. Close the
signature panel by clicking again on the ‘Signatures’ tool button.
One can also use the arrow keys (i.e., up and down) or the TAB key to navigate through the
list of signatures in the signature panel and select a signature.
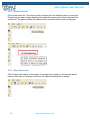
3.3.5 – Viewing Previous Versions of a Signed Document
Each time a document is signed in pDoc Signer, a signed version of the PDF is saved with the
PDF. Each version is saved as append-only so that it cannot be modified. In pDoc Signer, the
corresponding signed version of a signature can be viewed using the two following options.
1. In the Signatures panel, select the signature, and click on the “View signed version”
option available in the details of the signature.
2. Right click on the signed signature field and select “View Signed Version” from the list of
available options.
14
www.topazsystems.com
pDoc Signer User Manual
See the screenshot below that displays the options mentioned above.
Selecting one of the options specified above displays the signed version PDF in another
instance of pDoc Signer in which the only options available to the user are scrolling through
the document, zooming, the signature panel as shown below and saving the PDF using “Save
As” option if required.
15
www.topazsystems.com
pDoc Signer User Manual
3.3.6 – Specifying Signature Field Options
Each Signature Field must have a name associated with it. pDocSigner can assign a name to
a signature field automatically when a Signature Field is inserted into a PDF document if a
“Prefix” for Name is supplied. Another alternative is to provide a name for the signature field
when inserted manually. These options can be set in the “Signature Field” tab under
“ToolsPreferences”.
If the option ‘prompt for Signature field name during field insertion’ is selected, a window
prompting for a Name for the signature field gets displayed when a signature field is inserted in
the PDF document using pDoc Signer.
If the option ‘Automatically insert Signature field name’ is selected, then the signature field
name Prefix will be appended with the next number in the sequence of created form fields and
set as signature field name for both the blank signature field and during signing.
Select the “Signature Field Transparency” option if the signature field should be transparent on
the PDF document. The option is checked on by default.
3.3.7 – Signature Capture Options
To set the Signature Capture options, go to “ToolsPreferences”.
16
www.topazsystems.com
pDoc Signer User Manual
Select the signature position with respect to the signature details, i.e., the signer name and the
date/time the signature was collected. The three options available are “Behind”, “Beside”, and
“Image Only”.
If the option “Behind” is selected, the signature details are placed at the center of the signature
field with the signature squiggle behind the details as shown below.
If the option “Beside” is selected, the signature squiggle is shown on the left side of the field
and the details are shown on the right side of the signature field as shown below.
17
www.topazsystems.com
pDoc Signer User Manual
If the option “Image Only” is selected, only the signature squiggle is shown in the Signature
Field and details are not shown.
One can specify if the Maximum enlargement feature is enabled or not and also specify the
maximum enlargement percentage. The Maximum Enlargement Percentage is used only in
cases where the size of signature on the signature pad (after white space removal) is smaller
than the size of the Signature Field in the document. When the signature drawn on the
signature pad is smaller than the size of the Signature Field in the document, pDoc Signer will
enlarge the signature to fill the Signature Field. However, it will limit the enlargement to the
value of the Maximum Enlargement Percentage. The Maximum Enlargement Percentage
specifies the percentage of the destination to use in such cases. This prevents the signature
from looking too pixelated or jagged. The value of the maximum enlargement percentage can
be between 0 and 100. If a value of 0 is specified, the signature is not enlarged at all. If a value
of 100 is specified, the signature is enlarged to fit the complete destination.
One can also specify the default ink color for the signatures in this screen by clicking on the
“Color” button. The default color is Blue.
The Prefix and Date/Time format for date presentation in signature details can be specified in
the “Date Format” tab of the Preferences screen.
Note: The display of Signature Title and the time/date stamp is on by default and nonremovable for “Behind” and “Beside” options. But, if the height of the signature field is less than
30 pixels or the width of the signature field is less than 50 pixels, then the signature details
(i.e., Signature Title and Date/time stamp) are not printed on the signature.
18
www.topazsystems.com
pDoc Signer User Manual
3.3.8 – Signature Information
1. Creation of List of Signers
This feature can be used to create a list of signers for the purposes of signing. During
signing, in the signature capture screen, the list of signers available is displayed and a
signer can be selected from the list. Each profile contains First Name, Last Name and
Email of the signer.
To create a profile, enter the required information and then click on the “Add” button.
Once created, the Signer Information (i.e. First Name and Last Name) is added to the
Signers List.
A maximum of 10 profiles can be created here for use while signing.
To make a signer the default signer, select the Signer from the available list of Signers
and then click on OK. During the signature capture process, the selected signer
information is pre-filled in the signature capture window.
19
www.topazsystems.com
pDoc Signer User Manual
2. Remove a Signer from the List
To remove a signer from the list, select the signer from the available list and then click
on the “Remove” button.
3.3.9 – Automatic Configuration of Certificate
pDoc Signer provides a default certificate for signing. The default certificate will be
configuredautomatically during the installation of the pDoc Signer. If the user wants to change
the certificate during signing, the user needs to go the “Select Certificate for Signing” in the
“File Menu” and configure the certificate as shown in the certificate selection section.
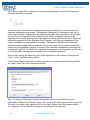
3.3.10 – Certificate Selection
Signing in pDoc Signer requires the use of a digital certificate. During its installation process,
pDoc Signer automatically installs and configures a certificate that is used by default for
signing. Users should select a different certificate that represents their organization. To select
another certificate for signing, go to “File Select Certificate for Signing...”. Selecting that
option opens a window titled Select Certificate for Signing.
20
www.topazsystems.com
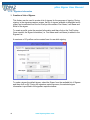
pDoc Signer User Manual
In that window, the certificate path (i.e., PFX Path) to the previously selected certificate (or to
the default certificate) will be shown. By default, the certificate path is set to the certificate (i.e.,
pDocSigner.pfx) that is installed and configured automatically during the pDoc Signer
installation; the password for the default certificate is “pdocsigner”. To select another certificate
for signing, browse to that certificate with the Browse button, then enter the password in the
Password text box, and click on the OK button.
3.4 – Sticky Note Comments
pDoc Signer allows insertion of sticky note comments in a PDF document. Sticky note
comments are notes that communicate ideas or provide feedback for PDFs. You can type a
text message using the sticky note comment tool. Text editing tools let you add editing marks
to indicate changes you want in the source document.
Most comments include two parts: the icon, or markup, that appears on the page and the text
message that appears in a pop-up note when you double-click the icon.
3.4.1 – Adding Sticky Note Comments
Click on the sticky note comment tool button. The mouse pointer changes from the normal
default arrow to an arrow with a sticky note comments icon attached to it. The sticky note
comment field button is shown in the image below.
21
www.topazsystems.com
pDoc Signer User Manual
Now click on the document where the sticky note comment field is required. A window is
displayed wherein the user can add the text for the comment. The image below shows the
sticky note comments input window.
Upon acceptance, a sticky note comment icon will be displayed on the document at the
specified location which indicates that the sticky note comment field is added in that position.
3.4.2 – Viewing Sticky Note Comments
Double click on any sticky note comment icon on the document. Sticky note comments
corresponding to the selected sticky note comment icon are displayed in a separate
transparent window.
22
www.topazsystems.com
pDoc Signer User Manual
3.5 – Text Comments
pDoc Signer allows insertion of Text Comments in a PDF document. Text Comments are notes
that communicate ideas or provide feedback in PDFs. You can type a text message using the
Text Comment tool. Text editing tools let you add editing marks to indicate changes you want
in the source document.
3.5.1 – Adding Text Comments
Click on the text comments tool button (the capital letter “T”). The mouse pointer changes from
the normal default arrow to cross hair. The text comments field button is shown in the image
below.
Now drag the mouse on the document to the required size and location of the text comments
field. Upon completion of the selection, the text comments field is displayed as shown below
and the text comments input window is displayed.
Using your keyboard, enter the text for the comment. Font attributes specified in the
Preferences windows for comments are applied for the text entered in this window.
23
www.topazsystems.com
pDoc Signer User Manual
Click on the “Add” button to the text comment to the PDF. The screenshot below shows the
text comments added in the PDF document.
Note:
1. If the text comments field size selected is smaller than 15 pixels wide and 5 pixels high,
the text comments field is treated as invalid and a message is shown saying “You are
trying to create a text comment field that is too small. Please create a larger text
comment field”.
2. Text lines that are longer than the width of the text field are truncated by standard
convention; they do not automatically wrap to the next line, so you should use line
returns for multi-line comments.
3.5.2 – Updating Text Comments
The existing text comments can be updated in pDoc Signer. Click on the text comment and
alter the text as required. The updated text is applied to the text comment when the PDF is
saved. The screenshot below shows a text comment after updates.
Note: Text comments in place when the document is signed will not be editable after signing;
however, after a document is signed new text comments can be added, but they cannot be
modified after addition.
3.6 – Pencil Tool
The Pencil tool creates free-form drawings and the Pencil Eraser tool removes the pencil
markups.
24
www.topazsystems.com
pDoc Signer User Manual
3.6.1 – Draw Pencil Line
Click on the pencil tool. The mouse pointer changes from the default pointer to a cross bar.
Drag where you want to begin drawing and release the mouse button where the pencil line
should end. The pencil markup with selected color and width will be drawn on the page.
3.6.2 – Erase Pencil Line
Click on the pencil markup to be erased. A rectangle box is drawn on the selected pencil
markup. Now click on the erase tool button; the selected markup will be erased.
25
www.topazsystems.com
pDoc Signer User Manual
Note: You cannot erase a pencil markup if the PDF document contains at least one signed
signature field or if the PDF is secured.
3.6.3 – Settings For Using the Pencil Tool
To specify the line width and line color for pencil markups, go to “ToolsPreferences”. Click on
the ‘Pencil’ tab, select the Pencil line color and width of the line and click on ‘Apply’.
3.7 - Attachments
One can attach PDF documents and other types of files to a PDF. If you move the PDF to a
new location, the attachments move with it. Click on the “Attachments” tool button at the left
pane to open the Attachments panel. The existing attachments list with “Attach”, “Delete” and
“View” buttons are displayed.
26
www.topazsystems.com
pDoc Signer User Manual
3.7.1 – Adding Attachments
Clicking on the “Attach” button will open a file dialog. Select the file to be attached to the PDF
document and click “OK”. The selected file will be attached to the document and the attached
file list will be updated.
3.7.2 – Delete Attachments
Select the attachment to be deleted from the list. Now click on the ‘Delete’ button present in
the Attachments panel to delete the attachment. The selected file will be deleted and the
attached files list will be updated.
Note: You cannot delete a file attachment if the PDF document contains at least one signed
signature field or if the PDF is secured.
3.7.3 – View Attachments
To view an existing attachment, select the attachment and click on the ‘View’ button in the
Attachments panel. If the attachment is a PDF, it is opened in another instance of pDoc Signer.
For other types of attachments, the attachment is opened in their respective application.
27
www.topazsystems.com
pDoc Signer User Manual
3.8 – Securing Documents
pDoc Signer can be used to secure an unsecured and unsigned PDF. For securing a
document, go to “FileSecure Document”. The secure document dialog is displayed. Provide
either “Permissions Password” or both “Open Password” and “Permissions Password”.
“Permissions Password” is mandatory. The default operations allowed for secured documents
are printing is not allowed and form filling and signing, comments, pencil drawing and
attachments are allowed.
Upon clicking “OK”, the document is secured with the information provided and is closed. The
secured document must be opened again for further use in the pDoc Signer tool.
Open Password: One will be prompted to enter this password when the document is being
opened.
Permissions Password: One will need to provide this password if permissions on the
document need to be modified at a later point of time in other PDF containers. Permissions
password once provided cannot be changed in pDoc Signer.
Printing Allowed: Two options are available for the user to select print permissions.
None: If the user selects the “None” option in the printing allowed, the secured documents are
not allowed for printing.
Allow Printing: If the user selects the “Allow Printing” option in the printing allowed, the secured
documents are allowed from printing.
28
www.topazsystems.com
pDoc Signer User Manual
Changes Allowed: Five options are available for the user to select the changes allowed on
the PDF.
None: If the user selects the “None” option in the changes allowed, no changes are allowed on
the PDF after securing the PDF.
Existing field signing and form fields filling: If the user selects the “Existing field signing and
form fields filling” option, the secured document will allow existing form field filling and signing
of existing blank signature fields. All other operations are disabled.
Existing field signing, form fields filling, comments, pencil drawing and attachments: If the user
selects the “Existing field signing, form fields filling, comments, pencil drawing and
attachments” option, the secured document will allow existing form fields filling, signing of
existing blank signature fields, insertion of comments, insertion of pencil drawing and adding
attachments in the secured documents. All other operations are disabled.
Insertion and deletion of pages: If the user selects the “Insertion and deletion of pages” option,
the secured document will allow only insertion of the pages and deletion of the pages in the
“Manipulate Pages”. All other operations are disabled.
All allowed except extract pages: If the user selects the “All allowed except extract pages”
option, the secured document will allow all the operations except “Extract Pages” in the
“Manipulate Pages”.
29
www.topazsystems.com
pDoc Signer User Manual
3.8.1 – Opening Secured Documents
When opening a document having “Open Password”, a dialog is displayed prompting for
“Open Password” to open the document. If the user provides the correct password, then the
document is opened, otherwise an error message will be displayed.
If the document being opened had a “Permissions Password” too, features of pDoc Signer are
enabled or disabled based on the Permissions set while securing the PDF.
If the document being opened has only the “Permissions Password”, the password dialog is
not displayed, but features of pDoc Signer are enabled or disabled based on the Permissions
set while securing the PDF.
3.9 – Printing and Print Preview
To print the opened PDF document from pDoc Signer, click on the ‘Print’ tool button on the
vertical toolbar or go to “FilePrint”. The print dialog will be opened. Select the Printer, one of
the options All, Current Page, or Page Range, and click on Print. The document pages are
printed on the selected printer.
30
www.topazsystems.com
pDoc Signer User Manual
To view the appearance of the printed document before actually printing it, the “Print Preview”
function can be used. This function can be invoked from “File -> Print Preview” or the “Print
Preview” tool button on the vertical toolbar. Clicking on “Print Preview” opens a window that
displays the document as it will be printed. The only toolbar icons available in this window are
for page navigation and printing the document. To print a document in the Print Preview
window, simply click on the Print icon.
3.10 – Merging and Splitting of PDF Documents
3.10.1 – Extract Pages
To extract (copy) pages from the opened PDF document, go to “ToolsManipulate
PagesExtract pages”. In the Extract Pages dialog, select the page range (i.e., starting page
to ending page) and click the “OK” button.
A dialog prompting the user to select the folder where the new PDFs should be created is
displayed. Once the folder is specified, the selected pages will be embedded into the new PDF
with same name as the original PDF and having a suffix “_Extract”. For example, if the opened
PDF name is “Demo.pdf”, the new PDF name would be “Demo_Extract.pdf”. If the option
“Extract Pages as Separate Files” is selected, each of the pages is exported into a new PDF
document, and the page number is appended to the file name for each page in the document.
Note: Any signature fields (both unsigned and signed) existing in the page are removed from
the page during the extraction process. Signature Fields should be inserted again if required.
31
www.topazsystems.com
pDoc Signer User Manual
3.10.2 – Delete Pages
To delete pages from the opened PDF document, go to “Tools Manipulate PagesDelete
pages”.
In the Delete Pages dialog, select the page range (i.e., starting page to ending page) and click
the “OK” button. Upon clicking OK, the selected pages will be permanently deleted from the
opened PDF.
3.10.3 – Insert Pages
To insert pages into the opened PDF document, go to “ToolsManipulate PagesInsert
Pages”. Select the PDF file from which the pages will be inserted in to the opened PDF
document from the file dialog.
The Insert Pages dialog will be opened, select the location at which the page will be inserted
(i.e., after or before). Select the page number at which the pages will be inserted (i.e. First or
Last or page number). The selected PDF pages will be inserted in the specified location.
32
www.topazsystems.com
pDoc Signer User Manual
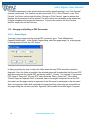
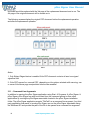
3.10.4 – Replace Pages
To replace the pages in the opened PDF document with the selected pages from another PDF
document, go to “ToolsManipulate PagesReplace Pages”. Select the document that
contains the replacement pages and click “Open”. Once the document containing the
replacement pages is selected, the Replace Pages dialog will be opened.
In the Replace Pages dialog, under Original, specify the pages you want to replace. Under
Replacement, specify the beginning page as shown in the image at right.
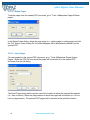
Case 1: Page Range to be replaced is more than the total number of pages of the
Replacement document.
In the above figure, replace pages are from Page 1 to 5, but in the replacement PDF document
we have only 4 pages. In this case, only the first 4 pages of the original document are replaced
with the 4 pages from the replacement document and the 5th page of the original document
would remain as-is.
33
www.topazsystems.com
pDoc Signer User Manual
The following screens display the original PDF document before the replacement operation
and after the replacement operation.
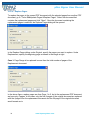
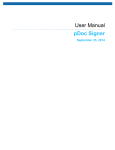
Case 2: Page Range to be replaced is same as the total number of pages of the Replacement
document, but the starting page is not the first page.
In the figure here, pages to be replaced are from 1 to 4. The total number of pages in the
replacement PDF document is 4. But the starting page specified in the replacement document
is 2, which indicates that only three pages from the replacement document are available for
replacement. In this case only 3 pages of the original document will be replaced by the 3
pages of the replacement PDF document. The 1st page of the original document would be
replaced with 2nd page of the replacement document and the 2nd page of the original
34
www.topazsystems.com
pDoc Signer User Manual
document would be replaced with the 3rd page of the replacement document and so on. The
4th page of the original document will be remain as-is.
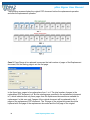
The following screens display the original PDF document before the replacement operation
and after the replacement operation.
Notes:
1. Only Extract Pages feature is enabled if the PDF document contains at least one signed
signature field.
2. If the PDF opened is a secured PDF, depending on the options selected while securing, one
or more of the above page manipulation functions are enabled.
3.11 – Command Line Arguments
In addition to opening the pDoc Signer application using Start Programs pDoc Signer
pDoc Signer, pDoc Signer can also be invoked from the command prompt or from other
applications by running the pDocSigner executable located in the pDoc Signer installation
folder. The pDoc Signer application accepts “FilePath” as a command line argument. Any third
party application that wants to invoke pDoc Signer can run the pDoc Signer executable using
the Windows API and provide the path of the file to be opened as a command line argument.
35
www.topazsystems.com
pDoc Signer User Manual
For example, clicking on “Start Run”, and then running the command “C:\Program
Files\pDoc Signer\pDoc Signer.exe” “C:\Sample.pdf” opens the pDoc Signer application and
opens the “C:\Sample.pdf” automatically. The above command assumes that pDoc Signer is
installed in the “C:\Program Files\pDoc Signer” folder. This feature is particularly useful for
custom third party applications to invoke pDoc Signer from their application.
3.12 – Recent File List
The pDoc Signer application maintains a list of 5 recently opened documents and the list can
be seen in the “File” menu.
4.0 – Appendix
4.1 – pDoc Signer Silent Installation Instructions
In your administrator PC:
1. Uninstall pDoc Signer if it is already installed.
2. Open the Command prompt.
3. Navigate to the folder where the pDoc Signer installer resides.
4. Type pDocSignerX.X_RXXXX.exe /randreplace the X.X_RXXXX with the actual version
numbers of the pDoc Signer software to start the installation in a dialog mode to create a
response file that will be used during the silent install.
5. Once the installation is complete, the response file named Setup.iss will be created in the
Windows folder; for example, if XP is the OS and the OS drive is C:\, then the Windows
directory is C:\Windows.
6. Take a copy the pDocSignerX.X_RXXXX.exe file and the Setup.iss file to use for silent
installation.
To perform silent installation on other PCs:
1. Copy the pDocSignerX.X_RXXXX.exe file and the Setup.iss file created above to a local
folder on the PC where pDoc Signer is to be installed.
2. Open the Command prompt.
3. Navigate to the folder where the pDocSignerX.X_RXXXX.exe file and the Setup.iss file are
located.
4. Type pDocSignerX.X_RXXXX.exe /s /f1"<Setup.iss Path>".Replace the X.X_RXXXX with
the actual version numbers of the pDoc Signer software, and replace <Setup.iss Path> with
the path name to the folder where the Setup.iss file is located; for example, if
pDocSignerX.X_RXXXX.exe and Setup.iss are located in the C:\Temp folder, then the
command would be pDocSignerX.X_RXXXX.exe /s /f1"C:\Temp\Setup.iss".
5. The pDoc Signer installation will start in silent mode and complete automatically without
any user intervention.
36
www.topazsystems.com
pDoc Signer User Manual
4.2 – Making pDoc Signer the Default Program for Opening PDF Documents
Procedure to Make pDoc Signer the Default Program for Opening PDF Documents in Windows XP*
1. Right click on a PDF document icon. A window will open with a menu.
2. Hover the mouse over the “Open With” option. A window will open with a list of programs.
3. Left click on the “Choose Program...” option at the bottom of the list. An “Open With”
window will open.
4. Left click on the “Browse...” button. An “Open With...” window will open.
5. Navigate to the pDoc Signer folder, and double-left click on it to display the folder contents.
6. Left click on pDoc Signer.exe. It will be highlighted and the entry pDoc Signer.exe will
appear in the File name box.
7. Left click on the “Open” button. The “Open With...” window will disappear, and the “Open
With” window will show pDoc Signer highlighted.
8. Left click in the check box “Always use the selected program to open this kind of file”.
9. Left click on the “OK” button. The “Open With” window will disappear, and pDoc Signer will
open displaying the document selected in step 1. After this, when you double-click on a
PDF document icon, pDoc Signer will open and display the document.
Procedure to Make pDoc Signer the Default Program for Opening PDF Documents in Windows 8.1 on
Desktop PCs*
1. Right click on a PDF document icon. A window will open with a menu.
2. Hover the mouse over the “Open With” option. A window will open with a list of programs.
3. Left click on the “Choose Default Program...” option at the bottom of the list. An “Open
With” window will open.
a) Left click "More Options"
b) Left click "Look for another app for this PC"
c) Left click C:\ drive or local disk
d) Double-left click “Program Files” or “Program Files (x86)”
e) Double-left click “pDoc Signer”
f) Left click “pDoc Signer.exe”
g) Left click “Open”
4. The “Open With” window will disappear, and pDoc Signer will open displaying the
document selected in step 1. After this, when you double click on a PDF document icon,
pDoc Signer will open and display the document.
*Note: The procedures for other Microsoft operating systems are similar, but may have
variations from these steps.
37
www.topazsystems.com