1
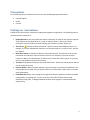
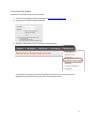
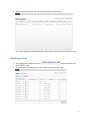
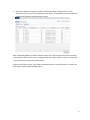
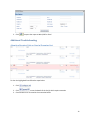
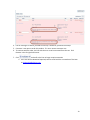
ProExpress User Manual Rev 3.0 Last Updated April 6, 2015 Contents Prerequisite ................................................................................................................................................... 3 ProExpress Conventions .............................................................................................................................. 3 Accessing ProExpress .................................................................................................................................... 4 Building an Order .......................................................................................................................................... 5 Review/Modify the Shopping Cart ................................................................................................................ 8 Deleting an Item from the Cart ................................................................................................................. 8 Placing an Order ............................................................................................................................................ 9 Special Features .......................................................................................................................................... 10 Copying an Order .................................................................................................................................... 10 Printing an Order .................................................................................................................................... 10 Exporting an Order.................................................................................................................................. 11 Generate a Customized Report of Orders .............................................................................................. 11 Additional Troubleshooting ........................................................................................................................ 12 Attention Required List on Line in Shopping Cart ................................................................................... 12 2 Prerequisite For the best experience, please be sure to use one of the following supported browsers: Internet Explorer Firefox Chrome ProExpress Conventions ProExpress has several basic conventions employed throughout the application. The following sections review these basic conventions. Required fields are text entry fields that require information in order for the system to operate. These field names are denoted by an (*) and are required fields. A user must provide information for these fields to continue building your Customer, Contact, Quote, etc. The Info Icon denotes entered information is either invalid or needs additional input. For example, if you enter alphabetical characters in a field that requires a numerical entry, the Info icon appears. Drop down menus (or option lists) display a menu when clicked. They allow the user to type information into the box or select an item from the list. For example, if you want to add a customer’s address, the State Option list allows you to choose the state or type it. As you type, the list scrolls based on the initial entry letters. Tool tips-briefly appear to display a tool name and function. Direct your mouse pointer above a tool to display the tool tip Inactive Options –When an option appears in gray, the option is inactive (not available for use). Inactive Options may mean that you need to enter more information in other areas to activate the grayed options. Immediate Save allows users to progress through the ProExpress application without manually saving Orders, or anything else. As soon as the user clicks off a field that field is saved. Seamlessly Create, Edit , or Navigate between entities while progress is saved automatically along the way 3 Accessing ProExpress ProExpress is accessible through the Partner Portal. 1. Launch any compatible browser and navigate to https://portal.allegion.com/ 2. Login with your credentials when prompted 3. Navigate to My Resources then to ProExpress Online Ordering If the link does not appear in the menu drop down, please contact your company admin or Allegion sales representative to activate your online ordering account. 4 4. After the application loads, the main Order Search screen will appear This screen displays all submitted and open orders and is searchable via the fields at the top Building an Order 1. After logging into ProExpress click the button located on the Order Search screen 2. This will create a new shopping cart and loads the product selection grid 5 3. Search for a product by typing in the SKU, Manufacturer Code, Catalog Number, Finish, Description or list price or any combination of the above. As the fields are populated the list is automatically filtered to meet the search criteria. Note: Checked by default, the Enable Contains Search in the top left corner the search will return results with any of the search criteria contained within the results. When uncheck, the search will return results that start with the search criteria. Expert Hint-For faster results, if you know the exact product you are searching for, as listed in the price book, uncheck Enable Contains Search. 6 4. When the product is found, click the check box to the left of the line 5. The curser will automatically move to the quantity field for the line selected. Enter the quantity desired a. The quantity can also be directly entered for the line which will automatically select the check box noted in step 4 6. Click The line and quantity selected on the screen is populated below the product selection grid 7. Repeat steps 3 through 6 to continue adding products to the order 7 Review/Modify the Shopping Cart Each line added to the order or cart will appear below the search grid in the following table Heading Validate All Collapse/Expand All Line Number Label Item Qty UOM Net Price Total Price (in the line) Total Price (in the header) Remove Description Validate Lines that “Require Attention” See Require Attention Section Collapses or Expands the line details Line on which the product is ordered User Defined Field to identify the product Contains a listing of the product placed in the cart The quantity placed in cart, can be change by clicking in the box and typing in a new number Unit of Measure Buying program price of the unit Net Price multiplied by the quantity Sum of each lines’ total price Remove the line from the cart Deleting an Item from the Cart Click Remove on the line which should be removed from the cart 8 Placing an Order 1. Once all lines have been added to the cart click window located in the top right of the 2. Fill out all fields with an * a. A quote number can also be added to an order. The system will only accept one quote number per order. 3. The Bill-to information will populate automatically 4. Ship-to address will be blank. The address can be populated by: a. Typing the start of the address in the ship-to field to determine if the address is preloaded. Then clicking the preloaded address b. Clicking Add New Address in the drop down, then typing in the address in the Name, Address etc. fields 5. Once all information is entered click on in the top right of the window 6. Upon successful transmission of the order, a confirmation window will appear 9 7. The order has been placed and will be received at the ship to address in 5 days. Special Features Copying an Order To save time entering products, any existing order can by copy into a new order. 1. Click on the icon located to the left of the order that is to be copied 2. The icon will expand options for the order selected, click copy 3. A new order will be created with all the lines copied for the existing order 4. This order will require validation to ensure accurate price and configuration. Click Apply the latest information and clear any validation error Printing an Order 1. Click on the icon located to the left of the order to be printed 2. The icon will expand options for the order selected, click Print 10 3. Select the options from the open dialog. For the most part, the defaults below provide all the information required. 4. Click in the upper right corner Exporting an Order The export selection generates an XML output of the order and is currently only used for technical support. Generate a Customized Report of Orders 1. From the Order Search Screen click on 2. Customize the filter options as desired and click Generate Report 11 3. Click to export the report to Word, PDF or Excel Additional Troubleshooting Attention Required List on Line in Shopping Cart To clear the highlighted lines follow the steps below 1. Click 2. Click to see the details of the line(s) which require attention 3. Check for BP1 error as noted in the screenshot below 12 4. If error message is as above, proceed to next step. Otherwise, proceed to the step 7 5. Customer is not open to order this product. If in error contact customer care 6. To continue with the order, the line with the error must be removed from the cart. Click Remove in the far right hand corner 7. Click and confirm the line no longer requires attention a. If the line still has Attention Required, send an email with the a screenshot of the item to [email protected] 13