1
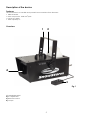
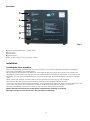
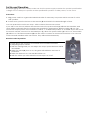
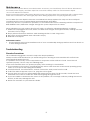
SnowStorm ORDERCODE 80363 Congratulations! You have bought a great, innovative product from Showtec. The Showtec Snowstorm brings excitement to any venue. You now own a rugged and powerful state-of-the-art machine. You can rely on Showtec, for more excellent products. We design and manufacture professional equipment for the entertainment industry. New products are being launched regularly. We work hard to keep you, our customer, satisfied. You can get some of the best quality, best priced products on the market from Showtec. So next time, turn to Showtec for more great equipment. Always get the best -- with Showtec ! Thank you! Showtec Showtec Snowstorm™ Product Guide Warning.................................................................................…...……………..…………………………….………..….. 2 Safety-instructions………………………………………………………………………………………………………… 2 Operating Determinations.……………………………………………………………………………………………… 3 Rigging.……………………………………………………………………………………………………………………… 4 Description...............................................................................…...………………………………………….………..…. 5 Features and Overview ………………………………...….……………….………….……….……….……………… 5 Backside…………………………………………………...…...….……………….…………………...….……………… 6 Installation...............................................................................…...…………………………………….………………… 6 Installing the snow machine............................................………………………………………..………………….. 6 Set Up and Operation.....................................................................……..……………………………………………… 7 Procedure………….........................................................................………………………………………….……… 7 Remote control operation.................................................................………………………………..…………….. 7 Maintenance...................................................................................………..………….…….……………………….…. 8 Performance notes........................................................................…………………….…………….……………... 8 Troubleshooting............................................................................………………….………………….………………... 8 Product Specifications.................................................................……………….…….………………………………... 9 1 WARNING CAUTION! Keep this device away from rain and moisture! Unplug mains lead before filling the tank! FOR YOUR OWN SAFETY, PLEASE READ THIS USER MANUAL CAREFULLY BEFORE YOUR INITIAL START-UP! SAFETY INSTRUCTIONS Every person involved with the installation, operation and maintenance of this device have to: be qualified follow the instructions of this manual CAUTION! Be careful with your operations. With a dangerous voltage you can suffer a dangerous electric shock when touching the wires! Before your initial start-up, please make sure that there is no damage caused by transportation. Should there be any, consult your dealer and do not use the device. To maintain perfect condition and to ensure a safe operation, it is absolutely necessary for the user to follow the safety instructions and warning notes written in this manual. Please consider that damages caused by manual modifications to the device are not subject to warranty. This device contains no user-serviceable parts. Refer servicing to qualified technicians only. IMPORTANT: The manufacturer will not accept liability for any resulting damages caused by the nonobservance of this manual or any unauthorized modification to the device. Never let the power-cord come into contact with other cables! Handle the power-cord and all connections with the mains with particular caution! Never remove warning or informative labels from the unit. Never aim the output directly at people. Never aim the output at open flames. Never add flammable liquids of any kind (oil, gas, perfume) to the snow liquid. Never drink snow liquid. If it is ingested, call a doctor immediately. If snow liquid comes in contact with skin or eyes, rinse thoroughly with water. Never lock snow-filled rooms. Risk : panic among the locked persons! Never blow snow permanently! The snow must only be used for a short period. Do not connect this device to a dimmerpack. Do not switch the device on and off in short intervals, as this would reduce the device’s life. Only use device indoor, avoid contact with water or other liquids. Only use snow in well-ventilated rooms. Only use the high-quality, snow liquid, that your Showtec dealer recommends.(5L snow fluid ordercode 80359) Other snow liquids may cause poor effect snow. Avoid flames and do not put close to flammable liquids or gases. Always make sure there is sufficient liquid in the snow liquid tank. Operating this unit without liquid will cause damage to the pump. Always allow free air space of at least 20 cm around the sides and top of the unit. 2 Always drain tank before shipping or otherwise transporting this unit. Always keep tank cap closed while operating. Always keep the snow machine upright. For adult use only. Snow machine must be installed out of the reach of children. Never leave the unit running unattended. Leave the grid guarding the nozzle in place if the machine is to be used in the presence of children. Always keep the nozzle at least 50 cm away from contact with anything, while in operation. Always disconnect power from the mains, when device is not used or before cleaning! Only handle the power-cord by the plug. Never pull out the plug by tugging the power-cord. Make sure that the available voltage is not higher than stated on the rear panel. Make sure that the power-cord is never crimped or damaged. Check the device and the powercord from time to time. If device is dropped or struck, disconnect mains power supply immediately. Have a qualified engineer inspect for safety before operating. If the device has been exposed to drastic temperature fluctuation (e.g. after transportation), do not switch it on immediately. The arising condensation water might damage your device. Leave the device switched off until it has reached room temperature. If your Showtec SnowStorm fails to work properly, discontinue use immediately. Drain all snow liquid from the tank, pack the unit securely (preferably in the original packing material), and return it to your Showtec dealer for service. Allow time to cool down, before cleaning or servicing. The residence time of persons in snow-filled rooms with less than 15 m of sight must never exceed 5 minutes. The use of snow-fluid is only allowed for adults. Repairs, servicing and electric connection must be carried out by a qualified technician. In dense, snow-saturated surroundings, the oxygen portion is substantially reduced! The snow density must be portioned in a way that the sight will always be above 5 m - Danger of anxiety state due to missing orientation! Every snow-filled room must be overseen by a skilled person. This device falls under protection class I. Therefore it is essential to connect the yellow/green conductor to earth. WARRANTY: Till one year after date of purchase. Operating instructions: This device is not designed for permanent operation. Consistent operation breaks will ensure that the device will serve you for a long time without defects. If this device is operated in any other way, than the one described in this manual, the product may suffer damages and the warranty becomes void. Any other operation may lead to dangers like short-circuit, burns, electric shock, explosion, crash etc. You endanger your own safety and the safety of others! 3 Rigging Please follow the European and national guidelines concerning rigging, trussing and all other safety issues. Do not attempt the installation yourself ! Always let the installation be carried out by an authorized dealer ! Procedure: If the snow machine is lowered from the ceiling or high joints, professional trussing systems have to be used. Use a clamp to mount the snow machine, with the mounting-bracket, to the trussing system. The snow machine must never be fixed swinging freely in the room. The installation must always be secured with a safety attachment, e.g. an appropriate safety net or safety-cable. When rigging, derigging or servicing the snow machine, always make sure, that the area below the installation place is blocked and staying in the area is forbidden. Improper installation can cause serious damage to people and property ! Connection with the mains Connect the device to the mains with the power-plug. Always pay attention, that the right color cable is connected to the right place. International EU Cable UK Cable US Cable Pin L BROWN RED YELLOW/COPPER FASE N BLUE BLACK SILVER NUL YELLOW/GREEN GREEN GREEN EARTH Make sure that the device is always connected properly to the earth! 4 Description of the device Features The Snowstorm is a versatile and powerful snow machine from Showtec. • 1000 W Heater • Snow output min. 1000 mm3/min. • Fuse 6,3A / 250V • Tank capacity 5 L Overview 1 2 4 3 Fig. 1 1) Hanging bracket 2) 5 L Liquid tank 3) Remote control 4) Output 5 Backside 5 6 7 8 9 Fig. 2 5) Snow output 600W Min. / 1000W Max. 6) ON / OFF 7) DMX input 8) DMX output 9) IEC Power connector + Fuse 6,3A / 250V Installation Installing the Snow machine Remove all packing materials from the snow machine. Check that all foam and plastic padding is removed, especially in the nozzle area. Fill with Snow Liquid (ordercode 80359) or other high-quality snow fluid. Any other types of fluid can damage the unit. Make sure that you mix the concentrate snow liquid in the proper proportion (1:25); otherwise you can get serious irritation to your eyes and lungs. When filled, place cap back on liquid tank. Firmly attach the remote control cable to the proper input on the rear of the machine The unit can also be operated at floor level or sitting on any regular surface as well. If the unit is to be mounted using the bracket, it is important that the snow does not shoot directly at any one’s face. Therefore, do not point the output in a direction that will aim directly at a person. Whatever installation method you choose, the unit must always be horizontally. Always disconnect from electric mains power supply before cleaning or servicing. Damages caused by non-observance are not subject to warranty. 6 Set Up and Operation Before plugging the unit in, always make sure that the power supply matches the product specification voltage. Do not attempt to operate a 120V specification product on 230V power, or vice versa. Procedure : 1. Plug power cord into a grounded electrical outlet. If necessary, turn power switch on rear of unit to “ON” position. 2. To emit snow, press the button on the remote (4) and hold for the desired length of time. You can operate the unit in two ways : with or without the remote control. If you wish to use the unit without the remote control, the power switch (6) will start the machine, and snow will be produced after the machine has reached its temperature. With the switch (5) you can choose the output power of the machine. Position “1” is 600W and position “0” is 1000W. If you wish to use the remote control, connect it to the DMX-input (7). When the power switch (6) is set to on, the red LED (4) will turn on. The DMX connector (8) can be used to connect a connector Snowstorm. You can now control several machines with one remote. They will work simultaneously. Remote Control Operation Its knob allows the operator to customize snow machine functions by adjusting output volume. 1. With the turning knob you can adjust the output power between 600W and 1000W. 2. When the switch(4) is set to on, the green LED will burn and snow is produced. 3. When the device is on, the red LED will turn on. 4. With the switch you can switch the snow output on or off. 1 2 3 4 Fig. 2 7 Maintenance The Snowstorm requires almost no maintenance. However, you should keep the unit clean. Disconnect the mains power supply, and then wipe the cover with a damp cloth. Do not immerse in liquid. Do not use alcohol or solvents. Keep connections clean. Disconnect electric power, and then wipe the connections with a damp cloth. Make sure connections are thoroughly dry before linking equipment or supplying electric power. Do not allow the snow liquid to become contaminated. Always replace the caps on the snow liquid container and the snow machine liquid tank immediately after filling. After every 40 hours of continuous operation, it is recommended to run a cleaning solution composed of 80% distilled water / 20% white vinegar through the system. Repeat this 2-4 times. When cleaning, use only a clean, lint-free soft cloth. An effective cleaning regimen is as follows: 1. While unit is unplugged and cool, clean out debris with vinegar and a pipe cleaner, making sure that the hole is free of clogs. 2. Empty all snow fluid from machine. Add cleaning solution to tank. Plug unit in. 3. Run unit in a well-ventilated area until tank is empty. 4. Refill with snow-liquid. Performance Notes Snow machines may sputter small amounts of snow occasionally during operation and for a minute or so after being turned off. Troubleshooting Showtec Snowstorm This troubleshooting guide is meant to help solve simple problems. Always monitor tank fluid level as you are blowing snow. Running a snow machine with no fluid can permanently damage the unit. If a problem occurs, carry out the steps below in sequence until a solution is found. Once the unit operates properly, do not carry out following steps. If the snow machine does not operate properly, refer servicing to a technician. 1. If you experience low output, mechanical pump noises other than the usual normal operating pump noise, or no output at all, unplug immediately. 2. Check fluid level, the external fuse, remote connection, and power from the wall. 3. If all of the above appears to be O.K., plug the unit in again. 4. If snow does not come out after holding the remote button down for 30 seconds, check the hose attached to the tank to make sure there is fluid going through the hose. 5. If you are unable to determine the cause of the problem, do not simply continue pushing the remote button, as this may damage the unit. 6. Return the machine to your Showtec dealer. 8 Product Specification Model: Showtec Snowstorm Voltage: 230V-50Hz (CE) Power consumption: 1000W(230V) Fuse: 250V/6,3A Output: 1000mm3/min. Tank capacity : 5 L Dimensions 540 x 320 x 230 mm (LxWxH) (H=440 incl. bracket) Weight: 10,5 kg Design and product specifications are subject to change without prior notice. Website: www.Highlite.nl Email: [email protected] 9