1
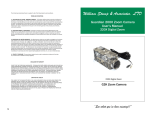
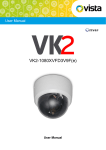
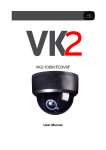
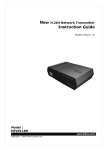
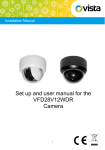
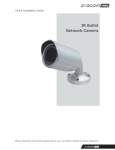
Installation Guide VK2-1080(720)BIR3V9F Installation Guide VK2-1080(720)BIR3V9F installation guide V2.1 2 WARNING TO REDUCE THE RISK OF FIRE OR ELECTRIC SHOCK, DO NOT EXPOSE THIS PROCUCT TO RAIN OR MOISTURE. DO NOT INSERT ANY METALLIC OBJECT THROUGH THE VENTILATION GRILLS OR OTHER OPENNINGS ON THE EQUIPMENT. CAUTION EXPLANATION OF GRAPHICAL SYMBOLS The lightning flash with arrowhead symbol, within an equilateral triangle, is intended to alert the user to the presence of un-insulated "dangerous voltage" within the product’s enclosure that may be of sufficient magnitude to constitute a risk of electric shock. The exclamation point within an equilateral triangle is intended to alert the user to the presence of important operating and maintenance (servicing) instructions in the literature accompanying the appliance. PRECAUTIONS Safety Installation Should any liquid or solid object fall into the cabinet, Do not install the unit in an extremely hot or humid unplug the unit and have it checked by the qualified place or in a place subject to excessive dust, personnel before operating it any further. mechanical vibration. Unplug the unit from the wall outlet if it is not going to The unit is not designed to be waterproof. be used for several days or more. To disconnect the Exposure to rain or water may damage the unit. cord, pull it out by the plug. Never pull the cord itself. Allow adequate air circulation to prevent internal heat build-up. VK2-1080(720)BIR3V9F installation guide V2.1 3 CAUTION: CHANGES OR MODIFICATIONS NOT EXPRESSLY APPROVED BY THE PARTY RESPONSIBLE FOR COMPLIANCE COULD VOID THE USER'S AUTHORITY TO OPERATE THE EQUIPMENT. CE COMPLIANCE STATEMENT WARNING: This is a Class A product. In a domestic environment this product may cause radio interference in which case the user may be required to take adequate measures. VK2-1080(720)BIR3V9F installation guide V2.1 4 1. Description This manual applies to the VK2-1080BIR3V9F VK2-720BIR3V9F bullet cameras. The VK2-1080(720)BIR3V9F are fully featured day/night IP bullet cameras with in built IR LEDs to provide 24/7 full HD images, with a remote zoom and focus set up function • Installation Steps Follow these steps to install the VK2-1080(720)BIR3V9F on your local network (LAN): 1. 2. 3. 4. Check the package contents against the list below. Connect the Network Camera. See page 3. Set an IP address. See page 6. Set the password. See page 8. • Package Component The system comes with the following components: • Contents in the installation CD The VK2-1080(720)BIR3V9F User’s Manual The SmartManager User’s Manual The VIP2 User’s Manual The SmartManager Installation software The VIP2 Installation software 1. 2. 3. 4. 5. Note: Check your package to make sure that you received the complete system, including all components shown above. • Connection Cable NO Wire Colour 1 Red: DC12V White: GND 2 Black Description Main Power, 2pin terminal, DC12V 700mA(8.4W), Note: internal heater does not operate when using PoE, the camera needs to be powered by external 12Vdc for heater to operate. Ethernet, RJ-45 port compatible with 10/100Mbps having PoE functionality. Modular Jack VK2-1080(720)BIR3V9F installation guide V2.1 5 Parts and Description Carefully remove the contents from the box, and verify that nothing was damaged in shipment. Camera Dimension See the diagrams below for the exact dimension of the VK2-1080BIR3V9F. Dimensions Unit: mm VK2-1080(720)BIR3V9F installation guide V2.1 6 2. Installation 2.1 Camera mounting Base Installation(Cable through the wall with the mount base) There are two ways of installing the camera. 1) Installation1 (Cable through the wall with the mount base) A. Drill the mounting location, using the template sheet (or the bottom of the mount base) as a template. B. Insert the plastic anchors into the drilled holes. C. Insert connection into drilled hole. D. Secure the camera to the wall using the supplied screws E. Adjust the camera orientation, and fasten the mount screws (M6x16) to fix the camera. VK2-1080(720)BIR3V9F installation guide V2.1 7 2) Installation 2 (Using the conduit knockout in bracket base) A. Drill the mounting location, using the template sheet (or the bottom of the mount base) as a template. B. Insert the plastic anchors into the drilled holes C. Insert connection into drilled hole. D. Secure the camera to the wall using the supplied screws E. Adjust the camera orientation, and fasten the mount screws (M6x16) to fix the camera. 2.2 Connection • Connecting to the RJ-45 Connect a standard RJ-45 cable to the network port of the network camera. Generally a cross-over cable is used for directly connection to PC, while a direct cable is used for connection to a hub. Micro SD memory slot on the Rear Board Remove the rear cap of the camera to insert the SD memory card. • Connecting the Power Connect the power of DC12V for the network camera. Connect the positive(+) pole to the ‘+’ position and the negative(-) pole to the ‘-‘ position for the DC power. Note: internal heater does not operate when using PoE, the camera needs to be powered by external 12Vdc for heater to operate. VK2-1080(720)BIR3V9F installation guide V2.1 8 2.3 Network Connection and IP assignment A standard straight network patch cable can be used to connect the camera to a switch or hub. Generally if connecting directly to a PC a crossover cable would be used. 1. 2. Connect the VK2-1080BIR3V9F/ device to the network and power up. Start SmartManager utility found on th supplied CD (Start>All programs>SmartManager), the main window will be displayed, after a short while any network devices connected to the network will be displayed in the list. 3. Select the camera on the list and click right button of the mouse. You can see the pop-up menu below. 4. Select Assign IP. You cam see a Assign IP window. Enter the required IP address. VK2-1080(720)BIR3V9F installation guide V2.1 9 3. Operation The VK2-1080(720)BIR3V9F can be used with Windows operating system and browsers. The recommended browsers are Internet Explorer, Safari, Firefox, Opera and Google Chrome with Windows. 3.1 Access from a browser 1. 2. 3. Start a browser (Internet Explorer). Enter the IP address or host name of the VK2-1080(720)BIR3V9F in the Location/Address field of your browser. The following page will be displayed. Click Live View or Setup to enter web page. 4. Live View 3.2. Access from the internet Access from the internet once connected, the VK2-1080BIR3V9Fis accessible on your local network (LAN). To access the VK2-1080BIR3V9Ffrom the Internet you must configure your broadband router to allow incoming data traffic to the camera. To do this, enable the NAT-traversal feature, which will attempt to automatically configure the router to allow access to the network camera. This is enabled from Setup > System > Network > NAT. VK2-1080(720)BIR3V9F installation guide V2.1 10 For more information, please see “3.5.5 System>Network>NAT” of User’s Manual. 3.3 Set-up menu access To gain access to the cameras set-up, a user name and password must be entered. As default: User = admin Password = admin It is recommended that the Administrator password is changed immediately. 3.4 Live View Page The live view page comes in eight screen modes: 1920x1080, 1280x1024, 1280x720, 720x480(576), 640x480, 352x240(288) and 320x240. Users are allowed to select the most suitable one out of those modes. Please, adjust the mode in accordance with your PC specifications and monitoring purposes. 1) General controls Live View Page Search & Playback Page Setup Page Help Page The video drop-down list allows you to select a customized or pre-programmed video stream on the live view page. Stream profiles are configured under Setup > Basic Configuration > Video & Image. For more information, please see “3.5.1 Basic Configuration > Video & Image” of User’s Manual. The resolution drop-down list allows you to select the most suitable one out of video resolutions to be displayed on live view page. The protocol drop-down list allows you to select which combination of protocols and methods to use depends on your viewing requirements, and on the properties of your network. VK2-1080(720)BIR3V9F installation guide V2.1 11 2) Control toolbar The live viewer toolbar is available in the web browser page only. It displays the following buttons: The Stop button stops the video stream being played. Pressing the key again toggles the start and stop. The Pause button pause the video stream being played. The Snapshot button takes a snapshot of the current image. The location where the image is saved can be specified. The digital zoom activates a zoom-in or zoom-out function for video image on the live screen. The Full Screen button causes the video image to fill the entire screen area. No other window will be visible. Press the 'Esc' button on the computer keyboard to cancel full screen view. The Manual Trigger button activates a pop-up window to manually start or stop an event. The Remote Focus button enables users to adjust focus and zoom remotely via network. The Smart Focus button readjusts focus automatically. 3) Video The VK2-1080BIR3V9Fprovides several images and video stream formats. Your requirements and the properties of your network will determine the type you use. The Live View page in the VK2-1080BIR3V9Fprovides access to H.264, MPEG-4 and Motion JPEG video streams, and to the list of available video streams. Other applications and clients can also access these video streams/images directly, without going via the Live View page. 3.5 VK2-1080(720)BIR3V9F setup This section describes how to configure the camera, and is intended for product Administrators, who have unrestricted access to all the Setup tools; and Operators, who have access to the settings for Basic, Live View, Video & Image, Audio, Event, and System Configuration. You can configure the VK2-1080(720)BIR3V9F by clicking Setup in the top right-hand corner of the Live View page. Click on this page to access the online help that explains the setup tools When accessing the VK2-1080BIR3V9Ffor the first time, the “Admin Password” dialog appears. Enter your admin name and password, set by the administrator. Note: If the password is lost, the VK21080(720)BIR3V9F must be reset to the factory default settings. See “3.6 Resetting to the Factory Default Settings”. VK2-1080(720)BIR3V9F installation guide V2.1 12 4) Focus and Zoom Control You can control Zoom and Focus in the live screen. Press the screen to activate the Zoom & Focus control panel. button on the left top in the live • Adjusting Zoom: Click “–“ button to zoom out and click “+” button to zoom in. The focus is moved slightly after adjusting zoom; adjust the focus again, as necessary. • Adjusting Focus: Click “–“ button for far focus and click “+” button to near focus. Note: Click the button in the live screen to set the focus to the optimum position. VK2-1080(720)BIR3V9F installation guide V2.1 13 3.6 Resetting to the factory default settings To reset the VK2-1080(720)BIR3V9F to the original factory settings, go to the Setup>System >Maintenance web page (described in “3.5.6 System>Maintenance” of the User’s Manual) or use the Reset button on the network camera, as described below: Follow the instructions below to reset the VK2-1080BIR3V9Fto the factory default settings using the Reset button. 1. 2. 3. 3. 4. 5. factory 6. Switch off the VK2-1080(720)BIR3V9F by disconnecting the power adapter. Remove the rear cap of the camera. Press and hold the Reset button with a straightened paperclip while reconnecting the power. Keep the Reset button pressed for about 5 seconds. Release the Reset button. The VK2-1080(720)BIR3V9F resets to factory defaults and restarts after completing the reset. Replace the rear cap of the camera. CAUTION: When performing a Factory Reset, you will lose any settings you have saved. 3.7 More Information For more information, please see the VK2-1080(720)BIR3V9F User’s Manual, which is available on the CD included in this package. VK2-1080(720)BIR3V9F installation guide V2.1 14 3.8 Specification Main Item C A M E R A N E T W O R K Specification Image sensor 1/2.8” Progressive scan RGB CMOS Active Array 1920(H) x 1080(V) Lens Motorized Varifocal 3.0mm ~ 9.0mm, F1.2, DC IRIS Angle of View 3.0mm – 93°(H) / 9.0mm – 31.7°(H) IR Distance 15m (with built-in 32 IR LEDs) Min. illumination Colour: 2.5Lux, B/W: 0.0Lux (F1.2, 50IRE with IR On) Shutter Speed Colour: 0.09Lux, 1/20,000 ~ 1/4 B/W: 0.0Lux (Slow Shutter with IR On) Video Compression Motion JPEG Video Resolutions MPEG-4 Part2 (VK2-1080BIR3V9F) : 320x240 ~ 1920x1080 Frame Rate H.264 @ (MPEG-4 Part: 320x240 10) VK2-1080BIR3V9F ~ 1920x1080 25fps all resolutions Video Streaming Profiles: H.264 HP, MP, and BP, MPEG-4 ASP and SP Simultaneously H.264(or MPEG-4) and MJPEG Protocol Controllable Rate and HTTPS, Bandwidth H.264 andRTP, MPEG-4 TCP/IP, UDP,Frame IPv4/v6, HTTP, QoS,VBR/CBR FTP, SNMP, uPnP, RTSP, RTCP, Security DHCP, ARP,authority, Zeroconf,HTTPS, BonjourIP Filtering, Privacy Zone Multi-user Max. Connection 10 API Programming Interface API Supported, Alarm Triggers Open Platform Compatible: ONVIFManual Trigger Motion Detection, External Input, Alarm Events File upload via FTP and HTTP Video Buffering Notification E-mail, HTTP and TCP Pre and Postvia Alarm Motion Detection External activation zone Yes, max.Output 8 programmable Network Time Synchronization Audio Yes alert activation SD Recording Yes, Continuous/Schedule/Event Software Reset Yes Factory Reset Yes, Button/Web browser Auto Recovery Yes Installation Tool SmartManager, Upgrade Web browser, SmartManager,VK2-Client Ethernet RJ-45 10BASE-T/100BASE-TX Video Output BNC, 1.0 Vp-p (75ohm, composite) Auxiliary Terminal, RS485 Tx+/Tx- Starting Temperature -20°C ~ 50°C Operating Temperature -30°C ~ 50°C (T.B.D) Operation Humidity 0~90% (non-condensing) Housing Weather-proof IP66-rated housing Power Consumption DC12V/PoE, 700mA Dimensions (W x H x D) Power over Ethernet IEEE 802.3af Class0 81.6mm x 68mm x 123.1mm Unit Weight 335g Approval CE VK2-1080(720)BIR3V9F installation guide V2.1 15 Norbain SD 210 Wharfedale Road Winnersh Triangle Wokingham Berkshire RG41 5TP 0118 912 5000 VK2-1080(720)BIR3V9F installation guide V2.1 16