1
Electric
Guitar
Amplifier
modeler
Owner’s Manual
Condenser
microphone
MR8mk3
Studio Monitors
Analog Synth
Headphones
Main Mix
Level
Main Mix
Laptop
Meters
Tape out
Assign to Main
Phones
Level
Tape input
Main out
Phones
output
Tape Level
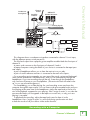
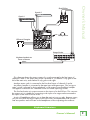
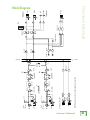
This diagram shows a condenser microphone connected to channel 1's mic input,
with the phantom power switch pressed in.
The line-level output from a popular guitar amplifier modeler feeds the line input of
channel 2.
A stereo synth connects to the line inputs of channels 3 and 4.
A laptop computer running the DAW of your choice is connected to the tape input
and output.
A pair of headphones allows you to hear the main mix as you play.
A pair of studio reference monitors is connected to the main mix outputs.
For a recording session example, you can record the vocals, guitar and keyboards.
These can be recorded as individual tracks, and you can listen directly through the
headphones. If you are recording through the mic, listen through the headphones
only, and turn off power to your loudspeakers. (The main mix level still needs to be
up, so you can record the tape out.)
For overdubbing, you will be playing live, and recording a new track onto the
computer through the tape outputs. You can listen to the pre-recorded tracks and your
live playing at the same time in the headphones. Adjust the tape level to find a nice
mix of the playback compared to your playing. If the "assign to main" is out, then the
pre-recorded tracks will not appear in the tape out or main mix, so only your new
playing is recorded.
To playback the recording, adjust the tape level control to hear it in the headphones. Press "assign to main" in, and slowly bring up the main mix level to hear the results of all your efforts in the studio monitors.
Recording with a Computer
Owner’s Manual
7