1
DREAM II Version 3.1
Software Release Information
15 December 2010
DREAM II Version 3.1
Page 1
Software Release Information
INTRODUCTION
December 15, 2010
Introduction
Version 3.1 software demonstrates some truly new directions for Fairlight, including MIDI, the
Background Recorder, and a new compound meter including PPM and Loudness metering. Some of
the features mentioned here were released as part of V3.0 software, which was only distributed to
EVO and XE-6 users. If you are one of those, you’ll recognise some things.
For existing users, some of the new features have been dongled, and so require a license update in
order to run. Please contact your Fairlight Business partner for details.
This documentation is a brief manual for the system, and a general overview about the new release.
We hope you enjoy the new features, many of which were requested by experienced users of the
system. Once again we are indebted to our family of users for their creativity, and for their patience.
DREAM II Version 3.1
Page 2
Software Release Information
MAJOR FEATURES
December 15, 2010
Major Features
Windows 7 64-bit
The system can now run in Windows 7 64-bit. This allows the addition of more RAM. There is a
minimum – DREAM will not start with less than 4 GB of RAM under Windows 7.
Note: Windows 7 32-bit is NOT SUPPORTED.
More RAM means better video performance, especially in HD or with multiple QuickTime files. It also
means better plug-in performance, and snappier all-round behavior.
This new operating system is recommended for anyone dealing with sluggishness in their system.
Fairlight is issuing an upgrade document for moving from XP to Windows 7. This is ESSENTIAL
READING for those upgrading their systems, because your Fairlight hardware panels must be
reprogrammed BEFORE you update the operating system. Ignoring this will cost you a lot of time.
It is recommended that you contact your local business partner anyway in order to talk through any
specific aspects of your setup and PC configuration.
DREAM II Version 3.1
Page 3
Software Release Information
MAJOR FEATURES
December 15, 2010
New Mixer Screen
Note: EVO and XE-6 users already have this feature from the V3.0 update.
A new “EVO Mixer Screen” is now available. It shows a row of mixer strips with mouse-active faders
and status displays including plugins, aux sends, dynamics, EQ, panning, input, plus active mute, solo,
arm and bus assignment buttons. Every channel includes metering, with Link Groups showing multichannel meters.
Operation is fairly intuitive, so I won’t give a detailed description here (though one will be developed
for the User Manual).
The system allows a choice of FMC (old mixer screen) or EVO Mixer Screen.
V3.1 software enables this new mixer screen by default; however it can be specifically enabled or
disabled from within the Themes setup dialog in:
Setup Î General Preferences Î Themes
To enable EVO Mixer Screen, ensure that its checkbox is selected, and choose the desired monitor
Now you may restart Dream II. The EVO Mixer Screen screen will appear on the nominated monitor.
EVO Mixer Screen was originally designed to work on a 1600 x 900 monitor, displaying 40 faders. If
your monitor is taller than 900 pixels, the faders will be taller, but everything else will look fine. If it is
narrower or wider than 1600 pixels, it will display fewer or more faders.
The bus meters in the upper right of the screen are sized to fit. Only active buses – ones with nonzero format, are shown. The fewer buses you have displayed, or the more pixels across your monitor,
the more details you will see. For the current version, there is a limit to the number of masters
displayed depending upon the individual bus widths.
The operation of EVO Mixer Screen is mostly straightforward, but here is a brief list of things you can
do.
• Use the scroll bar at the bottom to display a different set of channels.
• Click on any channel’s name to make it the current channel.
• Double click on the channel name to display the Virtual Channel.
• Drag faders up and down with the mouse.
• Double click on a fader for 0 dB.
• Single click Arm, Mute, Solo and Insert to toggle them.
• Single click on the Pan graph to toggle Pan on or off.
• Double click on the EQ / Dynamics / Pan / Aux graph to display the corresponding zoom page
(to close it, right click anywhere on it, or left click on the close box in the upper right corner).
• Double click the input slot to display the Patch I/O page.
• Double click any occupied plug-in slot to display its GUI page.
• Single click the Bus Assign numbers, or “Main” to toggle them on or off.
• Right click to bring up Plugins page.
DREAM II Version 3.1
Page 4
Software Release Information
MAJOR FEATURES
December 15, 2010
Automation Update
Note: EVO and XE-6 users already have these features from the V3.0 update.
Jog Mix. Until now, automation could only be read and written in Play Mode. Now it can be read and
written in any forwards transport mode. To do this, toggle the Jog Mix button ON in the Mix Menu
(Mixer Megamode). Any forwards movement can be used, including Jog, Shuttle, Play, FF, Jump,
GoTo, Locate or right-button-drag with the mouse. Any speed is OK, though of course the data
resolution will be very low if you go fast. Even if you press Stop, the system stays in write – this
allows you to adjust control values before moving forward again.
As soon as you move more than one frame backwards, the system will switch to Read.
Copy Mix. Allows any range of automation to be copied between paths, with an offset.
To use: select source paths (tracks, lives, buses, groups) and enable the parameters you want to copy.
Make a range, and position the play-head at a suitable sync point. Press the Copy Mix soft key.
Now select the destination paths. There can be any number of these, and they need not be of the
same module type e.g. you can copy from a bus to a track and so on. Move the play-head to a
suitable sync point for the paste, and press the Paste Mix soft key. If the number of destination paths
exceeds the source paths, the pastes cycle through the source paths in numerical order (a bit like
patching multiple paths on the Patch I/O page).
Preview Menu. Opens a new sub-menu of the Mix Menu, where some useful Preview commands have
been collected.
Glide range. This is a new command, available only when Preview is on. It takes the data at the
beginning of the range and glides smoothly to the current control value (fader or pot) by the end of
the range. This action will affect all signal paths in Preview status, on all enabled parameters.
Fill range. Same as before. When Preview is on you fill the range will the current control value of
the enabled parameters.
Flood range. This command copies parameters from one path, and flood fills them into the
automation on another path. It is available in the Path Copy menu (Mixer Megamode), and works
only when Preview is on. To use, make a range and select the source path. Copy the mix parameters
from the selected path by pressing the COPY soft key. Now select the destination path, and press the
flood range soft key. All the enabled parameters will be pasted to fill the range with automation
values from the source to the destination.
Live Preview. This is a quick way of getting signal paths in and out of Preview status. When Preview
is toggled ON, selecting any signal path puts it into Preview (normally this would require selection and
pressing the AUTO button on Xynergi, or pressing the AUTO button on a fader).
Read to Preview. Pressing this soft key while signal paths are in Preview status will load the current
Read value of enabled parameters into the control (fader or pot). It can then be used to fill range,
glide range, or as the basis for starting an automation pass.
Clipboard to Preview. This is a way of copying automation data from any point to any other. The
clipboard is loaded in the Path Copy menu by pressing the COPY soft key. Then, in the Preview menu,
pressing the Clipboard to Preview softkey loads the copied value of enabled parameters into their
controls (fader, pot or switch) for all signal paths in Preview status. From there it can be used to fill
range, glide range, or as the basis for starting an automation pass.
Preview Trim This command can raise or lower fader levels within a range, by a constant amount. It
can only be used with physical faders. It requires Preview to be on, and a range to be present.
DREAM II Version 3.1
Page 5
Software Release Information
MAJOR FEATURES
December 15, 2010
Press the Preview Trim soft key. The faders of the selected channels will snap to -10 dB. Move the
faders, playing if desired, to establish the amount of trim you want. Press the Commit P-Trim soft key
To escape with no change, press the Cancel P-Trim soft key.
Automation UNDO is now multi-step and is chronologically interleaved with audio edits in the UNDO
list. This means automation steps can be undone and redone with the regular Undo and Redo buttons.
Undo steps now include all write/trim passes, fill and glide range, mix copy operations, and graphical
edits made to the automation curves. Where automation changes were caused by following audio
edits, both data types are included in a single undo / redo step. Note that Automation Undo points are
removed from the Undo History when a new mix is created, or a mix is loaded.
Added Curves menu. The Auto Curves softkey in the Mix Menu (in the Mixer Megamode for Xynergi
users) accesses another menu level where Curves functions are available on tactile buttons. The
Curves Smart Pane is also associated with this sub-menu. You can also hold down Auto Curves and
touch any control in the Xynergi Pad to put its curve on all tracks selected for mixing.
Curve Target in the Mix Edit menu, Curve sub-menu: Selects the Display button on the Curves Smart
Pane, allowing you to select the parameter for curves displayed on all tracks selected on the Edit
Screen.
Safety Zone in the Auto Safe menu. Use this to protect your automation data, except for one zone
where you want to work.
Create a range using the IN and OUT soft keys in the Auto Safe menu. (Note: this is NOT the same
range used in any other commands – the Pad shows the timecode values of the safety zone while this
menu is selected). Now enable by toggling the Safety Zone button ON. While the safety zone is on,
the mixing software does not see any timecode outside the zone. So all Mix data outside the zone is
protected from change. This also means you cannot set ranges in Mix menus, nor use the Locators,
except within the zone.
There is also now an automatic update of the Insert state within the active mix when a plug-in is
added i.e. if Insert is off in the Automation, the insertion of a plug-in will override this. This prevents
the situation where you insert a plug-in after starting to automate your mix, and find that it doesn’t
seem to work.
DREAM II Version 3.1
Page 6
Software Release Information
MAJOR FEATURES
December 15, 2010
Compound Metering
The system offers a new compound meter including PPM and Loudness metering, as well as stereo
Phase indication. Note that the Compound metering is a dongled item (Part of the Software Plus
Pack Option), and so requires an additional license in order to be configured. Please contact your
local Fairlight Business partner for further details.
To enable it, click Setup Î General Preferences ÎMeters Î Enabled
Now you will see the new meters if you are using the new EVO Mixer Screen Mixer Screen (see
above), and on the ILP2 screen (if you have one).
The compound meter contains 2 individual components, a BarGraph and a Loudness meter.
The compound meters source can be selected as either the Control room source (pre-volume control),
or fixed to the main meter from the Source selection in the meter preferences. The Width of the
individual components is defined by the source, and so if for example you have the control room
selected as the source, and change the monitoring source between a 5.1 main, and a stereo sub bus,
the compound meter source and format will follow.
DREAM II Version 3.1
Page 7
Software Release Information
MAJOR FEATURES
December 15, 2010
The Bargraph can be chosen from several scales: Peak; PPM – BBC; PPM – DIN; RMS.
The Bargraph can also be individually disabled if this component is not required.
The Loudness meter component offers BS1770-1 compliant loudness metering consisting of
simultaneous momentary, short term and infinite integration RLB2 weighted meters.
These meters are referenced to a target LKFS value, and offer either a standard -18 - +9 LU scale, or
an optional -36 - +18 LU scale for material with a wider dynamic range (e.g. long form).
Settings for the loudness component include:
RMS Window: The length of the momentary sliding window (in ms).
Target Reference (in LKFS).
Short Window: The length of the short-term sliding window meter integration time (in seconds).
Integrated Gate: An optional Gate can be applied to the Infinite (programme) integration.
The blue numbers give running reports on level according to ITU R BS 1770-1 standard as a
referenced LKFS value (LK). They represent the subjective loudness of the audio program. The righthand number gives a rolling average over the defined short term window length, and the left-hand
number gives an average over the entire length of program i.e. since you last reset the meter. You
can reset the long-term average (infinite integration) by clicking the number.
The long-term average level can additionally have a gate applied in the meter preferences, in order to
allow it comply with the R128 EBU Standard.
DREAM II Version 3.1
Page 8
Software Release Information
MAJOR FEATURES
December 15, 2010
MIDI
This is a major new feature set in the Fairlight context.
Please note that MIDI is a dongled item (Part of the Software Plus Pack Option), and so requires
an additional license in order to be configured. Please contact your local Fairlight Business partner for
further details.
The software can:
•
Create MIDI Tracks
•
Record MIDI events in real-time
•
Load MIDI song files
•
Cut and paste MIDI clips
•
Edit the contents of MIDI clips
Setup
You will need a MIDI controller (keyboard or other) and at least one MIDI instrument (VSTi or rewire
device) to play out. These must be installed before starting Dream II software.
File Compatibility – IMPORTANT
Project files containing MIDI tracks CANNOT BE LOADED by earlier software.
Project files created by v3.1 software that do not contain MIDI tracks can be loaded by earlier
software.
If all MIDI tracks are converted back to audio tracks (losing all MIDI data) the project can be saved
and then loaded into earlier software.
NOTE: v3.0 software had a prototype version of MIDI tracks, using the Add MIDI Track command in
the Track Menu. This is incompatible with the MIDI implementation in v3.1, and you are advised NOT
TO USE IT.
Convert Tracks to MIDI
Each non-video track in the system is either audio or MIDI. By default all tracks are audio.
You can convert from audio to MIDI, or vice versa, by selecting tracks in the Editor and issuing the
command:
Tracks Î Convert to or From Midi Tracks
If you select some audio and some MIDI tracks before issuing the command, all the selected tracks
will end up the same – majority rules.
The audio and MIDI tracks are distinguished visually by a new pair of icons in the bar at the left.
MIDI
Audio
DREAM II Version 3.1
Page 9
Software Release Information
MAJOR FEATURES
December 15, 2010
Patching to MIDI Tracks
To patch MIDI inputs to tracks and their outputs to instruments, use Setup Î Instruments on the
Edit Screen.
Patching is done in three steps:
1. Load an instrument and patch a controller to it
2. Patch the instrument’s audio outputs to tracks or lives so you can hear it
3. Patch a controller to be recorded on a track, and patch the track’s output to an instrument to play it.
Step 1
On the input (left) side, load an instrument using the Add command. Choose any of your
installed instruments from the dropdown menu that is displayed. The GUI for that instrument
will appear on the screen.
Now assign a MIDI controller (MIDI Device In) and choose the MIDI channel (or OMNI) that
the instrument will play (it will not respond to other MIDI channels from the controller). The
MIDI controller you assign will play the instrument “live”.
Step 2
To hear the output of that instrument, it must be patched to one or more Track or Live Feed
inputs. This is done on the Patch I/O page in the normal way.
Step 3
The output (right) side shows all the tracks you have converted to MIDI. Choose the MIDI
controller (MIDI Device In) to be recorded on each track. Normally this is the same controller
for all tracks, which would be your MIDI keyboard. Patch the track output to any instrument
you have loaded.
Metronome
To set up a metronome, use Setup Î Bars and Beats Setup
DREAM II Version 3.1
Page 10
Software Release Information
MAJOR FEATURES
December 15, 2010
The metronome is created by the Oscillator. To hear it, use the Patch I/O page to patch the output
of the Oscillator Noise channel to an open track or live feed.
Recording MIDI Clips
Arm the MIDI track by clicking on the record button at the left of the screen. Put it in record using the
normal transport commands.
MIDI clips can be recorded on top of each other, just like audio clips. As usual, the top layer is heard.
Fades and crossfades have no effect.
DREAM II Version 3.1
Page 11
Software Release Information
MAJOR FEATURES
December 15, 2010
MIDI clips show black and white notes at their relative pitches.
Editing MIDI Clips
MIDI clips can be edited using the Cut, Copy and Erase menus, just like audio clips. Head, tail, clip
and range are all understood in the same way. The Trim head and tail commands, plus the Slip Clip
command, work as expected.
In addition the clips can be mouse-dragged, individually or in ranges, and edited with QWERTY
shortcuts in the same way as audio clips.
Each copy of an original MIDI recording is independent, so if MIDI Note Editing (see below) is used on
one of them, the other one will not change.
MIDI clips can’t be pasted on to audio tracks or the video track. Nor can the reverse be done.
Names can be added to the MIDI clips, then changed if desired, using either the Name Clip command
from the Xynergi Editor Megamode, or the Rename command in the screen Edit menu.
MIDI Note Editing
The system will only note-edit MIDI clips containing a single MIDI channel. If you have recorded or
imported notes from multiple MIDI channels into one clip, you can separate them using the command
MIDI Î Separate MIDI Notes by Channel
The system creates one clip for each channel, and places them on the tracks below the selected one.
For this to work, there must be sufficient MIDI tracks to take all the clips.
MIDI clips can be edited in detail using MIDI Î Edit MIDI Notes
Another way to do this is View Î Smart Pane Î MIDI Events, then click the Edit Events button.
Either way, one MIDI clip at a time can be edited – the one on the current track (blue name and blue
tab at left) under the cursor (the clip must be red).
MIDI Note Editing opens a piano-roll editor where each MIDI event (note ON + note OFF) is shown as
a clip-like object. Only mouse editing is available in this window.
Note: NO AUDIO OR VIDEO PLAYBACK OCCURS WHILE THE MIDI NOTE EDITOR IS OPEN.
DREAM II Version 3.1
Page 12
Software Release Information
MAJOR FEATURES
December 15, 2010
The Edit Events button toggles the Edit Screen between the MIDI Note Editor and the normal Track
Display.
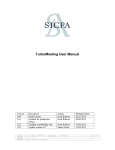
MIDI Events
Play head
Current length of MIDI clip being edited
The Play Head is set to Unlocked when you enter the MIDI Note Editor. This is to allow easy editing of
MIDI events while in Play.
The lighter background shows the current length of the MIDI clip. Notes can be outside this area if
you have trimmed the original MIDI clip (or copied its tail etc). You can edit notes inside and outside
the area. The notes outside the area cannot be heard in the MIDI Note Editor or the normal Track
Display.
Notes can be dragged horizontally, in time, or vertically, in pitch. Ranges of notes can also be selected
with a mouse lasso (marquee) and dragged horizontally or vertically. Notes dragged outside the limits
of the MIDI clip will not be heard after editing, but they are not erased.
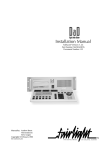
The Note Editor Smart Pane
Commands in the Note Editor Smart Pane are issued by clicking on the buttons.
Notes can be selected by moving the transport over them, like audio clips. In addition you can select a
range of notes in time and in pitch with the mouse lasso. The commands are described in detail below.
DREAM II Version 3.1
Page 13
Software Release Information
MAJOR FEATURES
December 15, 2010
Quantizes the
selected note(s)
to the current
note value.
Click to toggle
the track
display
between the
Piano Roll and
normal tracks.
To set the
velocity of the
selected
note(s), move
the slider to
show the
required value,
then click Set.
Click one of these
three buttons to set
the mouse click
action. It can be
used to select clicked
notes, add a note
where you click, or
delete notes where
you click.
To Trim the
velocity of the
selected note(s),
move the slider
to show a
positive or
negative value,
then click Trim.
Set the
current Note
Value, used
by Add Note,
Duration and
Quantize.
To Trim the
pitch of the
selected note(s),
move the slider
to show a
positive or
negative value,
then click Trim.
Shows
advanced
quantize
options.
These commands
act on the selected
note(s). They set
duration to the
current note value,
or add/subtract
the note value’s
duration.
To change the
MIDI channel of
the selected
note(s), move
the slider to
show a channel
number, then
click Set.
Control how
many octaves
are shown on
the piano.
Toggle the
metronome
on and off.
Set a playback
loop and start
it. Only MIDI
events are
played, not
audio.
Notes can be added. To do this, click the Select button in the Left Click group, then click a note value
from the array. Now move the mouse cursor into the piano roll and you’ll see the note length. Click to
create a note of any pitch at any position.
Deleting notes is done by selecting the Delete tool, then clicking on individual notes.
DREAM II Version 3.1
Page 14
Software Release Information
MAJOR FEATURES
December 15, 2010
Background Recording
Intro
Background recording is a major new feature in Version 3.1 software.
Please note that the Background Recorder is a dongled item (Part of the Software Plus Pack
Option), and so requires an additional license in order to be configured. Please contact your local
Fairlight Business partner for further details.
In brief, it allows you to make continuous background recordings of the Main Bus and/or the armed
tracks, independently of all other activity in the system. The background recordings can be brought
into the current project as clips at any time.
Uses
Recording the Main Bus can be useful for creating sound effects using real time controls on the
system. For example, you can jog or shuttle the transport to create a speeding up or slowing down
effect, and this will be captured into the background recorder.
Recording the armed tracks means that you will capture every sound made by artists in your studio,
even if they enter early, play a miraculous phrase that could never happen while the red light is on, or
crack a wonderful joke while you are listening to the creative director’s opinion of the last take.
Looped or Linear Recording
The background recording process has two recording modes:
Linear
Just like a normal recording, it captures everything from GO to STOP.
Looped
Records an audio loop on the disk, whose length you can control. For example, if you set the
length to 10 minutes, the recording always contains the last 10 minutes of source audio.
User Interface
To control background recording, open the Background Recorder using the following command:
Setup Î Background Recorder
DREAM II Version 3.1
Page 15
Software Release Information
MAJOR FEATURES
December 15, 2010
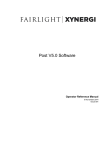
Options
Destination
Displays the “holding tank” folder where background recordings will be temporarily stored.
Click the … button to browse to the folder you want to use
Click the Reveal button to open the destination folder in Windows Explorer
Loop Length
Controls the amount of storage used when in Cached mode (see above)
Armed Tracks Slider
Choose the number of armed tracks you want to record in the background.
If you choose a number higher than the actual number of armed tracks, the system will
record the number of files shown in the Armed Tracks box. The actual armed tracks will
occupy as many of these recordings as they need, and the other recordings will record zeroes
but are ready for you to arm at any time, whereupon their inputs will be switched into the
recording tracks.
If you choose a number lower than the actual number of armed tracks, the system will record
the lowest-numbered armed tracks.
You can change the number of tracks to be recorded while a recording is in progress. To do
this, move the slider, then click the Apply button (where Go and Stop usually are).
Record Source
Main Bus Send
You may select the Looped or Linear checkbox for Main Bus Send. In either case, the system
will be ready to record the output of the Main Bus, one recording stream for each element of
that bus.
If you select Looped, the last few minutes of audio will be continuously stored on disk
(controlled by the Loop Length slider).
If you select Linear, the Main Bus output will be recorded continuously from the time you
press Go until the time you press Stop.
Armed Tracks
You may select the Looped or Linear checkbox for Armed Tracks. In either case, the system
will be ready to record the inputs to a number of armed tracks (as described under Armed
Tracks Slider above), one recording stream for each track.
Harvest
This is used to get access to the material stored by the background recorder.
When you press Harvest, the current contents of the destination holding tank are moved to
the project’s media folder. The media folder is opened so you can see the new recordings.
From there you can drag them into the project, or just leave them for later use.
If background recording was in progress when you clicked Harvest, the current recording is
terminated to allow its media to be moved, and a new recording started immediately.
DREAM II Version 3.1
Page 16
Software Release Information
MAJOR FEATURES
December 15, 2010
Clipboard
This is the same as Harvest, except that it also puts the recorded material into clips on the
clipboard (one clip for each recording). You will see the “ghosts” of the recorded clips
hovering over the selected tracks.
Resync
This is the same as Harvest, except that it also attempts to put the recorded material directly
onto the timeline at the record point (in the case of Armed Tracks) or the playhead position at
the start of the last loop point (in the case of the Main Bus Send).
Paste
This places a copy of the clipboard at the current cursor position. It’s exactly the same as
pressing the Enter button when you are in the Cut or Copy menu.
Go / Stop button
Go
Starts the background recording.
This button is only available when the background recorder is stopped.
If there is a recording already in the destination holding tank, it will be discarded. This could
happen if you are recording, then click Stop, then click Go, without using Harvest or Clipboard
in between.
Stop
Stops the background recording.
This button is only available when the background recorder is recording.
Apply
Applies any changes made to the background record settings whilst the background recorder
is active. If there is a recording already in the destination holding tank, it will be discarded.
Notes about the Background Recorder
It uses system resources:
a) the audio channels are sent to the disk via AudioBridge channels, so those channels are no longer
available to plug-ins or virtual instruments. Please bear this in mind when choosing a large number of
armed tracks for example.
b) disk bandwidth is used, which may impact normal high-track-count recordings.
Of course, you are using disk capacity as well, so it’s a good idea to remain aware when the recorder
is on, or at least to check on the holding tank now and then. But by and large the recorder is selfcleaning, because it throws away old recordings when you click the Go button.
DREAM II Version 3.1
Page 17
Software Release Information
MAJOR FEATURES
December 15, 2010
Dual Video Tracks (3D)
NOTE: The Dual-Stream (3D) Video Option will not be included in the initial 3.1 software release
(Available within Q1 2011)
A second video track can be added using the Add Pyxis Track command in the Track menu.
Note that 3D is an individually dongled item (Part number: 7CC1PT-DUAL), and will require an
additional license in order to be configured. When available … Please contact your local Fairlight
Business partner for further details.
System resources are affected strongly by adding a video track. At the moment our recommendation
is the following:
1. For dual SD tracks it should be possible to work under the existing Windows XP
implementation, but contention for memory may bring it down if too many plug-ins or
QuickTime files.
2. For dual HD tracks the system must be running Windows 7 64-bit. We recommend at least 6
GB of RAM and a 1 GB graphics card.
Pyxis Track playback on the Dry Ice screen can be optioned to show one track or the other, a split
view, or both side by side. This is selected in View Î Multi Video Monitor
Dream II is now capable of playing out 2 video streams when used in conjunction with Black Magic
Design HD Extreme 3D card. This would enable Dream II to play 3D footage. NOTE: BMD 7.9 drivers
(or later) required.
DREAM II Version 3.1
Page 18
Software Release Information
MAJOR FEATURES
December 15, 2010
In addition to proper licensing … in order to use the second video track, the system must also be
started with the -3D option. To do this, edit the shortcut used to start the system.
If you are using a desktop icon to start the system, add the phrase -3D to the “target” field – it will
then look something like this: "C:\Program Files\Fairlight\Dream II\Dream II.exe" -3D
If you are using the Xynergi “X” button to start the system, you need to edit the file:
C:\Program Files\Fairlight\Xynergi\Layouts\Dream II\layout.txt
The first line should become APPLICATION,{app}\Fairlight\Dream II\Dream II.exe -3D
If you are using a Decklink card, you will also need to add the –PRO2 to the startup string.
DREAM II Version 3.1
Page 19
Software Release Information
IMPORTANT IMPROVEMENTS
December 15, 2010
Importa nt Improvements
Undo List
The Undo list is now a menu which opens and closes using ctrl+Undo, BLUE+Undo or by holding
down Undo. Undo steps now include all write/trim passes, fill and glide range, mix copy operations,
and graphical edits made to the automation curves, interleaved in chronological order with the clip
edits. Where automation changes were caused by following audio edits, both data types are included
in a single undo / redo step.
When the list is open, the Jog Wheel and + / - buttons can be used to move up and down, before
pressing ENTER to execute up to the selected point.
Any point can also be executed by double-clicking with the mouse. Single step changes can be made
with the Undo and Redo buttons, both on the Xynergi / Constellation surface and the screen.
The list can be left open all the time, but the Jog Wheel and + / - buttons will only work when the list
has focus e.g. just after being opened, or when clicked with the mouse.
Note that Automation Undo points are removed from the Undo History when a new mix is created, or
a mix is loaded.
Plug-ins
Added new Plug-in Delay Compensation on busses. This compensates for latency caused by
inserting plug-ins on the bus itself, by advancing the playback of tracks assigned to the bus.
Since a track could be assigned to multiple busses with different plug-in configurations, there is a
strict priority for determining the delay compensation on a particular track. The priority goes Main,
Sub 1, Sub 2 etc Aux1, Aux 2 etc. This should compensate for the majority of stem mixing projects,
where each track is feeding a unique stem, and these stem sub-mixes are mixed to the main bus.
Note: there cannot be compensation for Live Feeds, or for tracks assigned to multiple busses (unless
all the busses have the same plug-ins inserted).
New Plugins Config menu. Press the Plug-in button in the Mixer Megamode once or twice to display
the menu. It allows you to load Plug-ins, delete them, re-order them and so on.
Added the ability to re-order plug-ins within a specific channel. This is accessed via an insert button
on the title bar of each plug-in window (next to the bypass). This insert window also allows an
overview of the plug-ins on that specific channel.
Changed the "Remove plug-in" logic to work on the currently active plug-in within a path, rather than
the last.
Themes
Graphical themes now available for Dream II
A new darker theme has been added for Dream II and FMC called the EVO1 theme. To change
between themes there is a new tab called Themes in "Setup -> General Preferences". FMC will not
respond to a change of theme until the application is restarted.
The colours for the track view are now defined in a new file called 'Track View Colours.xml',
located in the Dream II theme folder.
DREAM II Version 3.1
Page 20
Software Release Information
IMPORTANT IMPROVEMENTS
December 15, 2010
Mix and Edit Selection
Prior to the appearance of Xynergi, track selection for Mixing and for Editing were separate. In
Xynergi they were joined, to make editing and mixing on a small surface easier.
For Constellation XT users, however, the two remained separate. Then we introduced Constellation
XCS, and this inherited the Xynergi behaviour.
More Explanation
There are really four kinds of selection in the Dream system:
Edit Selection – may be multiple tracks, or Lives and buses
Mix Selection – may be multiple tracks, or Lives and Buses
Current Track – one track only, the last one that was selected for Editing.
Current Mix Module – one “path” i.e. Track, Live, Bus, Group, or Monitors. This is the “called” channel.
When a track is selected for editing, it will be affected by commands like cut clip and fade head.
Pressing a track button when an edit menu is selected will toggle that track in or out of the edit
selection.
The last track you selected for editing is the Current Track. That one is affected by Clip EQ, it used for
display of tracks on screen, and other things.
When a track is selected for mixing, it will be affected by commands like IN and OUT, it will be
available for Touch Latch or Snap, and so on. Pressing a track button when a mix menu is selected
will toggle that track in or out of the mix selection.
When a path is the Current Mix Module, it appears in the Xynergi Pad, the EVO Channel layout, the
old FMC Fat Channel, and so on. To call a path, you can press the Call button on its fader, or use the
Call Menu (in the Setup Megamode), or use several other menus like Insert Config, Direct Config, Path
Copy and so on.
What to Do
Now we have created a choice. To detach Mix selection from Edit selection, edit the System Variables
file using Shift+ctrl+U, and look for Mix Follows Edit in the Desk Functions group. Press OK to save
your choice. If Mix Follows Edit is ON, pressing a track button in either edit or mix menus will select it
for both. If Mix Follows Edit is OFF, pressing a track button only selects it for the current menu type.
Another option connected to this is Call Follows Edit/Mix/ALL/None. This is available in the Call
Menu, found in the Setup Megamode. This option controls what happens when you select a channel
for mixing or editing. For example, if it is set to ALL, selecting a channel for mixing or editing also
makes it the current module, or Called Channel, so it appears in the Xynergi Pad, the Fat Channel, and
other places.
How should you use this? If you are running a standalone Xynergi systems, it is easier to have Mix
Follows Edit and Call Follows ALL. This is the default setup, and you are already used to using it!
If you are running an EVO system you might consider setting Call Follows NONE. This will allow you to
call channels from your faders, without exposing them to edit commands or touch write. It’s a “safe”
option. But if you use touch write all the time, you might want to set Call Follows Mix. That way,
calling a fader makes it ready for your current touch mode.
By default, Call is set to follows ALL if Mix Follows Edit, and NONE otherwise.
DREAM II Version 3.1
Page 21
Software Release Information
IMPORTANT IMPROVEMENTS
December 15, 2010
Track Display
When choosing a number of tracks to display the system no longer includes the video track in the
calculation. Previously you would get one less audio track if the video track was displayed. Now the
video track (if one is loaded and displayed) appears automatically when audio Track 1 is displayed.
New option in Setup Î General Preferences called 'Display centers on current track'. This changes
the track display selection Blue 1T, 2T, 4T etc. so that it does not work in banks, but instead centers
the current track in the middle of the display. This also affects the track selection buttons. This option
is disabled by default.
More work on the track display views: the starting track in the track bank views is the same with or
without a video track.
Improvement to the drawing of linked tracks. Linked tracks no longer have the red line around the
first and last tracks in the link, as this got confusing with a lot of linked tracks. Instead the track
borders within the linked tracks are now a lighter colour. There is also a new option in Setup Î
General Preferences called “Linked Clips drawn as single clip”. When this is on linked clips are drawn
slightly thinner to make them stand out more clearly.
File Handling
(Preliminary) Video tape mode. Switched on using debug switch "Tape Mode", "for video". Currently
works with uncompressed video only.
I-frame Mpeg2 files and MVF files can now use the video pipeline feature (by turning on video pipeline
in Setup -> General Preferences -> Playback -> Compressed Video Pipeline Enabled). Formats
supporting pipelining include quicktime MPJPEG-A (.mov), quicktime DV50 (.mov), quicktime DV100
(.mov), mjpeg (.vmj), prunus mpeg2 (.mvf), I-frame mpeg2 MXF files (.mxf). If you turn video
pipeline on, these file formats will play more reliably on a network (including HD files).
Orphaned media dialog – restores clips from media which no longer have references. This is found
under the View menu above the Edit Screen. Select the menu command to display a list of the media
which have been orphaned during the current session. Double-click any piece of media to bring it back
into the project.
Playback of Avid MJpeg/MXF files
Dream II now reads Xdcam HD (long gop mpeg2) opatom files, generated on Avid M.C.
Long gop Mpeg 2 MXF files exported by Dream are now compatible with Sony XDCAM viewer, and
consequently they are now a lot quicker to drag and drop onto the timeline.
PRO2 decklink video output option tweaked and improved. Requires Decklink V7.8 drivers, which are
now enforced. -PRO2 decklink video output option further tweaked to work with 2 x Decklink Cards.
Sometimes the decklink video output was 1 frame out of sync when enabled with -PRO2 option.
PRO2 decklink video option detects whether a genlock video reference is connected to the decklink
card and warns if not so. other -PRO2 tweaks.
Reduced the timeout waiting for an AVI/mpg frame to render. Fixed an issue where AVI files could
"stick" when trying to playback the last frame of some .mpg files. previously using 9pin control to
control a Pyxis from a Dream with "bi-directional control" switched on, could intermittently jump out
of jog to stop, when jogging at slow speeds.
DREAM II Version 3.1
Page 22
Software Release Information
IMPORTANT IMPROVEMENTS
December 15, 2010
Import
When importing a project file containing more tracks than the current project, the number of tracks
will be automatically increased. This applies only when importing into DR2 files, and when importing
Pyxis, OMF, AAF, AES31 or Final Cut XML.
Load Speed
Very large projects are loaded faster than previously.
Audio Scrollers
Now display changed waveform when Clip EQ is applied.
Jump to Bar
There is now a Bar selection in the Jump Menu. This will cause the transport to jump to the next or
previous bar line.
Tempos and bar lines are defined in the dialog Setup Î Bars and Beats Setup.
This jump command works whether or not bars and beats are displayed in the timeline.
Localise
After localizing media, all clips that used that media are updated to access the new (localized) media
straight away. Previously it was necessary to close then reopen the project see the clips access the
new localized media.
Clip Level and EQ
When editing clip EQ or Level whilst playing, the playback responds much more quickly to the changes.
MIDI Machine Control
Dream II can now interpret the MMC protocol (as a receiver). To achieve this, a new type of Machine
is available under machine control, called "MMCSlave". Select and enable this machine. You may also
need to enable MTC generator, for true MIDI bi-directional control. Can also interpret MMC Loop
instructions.
Second Edit Menu
As the edit menu was getting very long, some of the menu items under it have been moved to a new
menu called 'Edit Settings'. Anything that was not an actual edit operation but instead affected edit
operations has been moved under this new menu.
Numeric Jumps
Added new Jump control using the numeric keys. These jump by the number pressed (n) and align
themselves to the edge of the currently displayed timescale (e.g. with H:M:S:F timescale, the jumps
are aligned to the nearest Frame and move by n seconds). The 00 key aligns to the frame (forwards
or backwards depending upon the Jump key pressed). The - and + aligns to the frame regardless of
the Jump key pressed. For Bars/Beats, the units above are substituted with beats and notes (defined
by snap-to). Bars/Beats also utilise the Subf/Clear key to align to the nearest beat.
DREAM II Version 3.1
Page 23
Software Release Information
IMPORTANT IMPROVEMENTS
December 15, 2010
ILP2
Mic gain control has been added to the ILP2.
This can be accessed via the Path Strip or the Channel page.
You can now double click within the buss assign area on the ILP2 screen and new mixer screen to
bring up the bus assign window.
DREAM II Version 3.1
Page 24
Software Release Information
XYNERGI / XCS IMPROVEMENTS
December 15, 2010
X y n e r g i / X C S I m p r o v e m e n ts
Fader Sets
Link Group markings are now shown when mapping Fader sets.
Fader sets can be changed safely at any point during mapping. This allows mapping of multiple fader
sets without leaving that layout.
Purple tally now shows fader being mapped i.e. path that will disappear if a different one is chosen.
Fast Mapping. Holding ctrl and pressing a path button (Track, Live or Bus) will fill up the rest of
the fader set in channel order. Link Groups are mapped as one item. This is a very quick way of
mapping your fader sets after setting up Link Groups.
Individual Param Enables
Parameters can now be enabled individually. This is done in the Param Enable layout, accessed from
Mixer Megamode when Mix ON is active.
Several of the buttons now contain red triangles, indicating that they control more than one
parameter. Pressing the button toggles all the parameters. Holding down the button causes display of
the individual parameters in the top row of keys. They can be toggled separately there. The group
button shows a half shading if only some of its parameters are enabled.
Zoom Screens
In the Mixer Megamode, double pressing Pad Mode buttons (Path, EQ, Dyn, Aux) toggle Zoom
screens on and off. This holds the Zoom Screen on indefinitely, regardless of settings in the Utils
menu. The Zoom screen changes to follow the current Pad Mode.
Soft Pot Layout
The Soft pot layout is delayed for a second to prevent it flashing when a toggle is intended.
Quick press and release toggles between Pan LR and the last other setting you used
Pot button shows all options (now includes all auxes) and illuminates when switched away from Pan
LR.
Clip Level Layout
This is accessed by pressing Clip Level a second time. This layout is now recalled when returning to
the Clip Level menu.
The +2db and -2db buttons were creating problems with fast operation, so have been replaced with
jog level and jog display. To use either one, hold down the button and jog the selected clip levels (or
displays) up and down. You can also use Numpad button e.g. hold down the button, press <Numpad>
3 and release for a 3 dB boost, hold down the button press <Numpad>minus <Numpad>3 and release
for a 3 dB cut.
Quick Edit menu
The Quick Edit menu (Shift+Editor) is now available in Record Megamode as well (Shift+Record).
Added Cut Head/Tail and Copy Head/Tail.
DREAM II Version 3.1
Page 25
Software Release Information
XYNERGI / XCS IMPROVEMENTS
December 15, 2010
Set source
This layout is available when SEL is active (48 path display). It allows quick patching of inputs or
buses to selected tracks or lives.
Set source now has a NONE button, for removing input patching to selected tracks or lives.
This layout now has VCA group selection for the selected tracks and lives.
Macro Improvements
Holding down key 7, labelled “macro” in the top row next to Help, will display three rows of macros,
allowing you to access them easily. Release the button to return to normal.
Macro bank numbers are now preserved when changing to Mixer or Record MM.
Added optional Fast macro layout switching when holding down the macro button in row 5. This is
available in the Edit Macro display (press Macro in the Setup Megamode, or BLUE+macro any time).
When Fast is selected, the 3-tier macro display will appear immediately the macro button is pressed.
More Xynergi Improvements
Now handling AutoCurves.
Asserting any faderset now cancels Mixer Set in Xynergi.
Added Play button to GoTo layout, to facilitate GoTo+Play
Added locate to Frame Edge from Xynergi REW/FF keys above the Jog wheel (use REW+Clear or
FF+Clear). In either case the transport rounds off its position to the previous frame edge.
Added access to Project Track Count from the Proj Megamode.
Implemented selection and double-pressing of VCA masters. These can be seen in the second bank
of buses. VCA Masters can now be isolated and made auto safe.
Added punch again button to the Record Megamode. This allows you to initiate recording at the
same place as last time, but with no programmed punch-out.
In Record Megamode, after pressing disarm all, go straight to Editor Megamode and the previously
armed tracks will be selected (user request).
Link Group markings now displayed for Armed, Thru, Solo, Mute, and for Live Feeds.
DREAM II Version 3.1
Page 26
Software Release Information
MISCELLANEOUS IMPROVEMENTS
December 15, 2010
M i scel l an e o u s Im p r o v e m e n ts
Dream now always chases stationary LTC, if "Chase stationary LTC" parameter is on. Previously
Dream would only chase stationary LTC if it was in a particular transport mode.
If RelinkMedia Tool fails to find any new media, then the project is not re-scanned and re-opened.
Improvements to the H:M:S:F timeline ruler. When it cannot draw every mark type at a certain zoom
level, causing it to skip marks, the divisions it chooses are no longer arbitrary: For minutes it draws a
mark for every minute or if not enough room every 2nd or 5th minute. For seconds it draws a mark
for every second or if not enough room every 2nd, 5th or 10th second. For frames it draws a mark for
every frame or chooses divisions that are divisible by the current frame rate.
Now shows the 'Background tasks' window automatically if audio had to be FUF stuffed for a MT
format save.
Some track names are now not imported from omf and aaf files because they dont make sense, and
are distracting (e.g.: a track named 'Track 3' will not rename the existing track).
The 'description' field inside a BWF is preserved when a clip is exported as BWF. The default value for
the BWF 'originator' field can now be specified. See Setup Î General Preferences Î Options
When using 'Backup Project To Folder' audio clips which are inefficient to backup are flagged, and you
are given the option to consolidate these clips (fuf stuff or localize) to make backup more efficient.
When using 'Backup Project To Folder', if video media which is transcoded to a specific video format,
then all other versions of the video media is deleted, to prevent multiple copies of the same video
media.
Decklink video output jog performance improved when using -PRO2 option.
While scrolling through the Audiobase list results with the jogger wheel, you can now hold down the
shift key to scroll through the results quicker
Now it only takes one undo to put clips back where they previously were after being moved by the
mouse.
An improvement has been made when creating a new project with a video track. The system will now
automatically create the same path structure on the video device, instead off creating it later when
some video has been recorded/imported into the project. This is useful so you can drag existing video
files dealing with the project into this new folder when you have just created the new project.
In Loop menu, the Pre/Post Roll switch controls whether or not the system pre-roll and post-roll times
are used by the Loop commands. The switch is ON by default. This gives the same behaviour as
previous releases.
AES31 and AAF project exports now export the name of the tracks. DMD AAF plugin 2.0.1.12 or later
is recommended.
When importing a project containing audio, if there are insufficient tracks, then tracks are added as
required. This applies only if the current project is DR2 format. Implemented when importing ...
Pyxis/DR2 project, OMF, AAF, AES31, FCP XML.
Dream II can now interpret MMC loop instructions.
After localizing media, all clips that used that media are updated to access the new (localized) media
straight away. Previously it was necessary to close then reopen the project see the clips access the
new localized media.
Auto-call of the Studio Monitor when selecting studio sources and speakers.
Improved the load speed of some very large projects (greater than 10,000 clips and files).
DREAM II Version 3.1
Page 27
Software Release Information
MISCELLANEOUS IMPROVEMENTS
December 15, 2010
Previously, if a DR2 project contained temporary audio media, it was necessary to localize that media
before the project could be saved. Now, if a DR2 project contains temporary audio media (located on
a temporary device), it is suggested that you localize the media, but the user may choose not to, and
the project will be saved as is. As Noted, this applies only to DR2 projects.
When editing clip EQ or Level whilst playing, the playback responds more quickly to the changes.
The EDL tool can now conform from EDLs which have mixed DF and NDF source timecodes.
Restore Project Dialog.
Now when you drag media onto the timeline it follows the same snapping rules as dragging clips
around on the timeline with the mouse. This makes it easy to drag some media onto the timeline
and have it begin at the playhead or in line with some other clip.
Now displays the current time on the menu bar on the top right of the Dream II screen.
New video codecs. Dream II and PyxisMT can now capture directly to these video codecs.
- IMX 30 (SD) - .mpg - IMX 50 (SD) - .mpg - Mpeg2, long gop (SD) - .mpg - Mpeg2, long gop
(HD) - .mpg
- Huffman codec (2:1 lossless) HD. - .vmh
- Huffman codec (2:1 lossless)
Encrypted (SD or HD). - .vmh
The Fairlight MPEG dongle option is required to capture in any of the
mpeg codecs. Capture directly to Mpeg2 Long Gop requires a PC with sufficient CPU grunt. The
codec is chosen in the SetupVideoCapture dialog under General Preferences.
If you wish to capture
to an encrypted format, you also choose a password for capture. The same password must be
entered to unlock encrypted video media, each time the project is opened.
New version of SX-20 Flash that work in Windows 7 64bit.
New menu item "Edit -> LR Stereo Swap". This edit function allows a quick way to reverse the left
and right sides of multi-channel stereo clips. This feature is only available in DR2 projects.
New ability for razor operations. It is now possible for razor to remove time before the playhead (to
the left) instead of after the playhead (to the right). To switch between razor working to the left or
to the right of the playhead, hold down the 'Razor On' key on the TUI. On the soft menu keys you
can choose between 'Leading Clips' and 'Trailing Clips', where 'Trailing Clips' is how razor has always
worked.
A new section has been added to the status bar to display which TUI edit menu is currently enabled,
or which Xynergi mega-mode the Xynergi is in if not in an edit mode. For Xynergi's the track bank
status bar display has never displayed anything as this does not apply to Xynergi's. Instead for
Xynergi's this area now displays if you are in 'Multi-Mode'. It is displayed with a red background to
help the user know they are currently in 'Multi-mode' also.
Aux To Main Assign. The bus to bus resources are currently shared, and so when this enabled, it is
possible to run out of the 64 bus to bus channels. This means that out of the 72 possible busses, the
last 8 are unable to be assigned to the main.
Added the ability to be able to edit what is contained within a group clip. To do this double left click
on the group clip you would like to edit. This will change the timeline to show just what is inside the
group clip. You can than edit these clips the same as editing any other clips. To exit editing the
group clip either press the 'Esc' key, or double left click on the timeline.
(ILP2 screens) Now shows touch enabled on the ILP2 screen as red triangles beside the controls.
(Evo Console) It is now possible to change what is displayed in the top section of the ILP2 screens.
By default it displays the Ancillary display (Automation and Bus meters) on the first ILP2 and the
track/live meters on the second ILP2 screen. To manually specify what is displayed at the top of
each ILP2 section add the registry value 'DisplayMode' to the ILP2Bay's registry location. This is the
registry location where you set the ILP2 screens up. Valid values are: 1 - Ancillary Display
2Track/Live Meters
The decklink output now supports SD NTSC @23.98 in both -PRO and -PRO2 modes. In this mode,
feed 29.97 BnB to SX20 and the Decklink card.
DREAM II Version 3.1
Page 28
Software Release Information
MISCELLANEOUS IMPROVEMENTS
December 15, 2010
Improved editing of group clips. Now if you erase the head/tail of a group clip and than ungroup the
group clip, it now only puts the section of the clips within the group clip that could be heard back onto
the timeline. That way ungrouping a group clip does not change how the timeline sounds if the length
of the group clip had been changed. This also fixes the issue if you have split a group clip and than
later ungroup a side, as that would return clips from outside the group clips range.
Wave Render menu now uses the plugin selection dialog, rather than just presenting the list of
plugins.
Undo surface menu Playhead Follows softkey has the standard toggle-key behaviour. It can be
explicitly turned On or Off by using Shift or Ctrl. Useful in macros.
The track bank display in the status bar now displays when you are in the first track bank. Previously
it only displayed text when a higher track bank. NOTE: This is for non Xynergi users only.
Now displays the max peak level text of multi-channel meters, which means there is always a max
displayed when there is a lot of meters displayed. As the meters were to thin to have individual peak
text representations. Also when the peak text is above zero is now red.
MXF compatibility issues with Ardendo AAF Tools generated DV video files addressed.
MXF compatibility issues with Ardendo AAF Tools generated DNxHD video files addressed.
MXF compatibility issues with Ardendo AAF Tools generated audio and imx mpeg video files addressed.
Vastly Improved Clip Level editing response.
Vastly Improved Clip EQ editing response when in loop jog.
Dream II will now read the Avid specific "Start" time parameter on MXF files generated on Avid
systems, and use this to set the clip birthday (so that it can be resunc). Dream II will also read Avid
clip name details.
Dream II can now export Op1a AVCi MXF files.
Descriptive information is displayed on the decklink output on bootup in PRO2 mode (much like PRO
mode).
Clip EQ now works on all selected clips, not just the clip on the current track.
AVCi MXF op1a files are now exported with 4 channels of audio using AES3 encoding for compatibility
with Quantel systems.
After performing a razor operation the range now reduces in length which helps emphasise the time
that was removed.
AES31 and AAF project exports now export the name of the tracks. DMD AAF plugin 2.0.1.12 or later
is recommended.
Added in-place SMPTE positional information to the offline VST render process in order to extend the
feature set.
9pin bi-directional control significantly improved.
DREAM II Version 3.1
Page 29
Software Release Information
BUG FIXES
December 15, 2010
Bug Fixes
Previously not all Machine Control setups were saved and restored. Now machine offsets, LTC/MTC
generator switches, and "In stop" parameters are saved and restored. "Video Arming" is a special
parameter, in that most people will not be over-recording video onto tape, and as a safety feature,
must be re-enabled each time you turn the system on, if required.
Setup->General Preferences->Options->"Multiple Workspace" options are no longer greyed out in MT
projects.
Video locator tiles are redrawn if necessary when encrypted video is unlocked.
Various old bugs fixed in legacy FMC code that failed to recognise Record & Rehearse transport
modes.
The current playlist is now recalculated after exiting from Setup->General preferences, to ensure that
the new value of soft edits is reflected in the playlist.
Resolved an issue with rendering video, with frame rate processing applied, to another codec.
Previously while changing the clip level on clips if you than changed to another mode which cancelled
the operation it could put the transport into stop. This has now been fixed.
Previously the timecode embedded into Quicktime mjpeg .mov files could be incorrect upto 1 frame in
NTSC.
Previously the long gop mpeg compressor generated incorrect mpeg files in 29.97DF
Previously some projects exported to AAF files as the wrong layers.
Previously some 'Blackmagic 10 bit' quicktime movies would fail to be read correctly, and could cause
a crash.
Previously natively recorded QT MJPEG files would indicate an incorrect length (when viewed in
quicktime player).
Previously dropping a 10 channel WAV file caused DREAM to generate an exception and then hang.
Previously changing the undo follows settings needed Dream II to be restarted to take affect, they
now take affect after pressing the okay button.
Previously if you shut down the PC while Dream II while was still running, the next time you ran
Dream II it would report that an exception had occurred. It no longer does this.
If you muted a clip and then pressed undo you would not hear the clip straight away, as the track
cache was not being flushed in this case.
If you did a view/hide Pyxis track it could increase the viewed audio tracks by one.
Fixed false "video reference not connected" messages for Decklink Studio and Studio 2 cards.
Fixed an issue with ATI 5000 series cards where graphics corruption could occur with the Dream II
menus.
Fixed a crash that could occur in the following circumstances: * You have 'Scroller follows current
track’ enabled * A clip in the clipboard which is displayed on an audio scroller * You are panning
through the tracks
Fixed a crash that could occur if you changed focus to another application while Dream II was in its
initial startup.
Fixed a bug with 'Track Menu - Numbers', where could not swap link groups back again immediately
after just swapping them without changing the track selection first.
DREAM II Version 3.1
Page 30
Software Release Information
BUG FIXES
December 15, 2010
Fixed a bug where could not display video full screen on a 1920x1080 monitor when 'Display Mode'
was set to 16:9.
Errors within the iXML chunk of BWF files rectified.
Clip EQ surface menu: In/Out sets all selected clips to be the same rather than toggling them
individually.
Bugfixes in OMF export - associated with multiple (very short) fades next to each other, induced by
translating the Dream II layering model into the OMF non layered model.
Previously, MP4 files containing audio would go "offline" after an Undo.
Localising a reversed clip in DR2 removes the reverse-ness.
Previously exporting a 32bit wav file (not BWF) resulted in distorted audio.
After performing a localize, sometimes the user would get an erroneous message when trying to save
the project.
Dream II now sets the embedded timecode for exported MXF files.
Previously the default Clip Eq was not fully loaded when the application started.
Previously undoing an apply clip eq would leave a clip with no eq, but with the EQ icon showing.
The Clip EQ edit state was sometimes incompletely cancelled or not cancelled at all. As a result the
dialog, surface menu and clips would disagree, get into different states. Now EQ edit is cancelled
when the current track changes, and after project load, undo and redo.
Fixed a bug where illegal video playback advances could be entered into the combo box.
Localizing now no longer requires multiple passes to localize all media. Additionally, clips can now
display an icon, when the media they represent is not local. Additional information available in
Statistics.
Previously recording @ 96khz, with rf64 wav file mode switched on, could prematurely drop out of
record, with the error message: Maximum File length reached.
Fix for the smart panes when Dream II is not run on the primary monitor.
Fixed a rare bug where some of the video window would be displayed over the status bar when it
should not be being shown.
Fixed a bug where when adding a fade to multiple clips not all of them would always get a fade. This
issue occurred if you have the option to display clip time in the range display.
Fixes to RestoreChannels. Previously it did not work with multiply selected clips. Other tweaks and
fixes to RestoreChannels.
Importing of Quicktime files with the crop/pad option was broken in v2.6.0b6. Now fixed.
Importing of some Quicktime files without crop/pad option was broken in v2.6.0b6. Now fixed.
Incorrect text displayed whilst scanning an MP2 file fixed.
Previously 8bit export was broken.
Previously some mpeg files (.mpg and .mvf) would snap to 1 frame too early on the timeline.
Previously the progress bar would not update (appear to be frozen) when backing up a project, with
dv25 chosen as the destination format.
Previously video capture could go out of sync, if video capture mode was turned on and left on whilst
closing/opening or making a new project.
DREAM II Version 3.1
Page 31
Software Release Information
BUG FIXES
December 15, 2010
Previously you could not load a MT format project from a read-only device (e.g. a DVD) then perform
a save-as to writeable device (e.g. local disk).
Some HD RGB encoded .avi files could crash Dream when imported and resized (to a smaller size).
When importing omf files, some stereo audio was mistakenly misinterpreted as mono. Bug introduced
in 2.6 (#692473) omf clips are now no longer imported onto safe tracks.
A bug related to media filename confusion with filenames which had a dot (.) as part of the filename.
e.g.: FL_-gloves on.new.01_a1-9Y4J86D4QNJM9.wav
Further improvements to using 9pin control to control a Pyxis from a Dream with "bi-directional
control" switched on.
Previously the read-only flag on a media device was not persistent. If you set it, it would reset it self.
Same for the media type flag (video/audio/both).
The new temporary clips were not being highlighted red when selected. Also fades on temporary clips
in non-layered mode could be drawn not yellow.
Added a cancel of the AudioBase Search or QWERTY via the global ESC key.
Previously D10 MXF files containing frames that were too large could not be exported. Now the larger
than legal frames are truncated.
Previously selected File Î Export Î Video File would de-select tracks if any tracks were armed,
making it difficult or impossible to specify which tracks were required for export.
Previously Auditioning blanked out the Decklink output.
Bogus error message "Media 'FL_bounce...' identical to 'FL_bounce.." which appeared sometimes
when bouncing audio. Bug fix - After Undo and Redo, certain parts of the system forgot that tracks
were armed. Consequently some features did not work as expected, for example the selection of
armed tracks on entry to the Arm menu.
Fixed a bug with Audiobase audition where on some machines the audition was always occurring on
the first audio track.
Importing of Quicktime files with the crop/pad option was broken in v2.6.0b6. Now fixed.
Saving to MT project format neglected to require FUF-stuffing for stereo audio referenced by mono
clip(s). Bug fix - Dream crashed when opening some OMF files.
Time remaining was calculated incorrectly when recording to mjpeg quicktime format.
Fix for some graphics cards where you could get graphics corruption on the track name section when
loading a new project. Improved the finding of files via Audiobase using the returned path. It can now
find files via the new returned path on Audiobase drives that are shared not as the default
administrator share (i.e E$) but as a shared name. Fixed a bug where in non-layered display mode
reversed clips with a fade out could display the red offline line for the duration of the fade out when
there should be no red line.
Improvement to the code that detects that a clip was accidently picked up in non-layered mode with a
left mouse click ( detected by the fact that the mouse is not moved much ), so that it now also works
with multi-channel clips. Also fixed an issue that could occur when a single clip was picked up
accidently and was reinserted at its old position.
Fixed a bug that could occur if 'Track display follows undo' is turned off and you add a video track.
This could cause the new video track to end up in the wrong spot after an undo was performed later.
Fix for a case where track names in a link group could be changed by going into a library project and
back again. Or they could change if the track names in the link group are given a new name and then
an undo is performed they would not all revert back to their old name.
Previously, space evenly did not work correctly with stereo or multi channel clips.
DREAM II Version 3.1
Page 32
Software Release Information
BUG FIXES
December 15, 2010
Previously unable to add more than 6 VST instruments, due to a graphics bug.
Several Bug fixes relating to changing the order of multiple plug-ins within a path - particularly on
busses.
Resolved issue with Xynergi PAD metering of Studio Monitoring.
Previously exporting an 8channel (or greater) wave file with sample rate conversion didn't work.
Previously some projects exported to AAF files as the wrong layers.
Cleaned up the Automation Curves display when in Jog Mix.
Fix for a Xynergi Mix Save QWERTY Focus issue.
Fix for Fill Range logic reverting controls in Preview back to mix state.
Fix for incorrect warning message (ADR_TREE and VIDEO_TRACK) on AAF export.
Fix for project save getting out of sync between FMC and Dream II.
Fix for re-ordering plug-ins messing up the order and indication on re-load of the project.
Fixed a bug that could occur if 'Track display follows undo' is turned off and you add a video track.
This could cause the new video track to end up in the wrong spot after an undo was performed later.
DREAM II Version 3.1
Page 33