1
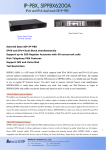
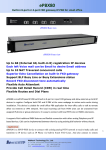
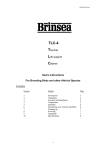
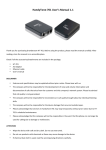
Welltech Computer Co., Ltd.
Content
Chapter 1 Attendant Console Introduction ..............................................................3
Chapter 2 Attendant Console Installation ................................................................4
Chapter 3 Attendant Console Quick Start ...............................................................5
Chapter 4 Operate Reference...................................................................................9
Chapter 5 Settings Button........................................................................................13
Index............................................................................................................................17
Attendant Console – V1.0
-2-
Welltech Computer Co., Ltd.
Chapter 1 Attendant Console Introduction
Attendant Console is an application for SIPPBX to play the role as a traditional
attendant console for a company in VOIP world. It offers a convenience way to
do the extension transfer, multiple queue calls, extension status etc which
greatly improve the call service level and performance.
Features:
- Log on/off
- Answer and Release
- 16 simultaneously call queue
- Call Hold
- Blind Call Transfer
- Consultant Call Transfer
- Transfer to Mobile
- Transfer to Home
- Transfer to Voice Mail
- Call Park and Retrieve
- Automatic Retrieve Parked Call when Time out
- Extension status monitor
- Organization Tree
- Speed Name Query
- Sort by Name, Tel, Department
Recommended System Requirements:
Intel Pentium 4 or above
256 MB RAM
20 MB HD space
Headset/Microphone or Bluetooth Phone
Windows 2000/XP
Attendant Console – V1.0
-3-
Welltech Computer Co., Ltd.
Chapter 2 Attendant Console Installation
Step 1: Double click the setup icon and the System will pop-up the install
shield wizard as figure 2.1, then following the wizard to continue installation.
Figure 2.1
Step 2: After finished installing Attendant Console on your computer, an icon
will be shown on desktop as figure 2.2.
Figure 2.2
Attendant Console – V1.0
-4-
Welltech Computer Co., Ltd.
Chapter 3 Attendant Console Quick Start
After installed Attendant Console successfully, the first step is to set up the
proxy and account.
Step 1: Double click the icon on the desktop to run Attendant Console, the
screen will display as figure 3.1.
Working Call
Incoming
call queue
Operation Button
Organization tree
User Status
Call park panel
(park code, TEL
No, park time)
User Query by Name
Figure 3.1
In the user status area, you can see the current extension/user real time
status in either talk (busy) or idle (free). By select different department in
organization tree area, you can see the different division’s extension status.
Step 2: Click Setting button and select Proxy and enter SIPPBX 6200 IP
address, port number and expire time. Click Apply and OK button as figure
3.2.
Attendant Console – V1.0
-5-
Welltech Computer Co., Ltd.
.
Figure 3.2
Step 3: Click Account selection and enter the deserved user account, TEL No
and password, then click Apply and OK button as figure 3.3.
Figure 3.3
Step 4: Right click Directory selection and click Add button to create new
division (You can also right click the division you created to do rename and
delete operation), then you can add subscriber as figure 3.4, after click Apply
and OK button to take effect, the screen will display as figure 3.5.
Attendant Console – V1.0
-6-
Welltech Computer Co., Ltd.
Right click
the Directory
to add new
division
Click to add extension
information
Figure 3.4
The extension information
you added
Figure 3.5
Step 5: Click
Attendant Console – V1.0
button to login the Attendant Console as figure 3.6.
-7-
Welltech Computer Co., Ltd.
You can expand
the organization
tree
The subscribers are active
after you log on
Figure 3.6
☺ Note: After configuration or changed any configurations, you need to
click Apply and OK button to take effect.
Attendant Console – V1.0
-8-
Welltech Computer Co., Ltd.
Chapter 4 Operate Reference
•
: Answer the incoming call, then the LCD screen will display
as figure 4.1. If there are more than 2 calls in the incoming queue, click
Answer to take first call in queue automatically. Or you can click the call
item in queue to answer or retrieve.
Figure 4.1
•
: (Please use the button after log on). Park incoming call.
When the attendant click Park after answered an incoming call, the
incoming call (in this case is 3700013) will be parked into park area for
retrieving back by another extension as figure 4.2. Another user can dial
the park code (in this case is 66800) to pick up the incoming call.
Figure 4.2
-
•
Park Code: Park Area Code
TEL No: Caller TEL being parked
Park Time: Time of the TEL NO being parked
: (Please use the button after log on). Transfer incoming call.
Click Transfer button and enter the TEL number you want to dial as figure
4.3. When transfer success, the Call Queue panel will display the
completed information as figure 4.4.
Attendant Console – V1.0
-9-
Welltech Computer Co., Ltd.
Figure 4.3
-
Figure 4.4
Dial: Make Call
Clear: Delete the last digit you entered
Another easy way to do the transfer, you can click the organization tree to
check the extension status. If it is free, you can double click the user to do the
transfer. If it is busy, you can right click to transfer to his voice mail or send a
email to notice him as figure 4.5.
Figure 4.5
•
: Disconnect the incoming call
•
: (Please use the button after log on). Transfer the incoming
call before consult with the called party. Click Consult Trans button and
enter the TEL number you want to transfer as figure 4.6, then you will
connect to the called and the caller will be held in the Call Queue as figure
4.7. If the called agreed to receive the incoming call, you can click Release
button to complete the transfer.
Figure 4.6
Attendant Console – V1.0
- 10 -
Welltech Computer Co., Ltd.
You connect
to the called
number
The incoming call is
held in the Call Queue
You should click Release button
to complete the call transfer
Figure 4.7
If there is a current call is working on working area, you can also do consult
transfer by double click extension or right click > Consult Trans as figure 4.8.
Ready
Figure 4.8
•
: Make call. Click the button as figure 4.9.
Figure 4.9
-
Dial: Make Call
Attendant Console – V1.0
- 11 -
Welltech Computer Co., Ltd.
- Clear: Delete the last digit you entered
If there is no current call in working area, you can do dial out operation by
double click the extension or right chick > Dial as figure 4.10.
Figure 4.10
•
: Please refer to Chapter 5 Settings Button
•
: (Please use the button after log on). Hold the incoming call.
The LCD will display as figure 4.11. Click the button again to retrieve the
incoming call.
Figure 4.11
•
: Login to service
•
: Logout attendant console.
Attendant Console – V1.0
- 12 -
Welltech Computer Co., Ltd.
Chapter 5 Settings Button
•
General
-
•
Figure 5.1
Stay on top: Always keep the Attendant Console on top of screen
Unregister all: When Attendant Console started, unregister all contacts
for the user from SIPPBX 6200
Parked Call No Retrieve Alert (sec): The max time for a call to be
parked care. The attendant console will monitor it. If it is exceed the
max time set here, an alert will pop up to tell Operator to process the
call
Proxy
Figure 5.2
Attendant Console – V1.0
- 13 -
Welltech Computer Co., Ltd.
•
Proxy: SIP proxy server
Port: The local port on which the SIP service listened
Expire Time: Time to Live value when register to proxy
Account
Figure 5.3
•
User Account: Register used ID
TEL No: Register TEL No
Password: Register user password
Codec
Figure 5.4
Attendant Console – V1.0
- 14 -
Welltech Computer Co., Ltd.
-
•
Codec Priority: Priority of codec
- Up: higher priority
- Down: lower priority
Packet Size: Packet size. It is recommended to have the following
setting: G.723/30 ms, G.729/20 ms, G.711A/20 ms
Telephone Event Payload Type: RFC2833 payload type (default is 101)
IVR
Figure 5.5
-
Play: Play the voice file
Welcome Voice: Browse and select another welcome voice file
Hold Voice: Browse and select another hold voice file
Transfer Voice: Browse and select another transfer voice file
Auto Answer time: The max time to wait the Operator to answer the call.
If it is exceed the timer, Attendant Console can answer the call
automatically and play the Welcome message to the caller.
•
Directory
You should right click the Directory selection and click Add button to
create a new division as figure 5.6. And you can right click the division you
created to do delete and rename operation as figure 5.7.
Figure 5.6
Attendant Console – V1.0
Figure 5.7
- 15 -
Welltech Computer Co., Ltd.
The division you created,
it will be showed in the
organization tree
Click to add subscriber
information in Division
(in this case is R&D)
Figure 5.8
-
Name: Subscriber name
TELNO: Subscriber telephone number
Division: The division subscriber belong to
Email: Email address
Delete: Delete the subscriber
Attendant Console – V1.0
- 16 -
Welltech Computer Co., Ltd.
Index
A
Account ........................................................................................................13
Answer............................................................................................................8
C
Codec............................................................................................................13
Consult Trans .................................................................................................9
D
Dial ................................................................................................................ 11
Directory .......................................................................................................14
Disconnect .....................................................................................................9
G
General .........................................................................................................12
H
Hold............................................................................................................... 11
I
Installation ......................................................................................................4
IVR.................................................................................................................14
L
Login ............................................................................................................. 11
Logout........................................................................................................... 11
P
Proxy.............................................................................................................12
S
Settings.........................................................................................................12
Attendant Console – V1.0
- 17 -
Welltech Computer Co., Ltd.
T
Transfer...........................................................................................................9
Attendant Console – V1.0
- 18 -