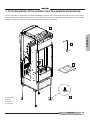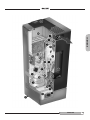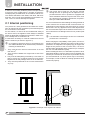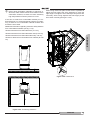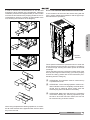
1
® ENG USER MANUAL FOR INSTALLATION USE AND MAINTENANCE PELLET STOVE BODY WITH FAN-ASSISTED HOT AIR CS09A WARNING: this user manual is an integral part of the product. It must be saved and read carefully. CS06A SERIAL NUMBER ENGLISH 2 ENGLISH Introduction Firstly, we would like to take this opportunity to thank you for purchasing this CALUX product. We have prepared this brief manual for you in order to facilitate the use of our product as much as possible. The specific technical issues contained herein should also be referenced by the individuals involved in the assembly, installation and commissioning of the product, in order to ensure that the relative operations are carried out as accurately as possible. • This “installation, use and maintenance” booklet must be read carefully before installing and using the product. This booklet is to be considered an integral a part of the product and must be stored in a safe location. ENGLISH • The installation, wiring, inspection, maintenance and repair operations must only be carried out by qualified personnel. • It is recommended to have the first ignition operation, or rather the commissioning procedure, carried out exclusively by qualified personnel. • Do not use any flammable liquids for the ignition process. • This product may not be used by individuals with reduced physical, sensory, and mental capabilities or with insufficient experience and/or skills (including children), unless supervised and instructed by someone who can guarantee their safety. • Children must always be supervised by an adult in order to protect them against accidental contact with the stove’s hot surfaces, as well as to prevent them from operating and/or tampering with the stove’s controls. • Please contact your reseller for any additional information you may require that is not contained within this manual. This manual makes use of the following symbols: ⚠ ATTENTION: Safety warning, IT IS FORBIDDEN: Forbidden operation, INFORMATION: Important information. Calux S.r.l. shall bear no responsibility or liability for any direct or indirect personal injuries or property damages resulting from the failure to observe the indications provided and highlighted within this manual. ENGLISH 3 TABLE OF CONTENTS 1. INTRODUCTION 1.1 Warranty conditions..................................................................................................................................................6 1.2 Product serial number...............................................................................................................................................7 1.3 Materials......................................................................................................................................................................8 1.4 Certifications...............................................................................................................................................................8 1.5 Dimensional characteristics....................................................................................................................................9 1.6 Product technical specifications.............................................................................................................................10 1.7 Fuel characteristics..................................................................................................................................................11 1.8 Safety recommendations.....................................................................................................................................12 ENGLISH 1.9 General recommendations......................................................................................................................................13 1.10 Safety devices.........................................................................................................................................................13 1.11 Usage environment.................................................................................................................................................14 1.12 Composition of the product and its supplied accessories................................................................................15 1.13 The product’s general operating features............................................................................................................16 2. INSTALLATION 2.1 Internal positioning.........................................................................................................................................18 2.2 Flue duct characteristics..............................................................................................................................20 2.2.1 External wall fume discharge...........................................................................................................................21 2.2.2 Rooftop fume discharge with a traditional chimney flue...............................................................................21 2.3 Dismantling and waste disposal..................................................................................................................22 2.4 Electrical connections....................................................................................................................................22 2.5 Room temperature sensor...........................................................................................................................22 3. USING THE PRODUCT 3.1 Checks and inspections required for first ignition..............................................................................................23 3.2 Loading the fuel..................................................................................................................................................23 3.3 Handheld radio control Kit (OPTIONAL).........................................................................................................23 3.3.1 Configuring the handheld radio control................................................................................................................25 3.4 Control panel and handheld radio control......................................................................................................26 3.4.1 Ignition...........................................................................................................................................................26 3.4.2 Setting the room temperature in MANUAL mode and modifying the settings............................................28 3.4.3 Programming for functionality in TIMED mode, timed-thermostat menu..................................................28 3.4.4 Shutting down the device...............................................................................................................................29 3.4.5 User menu.....................................................................................................................................................30 3.4.6 Alarm signals...................................................................................................................................................32 4 ENGLISH 4. MAINTENANCE 4.1 Routine maintenance...............................................................................................................................................33 4.1.1 Cleaning the display and the parts of the external casing..................................................................................33 4.1.2 Cleaning the ceramic glass................................................................................................................................33 4.1.3 Type 1 routine maintenance operations...............................................................................................................34 4.2 Special maintenance...............................................................................................................................................35 4.2.1 Type 2 special maintenance operations...............................................................................................................35 4.2.2 Type 3 special maintenance operations...............................................................................................................37 4.2.3 Checking the seals...............................................................................................................................................38 4.4 Troubleshooting........................................................................................................................................................39 4.4.1 Replacing the fuse...............................................................................................................................................39 5. FOR AUTHORIZED TECHNICIANS ONLY 5.1 Wiring diagram.........................................................................................................................................................40 ENGLISH 5 ENGLISH 4.2.4 Cleaning the flue ducts.......................................................................................................................................38 4.3 Decommissioning.....................................................................................................................................................39 1 INTRODUCTION 1.1 Warranty conditions All CALUX S.r.l. products are covered by warranty, throughout the entire national territory, in relation to any manufacturing and material defects that have been verified by the company itself. The invoice or receipt for the product must be kept up until the warranty’s expiry date. It must be submitted whenever any technical interventions are required. If the user is unable to produce the invoice or receipt, he/she will lose all rights to warranty. For all Calux brand products, the warranty period begins from the date of purchase indicated upon the invoice or receipt and remains valid for a period of: 5 years for the heat exchangers ENGLISH 2 years for the components. Any repairs or parts replacements under warranty may be carried out, at the discretion of CALUX S.r.l., upon the user’s premises, or else at the company’s own facilities, in which case the user will only be charged for the relative shipping costs. The user may not, under any circumstances, advance claims for damage compensation of any nature beyond the repairs or parts replacements required under warranty. The parts or products replaced under warranty remain the property of Calux S.r.l. and must be returned to the same at the user’s expense. For any technical assistance interventions that are not covered by warranty, the user will be billed for a fixed call-out charge, labour costs and the costs of any materials required for the repair operations themselves, based on the manufacturer’s current spare parts price list. This Warranty does not cover: 1. Damages resulting from transport (scratches, dents or similar); 2. Damages resulting from the improper installation of the product or due to the insufficiency/unsuitability of the smoke evacuation, electrical, plumbing, fuel-intake or discharge systems, nor any alterations due to environmental, or climatic conditions, etc.; 3. Any malfunctions due to carelessness, negligence, tampering, improper use, or repairs carried out by unauthorized personnel; 4. Any parts made from ceramic, glass, brass or wood, nor any of the product’s handles, knobs, gaskets, external piping and other accessories; 5. Parts that have been treated in a galvanic bath, nor any painted parts that may be subject to deterioration due to exposure to fire; 6. Any deterioration intrinsic to the natural and physical characteristics of the materials utilized (fading of the colour of the ceramics); 7. The installation and adjustment of the equipment; 8. System consultations and testing at the user’s convenience; 9. Maintenance, such as the cleaning of the filters, nozzles, burners, heat exchangers and circulation pumps; 10. Anything that may be considered as normal wear and tear due to use. 6 ENGLISH Once the request for intervention has been communicated to one of the following contact numbers, the equipment will be repaired based on the time constraints and the organizational requirements of Calux S.r.l.: Customer Assistance Service Tel. +39 0775 - 779822 Fax. +39 0775 - 779823 The Service is at the customer’s complete disposal Monday to Friday, from 9:00 AM until 13:00 PM, and from 2:00 PM until 5:00 PM. Any replacements or repairs carried out under warranty shall in no case be considered as an extension or renewal of the terms of the warranty itself. Any equipment malfunctions must be reported via registered letter with acknowledgement of receipt, and must be sent to Calux S.r.l. no later than two months from the date upon which the malfunction itself is encountered. No one other than Calux S.r.l. is authorized to modify the terms or conditions of the warranty or to make any other verbal or written statements pertaining to the warranty itself. The manufacturer shall bear no responsibility or liability for any personal injuries or property damage suffered as a result of device malfunctions or downtime. The law courts of Rome shall have complete jurisdiction over any disputes that may arise. Calux S.r.l. reserves the right to perform any modifications deemed useful or necessary to its own products, at any time and at its own discretion. Any such modifications shall have no bearing on the general conditions indicated above. 1.2 Product serial number ENGLISH The product’s serial number can be found on the label affixed to the rear of the unit as well as on the cover of this manual. The product’s serial number will be required whenever requesting assistance services. ENGLISH 7 1.3 Materials 1.4 Certifications Calux products generally make use of materials that possess the following characteristics: This product complies with the EN 14785 standard (residential space heating appliances fired by wood pellets). It also complies with the Italian laws implementing the following European directives: • Extra-thick sheet metals, which provide for solid device construction. ENGLISH • For the models in which they are foreseen, extra-thick earthenware and cast iron materials are utilized in order to give the products a unique design and elegant finish. • Before being painted at high temperatures, the metal parts are subjected to a phosphate treatment in order to optimize the painting process and improve the final result. • Seals, which ensure the combustion chamber’s air-tightness. These must be periodically inspected in order to prevent irregular combustion, which may result due to excessive seal wear. • Glass-ceramic elements for the combustion chamber’s door. For information regarding cleaning operations, please refer to the maintenance section. 8 ENGLISH - 89/336 CEE (EMC directive) and subsequent amendments; - 73/23 CEE (low voltage directive) and subsequent amendments; - 89/106 CEE (suitability for use) and subsequent amendments. 1.5 Dimensional characteristics ENGLISH SMOKE OUTLET ø 80 Dimensions in mm ENGLISH 9 1.6 Product technical specifications Product: CS06A Units of measure Nominal Thermal Output kW 5,5 3,0 CO emission (at 13% oxygen) % 0,021 0,033 Efficiency % 89,5 Nominal electrical power W 410 Nominal voltage V 230 Nominal frequency Hz 91,5 50 Fuel ENGLISH Minimum Wood pellet Fuel consumption per hour kg/h 1,30 Total capacity of flue gases g/s 5,0 3,6 Flue gas temperature °C 165,0 107,0 Flue draught pressure Pa 13,0 Receptacle capacity kg Autonomy h Operating power required W 0,70 13,0 16,5 11,5 40 90 Flue gases outlet mm ∅ 80 Combustion air intake 40x40 Net weigth mm kg Volume heated* m3 150 121 Product: CS09A Units of measure Nominal Thermal Output kW 7,5 Minimum 3,0 CO emission (at 13% oxygen) % 0,019 0,033 Efficiency % 87,0 Nominal electrical power W 410 Nominal voltage V 230 Nominal frequency Hz 91,5 50 Fuel Wood pellet Fuel consumption per hour kg/h 1,8 Total capacity of flue gases g/s 6,0 3,6 Flue gas temperature °C 214 107 Flue draught pressure Pa 12,0 Receptacle capacity kg Autonomy h Operating power required W 0,7 13,0 16,5 8 28 90 Flue gases outlet mm ∅ 80 Combustion air intake 40x40 Net weigth mm kg Volume heated* m3 220 123 * Values calculated according to law 10/91 for households with a thermal requirement of 35 W/m3 and a height of 3 m. 10 ENGLISH This stove is mainly characterized by the fact that it burns a natural fuel (wood pellets), which is ecologically obtained from timber industry waste (wood shavings/sawdust). After having been properly cleaned and dried, the wood shavings and sawdust resulting from wood processing operations are compacted under extremely high pressure in order to produce small cylinders of pure wood: pellets. Each tiny cylinder may vary in length and thickness, from 1 to 3 cm in length and from 6 to 8 mm in diameter respectively. The wood pellets are mainly characterized by their low humidity (less than 12%) and high density (=600 kg/m3)values, as well as their uniformity and compactness, which provide this type of fuel with characteristics of high calorific value (LHV 4100 - 5000 kcal/kg). The wood pellet used to fuel the stove must possess excellent qualitative characteristics, such as those which are defined by the DIN 51731 and ONORM M 7135 standards, for example, for which a number of fundamental data items are listed below. Quality standards Unit of for wood pellets measurement As required by the relevant Italian legislation governing commercial fuel characteristics (DPCM 10/1995), the pellets must only be manufactured using the wood shavings of untreated wood, with no other materials added. It is absolutely forbidden to fuel the stove using liquid fuels or any solid fuels other than wood pellets. In order to optimize the stove’s functionality, it is recommended to use wood pellets that have been certified by an accredited organization. The use of any types of pellets other than those which are indicated by the manufacturer may result in stove malfunctions and may invalidate the warranty. The storage and handling of the wood pellets are important tasks that must be carried out with care. - The fuel must be stored in a dry, warm environment. - The pellets must be handled in such a way so as to prevent them from being excessively crushed into a fine powder. Compliance with these two simple rules will provide for better combustion efficiency and will even help to maintain the proper functionality of the appliance’s moving mechanical parts. If the appliance is to be left off for a long period of time (more than fifteen days), any residual pellets should be removed from the hopper in order to prevent them from becoming excessively humid, as this can lead to product malfunctions. ÖNORM M 7135 DIN 51731 DIN plus Diameter mm from 4 to 10 from 4 to 10 from 4 to 10 Length mm 5 x D1 < 50 5 x D1 Density Kg/dm3 > 1,12 1,0 - 1,4 > 1,12 Humidity % < 10 < 12 < 10 Ash % < 0,50 < 1,50 < 0,50 Heat value kWh/kg >5 4,86 - 5,42 >5 Sulfur % < 0,04 < 0,08 < 0,04 Nitrogen % < 0,3 < 0,3 < 0,3 Chlorine % < 0,02 < 0,03 < 0,02 Dust % weight < 2,3 - < 2,3 Binding agents % pressed mass 1 2 <2 2 <2 Not more than 20% of the pellet can have a length greater than 7.5 times its diameter D The DIN prohibits the use of any substance added. However, this prohibition is not valid for small heating systems. ENGLISH 11 ENGLISH 1.7 Fuel characteristics ENGLISH 1.8 Safety recommendations ⚠ ATTENTION: Read the supplied instruction manual ⚠ ⚠ ⚠ carefully prior to installation. ATTENTION: The combustion chamber must be emptied before turning on the unit and in the event that any difficulties are encountered in turning on the unit itself. It is absolutely forbidden to fuel the stove using any solid or liquid fuels other than the 6 mm diameter wood pellets for which it has been designed. Avoid the use of damp or crushed pellets. In order to optimize the stove’s functionality, it is recommended to use wood pellets that have been certified by an accredited organization. The use of any pellets other than those which are indicated by the manufacturer may result in stove malfunctions and may invalidate the warranty. ⚠ ⚠ ⚠ ⚠ ⚠ ⚠ ⚠ 12 When loading the pellets, take care to prevent them from accidentally falling into any of the product’s internal areas other than the appropriate hopper. ATTENTION: If you are unable to ignite the stove, it will be necessary the empty the combustion chamber; failure to carry out this operation could lead to excessively rich combustion and may result in the production of significant amounts of smoke. ATTENTION: Do not open the door or shut off the electrical power supply during the phases of ignition or shutdown, nor while the stove is in function, even if the combustion chamber is blocked or overloaded; initiate the shutdown procedure and wait for the stove to complete its operating phases before addressing the issue. Do not attempt to reignite the stove until the problem has been resolved. ATTENTION: Do not interrupt the stove’s shutdown procedure (by cutting off the product’s electrical power supply, for example) until it has fully completed. ATTENTION: If the wood pellets should accumulate within the combustion chamber while the device is in function, shut off the device immediately and turn it back on using a more ventilated program. If the pellets continue to accumulate, try using a different type of wood pellet or call the manufacturer’s assistance service. ATTENTION: Never manually insert the pellets into the combustion chamber. ATTENTION: In order to prevent any possible accidents, always follow the correct usage indications contained within this manual for the device and its electrical components. ATTENTION: The installation, wiring, inspection, maintenance and repair operations must only be carried out by qualified personnel. ENGLISH ⚠ ⚠ ⚠ ⚠ ⚠ ⚠ ATTENTION: The product must be installed in full compliance with the current legal standards. ATTENTION: Always respect the safety requirements and safety standards indicated within this manual. ATTENTION: Anyone intervening upon the product must have read and fully understood the contents of this manual and must have a complete knowledge of the product’s controls. ATTENTION: The product may only be used, adjusted and programmed by adults. Incorrect or random settings could result in dangerous situations and/or malfunctions. ATTENTION: Calux S.r.l. shall bear no civil and/or criminal liability for any damages in the event that the product has been subjected to unauthorized tampering or parts replacements. ATTENTION: While in function, a number of the unit’s surfaces can reach extremely high temperatures. The user is therefore advised to take all of the necessary precautions, above all whenever children or elderly/disabled individuals are present. ATTENTION: Do not block or obstruct the hot air outlets in any manner. Do not cover the product with cloths or other similar materials. ATTENTION: In order to avoid accidentally causing the appliance to tip over, never lean against or apply excessive weight to the open door while cleaning operations are in progress. It is therefore recommended to avoid applying these types of stresses and to take all of the necessary precautions, above all whenever children or elderly/disabled individuals are present. ⚠ ⚠ ⚠ ATTENTION: Never use the product for purposes other than those for which it has been designed and manufactured. ATTENTION: The product must not be used for cooking activities. ATTENTION: The product must not be used in the event that any breakdowns or malfunctions are encountered. In such cases, immediately disconnect the product’s electrical power plug. NEVER keep the product’s door open while it is in function. The smoke flues must be inspected regularly. ⚠ NEVER use streams of water to wash the product. Always contact qualified and authorized personnel for any service interventions that may be required. Only use original spare parts for parts replacements. The fuel in the burner must only be loaded via the automatic feeding system, and not directly by the user. ATTENTION: In the event of an “ignition failure”, any pellets that may have accumulated within the burner must be removed before attempting to ignite the stove a second time. The pellets removed from the burner must never be placed back into the hopper. This manual is to be considered an integral part of the product and must accompany the product throughout its service life. It must be stored in a safe location. In the event that the manual should be lost or damaged, a replacement copy can be requested from your retailer. 1.10 Safety devices The product comes equipped with the following safety devices: • A thermostat for detecting the pellet hopper’s temperature: this unit shuts down the product’s functionality whenever the set safety limit is exceeded. • A probe for detecting the smoke temperature: this element detects the temperature of the smoke and constantly monitors the product’s proper functionality. • A pressure switch: this element detects any flue duct blockages. • An ambient thermometer: this element constantly monitors the temperature of the room in which the stove is installed. • Modulation operating mode: if the smoke temperature exceeds the preset safety threshold, the unit will automatically reduce the quantity of pellets to be burnt until the temperature falls below the established limit. Incorrect parameter settings can cause the safety limits to be exceeded and may also result in excessive pellet consumption. The safety limits might also be exceeded due to a poorly ventilated installation environment that does not provide the unit with sufficient cooling air. IT IS FORBIDDEN to deactivate the safety devices. ⚠ Once the cause of a safety system’s activation has been eliminated, the unit can be restarted in order to restore its regular functionality. ATTENTION: The unit must be installed in such a way so that its electrical plug can be easily accessed. Note: This safety section has been drafted in consideration of the product’s normal conditions of use, which are described and specified in chapter 3. Calux S.r.l. shall bear no responsibility for any personal injuries or property damage that may occur if the stove is not used in accordance with the conditions indicated in this instruction manual. Calux S.r.l. shall likewise bear no responsibility for any property damage or personal injury resulting from failure to respect the following regulations: A) All of the appropriate measures and precautions must be adopted in order to ensure that the equipment will not be activated by another party while repairs, adjustments, parts replacements and/or maintenance operations are being carried out; B) Do not remove and/or tamper with any of the unit’s safety devices; C) The unit must be connected to a properly functioning smoke extraction systemi; D) Make sure that the installation environment is sufficiently ventilated, as prescribed in the manual. ENGLISH 13 ENGLISH 1.9 General recommendations 1.11 Usage environment ⚠ ENGLISH ⚠ ATTENTION: The unit must be positioned in a well ventilated location with sufficient combustion air available, in accordance with the current regulations regarding installation. This is to ensure its proper functionality. ATTENTION: The room must have a volume of no less than 20 m3 and must possess all of the necessary ventilation features, as described in chapter 2 of this manual. These conditions will ensure the air flow necessary to ensure proper combustion (40 m3/h). IT IS FORBIDDEN to operate the product in bedrooms or bathrooms. IT IS FORBIDDEN to operate the product in any rooms in which another heating device is installed that does not have its own air intake system. IT IS FORBIDDEN to install the product in the vicinity of flammable materials. IT IS FORBIDDEN to install the product upon flooring made of flammable material unless using a protective plate made of non-flammable material. IT IS FORBIDDEN to operate the product in explosive or potentially explosive atmospheres. 14 ENGLISH 1.12 Composition of the product and its supplied accessories The Forma model is comprised of two distinct packaging elements, one for the heat exchanger and one for the casing. The packaging for the latter contains the list of the components of which the casing is comprised, along with the relative assembly instructions. The heat exchanger’s packaging contains the following: ENGLISH A B 1x C C 1x 4x A Stove body B Brush C Manual D 4 screws D ENGLISH 15 ENGLISH 1.13 The product’s general operating features This device is fuelled by wood pellets, the composition of which is described in the section entitled “Fuel characteristics”. The pellets are burned inside a container, which is called the burner. The combustion process is controlled by the electronic circuit board, which regulates the proper amounts of combustion air and fuel whenever the thermal power requirements may vary. While in function, the combustion air is drawn into the combustion chamber as a result of the vacuum created inside the device itself by the smoke extractor. The device’s operating power is regulated automatically by the DYNAMIC POWER SYSTEM, which evaluates the difference between the temperature set on the control panel and the temperature detected by the room sensor, thus ensuring optimal comfort and efficiency levels. In order to diffuse the heat, the product has been equipped with tangential-type fan, which operates either in automatic mode, or rather in proportion to the operating power, or else in manual mode, whereby the fan’s power level can be adjusted independently of the operating power. 1. Back plate in cast iron 2. Smoke duct 3. Smoke extractor 4. Smoke outlet 5. Tangential fan for ventilation 6. Fin heat exchanger: for high-efficiency air heating 7. Secondary heat exchanger 8. Hot air outlets 9. Heat exchanger dust collection compartment 10. Ash collection tray for the burner 11. Ash pan 12. Electronic card with microprocessor: for monitoring and adjusting the unit’s operating parameters 13. Smoke temperature sensor 14. Structural temperature sensor 15. Steel support structure 16. Control panel with timed thermostat 17. Adjustable support feet 18. Wood pellet hopper 19. Automatic pellet feeding system 20. Pellet intake auger: for dosing the fuel based on the selected operating power 21. Pellet intake duct 22. Combustion air intake 23. Combustion air 24. Air passages for combustion in the burner 25. Cast iron burner 26. Secondary air intake 27. Ceramic glass elements 16 ENGLISH ENGLISH ENGLISH 17 2 INSTALLATION In order to successfully install the product and prevent the occurrence of any malfunctions, a number of simple assembly tips are provided below, in accordance with the current relative standards: UNI 10683, UNI 9615, UNI 9731 and UNI - CIG 7129 for gas installations for domestic use, UNI - CIG 7131 and its subsequent updates. ENGLISH 2.1 Internal positioning It is recommended to avoid installing the heat generator in rooms where there are devices that cannot function in a sealed manner with respect to the environment or in rooms where there are any appliances that could depressurize the room itself with respect to the external environment, as this could result in low draught issues for our product (UNI 10683). Our product is a heat generator that intakes the combustion air required for the combustion process directly from the environment to be heated. For this reason, as well as for the fundamental safety of the stove’s users, the appliance must always be installed within an adequately ventilated environment in order to ensure a steady flow of combustion air. It is therefore necessary to create air intakes that connect with the outdoors (as shown in figure 2.1). The proper flow of fresh air can also be ensured through the use of openings into an adjacent room, provided that the room in question is equipped with direct ventilation and does not pose a risk of fire, such as a storage room, garage or warehouse, as prescribed by the UNI10683 standard. It is forbidden to discharge the stove’s combustion products into a shared flue. When verifying the compatibility of the system, it is recommended to determine whether the support surface (floor) possesses an adequate load capacity (kg) to support the weight of the product. If this is not the case, it is recommended take appropriate safety measures (for example, the use of a load distribution plate). When installing the stove, it is advisable to position it at an appropriate distance from the wall in order to facilitate rear access (we recommend at least 20 cm) and side access (we recommend 80 cm). Such space may be necessary, for example, in order to allow for cleaning operations to be carried out properly. In accordance with that which is prescribed by the UNI 10683 standard, the air intakes must possess the following characteristics: 1. They must have an internal cross-section of no less than 80 cm2; 2. They must be installed at a height near to that of the flooring; 3. They must be adequately protected by a wire mesh or grille in such a way so that the minimum cross-section requirement for the passage of the air is not reduced; 4. They must be positioned so as to not be obstructed in any way. A A Figure 2.1: Example of the required air intakes 18 ENGLISH Never allow flammable materials to approach or, above all, make contact with the outer surfaces of the combustion chamber, as these can reach extremely high temperatures while the product is in use. After having chosen the place for the stove it is possible to adjust the feet angling the stove sideways to reach the right height. To angle the stove sideways two persons are necessary. After having adjusted the feet height put the stove down carefully (see figure 2.2.b). If the floor is made from combustible material (ex. hardwood flooring), it is recommended to protect it by positioning a sheet of non-combustible material beneath and around the stove itself. Additional information regarding minimum safety distance from combustible materials (see fig. 2.2.a): -Minimum distance from flammable floor (F=4 cm); -Minimum distance from flammable back wall (P=20 cm); -Minimum distance from flammable side wall (L=40 cm); ENGLISH -Minimum distance from flammable front material (R=150 cm). F Figure 2.2.b: Tilted stove P L L R Figure 2.2.a: Positioning distances ENGLISH 19 2.2 Flue duct characteristics L<1,5m The main features of the flue duct are listed below, based on that which is required by the UNI 7129 and UNI 10683/98 standards: I I ENGLISH - Inspection valve (I); - The maximum height of the tube connected directly to the stove’s smoke outlet must be between 2 to 3 m; - If a horizontal tract is required, it is recommended that it have a maximum length of 1,5 m and an incline of 3 to 5 % in order to facilitate the passage of the fumes; - Use a windproof and waterproof end section in order to avoid altering the slight overpressure status of the flue itself (do not terminate the flue with a horizontal tract); 20 Ø 80 H >5m M ax 2-3m Ø 80 The overpressure status of the flue serves to facilitate the normal flow of smoke from the combustion chamber to the outdoors in the event of a blackout. I Figure 2.3: Flue duct Please note that the discharging of any excess heat is handled in an optimal manner by the electronic control unit (modulation, shutdown phase, etc.). - The exhaust ducts must be made of materials that are resistant to the combustion products and condensation (the inspection will allow for drainage of any condensation that may have formed); - The ducts must be manufactured in such a way so as to prevent any smoke from leaking out (UNI 10683/98); - The flue duct must be insulated, especially the external portion that is exposed to the elements. M in 3-5% Avoid making use of completely horizontal tracts. ENGLISH The room in which the heat generator is to be installed should not have any fume hoods installed, as these could depressurize the environment. It is strictly forbidden to close the air intakes. The flue should be cleaned at least on an annual basis; we recommend that you carry out a thorough cleaning of both the flue, as well as its connections. One of the solutions that can be adopted involves positioning the wood pellet stove near a perimeter wall of the house so that the exhaust fumes are discharged directly outside (figure 2.4). A number of indications highlighted by the UNI 7129 standard for this particular type of system configuration are provided below: - Always make sure that there is an inspection valve (I) that will allow for the performance of regular cleaning operations, as well as for the elimination of any condensation that may have formed; - The chimney cap (T) must be of a strictly windproof and waterproof type; - Make sure that the flue duct is properly insulated in the tract that passes through the wall. If the flue duct for extracting the exhaust fumes is located completely outdoors, is must be made of double wall stainless steel in order to ensure greater resistance to the elements, as well as the proper temperature of the exhaust fumes themselves. 2.2.2 ROOFTOP FUME DISCHARGE WITH A TRADITIONAL CHIMNEY FLUE The stove’s combustion fumes can also be discharged using a traditional pre-existing chimney flue (figure 2.5), provided that it complies with the current standards (see UNI 10683 ). The standard highlights the main features of a good chimney (C), a number of which are indicated below in concise form: - Proper insulation, above all in the external tract that’s exposed to the elements; - Constant internal diameter (there should not be any tracts of a smaller diameter); - It must be made of a material that is resistant to high temperatures, to the effects of the combustion products and to the corrosive effects of any condensation that may eventually form; - Predominantly vertical configuration, with no deviations at vertical angles in excess of 45°. It is recommended that the base of the chimney be equipped with a collection chamber for collecting solid materials and/or condensation (R). This chamber must be accessible by means of an airtight access door (I). T C R I Figure 2.4: External wall fume discharge I Figure 2.5: Fume discharge with a traditional chimney flue It is recommended to follow the guidelines that have been established by the UNI 9615 and UNI 9731 standards in relation to the sizing and diameter of the chimney flue (C). Whatever the case, never make use of flue ducts with internal diameters of less than 100 mm. In the case of flue ducts of larger diameters, a steel pipe (A) must be inserted inside the brick or masonry chimney (C), as shown in figure 2.6. ENGLISH 21 ENGLISH 2.2.1 EXTERNAL WALL FUME DISCHARGE The steel pipe must be insulated using an appropriate heat-resistant material, such as rock wool or vermiculite (B), and must be sealed off from the external portion of the chimney itself. C 2.4 Electrical connections The product must only be connected to the mains electrical network after its casing has been installed. Connect the product to a household electrical outlet. Only press the on/off button on the back of the device if you want to turn it on. In this manner, the stove will be ready to be ignited. For the ignition and programming operations, please refer to the section 3.4. 2.5 Room temperature sensor B ENGLISH The room temperature sensor must only be positioned after the casing has been installed. This sensor allows for the temperature to be continuously monitored in the room where the stove is installed. A Figure 2.6: Example of connection to a chimney flue If the chimney or flue duct should catch fire, turn off the stove immediately and disconnect it from the electrical outlet. 2.3 Dismantling and waste disposal The packaging is comprised of non-toxic and non-harmful materials. No special conditions are required for its disposal. The disposal of the residual packaging materials is the responsibility of the user, who must perform the relative disposal operations in compliance with the current standards for the country in which the product is installed. ⚠ 22 ATTENTION: the packaging elements must be kept out of the reach of unsupervised children or individuals with disabilities. ENGLISH The correct positioning of the room temperature sensor will ensure the unit’s proper functionality. USING THE PRODUCT 3.1 Checks and inspections required for first ignition Observe the following indications when carrying out the first start up procedure: • Check to make sure that all of the necessary safety conditions have been met (see sections 1.5); • Only connect the device to its electrical power supply after having made sure that the power supply’s voltage is equal to 230 V ̴ 50 Hz. Once this has been verified, set the main switch on the unit’s rear panel to its “ON” position; 3.2 Loading the fuel Open the product’s upper door to load the pellet hopper. The fuel must comply with the indications provided in the relative section of this manual. ⚠ ⚠ ⚠ • Check to make sure that the control panel’s display has lit up, indicating that the unit is properly connected to its electrical power supply; ⚠ • Check to make sure that there is enough fuel in the hopper for the foreseen operating period. The fuel must comply with the indications provided in the relative section of this manual. The stove’s painted components may give off fumes with unpleasant odours the first few times that the stove is ignited. This phenomenon is linked to the chemical stabilization process of the special paint products that have been utilized. For this reason, the room must be well ventilated during this stage. ATTENTION: Make sure that the wood pellet bag does not come into contact with the product’s hot parts while reloading the hopper. ATTENTION: Do not remove the protective grille inside the pellet hopper. ATTENTION: Do not rest the full weight of the bag containing the fuel upon the product itself. ATTENTION: Once finished loading the hopper, close its upper door. Periodically check the amount of wood pellets contained in the hopper and refill it in a timely fashion. This will prevent the stove from going into an alarm state due to lack of fuel, whereby an acoustic signal will be activated until the user intervenes to resolve the situation. 3.3 Handheld radio control Kit (OPTIONAL) The kit is made up of a handheld radio control unit, a recharging base and a radio control receiver to be installed upon the stove itself. ⚠ ⚠ ATTENTION: This operation must be carried out by a qualified technician. ATTENTION: This operation must only be carried out while the stove is completely cold and disconnected from its electrical power supply (with the electrical plug disconnected from the outlet). In order to install the handheld radio control, the receiver must be installed on the back of the stove. If the stove has already been installed, it must be distanced from the wall accordingly; the cover and the left hand side must also be carefully removed (please refer to the casing kit instructions). ENGLISH 23 ENGLISH 3 . In order to install the handheld radio control kit, follow the procedure below: A. Unscrew the 3 screws that fasten the electronic control board to the structure. ENGLISH A D B. Use pliers to remove the knockout from the rear protective grille. B E. Connect the receiver’s connector to the electronic card. E C. Insert the receiver’s cable from the rear portion of the stove’s structure. C 24 D. Use the 2 supplied screws to fasten the receiver to the unit. F. Return the electronic card to its lodging and fasten it in place using the three screws.Wind up the receiver's wiring and secure it using the supplied strap. F ENGLISH G. To recharge the handheld remote control, place it on the charging base. 3.3.1 CONFIGURING THE HANDHELD RADIO CONTROL This operation must be carried out before turning the stove on (while it is cold), and only needs to be carried out the first time in order to configure the handheld radio control for use with the electronic control board. In order to configure the handheld radio control for use with the unit’s electronic control board, do the following: • Connect the stove to a household electrical outlet. • Set the switch on the back of the stove to its ON position. The handheld radio control’s functions are the same as those on the stove’s control panel. The handheld radio control only works if the stove is connected to its electrical power supply (electrical plug connected to an electrical outlet) and if the switch on the back of the stove is set to its ON position. Otherwise, the handheld radio control’s display will show the NO SIGNAL message. Before carrying out any operations using the handheld radio control, make sure that at least one of the three reception signal indicators is active (see the upper right-hand portion of the display). If no reception signal is present, the handheld radio control unit must be brought closer to the stove. Also make sure that the handheld radio control’s batteries are sufficiently charged, with at least one of the battery charge indicators active (see the upper left-hand portion of the display). If this is not the case, the handheld radio control’s batteries must be recharged by positioning the unit on its recharging base. ENGLISH 25 ENGLISH G • After the first acoustic signal, repeatedly press any button on the radio control until the message [Calux] appears on the radio control’s display. 3.4 Control panel and handheld radio control LED 2 Red light ENGLISH LED 1 Green light Led1: Green light = the unit is on off = the unit is off. Led2: Red light = TIMED operating mode off = MANUAL operating mode The stove's control panel and the handheld radio control are both equipped with a backlit display and six buttons, as described below: [TIMED/MANUAL] hold down this button for 3 seconds to access the timed-thermostat menu, [ON/OFF] this button can be used to turn the stove ON or OFF, [GUIDE] this button can be used to obtain indications regarding the various menu settings, [MENU] this button can be used to access the user menu, and 3.4.1 IGNITION A number of preliminary operations must be carried out before igniting the stove. If necessary, clean the door’s ceramic glass (see section 4.1.2); remove any combustion residues from the burner; clean out the combustion chamber and empty the burner’s ash collection tray and the ash pan (see section 4.1.3). Any accumulations of unused pellets and pellet fragments left inside the hopper for extended periods of time should be removed using an appropriate vacuum cleaner. ⚠ ATTENTION: Do not remove the protective grille inside the pellet hopper when performing this cleaning operation. Turn the stove on by setting the main switch on the rear panel to its ON position. This will activate the unit’s control panel. An acoustic signal will sound to confirm that the stove has been activated. 26 ENGLISH [+] [-] these buttons can be used to adjust the contrast of the display and to scroll through the various menu and submenu items. The control panel is also equipped with two led indicator lights. If screensaver function is on (see 3.4.5, DISPLAY OFF Submenu) in order to save energy, the display’s backlighting will turn off automatically after about 2 minutes; just press any button to reactivate the display’s backlighting. On the main screen, the display shows the current date and time, the room temperature, the stove’s operating status and the selected operating mode. DISPLAY CONTRAST ADJUSTMENT: If the display is not sufficiently lit or is difficult to read, the contrast can be adjusted from the main screen by using the [+] button to increase the contrast and the [-] button to decrease it. Once you’ve filled the pellet hopper and are ready to turn on the stove for the first time, remember that the fuel feeding auger is empty and must be loaded using the PRELOAD function from the user menu (see section 3.4.5). This function must be used each time the pellet hopper and auger are emptied. In order to turn on the stove in [MANUAL] mode, hold down the [ON/OFF] button for at least 3 seconds; when the device is turned on in [MANUAL] mode, the green led indicator light next to the [ON/OFF] button on the stove's control panel also turns on. If a handheld radio control unit has been configured, the [ • ] symbol will appear on the lower left-hand portion of the display. Once the stove has been turned on, it will carry out its 6 operating stages: ⚠ ⚠ ATTENTION: The fuel in the burner must be removed before attempting to reignite the stove in the following cases: - following a failed ignition cycle, - if the shutdown command is given. ATTENTION: For safety reasons, the pellets removed from the burner must never be placed back in the hopper. The stove's operating power levels are automatically managed by the unit based on the room temperature and the temperature set in [MANUAL] or [TIMED] mode. The stove gradually decreases the operating power level automatically as the room temperature nears the set temperature; upon reaching the set temperature, the stove sets itself to [ECO] status. If enabled Standby-by, when the room temperature exceeds the set temperature by 3°C, the stove goes into shutdown mode, passing through the operating stages of [Wait St-by] and [Stand-by]; once the room temperature drops below the set temperature by 1°C, the stove turns itself back on by activating its [Restart] operating stage. [Clean]: the smoke extractor is brought to its fastest speed in order to clean any combustion residues out of the burner, [Warm]: the ignition heating element begins to heat up, [Load]: the auger supplies the burner with a sufficient amount of fuel to ignite the stove. [Wait]: the unit waits for the fuel in the burner to be ignited, [Ignition]: the auger supplies the burner with a sufficient amount of fuel to heat up the stove, [Fire on]: the unit verifies that the fire in the burner has been properly ignited and checks the regularity of the flame. Once the ignition phase has been completed, the stove’s operating status will disappear from the display and will be replaced by the set room temperature. ⚠ ATTENTION: If the ignition cycle is not successful, the display will show the [No start] message. Before attempting to ignite the stove a second time, be sure to completely empty the burner of any fuel that may have accumulated within it during the first attempt. ENGLISH 27 ENGLISH If a handheld radio control has been configured, the display will also show the battery charge level of the handheld radio control itself (on the upper left), as well as the level of the reception signal (on the upper right). The stove can work in two different modes: [MANUAL] (displayed as NORMAL) and [CRONO]. 3.4.2 SETTING THE ROOM TEMPERATURE IN [MANUAL] MODE AND MODIFYING THE SETTINGS In order to modify the set temperature in [MANUAL] mode, press the [MANUAL] button once from the main screen and use the [+] and [-] buttons to increase or decrease the temperature as desired. The display shows the room temperature on the upper portion of the screen and the set temperature on the lower portion of the screen. Press the [+] and [-] buttons respectively to activate [ON] or deactivate [OFF] the TIMED/MANUAL operating mode. In order to exit and return to the previous screen, press the menu button. ENGLISH • SET COMFORT Submenu • SET NORMAL Submenu • SET ECONOMY Submenu If a handheld radio control has been configured, press the [MENU] button to exit and return to the main screen. 3.4.3 PROGRAMMING FOR FUNCTIONALITY IN [TIMED] MODE, TIMED-THERMOSTAT MENU The timed-thermostat menu can be accessed from the main screen by holding down the button for more than 3 seconds. Use the [+] and [-] buttons to scroll through the menu items. Press the [MENU] button to confirm the selected User menu item. • EXIT: exits from the TIMED-THERMOSTAT menu and returns to the main screen. • PROGRAM ENABLING: allows for timed-thermostat [TIMED] mode to be activated. By activating timed-thermostat [TIMED] mode, the stove will turn itself on or off at the programmed times and will automatically manage its operating power based on the set temperature. A red led indicator light next to the button turns on to confirm that timed-thermostat [TIMED] mode has been activated. The stove will only ignite in [TIMED] mode if it is on (with the green led indicator light on the control panel lit) and if it has been set to [TIMED] mode (with the red led indicator light on the control panel lit). 28 ENGLISH 3 different operating temperatures can be set in timed-thermostat [TIMED] mode: [COMFORT], [NORMAL] and [ECONOMY]. Press the [+] and [-] buttons respectively to increase or decrease the set temperature. Press the [menu] button for more than 3 seconds to exit and return to the previous screen. • TIME SLOT SETTING Submenu: This submenu allows the user to set the time frames and the days of the week for the timed-thermostat in [TIMED] operating mode. The weekly timed-thermostat allows the user to set the desired operating temperatures and shutdown times, selecting from amongst the three available [ECONOMY], [NORMAL] or [COMFORT] modes or the [OFF] function, for each half hour time frame within the span of 24 hours. Each day of the week can be programmed individually. Press the [+] or [-] buttons to move to the desired time frame, then press the [MENU] button repeatedly to set the desired temperature or to return to the [OFF] function. Press the [+] or [-] buttons to move to the desired day of the week, then press the [MENU] button repeatedly until the desired day is shown. The programming for the day shown on the display can be copied by moving to the COPY function (on the lower righthand portion of the display) and pressing the [MENU] button. The programming that has just been copied can subsequently be pasted into a different day by switching to the desired day, moving to the PASTE function (on the lower right-hand portion of the display) and pressing the [MENU] button. In order to save any changes that have been made and return to the main screen, move to the EXIT function (a lower right-hand portion of the display) and press the button. Whenever the programming is modified, the settings will only come into effect once the stove has passed into the next time slot, or rather after a maximum of 30 minutes. The stove is furnished with a number of default settings that can be modified and/or copied and pasted as desired. MONDAY: Ignition at 7:30 AM; Comfort mode until 3:00 PM; Normal mode from 3:00 PM until 7:30 PM; Comfort from 7:30 PM until 9:30 PM; Normal from 9:30 until 11:00 PM; Economy from 11:00 PM until 00:00; Shutdown at 00:00 PM. SATURDAY: Ignition at 8:00 AM; Comfort mode until 3:00 PM; Normal mode from 3:00 PM until 7:30 PM; Comfort from 7:30 PM until 9:30 PM; Normal from 9:30 until 11:00 PM; Economy from 11:00 PM until 00:30; Shutdown at 00:0 PM. 3.4.4 SHUTTING DOWN THE STOVE Whether it is set to the normal or timed operating mode, the stove can be shut down by pressing the [ON/OFF] button for more than three seconds. If the handheld radio control unit has been configured, the [ ] symbol will appear on the lower left-hand portion of the display. The shut down cycle is comprised of the following 2 stages, which are shown on the display: [Shutdown]: the smoke extractor and ambient fan remain in function until the smoke has cooled down. The green LED indicator light flashes. [Off]: in this state in which the stove is completely deactivated. The green LED indicator light is off. SUNDAY: Ignition at 7:30 AM; Comfort mode until 3:00 PM; Normal mode from 3:00 PM until 7:30 PM; Comfort from 7:30 PM until 9:30 PM; Normal from 9:30 until 11:00 PM; Economy from 11:00 PM until 00:30; Shutdown at 00:30 PM. ENGLISH 29 ENGLISH The display shows the [OFF] function and the three available temperature settings, with the following symbols: OFF (stove off) ECONOMY (stove on in economy mode) NORMAL (stove on in normal mode) COMFORT (stove on in comfort mode) 3.4.5 USER MENU The user menu can be accessed from the main screen by holding down the [MENU] button for 3 seconds. ENGLISH Use the [+] and [-] buttons to scroll through the menu items. Press the [MENU] button to confirm the selected user menu item. EXIT: exits from the user menu and returns to the main screen. PRE-LOAD: it is available only when the stove is off and cold, it can be either NORMAL (manual preload of the auger) or AUTOMATIC, and allows the preload of the auger: this operation is necessary during the first ignition or when the pellet reservoir is empty. Press the [+] and [-] buttons to scroll through the menu items and press the [MENU] button to confirm the selected user submenu. SYSTEM STATUS: Displays the current system status, such as the stove’s operating status, the smoke temperature, the smoke extractor’s operating speed, the stove’s operating power lever and the room temperature. Note: the values in square brackets represent the set values. In order to exit and return to the user menu screen, press the [MENU] button. SET PELLET: allows the user to view and modify the parameter that regulates the combustion calibration. Upon first startup, allow the device to function for at least six hours time and check to make sure that the following combustion-related issues are satisfied: - the fuel should not tend to accumulate in the burner due to excessive fuel or low draught; - the flame should not tend to go out due to lack of fuel or excessive draught. In order to function properly, the product must be operated under optimal conditions, above all with regard to the following four aspects: the installation environment, the flue pipe’s draught, the type of wood pellets utilized, and the cleanliness of the product itself. EXIT submenu: exits from the PRE-LOAD menu and returns to the user menu screen. Submenu NORMAL (manual preload of the auger): it activates the manual PRE-LOAD of the auger, press the button [+] and [-] until the pellet starts falling down into the burner; it is displayed the working time (in seconds) of the auger. In order to exit and return to the user menu screen, press the [MENU] button. AUTOMATIC Submenu: Enables automatic auger preloading and returns to the user menu screen. Upon exiting and returning to the main screen, the message Auto.Preload (automatic preloading) will appear on the display and will remain for approximately 2 minutes. 30 ENGLISH The calibration parameter can be set to any value between 0 and 14. The stove is set to the middle value: 7 (default value). By increasing or decreasing this value, the stove’s functionality can be adapted to various draught conditions, as well as to the density and specific weight of the wood pellets: Increasing or decreasing this value, one number at a time, will increase or decrease the flow of the pellets while simultaneously increasing or decreasing the draught level. Monitor the combustion quality for at least one hour and, if necessary, make further adjustments until the requirements for optimal combustion have been met. Press the [+] and [-] buttons to increase or decrease the set parameter. To exit and return to the user menu screen, press the button. BLOWER SET: it allows the regulation of the ambient ventilator. GENERAL SETTINGS: Provides for access to the general system settings. Use the [+] and [-] buttons to scroll through the menu items. Press the [MENU] button to confirm the selected user menu item. • EXIT submenu: exits from the GENERAL SETTINGS menu and returns to the user menu screen. • TIME SETTING Submenu: Allows the user to set the date and time. Press the [+] and [-] buttons to modify the date and time values and press the [MENU] button to move on to the next setting. Press the [MENU] button for more than 3 seconds to exit and return to the previous screen. • STAND-BY Submenu: allows for the activation and deactivation of [STAND-BY] status. With [STAND-BY] mode activated, the stove does not shut down once the set room temperature has been exceeded by 3°C, but rather remains on in [ECO] mode. In certain cases, deactivating standby mode could cause the room temperature to increase to levels which are no longer comfortable. Press the [+] and [-] buttons respectively to activate [ON] or deactivate [OFF] Stand-by mode. In order to exit and return to the previous screen, press the [MENU] button. • REMOTE PROBE Submenu: if the handheld radio control has been configured, this menu allows for its internal radio sensor for reading the room temperature to be activated or deactivated. If it is deactivated, the stove can be commanded even if the radio sensor is malfunctioning. In this case, the room temperature will be detected by the sensor installed upon the stove itself. Press the [+] and [-] buttons respectively to activate [ON] or deactivate [OFF] the radio sensor. In order to exit and return to the previous screen, press the [MENU] button. • The DISPLAY OFF Submenu allows for the activation or deactivation of the display’s screensaver. If a radio control has been configured, its display only remains continuously on and lit while it is positioned upon its charging base. ENGLISH 31 ENGLISH Press the [+] and [-] buttons respectively to activate [ON] or deactivate [OFF] the screensaver. In order to exit and return to the previous screen, press the [MENU] button. • LANGUAGE SET Submenu: allows the user to modify the display’s interface language. ENGLISH Use the [+] and [-] buttons to select the desired language. In order to exit and return to the previous screen, press the [MENU] button. • LOGS Submenu: Allows the user to view the history of the individual alarms that have taken place. Each alarm record is preceded by the date and time at which the alarm took place; the system’s memory allows for up to 30 events to be recorded. In order to exit and return to the previous screen, press the [MENU] button. • SERVICE Submenu: Allows the user to view the stove’s total operating time and the number of ignitions that have been carried out. In order to exit and return to the previous screen, press the [MENU] button. 3.4.6 ALARM SIGNALS ⚠ ⚠ ATTENTION: If any negative conditions should arise that alter the stove’s normal functionality while it is in function, this will be indicated by a relative alarm message on the display, accompanied by an acoustic beep. If these negative conditions are only temporary, the stove’s normal functionality will be restored once the conditions have subsided. If the conditions should persist, however, an acoustic warning signal (a continuous intermittent beep) will sound. In order to silence the warning signal, just press the [on/off] button once and, based on the message that is shown on the display, follow the indications below. ATTENTION (FOR THE TECHNICIAN): For the indications that contain the “*solution” field below, be sure to disconnect the stove’s power cable from the electrical outlet before carrying out the relative intervention. Failed ignition alarm [No start]: indicates that the ignition cycle was not successful. Solution: check the cleanliness of the burner and the compartment beneath it (see section 4.1.3). Any pellets that may have accumulated in the burner must be removed. Press the [ON/OFF] button to shutdown the stove and turn it back on again. Low pellets alarm [No pellet]: the hopper is out of wood pellets. Solution: refill the hopper with pellets before starting a new ignition cycle. Press the [on/off] button to shutdown the stove and turn it back on again. Note: if the fire in the burner tends to go out, this situation can be corrected by the calibration setting. 32 ENGLISH Thermostat alarm [H. T pellet]: indicates that the temperature of the pellet hopper is too high. Solution: once the stove has been shut down, do the following: - Set the switch on the back of the stove to its “OFF” position. - Reset the thermostat on the back of the stove (unscrew its black cover, press the button at the centre and screw the cover back on) and set the switch on the back of the stove to its “ON” position. - Turn the stove back on by pressing the [ON] button. Pressure switch alarm [Al. depr]: the pressure switch has detected excessive pressure inside the smoke extraction duct. Solution: if the excessive pressure is only temporary, the stove’s normal functionality will be restored once the pressure has dropped back to a normal level; if the excessive pressure should persist, on the other hand, check to make sure that there are no obstructions in the smoke extraction duct. Press the [ON/OFF] button to shutdown the stove and turn it back on again. Sensor alarm [Al. roomP]: indicates a fault or malfunction in the room temperature sensor. *Solution: a qualified technician must be contacted in order to reset the sensor and determine the cause of the alarm. Smoke sensor alarm [Al. smokeP]: indicates a fault or malfunction in the smoke temperature sensor. *Solution: a qualified technician must be contacted in order to reset the sensor and determine the cause of the alarm. Smoke extractor alarm [Al. blower]: indicates a fault or malfunction in the smoke extractor. *Solution: a qualified technician must be contacted in order to reset the sensor and determine the cause of the alarm. High smoke temperature alarm [Al. smokeT]: indicates that the temperature of the combustion smoke is too high due to: - lack of special maintenance and cleaning. - improper combustion calibration. Solution: in the first case, it is necessary to carry out the special maintenance operations (see section 4); in the second case, it is necessary to change the calibration setting (see section 3). Irregular flame alarm [Fail]: Indicates an irregular flame during the [Fire on] stage, while the stove's ignition cycle is in progress. Solution: Once the shutdown phase has been completed, check the cleanliness of the burner and the compartment beneath it (see section 4.1.3). Remove any pellets that may have accumulated in the burner, check the level of the pellets in the hopper and, if necessary, refill the hopper before attempting to ignite the stove again. 4 MAINTENANCE 4.1 Routine maintenance With routine cleaning and maintenance, the stove will maintain its thermal and functional performance over time. ⚠ ATTENTION: The various cleaning operations must only be carried out while the stove is completely cold and disconnected from its electrical power supply (with the electrical plug disconnected from the outlet). 4.1.1 CLEANING THE DISPLAY AND THE PARTS OF THE EXTERNAL CASING 1 ENGLISH The cleaning operations should be carried out using a soft dry cloth, without any detergents or chemical products. 4.1.2 CLEANING THE CERAMIC GLASS To be performed whenever necessary. The frequency with which the ceramic glass needs to be cleaned depends on the quality and type of the fuel, as well as the methods with which the stove is utilized. In order to properly clean the ceramic glass, it is recommended to spray a small amount of an appropriate detergent onto a cloth and to wipe away the dirt using the cloth itself (see figures 1 and 2). Never spray the detergent or any other cleaning liquid directly onto the ceramic glass (see figure 3). ⚠ 2 NEVER use abrasive sponges or other similar items to clean the ceramic glass, as these could irreparably damage it. ATTENTION: Be sure to close the door well each time after opening it to clean the ceramic glass. NO 3 ENGLISH 33 4.1.3 TYPE 1 ROUTINE MAINTENANCE OPERATIONS 3. Remove the pellet protection and the burner. These operations must be carried out at least twice a week based on the usage conditions. The user’s experience over time will allow him/her to determine the right frequency for carrying out cleaning and maintenance operations upon the stove. ENGLISH ⚠ ATTENTION: Each cleaning operation must be carried out while the stove is completely cold and disconnected from its electrical power supply (with the electrical plug disconnected from the outlet). The number of maintenance interventions required increase proportionally in relation to the stove’s intensity of use . ⚠ ATTENTION: Make sure that the ash is completely cold before initiating any cleaning operations upon the stove. Once this has been verified, the ash can be removed using a vacuum cleaner. The type 1 periodic maintenance operations can be carried out by following the procedure below: 1. Open the stove’s door slowly in order to prevent the ash accumulations from being blown about by a rapid movement. 4. Use a vacuum cleaner and a brush with steel bristles (or another sufficiently abrasive material) to clean the ash and any more consistent ash incrustations off of the burner, as these could obstruct the air passages. 2. Remove the grille. 34 ENGLISH 5. Remove the ash pan with your hands and empty it. 4.2 Special Maintenance The special cleaning and maintenance operations (types 2 and 3) help to maintain the stove’s thermal and functional performance over time. In order to make sure that the maintenance carried out upon the stove itself will not be in vain, the smoke extraction system should also be maintained with the same diligence. 4.2.1 TYPE 2 SPECIAL MAINTENANCE OPERATIONS ⚠ ⚠ ATTENTION: Each cleaning operation must be carried out while the stove is completely cold and disconnected from its electrical power supply (with the electrical plug disconnected from the outlet). ATTENTION: Make sure that the ash is completely cold before initiating any cleaning operations upon the stove. Once this has been verified, the ash can be removed using a vacuum cleaner. The type 2 periodic maintenance operations can be carried out by following the procedure below: 1. Lift and push the refractory plate on the upper portion of the stove towards the inside so that lower part protrudes. 7. Thoroughly vacuum out the inside of the compartment that houses the ash pan. After having completed the cleaning operations, re-assemble all of the elements in the opposite order of that in which they were removed. ENGLISH 35 ENGLISH 6. Using a vacuum cleaner of sufficient power (10001300W), remove all of the ash that has accumulated in the combustion chamber, in the burner’s ash collection tray and on the door. In addition to the type 1 maintenance operations, the type 2 maintenance operations must be carried out after approx. 350 - 400 hours of use or else after about 500~600 kg of fuel have been consumed. 2. Grasp the refractory plate with both hands and tilt it to extract it from the combustion chamber, taking care to avoid jolting it against the structure of the stove itself. 6. Unscrew and remove the 4 Allen screws that fasten the cover of the heat exchanger’s dust collection tray compartment. ENGLISH 3. Thoroughly clean the entire rear portion of the fin heat exchanger with the supplied 90° brush, even inside the two holes at the bottom. 7. Remove the cover of the heat exchanger’s dust collection tray compartment. 4. Use a vacuum cleaner to clean up all of the soot and ash that comes out of the fin heat exchanger. 5. Remove the base of the casing by lifting and releasing it. 36 ENGLISH 8. Remove the soot with a shovel and use a vacuum cleaner to vacuum out any remaining soot and ash inside the heat exchanger’s dust collection tray compartment. In order to properly eliminate the soot and ash in the CS09A model, it is also necessary to remove the components of the “smoke deflector kit”, which are located inside the heat exchanger’s dust collection tray compartment. 4.2.2 TYPE 3 SPECIAL MAINTENANCE OPERATIONS To be carried out at the end of the season along with the type 1 routine maintenance operations and the type 2 special maintenance operations. ENGLISH In order to reinsert the ‘smoke deflector kit’ into the heat exchanger’s dust collection tray compartment, follow the indications provided in the diagram below (in order to make sure that the kit’s elements are properly positioned, it is recommended to perform a number of trials outside of the unit, following the indications in the diagram).. Smoke extractor These special maintenance operations serve to clean the smoke extractor and its housing, as well as to provide for a more thorough cleaning of the lower portion of the heat exchanger. These operations must be performed on both sides of the stove by removing its external casing. (In order to properly remove the casing, please refer to the instructions provided along with the casing kit). ⚠ ⚠ ⚠ ATTENTION: This operation must be carried out by a qualified technician. ATTENTION. : Each cleaning operation must be carried out while the stove is completely cold and disconnected from its electrical power supply (with the electrical plug disconnected from the outlet). ATTENTION: Make sure that the ash is completely cold before initiating any cleaning operations upon the stove. Once this has been verified, the ash can be removed using a vacuum cleaner. After having completed the cleaning operations, re-assemble all of the elements in the opposite order of that in which they were removed. ENGLISH 37 The smoke extractor and its housing can be cleaned by carrying out the operations described below: ENGLISH 1. After lifting and removing the cover, the left side can also be lifted and removed. Perform the same operation to remove the right side. This will provide for complete access to the smoke extractor. 4. Use a vacuum cleaner to vacuum out all of the soot that has deposited upon the smoke extractor’s stainless steel blades. 5. Vacuum out all of the soot that has deposited inside the smoke extractor's lodging, above all on the left hand side near the connection to the flue duct, which must also be cleaned out. 2. Use a 3 mm Allen key to remove the 4 screws (2 on each side) that hold the smoke extractor in place. 4.2.3 CHECKING THE SEALS 3. Tilt the smoke extractor to remove it. Since the smoke extractor is connected to the stove by its electrical cable, it cannot be distanced from the stove itself. For this reason, the cleaning operations described below must be carried out by resting the smoke extractor on top of the stove, while adopting the necessary precautions (see the diagram). When carrying out the special maintenance operations at the end of the season, make sure that the technician also checks the seals of the door and the removable parts. They normally need to be replaced every one to three years, based on the type of stove, usage intensity, etc. The seals should be somewhat elastic to the touch: they must be replaced once they have become fully vitrified. 4.2.4 CLEANING THE FLUE DUCTS It is recommended to clean the smoke pipe and the vertical flue ducts on a regular basis. These cleaning operations should be carried out at least once a year, and more often if the unit is used on a daily basis or if fuel is utilized with characteristics different from those which are indicated in section 1.7. It is recommended to have these cleaning operations carried out by expert personnel, requesting their contact information from your reseller. The intervention of an expert technician can be an effective and economical way to protect the system against corrosion and to keep it running efficiently. 38 ENGLISH 4.3 Decommissioning It is recommended to allow the stove to burn all of the wood pellets in the hopper before carrying out the routine and special maintenance operations and decommissioning the stove at the end of the season. ⚠ ATTENTION: The stove must have its power cable disconnected from the electrical outlet during the off season. 4.4 Troubleshooting The stove is not receiving electrical power (led indicator not lit); • ithe power cable could be damaged or else could be disconnected from the electrical outlet; • the fuse inside the electronic card may have burnt out (see section 4.4.1). Repeated failed ignitions take place; • the door’s seal may be worn or damaged; • lthe combustion chamber may not have been subjected to regular maintenance (see section 4.1.3); • the ignition heating element or the smoke temperature sensor may have malfunctioned (in this case, request technical assistance). The ventilation is not working; • the fan may be blocked or malfunctioning (in this case, request technical assistance). The burner is being filled with too many pellets (with pellets overflowing): • the door’s seal may be worn or damaged; • the holes in the burner may be blocked by deposits (see section 4.1.3, figure 4); • the stove may not have been subjected to regular maintenance (see sections 4.1.3 and 4.2); • there may not be sufficient combustion air (if the problem still persists after cleaning the stove, request technical assistance); • the smoke extractor’s motor may not be working properly (in this case, request technical assistance); • the fuel may be damp; • lthe combustion air intake could be obstructed; • ithe set pellet parameter may not be set to the proper value and may need to be corrected (see section 3.4.5); • the stove may not have been subjected to regular maintenance (see sections 4.1.3 and 4.2); • the smoke extraction duct (flue duct and chimney) may not be clean or may not to be airtight; • the point for inserting the flue duct into the chimney may be flawed; • the size of the flue duct may not comply with the indications provided in this manual (see sections 2.2, 2.2.1 and 2.2.2); • the room should be well ventilated during the first start up phases as the paint normally releases unpleasant odours; • there could be obstacles (trees, buildings, etc.) that exceed the height of the chimney and prevent the smoke from flowing out; the draught in the chimney may not be sufficient. 4.4.1 REPLACING THE FUSE If the led indicator light and the control panel’s display do not turn on when the power button is pressed, the stove’s fuse may have to be replaced. ⚠ ATTENTION. This operation must only be carried out while the stove is completely cold and disconnected from its electrical power supply (with the electrical plug disconnected from the outlet). The fuse is located on the stove’s control unit. In order to replace it, do the following: • remove the left side of the casing (refer to the instructions provided along with the casing kit); • carefully extract the fuse (see figure 1); • check whether the fuse is intact; • if the fuse is bunt, replace it with a new one and reinstall the stove’s casing element; • Plug the stove’s power cable back into the electrical outlet and press the power button again. Request technical assistance if the problem persists or if the fuse burns out again. Fuse characteristics: "5A T 5x20 fuse (delayed). 1 Presence of smoke in the room: • the seals may be worn or damaged; • there may be another functional (stove, fireplace, wood burning range or fume hood) or non-functional (open fire) unit in the same room whose draught is limiting or impeding that of the pellet stove, or vice versa; ENGLISH 39 ENGLISH For houses that are not inhabited year round, it is recommended to inspect the flue duct and chimney at the beginning of the season, even if they have already been cleaned, in order to make sure that no obstructions are present, such as beehives, bird nests or other similar elements. 5 RESERVED FOR TECHNICAL ASSISTANCE PERSONNEL 5.1 Wiring diagram ⚠ ATTENTION: The main switch does not guarantee the stove’s disconnection from its electrical power supply. For this reason, the stove’s power cable must be unplugged before removing the casing, the rear panel and/or the screws that hold the circuit board compartment in place. Control board ENGLISH Radio control kit USB Thermostat Pressure controller ⚠ Ignition resistance Screw auger geared motor 19 18 17 16 15 14 ⚠ M Convection fan Smoke exhauster 13 12 11 N 10 L 9 N 8 L 7 N L N L 6 5 4 3 Switch with light N 2 L 1 230V 50Hz 40 ENGLISH 22 21 20 ELECTRONIC CARD + - Smoke sensor Room temperature sensor Encoder Smoke exhauster ENGLISH QUALITY CONTROL ENGLISH 41 ® The manufacturer reserves the right to modify this manual at any time and without any previous notice. Any complete or partial reproduction, without any written authorization of the manufacturer, is strictly forbidden. Calux S.r.l. Zona Industriale Paduni 03012 Anagni (Fr) Italy Tel. + 39 0775 779822 Fax + 39 0775 779823 [email protected] www.calux.it