1
User manual
Rapsody N36
Date: 10 March 2008
www.rapsody.ch
User Manual Rapsody N36
Page 2
Copyright 2008 by Simpex & Ceptra – Alterations and omissions excepted – reproduction & publication is only allowed after obtaining prior permission
User Manual Rapsody N36
Page 3
Table of contents
1. Information.................................................................................................................................. 4
1.1.
Introduction .......................................................................................................................... 4
1.2.
Brief description of the functions.......................................................................................... 4
1.3.
Scope of delivery.................................................................................................................. 4
1.4.
Replacement parts/accessories........................................................................................... 4
2. Installation................................................................................................................................... 5
2.1.
Installing a hard disk ............................................................................................................ 5
2.2.
The remote control unit ........................................................................................................ 5
2.3.
The Rapsody N36 connections............................................................................................ 6
2.4.
The power supply unit .......................................................................................................... 6
2.5.
Audio outputs ....................................................................................................................... 6
2.6.
Video outputs ....................................................................................................................... 6
2.7.
LAN connection.................................................................................................................... 7
2.8.
USB host .............................................................................................................................. 7
2.9.
PAL/NTSC switch................................................................................................................. 7
2.10. Protective film....................................................................................................................... 7
2.11. Cleaning ............................................................................................................................... 7
3. Set up ......................................................................................................................................... 8
3.1.
Transmit picture to output device......................................................................................... 8
3.2.
Set up ................................................................................................................................... 8
3.3.
Network settings for the device.......................................................................................... 12
3.4.
Connect PC with Rapsody N36 ......................................................................................... 14
3.5.
Carry out a firmware update............................................................................................... 17
4. Operating the device ................................................................................................................ 18
4.1.
Navigation/Main menu ....................................................................................................... 18
4.2.
Play back multi media files................................................................................................. 21
4.3.
The remote control unit and its functions ........................................................................... 23
4.3.
The remote control unit and its functions ........................................................................... 23
4.4.
Touch Panel Front.............................................................................................................. 26
4.5.
Bookmarks ......................................................................................................................... 26
4.6.
Subtitles.............................................................................................................................. 26
5. Solving problems ...................................................................................................................... 27
5.1.
Frequently asked questions ............................................................................................... 27
5.2.
Further information............................................................................................................. 27
5.3.
Service/Repair.................................................................................................................... 27
Technical details of the Rapsody N36 ............................................................................................ 28
Imprint ............................................................................................................................................. 29
Copyright 2008 by Simpex & Ceptra – Alterations and omissions excepted – reproduction & publication is only allowed after obtaining prior permission
User Manual Rapsody N36
Page 4
1. Information
1.1. Introduction
Congratulation on your purchase of a Rapsody N36. This user manual gives you a quick
overview about connecting, installing and using your Rapsody N36. If you are not satisfied with
a section of the user manual or if particular questions arise that are not answered here, please
contact our support division at the Rapsody-Homepage (http://www.rapsody.ch).
Please read this user manual carefully prior to using your device!
1.2. Brief description of the functions
With the N36 you can play back multi media content stored on the internal hard disk, on a
network, or on a connected USB device simply and easily, without using a PC.
Apart from televisions or stereos, you can use also use practically any multi media device such
as beamers or plasma screens as the output medium. The possibilities are unlimited.
Thanks to a high-grade design with a touch panel front, the Rapsody N36 also enhances the
appearance of your home cinema system.
You can access the internal hard disk via the network connection and the NDAS technology.
Easy-to-apply firmware updates increase the variety of functions, offered by your Rapsody N36,
even further. This lets you keep up to date with the latest technologies.
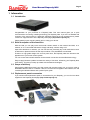
1.3. Scope of delivery
Along with the HDD player itself, your N36 comes with a power supply unit, a cinch AV cable, a
DVI/HDMI cable as well as a network cable, the remote control together with batteries, the CD
containing the NDAS software and a printed quick guide.
1.4. Replacement parts/accessories
If you should need replacement parts or accessories for your Rapsody, you can find out about
suppliers at the Rapsody-Homepage (http://www.rapsody.ch).
Copyright 2008 by Simpex & Ceptra – Alterations and omissions excepted – reproduction & publication is only allowed after obtaining prior permission
Page 5
User Manual Rapsody N36
2. Installation
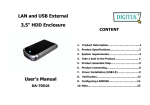
2.1. Installing a hard disk
You can install any 3.5" SATA and PATA disk in your Rapsody HDD Player. To connect a PATA
HDD just remove the SATA adapter board. There is no restriction to the storage capacity. The
hard disk may be partitioned and formatted prior to installing; this is, however, not essential. It
goes without saying that your guarantee is not affected by a correctly carried out installation; the
devices are intended for this purpose.
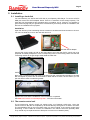
Installation
Open the device by first unscrewing the two screws on the sides and three screws on the rear.
You can now slide the cover to the rear and remove it.
N36 with SATA adapter
Connect the power supply as well as the data cable to the hard disk (PATA: which has to be
jumpered as master) and place it in the corresponding frame in the housing. Make sure that the
connecting cables do not get caught underneath the hard disk.
PATA:
SATA:
Now screw 4 screws through the holes in the sides into the corresponding threads on the hard
disk and tighten by hand. One of the threads is rather difficult to reach; for this reason you can
just use three screws to make fixing easier.
Replace the cover and the installation of the hard disk is completed.
See item 3.4 "Connect PC with Rapsody N36 ". for further information.
2.2. The remote control unit
The accompanying remote control unit makes using your Rapsody child's play. Using the
remote control in the dark is simplified by its fluorescent keys that glow for a while in the dark.
The acknowledge LED on the front blinks when you send a signal. If the remote control stops
functioning, or if the LEDs do not blink, the batteries in the remote control are probably dead.
They should only be replaced with two leak-proof common micro batteries (AAA).
Copyright 2008 by Simpex & Ceptra – Alterations and omissions excepted – reproduction & publication is only allowed after obtaining prior permission
User Manual Rapsody N36
Page 6
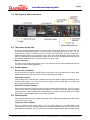
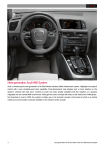
2.3. The Rapsody N36 connections
2.4. The power supply unit
The energy saving switched-mode power supply has a wide range input of 100-240V and can
be used, with appropriate adapters, in many countries throughout the world. It has a 12 volt
output and can supply a maximum current of 5 amps. This is necessary, as many modern highspeed hard disks require a high starting current. Only use original Rapsody power supply units
with your HDD player! Undersized power supply units can not only damage the devices but may
also become overloaded and, in the worst case, can cause a fire!
Safety information:
Important! The provided power supply unit is only approved for use with the Rapsody N36! Do
not use it for other electric appliances!
2.5. Audio outputs
Stereo cinch (red/white)
A normal stereo audio signal is output here for connecting to any end devices as you wish. Multi
media contents with multi-channel tone will be reduced to stereo output.
Optical AC3 output
Your Rapsody has a TOSLINK jack, suitable for a fibre optic cable for digitally transmitting multichannel audio signals. You can connect this to a device with an input that can handle AC3
audio signals (DolbyDigital or DTS).
Coaxial AC3 output (orange)
AC3 multi-channel audio signals can also be output via the coaxial connection. You can connect
it with a cinch cable to an appropriate output device. This way of connecting does not usually
cause any loss of sound quality when compared with an optical connection. Most cinch cables
are suitable, a special digital cable is not usually necessary.
2.6. Video outputs
Your Rapsody N36 has several video outputs that can be selected by switching with the remote
control unit (TV OUT key).
Composite video (yellow)
This is a common video output, which you can connect directly to an output device with
composite input, using the provided cable. Your Rapsody specialist shop has favourably priced
scart adapters with which you can transmit the composite signal together with the stereo audio
Copyright 2008 by Simpex & Ceptra – Alterations and omissions excepted – reproduction & publication is only allowed after obtaining prior permission
User Manual Rapsody N36
Page 7
signal directly onto a scart plug. This enables you to connect your Rapsody to any television set
with a scart input.
The composite output can produce either a PAL or a NTSC signal.
S-Video (Mini DIN jack)
Standard S-Video signals are output here. The picture quality is usually better than with output
via composite video.
Component video (red/green/blue)
The component output enables the output of high resolution HDTV video signals. These are
YPbPr or YCbCr colour coded and are transmitted to the output device via 3 cinch cables.
Possible resolutions are 480p, 720p, 1080i and 1080p, up to a maximum of 1920x1080 and are
specified in the N36 setup.
DVI output (HDMI)
The Rapsody N36 has a 24+5 pin DVI jack. This means that practically all DVI plugs will fit. The
DVI output provides TOP picture quality and is recommended to be used if corresponding high
resolution output devices are available. Possible resolutions are 480p, 720p, 1080i and 1080p,
up to a maximum of 1920x1080 or 1600x1200 and are specified in the setup of the N36. A DVI
to HDMI cable for connecting to a modern TV is provided.
2.7. LAN connection
This is a RJ-45 10/100 LAN jack. Please read section 3.3 "Network settings for the device" for
information about connecting and installing.
2.8. USB host
You can connect further USB devices such as external hard disks, memory card readers, USB
sticks or digital cameras to the USB host sockets. This enables you to play multi media files
directly from this device via the menu item "USB".
Please observe that this will only work with devices that can log on to a windows operating
system as USB mass storage devices, in other words, after connecting, they are available as a
separate drive without the need for installing a driver.
2.9. PAL/NTSC switch
With this switch you can choose the transmission standard for the display. This depends on the
output devices that are connected. PAL should work in the most cases in Europe.
2.10. Protective film
There is a wafer-thin protective film on the front of your N36. Many customers forget to remove
the film and, after a short time, are annoyed about apparent scratches on the display, although
the scratches are only on the film. After removing the protective film, your Rapsody's touch
panel appears in a perfect, lasting, new look.
2.11. Cleaning
Please do not clean the device with strong cleaners or even water! A lint-free and nonscratching cloth, at the most slightly moist, with a little glass cleaner removes greasy marks
reliably.
Copyright 2008 by Simpex & Ceptra – Alterations and omissions excepted – reproduction & publication is only allowed after obtaining prior permission
User Manual Rapsody N36
Page 8
3. Set up
3.1. Transmit picture to output device
Make sure that your connected TV, beamer or other display appliance is
ready to receive. Switch your television accordingly to the respective AV
input channel to which the Rapsody is connected.
When you start your Rapsody N36 for the first time, it may send a signal
from the wrong video output channel or it may be necessary to switch over, on the rear, from
PAL to NTSC.
Switch the device on and wait 10 seconds until it is ready.
Now simply press the TV-Out key (lower right) on your remote control and wait a moment each
time your press a key to see if a picture is displayed. Depending on the receiver, it may take a
moment until a picture is displayed. The output mode that is currently active (e.g. DVI) is
displayed on the touch panel front.
If the cable is connected correctly and if the output device is ready to receive, you should have
a picture after switching 5 times, at the most.
You can now proceed to set up the video output.
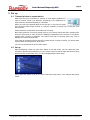
3.2. Set up
Start the Rapsody. There is a menu item "Setup" in the main menu. You can reach this menu
item either directly with the setup key on your remote control or with the right and left arrow keys
and the OK key. In the setup menu, you also navigate with the arrow keys.
Simply press the setup key when you want to leave the setup menu. Your changes will now be
saved.
Copyright 2008 by Simpex & Ceptra – Alterations and omissions excepted – reproduction & publication is only allowed after obtaining prior permission
User Manual Rapsody N36
Page 9
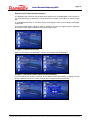
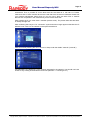
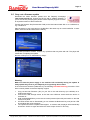
System video output (Video-Ausgabe)
The Rapsody N36 has 4 different modes for outputting the video signal.
C/S-Video: The signal is outputted simultaneously to the composite and the s-video jacks.
Component: The signal is outputted to the component jacks.
DVI: The DVI output is activated (conforming to HDMI).
RGB: An RGB signal is sent to the component output.
A further menu item is activated, depending on the mode selected (not with C/S video) in which
you can select the output resolution.
System TV-type (TV-Typ)
Here you can specify the picture format of the connected output medium. Normal televisions
and most beamers have a format of 4:3, while wide screens have 16:9.
In 4:3 Letterbox mode, video material is scaled on the screen in such a way as to fill its entire
width. This results, for example, in black bands at the top and the bottom with 16:9 films.
In 4:3 Pan & Scan mode, the material is scaled to take up the full height of the screen. This
means, under circumstances, that picture information on the right and the left is cut off.
Copyright 2008 by Simpex & Ceptra – Alterations and omissions excepted – reproduction & publication is only allowed after obtaining prior permission
User Manual Rapsody N36
Page 10
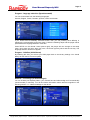
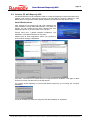
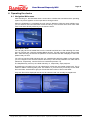
System audio output (Audio-Ausgabe)
The Rapsody N36 can send multi channel audio signals such as DolbyDigital or DTS, either as
a 2 channel downmix, or directly as a multi channel AC3 stream, to its optical or coaxial output
jack.
In analogue/DPCM mode, a 2-channel stereo audio signal is sent to the analogue and digital
output jacks.
In Encoded Digital mode, analogue output is turned off and only the digital signal is outputted,
unchanged, to the digital outputs for multi channel audio tracks.
Program - subtitles (Untertitel)
Here you can change the size and the colour of the subtitles that are displayed.
Program - slideshow interval (Diashow-Pausendauer)
You can specify the length in seconds of the interval when automatically changing pictures
during a slideshow. Enter a 0 here if you don't want to skip pictures automatically.
Copyright 2008 by Simpex & Ceptra – Alterations and omissions excepted – reproduction & publication is only allowed after obtaining prior permission
User Manual Rapsody N36
Page 11
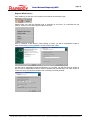
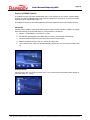
Program - language selection (Sprachauswahl)
You can choose here from the following languages:
German, English, French, Russian, Spanish, Czech and Korean.
If you should have accidentally selected Korean, then you will probably have difficulty in
selecting the corresponding menu item again. Follow the following steps and the player will be
positioned at the language selection menu item.
Press SETUP on the remote control (above right), the player will now change to the setup
menu. Now press the arrow down key once, the arrow right key twice and the OK key. The
language selection should now appear.
Program - Initialise (Initialisieren)
By selecting this item you will set your HDD player back to the factory settings. You should
always do this after a Firmware update.
Network – IP settings (IP Einstellungen)
You can include your Rapsody N36 in your network here and either assign an IP automatically
(recommended) or manually. You will find further information about network recognition in the
following section 3.3 – Network settings for the device.
Copyright 2008 by Simpex & Ceptra – Alterations and omissions excepted – reproduction & publication is only allowed after obtaining prior permission
User Manual Rapsody N36
Page 12
3.3. Network settings for the device
In order to connect your Rapsody with the network, it must be correctly
included in the network (LAN). To do this, connect the N36 with the provided
patch cable to a network hub/switch or router, for example that is connected
to your PC. It is not possible to connect directly with a PC using this cable!
You need a crossover cable if you want to do this.
These instructions can not, unfortunately, cover networks and their topologies; this is partly a
very complex topic. Each network is set up and configured differently.
In order for the data transmission between PC and N36 to work, it must, for example, be
ensured that any firewalls that are present do not block the data traffic. These may have to be
reconfigured, under circumstances.
The following describes the case where a PC and N36 are included in a common network, and
data transmission for both devices is not restricted.
Automatic IP setup
Each device in your network requires an IP. This is a unique number with which a device can be
addressed. With your N36, the IP is specified in Setup under "Network".
If the network includes a DHCP router it can automatically assign an IP to the Rapsody. First
select "automatic" ("automatisch") from IP settings (IP Einstellungen). A search process will be
started. If the following image appears during this process this indicates that an IP could not be
assigned to the N36.In this case the IP must be entered manually.
Entering the IP manually
If automatic assignment was not possible, you must enter an IP and a netmask manually. To do
this you must first find out the network IP address of the PC to be connected. If you use the
operating system Windows 2000 or XP, you can display the properties of the network
connection used with the item "network connections" in the "settings" control panel. You will find
the IP address among the properties for the TCP/IP protocol used.
If you use another operating system or if you can't find what you are looking for, please consult
the documentation for your operating system to find out your PC's IP address.
Assume that the PC has the IP-Address 192.168.0.1. In this case you must enter an IP where
the first three parts are identical to this but the last part is different! The last number may not
Copyright 2008 by Simpex & Ceptra – Alterations and omissions excepted – reproduction & publication is only allowed after obtaining prior permission
User Manual Rapsody N36
Page 13
exceed 255. Thus, a possible IP for the N36 would be 192.168.0.33 or 192.168.0.47. Please
make sure that no other network devices are used that have the same IP-Address! Please ask
your network administrator about which IP you may use if there are other PCs or network
devices such as printers in the network and you are unsure about this.
After entering the IP you must enter a netmask (subnet mask). The preset value 255.255.255.0
is usually the right one.
After confirming the entry the "no connection" symbol should no longer appear otherwise the IP
address is not correct or the network is interrupted somewhere.
After successfully entering the IP it is shown in Setup under the details "manual" ("manuell").
Congratulations, the Rapsody is now correctly integrated in the network! You should now have
access to any existing shared network resources (see item 4.1 "Sharing a PC").
Copyright 2008 by Simpex & Ceptra – Alterations and omissions excepted – reproduction & publication is only allowed after obtaining prior permission
User Manual Rapsody N36
Page 14
3.4. Connect PC with Rapsody N36
PC NDAS software must be installed in order to access the Rapsody's internal hard disk from a
network. This serves to authorise the access to the hard disk by entering a NDAS key. Also
NDAS allows much greater transfer speed (hardware acceleration through built-in chip).
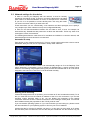
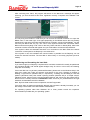
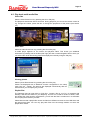
Install NDAS software
After inserting the accompanying CD under Windows, the
setup assistant normally starts automatically. If this does not
happen, you can initiate the start with a double click from
Windows Explorer on the drive letter of the CD drive.
Choose menu item 1 (NDAS Software Installation). The
installation of the NDAS software will now start.
Please close all other applications before you proceed to
avoid conflicts during the installation.
Click Next, check the box to confirm that you accept the licence conditions, click again on Next
and then on Install. The files will now be transferred.
If a question arises regarding an unsuccessful Widows logo test, you can reply with "continue
installation".
It may be necessary to restart the computer after the installation is completed.
Copyright 2008 by Simpex & Ceptra – Alterations and omissions excepted – reproduction & publication is only allowed after obtaining prior permission
User Manual Rapsody N36
Page 15
Register NDAS device
After restarting you will see a new symbol in the task bar at the bottom right:
Please make sure that the Rapsody N36 is switched on and that it is connected with the
network. Clicking on the NDAS symbol opens the menu:
Click on "Register a New Device". After clicking on "Next" you will be requested to supply a
name for the device to be registered e.g. N36. Confirm with "Next".
You will now be requested to enter the NDAS key for your N36. You will find this on a sticker on
the CD case or underneath the device. Enter it together with the Write Key. The "Next" button to
confirm the entry will only be activated if the correct key has been entered.
Copyright 2008 by Simpex & Ceptra – Alterations and omissions excepted – reproduction & publication is only allowed after obtaining prior permission
User Manual Rapsody N36
Page 16
After confirming with "Next", the program will search for the N36 and a message will appear
informing you that the device has been registered correctly. Complete the installation with
"Finish".
The only thing that remains in order that you can access the internal hard disk is to open the
NDAS menu, in the lower right, once again (depending on the NDAS version this may already
happen during the setup procedure described above; important: mount as Read/Write!). You will
now see your N36.at the very top. The colour of the symbol indicates the connection status.
Blue means that everything is OK. Click on the entry "N36" and then on Mount (RW). After a few
moments a further drive letter will appear and you will be able to access the N36 hard disk.
If the symbol is black this indicates that there is no connection to the N36. Either the network
connection is interrupted or the Rapsody is not switched on.
If the symbol is red, this indicates that communication is possible but the Rapsody can not
access the internal hard disk. The hard disk is either faulty or incorrectly jumpered (must be
master).
Partitioning and formatting the hard disk:
If you have bought your Rapsody complete with a hard disk, the disk will normally be partitioned
and formatted already and should appear straight away as a drive. In this case, the following
steps are unnecessary.
If the hard disk has not yet been partitioned/formatted, please refer to the Windows help in the
start menu under item "Help and support" and search for the topic "Creating a partition or
deleting a logical drive" (Windows XP) or, respectively, "Creating and formatting a hard disk
partition" (Windows Vista). Now create a primary partition (Windows XP) or a "simple volume"
(Windows Vista). Always use the pre-set standard settings and choose the file system NTFS.
Quick format is usually sufficient. ATTENTION: Make sure that you partition/format the right
hard disk; all data held there will be deleted!
Note: Dynamic data mediums and compression are NOT supported!
If the drive does not appear automatically although the hard disk is already formatted, you can
also assign a drive letter in the data medium administration.
For operating systems other than Windows XP or Vista, please consult the respective
documentation provided with your operating system.
Copyright 2008 by Simpex & Ceptra – Alterations and omissions excepted – reproduction & publication is only allowed after obtaining prior permission
User Manual Rapsody N36
Page 17
3.5. Carry out a firmware update
Download the latest firmware update from the Rapsody homepage
(http://www.rapsody.ch). Unpack the ZIP file with a suitable unpacker. If
you do not have a pack program please contact Rapsody support to obtain
an unpacked version of the firmware file.
Transfer the firmware file (file extension: BIN) to the N36 internal hard disk or to a USB device,
e.g. a USB stick.
Start the device in play mode and run the BIN file in the same way as a multi media file. In other
words, select the file and start with the OK key.
The update procedure will start. Confirm any questions that may arise with OK. The player will
restart after completing the update.
Be sure to always run an initialisation in Setup!
Warning:
Make sure that the power supply is not switched off accidentally during the update. A
faulty update may result in your Rapsody no longer being able to start!
In the event that a firmware update fails, try the following Firmware Recovery procedure. If this
does not work please contact the Rapsody support.
1.
2.
3.
4.
5.
Copy current N36 Firmware (.bin) on your PC to the main directory (no subfolder) on a
USB storage device.
Connect the USB storage device to the N36 rear USB host socket while the device is
switched off.
Hold the BOOKMARK key on the remote control pressed (lower left) and switch on the N36
at the touch panel.
All LEDs should now be illuminated (you can release the Bookmark key now) and an LED
should blink after a few moments.
The update should be completed after approx. 10 minutes and the player will automatically
shut down. Switch on again and select the video output via the TV OUT key.
Copyright 2008 by Simpex & Ceptra – Alterations and omissions excepted – reproduction & publication is only allowed after obtaining prior permission
User Manual Rapsody N36
Page 18
4. Operating the device
4.1. Navigation/Main menu
After switching on, the N36 takes about 10 seconds to initialise the hard disk and the operating
system. No picture appears on the output device during this time.
When the initialisation is completed the main menu is displayed. With the arrow left/right keys,
you can select a menu item and enter it with the OK key. You can also reach each of the main
menu's sub items directly with a key on the remote control.
NDAS Disk / HDD
You can play back multi media files from the internal hard disk here. After selecting the menu
item you will first see a list with available NDAS devices. This will normally be the internal hard
disk. After selecting, the list with the partitions on the internal hard disk is displayed. Select the
partition that you want.
You will now see the folder structure that you created when saving the data on the hard disk;
you can navigate in this structure with the arrow keys. The OK key switches to a folder that is
selected or, respectively, runs the file if one is selected (see item 4.2).
The Stop/Back key moves up one folder hierarchy or, respectively, stops playback.
By pressing the number keys you can skip directly to files that are located further back. This is
useful for folders containing many files. For instance, if you enter 345 you will skip to the 345th
file in the folder. At the bottom right you will see the total number of files in this folder.
Only such files will be displayed that have a file extension that can normally be played back.
Copyright 2008 by Simpex & Ceptra – Alterations and omissions excepted – reproduction & publication is only allowed after obtaining prior permission
User Manual Rapsody N36
Page 19
Sharing a PC
If you select this item you will see a list showing all PCs in the network by
name. When you select a PC a list of shared network resources, which you
can open, will be displayed.
In this way you can access data saved on network resources.
You navigate in the same way as with the internal hard disk (see HDD).
By right clicking on a folder under Windows 2000/XP, you can release it directly for sharing in
the network.
Please consider that other network participants can also access your data if read access rights
are granted!
USB Disk
Here you can play back files directly from the devices connected via the USB
host socket. You navigate in the same way as with the internal hard disk (see
HDD).
Available USB devices will be listed when you select the USB menu item; if
you select a device its folder structure will be displayed.
Copyright 2008 by Simpex & Ceptra – Alterations and omissions excepted – reproduction & publication is only allowed after obtaining prior permission
User Manual Rapsody N36
Page 20
Playlist / INTERNET RADIO
The playlist function has been deactivated and is now intended for the future "Internet Radio"
function; this will be available with a free firmware update from rapsody.ch. You will find further
information about Playlist files under 4.2.
The Playlist function (for automated playback) has been replaced by the new Autoplay function.
AUTOPLAY
Autoplay allows media in a particular folder (internal HDD, network resource, USB) to be played
back automatically when the N36 starts up. The procedure is as follows:
a. SETUP -> PROGRAM -> AUTOPLAY -> [On]
b. exit SETUP and navigate to the folder that you want to have played automatically.
c. select the folder and press the [GOTO] button on the remote control
d. Make sure that the check is set (X = cancel) and press OK
e. The contents of the folder will be automatically played back the next time the N36 starts
up
Settings/Setup
With this menu item you enter the setup menu. You will find exact information about setting up
your N36 under 3.2 – Setup.
Copyright 2008 by Simpex & Ceptra – Alterations and omissions excepted – reproduction & publication is only allowed after obtaining prior permission
User Manual Rapsody N36
Page 21
4.2. Play back multi media files
Video files
Select a video file and run it by pressing the OK or Play key.
The playback should start after a short time. During playback you can use the remote control to
e.g. change the volume, pause the film or change the proportions of the picture (see section
4.3)
Audio files
Select an audio file and run it by pressing the OK or Play key.
A media player appears on the screen and playback starts. This shows you additional
information (if present) held in the files (ID3 Tags) and has a small navigation field in which you
can select other audio files during playback and play them directly using the Play key.
Viewing photos
Select a photo file and start it by pressing the OK or Play key.
Photos are displayed with a slideshow function configurable in the setup
menu (see 3.2 – Setup). The pictures are displayed consecutively after an
interval which you can specify as you wish.
Playlist files
The Rapsody N36 can open M3U or PLS files. Create a file on your PC, for example with
Winamp, and save this direct on your Rapsody. This file can contain a mixture of audio, video
and image files. After opening a playlist file, you will see the files it contains as in a sub-folder
and can play them back as you wish.
Please observe that a playlist file cannot mix files from different sources such as USB discs and
the internal hard disk. You can only play back files from the storage medium on which the
playlist file is stored.
Copyright 2008 by Simpex & Ceptra – Alterations and omissions excepted – reproduction & publication is only allowed after obtaining prior permission
User Manual Rapsody N36
Page 22
DVD Contents
You can play back the contents of the DVD that you previously copied on to the hard disk
together with the menus and all the features of a DVD. To do this simply copy the DVD files to a
directory and run the IFO file from there.
Make sure that you do not infringe upon any copyrights when copying the DVD contents!
After starting the IFO file, you can navigate with the menu in the DVD, display subtitles, change
the language or adjust viewing preferences using the remote control. In the same way as you
are used to with a DVD player.
Copyright 2008 by Simpex & Ceptra – Alterations and omissions excepted – reproduction & publication is only allowed after obtaining prior permission
User Manual Rapsody N36
Page 23
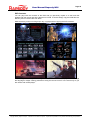
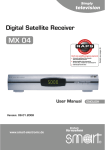
4.3. The remote control unit and its functions
Your Rapsody N36 comes with a modern and easy to use
remote control unit. The illuminated keys glow for a while
making using your remote control in the dark much easier.
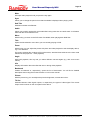
Arrow keys/OK key (tick icon)/number keys
The OK key and the surrounding arrow keys are the central
operating elements. You can navigate in the N36 with these
keys (see 4.1 – HDD).
Play/Pause
This key starts a multi media file playback. While a multi media
file is running, this key pauses the playback. Press again and
playback will continue.
Stop/Back
This key interrupts playback and returns to the menu or allows
you to navigate to a higher folder.
Volume
You can change the playback volume of your Rapsody N36
here.
Skip
With these keys you can skip to the next or the previous menu
item during playback.
Search
These keys allow you to fast forward or reverse when playing
audio or video files. With video files the speed can be changed
by repeatedly pressing the key.
Home
The player returns to the main menu when you press this
button.
NDAS
Access the internal hard disk.
PC
Access to network resources
USB
Displays connected USB devices
Playlist
Skips directly to the Playlist folder on the internal hard disk and
begins to play the first file.
Power
Switches the Rapsody on/off.
Setup
This key starts the Setup menu as long as a multi media file is not currently being played.
Goto
The Goto key allows you to skip to a particular point in time when playing back a video.
Copyright 2008 by Simpex & Ceptra – Alterations and omissions excepted – reproduction & publication is only allowed after obtaining prior permission
User Manual Rapsody N36
Page 24
Mute
Interrupts audio playback until you press the key again.
Sync
Allows you to change the point in time that the subtitle is displayed when playing a film.
Sub Title
Switches sub titles on/off/further.
Audio
Allows you to switch tracks with multi media files having more than one audio track. It will take a
while until the sound switches over.
Menu
With this key you return to the DVD menu if available, when playing back DVD files.
Title
Opens the title selection menu when you are currently playing a DVD.
Zoom
With this key you can adjust the picture with photo and video playback to suit the display device,
e.g. if it is distorted.
Full screen enlarges the contents to fill out the screen, standard view switches to the view mode
selected in setup (see 3.2 - video playback)
Angle
With DVD playback, this key lets you select different camera angles (e.g. with some music
videos).
Info
Displays information about the files that are run during video playback.
Bookmark
Creates a bookmark or, respectively, opens the list of bookmarks. You will find a detailed
description about using the functions further on in this user manual.
Picture
With the picture key you can adjust the picture's brightness, contrast and colour.
TV Out
Switches between video signal outputs, or respectively, the types of video signal. The current
output mode is shown on the front panel of the device.
Copyright 2008 by Simpex & Ceptra – Alterations and omissions excepted – reproduction & publication is only allowed after obtaining prior permission
User Manual Rapsody N36
Page 25
Repeat
This button switches between the different repeat modes. These are:
All files in the folder will be played consecutively over and over again.
All files will be played at random over and over again.
All files will be played consecutively once.
All files will be played at random once.
A single file will be played repeatedly.
Copyright 2008 by Simpex & Ceptra – Alterations and omissions excepted – reproduction & publication is only allowed after obtaining prior permission
User Manual Rapsody N36
Page 26
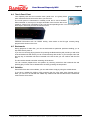
4.4. Touch Panel Front
Your Rapsody N36 has an innovative touch panel front. It is glossy black
when switched off and comes alive when you switch on.
The on/off symbol is illuminated in standby mode and is touch sensitive.
When switched on, the keys on the right hand side of the front are also touch
sensitive. A light touch is sufficient to carry out the corresponding action. You can navigate with
these keys in same way as with the remote control.
Additional information such as network activity, video mode or the file type currently being
played is also shown on the front.
4.5. Bookmarks
During playback of video files, you can set bookmarks at particular positions enabling you to
skip there directly later on.
If you are not currently playing back a file, pressing the Bookmark key will provide you with a list
of saved bookmarks with which you can continue directly with the film. If you interrupt a film with
the stop key, a bookmark will also be created in the list so that you can continue with the film
later.
The list remains stored even after switching off the device.
You can continue playback from this position by choosing a title from the bookmark list and
pressing play. Entries can be deleted from the list by pressing the stop button.
4.6. Subtitles
Some DVD films also have subtitles; you can select them simply by using the subtitle button.
If you have a subtitle file (SUB or IDX), matching the film, with other video formats such as
DivX, you can run it as well with the subtitle key. Please note that the video and the subtitle file
must have the same name.
Copyright 2008 by Simpex & Ceptra – Alterations and omissions excepted – reproduction & publication is only allowed after obtaining prior permission
User Manual Rapsody N36
Page 27
5. Solving problems
5.1. Frequently asked questions
With some video files my Rapsody indicates that playback is not possible. This is
indicated although the file is an AVI-file. Why does this happen?
AVI is a so-called container. This container can include all types of video files. Among others, of
course, these may also be seldom video formats or formats that do not conform to the usual
conventions. For this reason, the Rapsody N36 may be unable (at the present time) to play
back some video files even if they have a standard file extension.
This is the case e.g. with some video files from digital camcorders or TV cards.
Help! My Rapsody suddenly shows a Korean menu and I can't find the language setting
any more!
Very annoying! Under 3.2 – language selection you will find detailed steps to enable you to set
your player's language back to German.
The picture quivers. What is the fault?
This can have different causes. As well as faulty video files this can also be caused by too slow
data transmission (with some USB devices) or also a data transfer rate that is too high for the
Rapsody's chipset.
For example, unpacked AVI files or extremely high resolution HDTV streams can cause
problems. In order to view them with the Rapsody, you should convert such files to file formats
that are compatible.
I can't access a device connected to the USB host although I can see it in the USB list.
Not all USB devices keep exactly to the specifications for a USB mass storage device. It is, of
course, not possible to install a driver on the Rapsody for a special device. This means that
connected devices must keep to the respective standards. Unfortunately this is not always the
case. If you are looking for USB-hard disk housings, USB sticks or other devices that work
reliably with the N36, please contact our support (http://www.rapsody.ch).
5.2. Further information
On our Internet site (http://www.rapsody.ch) you will find further information, downloads and
assistance in connection with your Rapsody. You will also find our Internet forum there where
we can help you quickly and competently with your problems.
5.3. Service/Repair
Should you have any questions that cannot be answered by this user manual, we recommend
that you first consult the forum at www.rapsody.ch/forum. Please contact your dealer directly,
if you suspect that your device is defective.
Copyright 2008 by Simpex & Ceptra – Alterations and omissions excepted – reproduction & publication is only allowed after obtaining prior permission
User Manual Rapsody N36
Page 28
Technical details of the Rapsody N36
Supported file formats (without liability)
Video playback:
DivX 3.x/4.x/5.x/6.x, DivX-HD, XviD, AVI (container, compatible Codec necessary), MPEG1/2/4
(no MPEG4-AVC / H.264 possible), DAT, VOB, IFO, ISO, HD-WMV, WMV, M2V, M2P, TP,
TRP
Audio playback:
MP3, WMA, WAV, AAC, Ogg Vorbis
Pictures:
JPEG
Video output: Composite with PAL/NTSC resolution, component and DVI with 720p, 1080i and
1080p resolution (DVI also1600x1200).
Audio output: 2 channel analogue, 5.1 channel optical/coaxial (AC3, DTS)
Interface: RJ45 for access to internal HDD (with NDAS software), 2 x USB 2.0 host for
connection to data mediums
Operating system: MS Windows 98SE / ME / 2000 / XP / Vista, Mac OS X, Linux
File system: FAT32, NTFS
Temperature: 0~40 C°
Dimensions: 248mm (W) x 244mm (D) x 47mm (H)
Weight: 1800 Gram (without hard disk)
Power supply: 12v 5A AC/DC adapter with wide area input (AC 100~220v, 50~60Hz)
Copyright 2008 by Simpex & Ceptra – Alterations and omissions excepted – reproduction & publication is only allowed after obtaining prior permission
User Manual Rapsody N36
Page 29
Imprint
Simpex IT-Solutions AG (Switzerland) & Ceptra Solution GmbH (Germany)
Copyright
The texts, pictures and graphics as well as the layout of this user manual are protected worldwide
by copyright. All texts, pictures, graphics and other files included in this user manual are protected
by copyright and other laws protecting intellectual property. They may be used within the scope
offered but not, however, be copied or modified for trading purposes or with the intent of passing
them on to others or be used in other documents. Unauthorised use, copying or distribution of
individual contents or entire pages is prohibited.
A licence for the use of intellectual property is not granted with this user manual. All trade marks
used in this user manual are subject to the respective valid trade mark laws and the ownership
rights of the registered owners. This also applies to any third part trade marks. It should not be
assumed that trade marks are not protected by third party rights simply because they are named
here.
All rights reserved.
Exclusion of liability
The content of this user manual has been composed with the utmost care. However, we cannot
assume responsibility for the correctness and exactness of the information provided. We exclude all
liability for damage that may arise directly or indirectly from using this user manual as far as no
intentional or grossly negligent fault exists on our part.
Copyright 2008 by Simpex & Ceptra – Alterations and omissions excepted – reproduction & publication is only allowed after obtaining prior permission