1
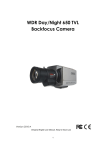
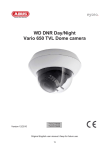
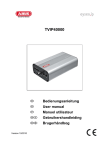
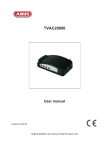
TVVR10000
User manual
Version 05/2010
Original English user manual. Keep for future use.
19
English
Introduction
Dear Customer,
Thank you for purchasing this product.
This product meets the requirements of the applicable European and national guidelines. The
corresponding declarations and documents can be obtained from the manufacturer
(www.abus-sc.com).
To maintain this condition and to ensure risk-free operation, you as the user must observe these operation
instructions!
Before initial start-up, read through the complete operating instructions observing operating and safety
instructions.
All company and product names mentioned in this document are registered trademarks.
All rights reserved.
If you have any questions, please contact your installer or your local dealer!
3
Disclaimer
This user manual was prepared with greatest care. If you should notice omissions or inaccuracies, please
inform us about these on the back of this manual given address.
The ABUS Security-Center GmbH assumes no liability for technical and typographical faults and reserves
the right to make at any time modifications to the product or user manual without a previous announcement.
The company is not liable or responsible for direct and indirect subsequent damages which are caused in
connection with the equipment, the performance and the use of this product.
No guarantee for the content of this document is taken.
20
English
Icon explanation
A flash in the triangle is used if there is danger for the health, e.g. by an electric shock.
An exclamation mark in the triangle points to an important note in this user manual
which must be minded.
This symbol can be found when you are to be given tips and information on operation.
Important safety advice
The warranty will expire for damage due to non-compliance with these operating
instructions. ABUS will not be liable for any consequential loss!
ABUS will not accept liability for damage to property or personal injury caused by
incorrect handling or non-compliance with the safety-instructions.
In such cases the warranty will expire.
The device has been manufactured in compliance with international safety standards. Please read these
safety advices carefully.
Safety advice
1. Mains supply
90 - 250V AC 50/60Hz
Operate this product only from the type of power supply indicated on the marking label. If you are not sure
of the type of power supplied to your home, consult your local power company. Disconnect the product
from the mains before you start any maintenance or installation procedures.
2. Overloading
Do not overload a wall outlet, extension cord or adapter as this may result in electric fire or shock.
3. Liquids
Setup the device only in dry and dust-protected rooms. Protect the device from any kind of liquids
entering.
4. Cleaning
Disconnect the product from the wall outlet before cleaning. Use a light damp cloth (no solvents) to dust
the product.
5. Ventilation
The slots on top of the product must be left uncovered to allow proper airflow into the unit. Do not stand
the product on soft furnishings or carpets. Do not stack electronic equipments on top of the product.
6. Accessories
Do not use any unsupported accessories as these may be hazardous or cause damage the product.
21
English
7. Location
x Setup the device only in dry and dust-protected rooms.
x Protect the device from any kind of liquids entering.
x Do not place the device near a radiator or heat register.
x Setup the device only in areas with the advised operating temperatures of 0° ~ 40°C.
Warnings
Follow all safety and operating advises before starting-up the device!
1. Follow these directions in order to avoid damage of the power cord or plug:
x Do not modify or process the power cord or plug arbitrarily.
x Do not bend or twist the power cord.
x Make sure to disconnect the power cord holding the plug.
x Keep heating appliances as far as possible from the power cord in order to prevent the cover
vinyl from melting.
2. Follow these directions. Failure to follow any of them may cause electrical shock:
x Do not open the main body, except for installing the HDD.
Disconnect the product from the mains before you start.
x Do not insert metal or inflammable objects inside the product.
x In order to avoid any damage during lighting use a surge protection.
3. Do not use the product when it is out of order. If you continue to use the product when defective, serious
damage can be caused to it. Make sure to contact your local product distributor if the product is out of
order.
During the installation into an existing video surveillance system make sure that all devices are
disconnected from the low and supply voltage circuit.
If in doubt allow a professional electrician to mount, install and wire-up your device. Improper
electrical connection to the mains does not only represent at threat to you but also to other
persons.
Wire-up the entire system making sure that the mains and low voltage circuit remain separated
and cannot come into contact with each other in normal use or due to any malfunctioning.
Unpacking
While you are unpacking the device please handle it with utmost care.
If you notice any damage of the original packaging, please check at first the device.
If the device shows damages, please contact your local dealer.
22
English
Table of contents
1.
Intended use ......................................................................................................................................... 23
2.
Scope of delivery .................................................................................................................................. 24
3.
Features and functions ........................................................................................................................ 25
4.
Charging the battery ............................................................................................................................ 25
5.
Setting date and time ........................................................................................................................... 26
6.
Button description................................................................................................................................ 27
7.
Mounting ............................................................................................................................................... 28
7.1 Clip bracket .................................................................................................................................. 28
7.2 Wall bracket.................................................................................................................................. 28
7.3 Further mounting options ............................................................................................................. 28
8.
Getting started ...................................................................................................................................... 29
8.1 Inserting SD card and turning on the Camcorder ........................................................................ 29
8.2 Manual recording.......................................................................................................................... 29
8.3 Sound trigger recording ................................................................................................................ 29
9.
Playback ................................................................................................................................................ 30
10.
Using the Camcorder as webcam ....................................................................................................... 30
11.
Included software ................................................................................................................................. 30
11.1 Capture software ........................................................................................................................ 30
11.2 Playback software ...................................................................................................................... 30
12.
Technical specification ........................................................................................................................ 33
13.
Disposal................................................................................................................................................. 33
1. Intended use
Thanks to its 2 hour battery life time the Eytron Camcorder can be used for mobile surveillance as well as for
sport and leisure recordings. Furthermore it can also be used as PC webcam. Inside the compact aluminium
housing a high resolution camera and a recorder for real-time recording (640x480 Pixel @ 30 fps) is hidden.
You can choose between continuous or sound triggered recording. The image data is stored on standard
microSD cards and the AVI file format allows playback on any standard PC.
A detailed description of all functions can be found in chapter „3 Features and functions“.
Data storage is object to country-specific regulations. Point this to your customer during the
installation.
23
English
2. Scope of delivery
Camcorder
Power supply
Clip
Wall bracket
Velcro and screws for bracket
Silicon case
Pouch
Chain
USB cable
USB connector
CD
Manual
24
English
3. Features and functions
x
x
x
x
x
x
x
x
Built-in high resolution camera
Real time recording with 640x480 pixel @ 30 fps
1,5 hours continuous recording, 100 hours standby
Sound trigger and continuous recording
AVI video format recording for easy playback using a PC
Supports standard microSDHC cards (max. 8GB)
Compact aluminum housing
Can be used as PC webcam
4. Charging the battery
In order to charge the battery you need to connect the Camcorder to a PC by using the included USB cable. If
the battery is completely empty the charging time will be approx. 2 hours.
A fully charged battery will last approx. 100 hours in stand-by mode and 2 hours in continuous recording.
25
English
5. Setting date and time
In order to set date and time after the DVR being not powered for while, please proceed as following:
x
Create a text file named „time.txt“
x
Enter date and time in following way:
Year.month.Day Hour:Minute:Seconds, Example: 2009.10.30 09:35:30
x
Copy the file to the MicroSD card, insert it into the DVR and start the recorder. The entered time
stamp will be used as of now.
26
English
6. Button description
Left
1
2
3
4
5
6
7
8
Right
Top
Bottom
Hole for necklace
Sound trigger switch
MicroSD card slot
ON / OFF switch
Stop / Record button
Microphone
Status LED *
USB connector
* The different colors of the status have following meaning:
LED color
Blue
Green
Red
State
Off
Always on
Flashing slowly
Flashing quickly
Always on
Flashing slowly
Flashing quickly
Off
Always on
Description
Stand-by mode
Camcorder is ready
Low battery
Copying data to PC
MicroSD card is full
Camcorder is Recording
No MicroSD card inserted
Camcorder is fully charged
Camcorder is Charging
27
English
7. Mounting
The Camcorder can easily be mounted to a clip or wall bracket.
7.1 Clip bracket
7.2 Wall bracket
Use the included screws to install the wall bracket safely.
You can then use the Velcro or the clip bracket to install the Camcorder.
or
After mounting the wall bracket you can adjust the viewing angle by turning the clip.
7.3 Further mounting options
By threading a necklace or similar through the opening of the Camcorder you can wear the Camcorder
around your neck or hang it from ceilings.
28
English
8. Getting started
8.1 Inserting SD card and turning on the Camcorder
In order to get started first insert a MicroSD card into the SD card slot.
Then turn on the Camcorder by pushing the POWER switch from OFF to ON. The status LED will turn blue.
Notice:
x The Camcorder will automatically go into stand-by mode after 2 minutes of inactivity.
x The status LED will flash quickly green if no MicroSD card is inserted.
x If the battery is low the status LED will slowly flash blue and the Camcorder will automatically turns
itself off after 2 minutes.
8.2 Manual recording
After turning on the Camcorder press once the “Stop / REC” button to start recoding manually. The status will
start to flash slowly green. Press the “Stop / REC” button again to stop the recording.
Notice:
x Do not remove the MicroSD card during recording. The current recording will be damaged and cannot
be viewed.
x Longer recordings will be put into AVI files, each 30 minutes long and 1GB big.
x If the MicroSD card is full the status LED will turn green and turn itself off after 30 minutes. No further
buttons are functional at this state so please turn the Camcorder off.
8.3 Sound trigger recording
After turning on the Camcorder also activate the sound trigger by pushing the VOX from OFF to ON.
The Camcorder will automatically start a 2 minute recording if it recognizes any noise above 65dB.
If during the recording the noise level raises again above 65db the recording time will be extended.
If the Camcorder is not triggered by sound within 2 minutes the Camcorder will switch to stand-by mode and
will automatically start recording at the next noise detection.
29
English
9. Playback
In order save and playback the recorded video files connect the Camcorder (Power = ON & VOX = OFF) to a
PC by using the included USB cable. The PC will automatically recognize the Camcorder and a drive letter
will be assigned.
You can then access the Camcorder and copy or playback the recorded files by using any standard media
player.
10. Using the Camcorder as webcam
You can also use the Camcorder as PC webcam. In order for the PC to recognize the Camcorder as standard
camera the drivers from the included CD have to be installed.
After the successful driver installation you can use the Camcorder as webcam for communication in any
messenger program or use the included software to capture images.
11. Included software
11.1 Capture software
After the successful driver installation you can use the Camcorder as webcam for communication in any kind
of messenger.
11.2 Playback software
All recorded AVI files can be watched in any standard PC multimedia player or you can use the included
software named “TVVR10000 Player.exe” which can be found on the included CD. This software also
provides the function to merge several separate AVI files to one file.
30
English
Open
Play
Pause
Stop
Snap
Full
Parameter
Merge
Open a AVI file from the Camcorder or hard disk
Play the opened file
Pause the current playback
Stop the current playback
Creates a bmp (bitmap) snapshot in Play or Pause mode, which can be opened
by drawing programs, e.g. Paint
Full screen display of the video
Important video parameters are displayed
Here you can merge several AVI files to one file
31
English
AVI Merge:
Add
Delete
Remove
Up
Down
Merge
Stop
Close
Add recorded AVI files you like to merge
Delete selected files you have added
Delete all files you have added
Move selected file upwards. Top files will be
merged first.
Move selected file downwards. Top files will be
merged last.
Merge added files
Stop merging manually
Close window
32
English
12. Technical specification
TVVR10000 Camcorder
MJPEG
Video compression
Simplex
Operating mode
Recording resolution
640 x 480 @ 30fps
1
Compression levels
Micro SD Card
Storage
Recording modes
Continuous, sound trigger (as of 65dB)
Built-in microphone
Audio
Image sensor
CMOS
Camera type
Color camera
2 MPx
Resolution
Picture elements (total)
1600 x 1200
Picture elements (effective)
1280 x 960
Lens
F2.8
Horizontal viewing angle
72°
1 Lux
Min. Illumination (Day)
White balance
Automatic
Gain Control
Automatic
Automatic
Backlight compensation
Battery operation
1,5 hours continuous recording
3,7 VDC
Power supply
120mA
Power consumption
-10°C - 60°C
Operating temperature
15% - 80%
Operating humidity
50 x 28 x 20 mm
Dimensions (W x H x D)
50g
Weight
13. Disposal
Products which are labeled with this pictogram may not be disposed by the domestic
rubbish. Please dispose the product in accordance with the prevailing legal regulations at
the end of its life time.
Please consult your dealer or dispose the product over the municipal gathering point for
electric scarp.
33