1
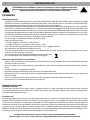
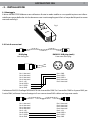
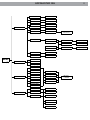
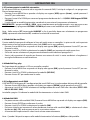
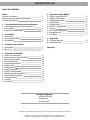
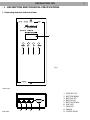
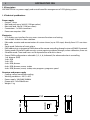
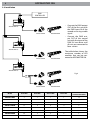
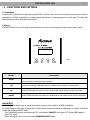
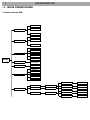
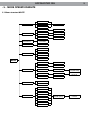
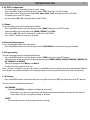
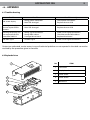
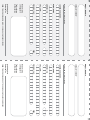
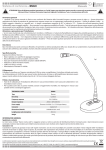
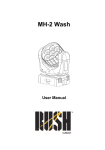
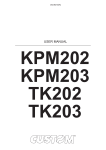
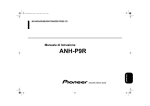
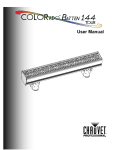
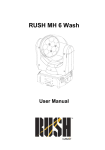
ARCMASTER136 ARCHITECTURAL LIGHTING ® WN DO UP SET ME NU R136 ASTE ARCM Manuale Utente User Manual I GB REV.003-10/11 ARCMASTER 136 3 INDICE Sicurezza Avvertenze generali Attenzioni e precauzioni per l’installazione Informazioni generali 4 4 4 1 Descrizione e specifiche tecniche 1. 1 Elementi di comando e collegamenti 1. 2 Descrizione 1. 3 Specifiche tecniche 5 6 6 2 Installazione 2. 1 Montaggio 2. 2 Cavi di connessione 2. 3 Installazione 7 7 8 3 Funzioni e impostazioni 3. 1 Funzionamento 3. 2 Impostazione base 9 9 4 Modalità funzionamento RGB 4. 1 Struttura del menu RGB 4. 2 Funzionamento in modalità automatica 4. 3 Modalità Master/Slave 4. 4 Modalità Easy Play 4. 5 Configurazioni canali DMX 4. 6 Modalità DMX 4. 7 Tabella canali DMX 4. 8 Funzioni speciali 4. 9 Configurazione STATIC 4. 10 Editing programmi personalizzati 4. 11 Esecuzione della programmazione 4. 12 Programmazione 4. 13 Patch 4. 14 Impostazioni 10 12 12 12 12 12 13 13 15 15 15 15 15 15 5 Modalità funzionamento WHITE 5. 1 Struttura del menu WHITE 5. 2 Modalità Master/Slave 5. 3 Configurazioni canali DMX 5. 4 Modalità DMX 5. 5 Tabella canali DMX 5. 6 Configurazione STATIC 5. 7 Mood 5. 8 Esecuzione della programmazione 5. 9 Programmazione 5. 10 Impostazioni 17 18 18 18 18 19 19 19 19 19 6 Appendice 6. 1 Risoluzione dei problemi 6. 2 Vista esplosa 21 21 Certificato di garanzia CONTENUTO DELL’IMBALLO: • ARCMASTER136 • Cavo di alimentazione • Manuale utente Music & Lights S.r.l. si riserva ogni diritto di elaborazione in qualsiasi forma delle presenti istruzioni per l’uso. La riproduzione - anche parziale - per propri scopi commerciali è vietata. Tutte le specifiche possono essere variate senza alcuna notifica. ARCMASTER 136 4 ATTENZIONE! Prima di effettuare qualsiasi operazione con l’unità, leggere con attenzione questo manuale e conservarlo accuratamente per riferimenti futuri. Contiene informazioni importanti riguardo l’installazione, l’uso e la manutenzione dell’unità. SICUREZZA Avvertenze generali • I prodotti a cui questo manuale si riferisce sono conformi alle Direttive della Comunità Europea e pertanto recano la sigla . • Il dispositivo funziona con pericolosa tensione di rete 230V~. Non intervenire mai al suo interno al di fuori delle operazioni descritte nel presente manuale; esiste il pericolo di una scarica elettrica. • È obbligatorio effettuare il collegamento ad un impianto di alimentazione dotato di un’efficiente messa a terra (apparecchio di Classe I secondo norma EN 60598-1). Si raccomanda, inoltre, di proteggere le linee di alimentazione delle unità dai contatti indiretti e/o cortocircuiti verso massa tramite l’uso di interruttori differenziali opportunamente dimensionati. • Le operazioni di collegamento alla rete di distribuzione dell’energia elettrica devono essere effettuate da un installatore elettrico qualificato. Verificare che frequenza e tensione della rete corrispondono alla frequenza ed alla tensione per cui l’unità è predisposta, indicate sulla targhetta dei dati elettrici. • L’unità non per uso domestico solo per uso professionale. • Evitare di utilizzare l’unità: - in luoghi soggetti a vibrazioni, o a possibili urti; - in luoghi a temperatura superiore ai 40°C oppure a -20°C. • Evitare che nell’unità penetrino liquidi infiammabili, acqua o oggetti metallici. • Non smontare e non apportare modifiche all’unità. • Tutti gli interventi devono essere sempre e solo effettuati da personale tecnico qualificato. Rivolgersi al più vicino centro di assistenza tecnica autorizzato. • Se si desidera eliminare il dispositivo definitivamente, consegnarlo per lo smaltimento ad un’istituzione locale per il riciclaggio. Attenzioni e precauzioni per l’installazione • Ogni persona coinvolta con l’installazione e la manutenzione di questo prodotto deve essere qualificata e seguire le istruzioni di questo manuale • Prima di iniziare qualsiasi operazione di manutenzione o pulizia sull’unità togliere la tensione dalla rete di alimentazione. • Installare l’unità in un luogo ben ventilato. • Mantenere materiali infiammabili ad una distanza di sicurezza dall’unità. • Nell’eseguire qualsiasi intervento attenersi scrupolosamente a tutte le normative (in materia di sicurezza) vigenti nel paese di utilizzo. • Assicurarsi sempre che la struttura portante sia solida e capace di sostenere il peso del prodotto. • Non toccare i cavi di alimentazione con le mani bagnate. INFORMAZIONI GENERALI Spedizioni e reclami Le merci sono vendute “franco nostra sede” e viaggiano sempre a rischio e pericolo del distributore/cliente. Eventuali avarie e danni dovranno essere contestati al vettore. Ogni reclamo per imballi manomessi dovrà essere inoltrato entro 8 giorni dal ricevimento della merce. Garanzie e resi Il prodotto è coperto da garanzia in base alle vigenti normative. Sul sito www.musiclights.it è possibile consultare il testo integrale delle “Condizioni Generali di Garanzia”. Si prega, dopo l’acquisto, di procedere alla registrazione del prodotto sul sito www.musiclights.it. In alternativa il prodotto può essere registrato compilando e inviando il modulo riportato alla fine del manuale. A tutti gli effetti la validità della garanzia è avallata unicamente dalla presentazione del certificato di garanzia. Music & Lights constata tramite verifica sui resi la difettosità dichiarata, correlata all’appropriato utilizzo, e l’effettiva validità della garanzia; provvede quindi alla riparazione dei prodotti, declinando tuttavia ogni obbligo di risarcimento per danni diretti o indiretti eventualmente derivanti dalla difettosità. Le informazioni riportate in questo manuale sono state attentamente controllate. Music & Lights S.r.l. non si assume, tuttavia, responsabilità derivanti da eventuali inesattezze. ARCMASTER 136 5 - 1 - DESCRIZIONE E SPECIFICHE TECNICHE 1.1 Elementi di comando e di collegamenti 1 2 3 4 5 Fig.1 Vista Frontale Vista Laterale 6 7 8 9 1. 2. 3. 4. 5. 6. 7. 8. 9. DISPLAY LCD TASTO MENU tASTO SET TASTO UP TASTO DOWN LINE OUT DMX OUT DMX IN PRESA RS232 ARCMASTER 136 6 1.2 Descrizione ARCMASTER136 è un’unità di gestione e alimentazione per sistemi d’illuminazione basati su tecnologia LED. 1.3 Caratteristiche tecniche Sezione di alimentazione • Output: 1 linea di alimentazione • Carico Max per linea: 36 x 1W (12W per colore) • Carico Max totale: 36 x 1W (12W per colore) • Connessioni: 1 x RJ45 connettori • Assorbimento totale: 58W Sezione controlli • Interfaccia utente: display LCD per l’accesso alle funzioni e alle impostazioni dell’unità di controllo. • Modalità AUTO: selezione ed esecuzione dei 10 show pre-memorizzati. • Modalità EDIT: possibilità di creare show personalizzati fino a 255 scene direttamente da panello di controllo. • Modalità STATIC: selezione di colori statici. • Indirizzamento DMX: assegnazione di un canale DMX preferenziale al LED driver, per gestire le linee da un qualsiasi light controller esterno. • Modalità Settings: attiva/Disattiva sistemi sicurezza contro manomissioni accidentali, calibrazione dei colori, impostazioni timer. • Modalità Schedule: impostazione data e ora di riproduzione degli show memorizzati. • Diverse configurazioni DMX disponibili (1, 3, 4, 6, 8 canali) per controllo avanzato o semplificato: 1 canale: dimmer (RGB) 3 canali: RGB 3 canali: HSV 4 canali: dimmer, RGB 6 canali: dimmer, RGB, macro, strobo 8 canali: dimmer, RGB, macro, strobo, auto, speed Corpo e alimentazione • Dissipazione: convezione naturale del calore. • Condizioni di esercizio: -20°C/+40°C • Alimentazione: interna 100-240V 50/60Hz • Dimensioni: 145x250x50 mm • Peso: 1kg 50 145 250 Fig.2 ARCMASTER 136 7 - 2 - INSTALLAZIONE 2.1 Montaggio Il driver ARCMASTER136 deve essere collocato e fissato in modo stabile su una superficie piana non infiammabile per mezzo delle due viti che devono essere inserite negli appositi fori sul corpo del dispositivo come mostrato nella fig3. Fig.3 2.2 Cavi di connessioni RJ45 plug View facing pins DMX 512 XLR plug (male) Front view of the plug 1 2 3 Pin 1: Not used Pin 2: Not used Pin 3: Not used Pin 4: Not used Pin 5: +5V Pin 6: DATA + Pin 7: DATA Pin 8: GND 1 2 3 5 4 Pin 1: GND Pin 2: DATA Pin 3: DATA + Pin 4: Not used Pin 5: Not used L’adattatore RJ45/XLR collega l’ARCMASETR136 al controller DMX. Se il controller DMX ha la presa RJ45 per l’uscita DMX, utilizzare il cavo di categoria 5 con connessione RJ45 cablato nel seguente modo: Pin 1: Not used Pin 2: Not used Pin 3: Not used Pin 4: Not used Pin 5: +5V Pin 6: DATA + Pin 7: DATA Pin 8: GND Pin 1: Not used Pin 2: Not used Pin 3: Not used Pin 4: Not used Pin 5: +5V Pin 6: DATA + Pin 7: DATA Pin 8: GND ARCMASTER 136 8 2.3 Esempio schema di connessione DMX CONTROLLER • Collegare l’uscita DMX OUT del primo ARCMASTER136 con l’ingresso DMX IN del secondo ARCMASTER136 servendosi di un cavo di segnale. • Collegare l’uscita DMXOUT del secondo ARCMASTER136 con l’ingresso DMX IN dell’ unità successiva finché tutte le unità sono collegate formando una catena (fig.4). ARCMASTER136 ARCCELL3RGB ARCBAR12RGB ARCMASTER136 Nella tabella riportata di seguito è indicato il numero massimo di moduli LED che possono essere collegati all’ARCMASTER136. ARCCELL3RGB ARCBAR12RGB ARCMASTER136 Fig.4 ARCCELL3RGB ARCBAR12RGB Model Total LEDs Red LEDs Green LEDs Blue LEDs Max. number of connected modules ARCCELL3RGB 3 1 1 1 12 12 ARCCELL3TRI 3 1 1 1 ARCCELL6RGB 6 2 2 2 6 ARCCELL12RGB 12 4 4 4 3 ARCCELL12TRI 12 4 4 4 3 ARCBAR12RGB 12 4 4 4 3 ARCBAR24RGB 24 8 8 8 1 ARCBAR12WRGB 12 4 4 4 3 ARCMASTER 136 9 - 3 - FUNZIONI E IMPOSTAZIONI 3.1 Funzionamento Inserire la spina del cavo di alimentazione in una presa di rete (230V~ 50Hz). Il display si accende. A questo punto, l’unità è pronta e può essere comandata da un’unità DMX di comando oppure svolgere autonomamente il suo funzionamento. Per spegnere staccare la spina dalla presa di rete. 3.2 Impostazione base L’ ARCMASTER136 dispone di un LED display e 4 pulsanti per accesso alle funzioni del pannello di controllo (fig.5). Fig.5 Tasto Istruzioni MENU Premendo questo tasto, è possibile selezionare la funzione desiderata. Con questo tasto è possibile anche tornare ad un opzione del MENU precedente. SET Tasto per entrare nel menu selezionato o confermare il valore della funzione scelta UP Tasto per scorrere attraverso le diverse funzioni in ordine discendente o aumentare il valore della funzione stessa. DOWN Tasto per scorrere attraverso le diverse funzioni in ordine ascendente o diminuire il valore della funzione stessa. IMPORTANTE L’unità ARCMASTER136 permette di gestire sistemi d’illuminazione con sintesi di colore RGB e White. Quindi, a seconda della tipologia di proiettore far riferimento alla rispettiva modalità di funzionamento; in particolare per passare dal menu relativo al funzionamento RGB al funzionamento WHITE: • Premere il tasto MENU e selezionare la funzione SET e scegliere [GO WHITE], quindi premere SET. Quando appare [YES] premere nuovamente SET. Sul LED comparirà “OK” e l’unità entrerà nella modalità [WARM&COOL WHITE]. ARCMASTER 136 10 - 4 - MODALITÀ FUNZIONAMENTO RGB 4.1 Struttura del menu RGB RGB 1 Auto RGB 2 .. . RGB 10 CUSTOM 1 Custom CUSTOM 2 .. . CUSTOM 10 RED[000-255] GREE[000-255] Static BLUE[000-255] DIMM[000-255] STRO[000-20] MENU (1) Play schedule SCHEDULE PLAYING! Dmx [001-512] EFFECT RGB Person RGB + D RGB + DMS SOLID Edit Red (0-255) C-1 S1 Green (0-255) C-2 S2 Blue (0-255) .. . C-10 .. . S20 Strob (0-20) Time (0-255) Fade (0-255) ARCMASTER 136 Set PASSWORD ON/OFF ALL EDIT YES/NO RSET ALL YES/NO RSET CUS YES/NO RSET SCH YES/NO UPLOAD PASSWORD CLOCK EDIT TIM CALIBRAT WHITE 01 WHITE 02 .. . WHITE 09 RGB TO W MENU (2) RGB TO W YES/NO GO WHITE YES? 11 [SA] 11/06/2011 01:01:10 Red (0-255) Green (0-255) Blue (0-255) Dmx Run Slave Easy Play SUNDAY MONDAY TUESDAY Sched WEDNESDAY THURSDAY FRIDAY SATURDAY NO. (01-10) RGB (01-10) CSTM (01-10) STATIC PL NONE EVERY DAY Parch K1 RGB 1 K2 RGB 2 K6 RGB 10 .. . .. . cstm1 cstm2 .. . cstm10 00:00>> >>00:00 12 ARCMASTER 136 4.2 Funzionamento in modalità automatica Se alla presa DMX non è presente alcun segnale di comando DMX, l’unità può svolgere il suo programma Show autonomamente: • Premere il tasto MENU fino a quando sul display non appare [AUTO] oppure [Custom] , quindi premere il tasto SET per confermare. • Premere il tasto UP o DOWN per scorrere al programma desiderato da 1 a 10 (RGB 01 - RGB 10 oppure CUSTOM1 - CUSTOM10) • L’unità entrerà in modalità automatica mandando in esecuzione il programma selezionato. IMPORTANTE: I programmi RGB 01 - RGB10 sono completamente pre-programmati e non possono essere modificati. Invece, i programmi CUSTOM01 - CUSTOM10 possono essere modificati nella modalità EDIT. Nota - Nella sezione [SET] impostando ALLOW EDIT su Yes è possibile, dopo aver selezionato un programma [AUTO] e premendo nuovamente SET, cambiare la velocità di esecuzione. 4.3 Modalità Master/Slave Questa modalità consente di collegare in linea più unità senza un controller. La prima unità sarà impostata come master e le altre funzioneranno come slave (SLAVE) con lo stesso effetto. • Premere il tasto MENU fino a quando sul display non appare [RUN], quindi premere il tasto SET per confermare la scelta. • Premere i tasti UP o DOWN e selezionare la modalità [SLAVE] per impostare le unità come slave. • Sull’unità master selezionare il programma desiderato come indicato al paragrafo 4.2 • Servirsi dei connettori di segnale per formare una catena di unità. In certe condizioni e lunghezze si consiglia di effettuare una terminazione. 4.4 Modalità Easy play Per la gestione dei proiettori a LED con controller semplici: • Premere il tasto MENU fino a quando sul display non appare [RUN], quindi premere il tasto SET per confermare la scelta. • Premere i tasti UP o DOWN e selezionare la modalità [EASY PLAY]. • Premere il tasto SET per confermare la scelta. 4.5 Configurazioni canali DMX L’ ARCMASTER136 dispone di 5 configurazioni dei canali DMX a cui si può accedere dal pannello di controllo. • Premere il tasto MENU fino a quando sul display non appare [PERSON], quindi premere il tasto SET. • Attraverso i tasti UP e DOWN selezionare la configurazione dei canali DMX che si desidera (EFFECT - RGB RGB+D - RGB+DMS - SOLID). Le tabelle a pagina 13 indicano le modalità di funzionamento e i relativi valori DMX. 4.6 Modalità DMX • Per poter entrare nella modalità DMX; Premere il tasto MENU fino a quando sul display non appare [RUN]. • Premere il tasto ENTER per confermare la scelta. • Premere i tasti UP o DOWN e selezionare la modalità [DMX]. • Dal menu iniziale, per impostare il valore desiderato, entrare nella modalità [DMX], e selezionare il valore desiderato [001 - 512]; tenere premuto per lo scorrimento veloce. • Al termine dell’impostazione il valore verrà salvato automaticamente. Nota - Quando il dispositivo opera nella modalità automatica la funzione [RUN] non è disponibile. ARCMASTER 136 13 4.7 Indirizzamento DMX Per poter comandare le unità connesse con un controller DMX, occorre impostare l’indirizzo di start DMX per il primo canale DMX. Se, per esempio, sul controller è previsto l’indirizzo 33 per comandare la funzione del primo canale DMX, si deve impostare sull’ unità l’indirizzo di start 33. Le altre funzioni del pannello saranno assegnate automaticamente agli indirizzi successivi. Segue un esempio con indirizzo 33 di start e una configurazione a 8 canali DMX: Numero canali DMX Indirizzo di start (esempio) Indirizzo DMX occupati Prossimo indirizzo di start possibile per unità n°1 Prossimo indirizzo di start possibile per unità n°2 Prossimo indirizzo di start possibile per unità n°3 8 33 33-40 41 49 57 4.8 Tabella canali DMX RGB Channel Function in EFFECT mode DMX value 1 RED 0-100% 000-255 2 GREEN 0-100% 000-255 3 BLUE 0-100% 000-255 4 MASTER DIMMER 000-255 Channel 5 6 000-010 011-035 036-060 061-085 086-110 111-135 136-160 161-185 186-210 211-215 216-220 221-225 226-230 231-235 236-240 241-245 246-250 251-255 STROBE No function 1-20 Hz 000-004 005-255 NOTE R*=Red G*=Green B*=Blue W*=White DMX value AUTO + CUSTOM PROGRAMS No function Auto RGB 1 Auto RGB 2 Auto RGB 3 Auto RGB 4 Auto RGB 5 NO FUNCTION NO FUNCTION NO FUNCTION NO FUNCTION NO FUNCTION CUSTOM 1 CUSTOM 2 CUSTOM 3 CUSTOM 4 CUSTOM 5 CUSTOM 6 CUSTOM 7 CUSTOM 8 CUSTOM 9 CUSTOM 10 NO FUNCTION 000-020 021-030 031-040 041-050 051-060 061-070 071-080 081-090 091-100 101-110 111-120 121-130 131-140 141-150 151-160 161-170 171-180 181-190 191-200 201-210 211-220 221-255 8 AUTO SPEED Slow to fast 000-255 Channel Function in SOLID mode DMX value 1 RGB + MASTER DIMMER 000-255 COLOR MACRO + No function R*: 100% / G*: Up / B*: 0% R: Down / G: 100% / B: 0% R: 0% / G: 100% / B: Up R: 0% / G: Down / B: 100% R: Up / G: 0% / B: 100% R: 100% / G: 0% / B: Down R: 100% / G: Up / B: Up R: Down / G: Down / B: 100% White 1: 3200 K White 2: 3400 K White 3: 4200 K White 4: 4900 K White 5: 5600 K White 6: 5900 K White 7: 6500 K White 8: 7200 K White 9: 8000 K Function in EFFECT mode 7 ARCMASTER 136 14 Channel 1 2 3 Function in RGB + D mode RED 0-100% GREEN 0-100% BLUE 0-100% DMX value 000-255 000-255 000-255 4 MASTER DIMMER 000-255 Channel Function in RGB + DMX mode DMX value 1 2 3 RED 0-100% GREEN 0-100% BLUE 0-100% 000-255 000-255 000-255 4 MASTER DIMMER 000-255 5 COLOR MACROS 000-255 6 STROBE 000-255 Channel Function in RGB DMX value 1 2 3 RED 0-100% 000-255 GREEN 0-100% 000-255 BLUE 0-100% 000-255 ARCMASTER 136 15 4.9 Configurazione STATIC Per creare combinazioni di colore entrare nella modalità Static: • Premere il tasto MENU fino a quando sul display non appare [STAT], quindi premere il tasto SET. • Selezionare il canale rosso, verde, o blue (Red - Green -Blue) attraverso i tasti UP e DOWN. • Per confermare premere il tasto SET. • Impostare i valori (000 - 255), attraverso i tasti UP e DOWN. • Infine, impostare il valore delle funzioni [Dimm] e [Strobe] mediante i tasti UP e DOWN. 4.10 Editing programmi personalizzati Per effettuare le modifiche dei programmi personalizzati procedere come segue: • Premere il tasto MENU fino a quando sul display non appare [EDIT], quindi premere il tasto SET. • Selezionare il programma da modificare tra C-1 e C-10. • Per ogni programma è possibile modificare 20 scene, intervenendo sui valori del canale rosso (Red), verde (Green), blue (Blue); modificando i valori della funzione strobo (Strobe), il tempo di esecuzione della scena (Time) ed infine la dissolvenza (Fade). • I valori (000 - 255) possono essere selezionati attraverso i tasti UP e DOWN. 4.11 Esecuzione della programmazione Per mandare in esecuzione la programmazione selezionare questo comando: • Premere il tasto MENU fino a quando sul display non appare [PLAY SCHEDULE] e attivare Schedule Playing. 4.12 Programmazione Per effettuare una programmazione entrare nella seguente modalità: • Premere il tasto MENU fino a quando sul display non appare [SCHED], quindi premere il tasto SET. • Selezionare il giorno dell’esecuzione della programmazione tra SUNDAY, MONDAY, TUESDAY, WEDNESDAY, THURSDAY, FRIDAY, SATURDAY e EVERYDAY. • Selezionare il programma (RGB (1-10), CUSTOM (1-10), STATIC o Play none). • Impostare sia l’orario di inizio che di fine esecuzione. Nota - Nel caso ci sia conflittualità nei periodi impostati, il primo evento programmato ha la priorità sul secondo evento. Inoltre nel caso ci sia contrasto tra la modalità Everyday e un giorno della settimana, questo ultimo avrà la priorità. 4.13 Patch Entrare nella modalità Patch nel caso di gestione dei proiettori a LED con controller semplici. • Premere il tasto MENU fino a quando sul display non appare [Patch], quindi premere il tasto SET. • Creare i programmi da K1 a K6 selezionando i programmi automatici da RGB (1-10), CUSTOM (1-10). Nota - Nella gestione con semplici controller selezionare la modalità di funzionamento Easy play. 4.14 Impostazioni • Premere il tasto MENU e selezionare attraverso i tasti direzionali la voce [SET]; per confermare premere il tasto SET. È possibile accedere alle seguenti funzioni: 16 ARCMASTER 136 PASSWORD • Entrare nella modalità [PASSWORD] per attivare o meno la password. -- Selezionando On, il funzionamento dell’unità sarà protetto da password dopo 30 secondi di inattività. -- Selezionando Off, è possibile in ogni momento operare liberamente. ALL EDIT • Questa funzione attiva o disattiva la modifica dei programmi nella modalità automatica. RESET ALL • Questa funzione ripristina tutte le impostazioni originali di fabbrica. RSET CUS • Questa funzione resetta i programmi personalizzati. RSET SCH • Questa funzione resetta la programmazione. UPLOAD • Selezionando la funzione [UPLOAD] è possibile caricare i programmi personalizzati dalla unità corrente Master alle unità Slave. Per eseguire il trasferimento è necessario inserire la password che risulta essere la stessa per l’accesso principale. • Durante la fase di caricamento dei programmi le unità Master e Slave si illumineranno di giallo. • Se, durante questo processo, si presentasse un errore le unità si illumineranno di rosso. • Se il caricamento dei programmi avviene con successo le unità si illumineranno invece di verde. Nota - Le impostazioni di fabbrica relative alla password di accesso corrispondono alla combinazione dei tasti UP + DOWN + UP + DOWN. Premere ENTER per confermare. CLOCK • Selezionare la funzione [TIME NOW] per visualizzare la data e l’ora corrente. • Selezionare la funzione [EDIT TIME] per modificare la data e l’ora. CALIBRAT • Entrare nella modalità [CALIBRAT] per impostare il bilanciamento personalizzato della temperature colore bianco: • Selezionare una delle 9 impostazioni colore bianco pre-programmate. • Le impostazioni possono essere modificate, intervenendo sui valori (000 - 255) relativi ai canali rosso, verde e blu (Red - Green -Blue), attraverso i tasti UP e DOWN. RGB TO W • Quando [RGB TO W] è impostato su Yes, su RGB =255, 255, 255 il colore è perfettamente bianco con i valori di calibratura regolati e impostati. • Invece, quando è impostato su No, su RGB =255, 255, 255 il colore non può essere regolato e l’uscita mostrerà la massima potenza. Nota - È possibile regolare i parametri nella modalità [CALIBRAT]. GO WHITE • Premere il tasto MENU e selezionare la funzione SET e scegliere [GO WHITE], quindi premere SET. Quando appare [YES] premere nuovamente SET. Sul LED comparirà “OK” e l’unità entrerà nella modalità [WARM&COOL WHITE]. ARCMASTER 136 17 - 5 - MODALITÀ FUNZIONAMENTO WHITE 5.1 Struttura del menu WHITE WARM Mood NATURAL DIM [000-255] COOL Static COOL [000-255] WARM [000-255] DIMME [000-255] STROB [000-20] PLAY SCHEDULE SCHEDULE PLAYING Address [001-512] STUD W STUD W+D Person STUD 1 STUD 2 SOLID MENU Set Run PASSWORD ON/OFF RESET YES/NO CALL WHITE [1-5] Warm [000-255] Cool [000-255] CLOCK EDIT TIME SA/06/11 01:01:10 GO RGB? YES? DMX SLAVE SUNDAY MONDAY TUESDAY SCHEDU WEDNESDAY THURSDAY FRIDAY SATURDAY EVERY DAY NO.(01-10) WHITE (01-5) 00:00>> >>00:00 ARCMASTER 136 18 5.2 Modalità Master/Slave Questa modalità consente di collegare in linea più unità senza un controller. La prima unità sarà impostata come master e le altre funzioneranno come slave (SLAVE) con lo stesso effetto. • Premere il tasto MENU fino a quando sul display non appare [RUN]. • Premere i tasti UP o DOWN e selezionare la modalità (SLAVE) per impostare le unità come slave. 5.3 Configurazioni canali DMX L’ARCMASTER136 dispone di 5 configurazioni dei canali DMX a cui si può accedere dal pannello di controllo. • Premere il tasto MENU fino a quando sul display non appare [PERS], quindi premere il tasto SET. • Attraverso i tasti UP e DOWN selezionare la configurazione dei canali DMX che si desidera (STUD W - STUD W+D - STUD1 - STUD2 - SOLID). Le tabelle riportate di seguito indicano le modalità di funzionamento e i relativi valori DMX. 5.4 Modalità DMX • Per poter entrare nella modalità DMX, premere il tasto MENU fino a quando sul display non appare [RUN]. • Premere il tasto SET per confermare la scelta. • Premere i tasti UP o DOWN e selezionare la modalità [DMX]. • Dal menu iniziale, per impostare il valore desiderato, entrare nella modalità [ADDRESS], e selezionare il valore desiderato [001 - 512]; tenere premuto per lo scorrimento veloce. • Al termine dell’impostazione il valore verrà salvato automaticamente. 5.5 Tabella canali DMX Channel Function in STUD 2 mode DMX value Channel Function in STUD 1 mode DMX value 1 MASTER DIMMER 000-255 1 MASTER DIMMER 000-255 2 WARM WHITE 000-255 3 COOL WHITE 000-255 4 WHITE MACRO White 1: 3200 K White 2: 3400 K White 3: 4200 K White 4: 4900 K White 5: 5600 K 000-050 051-080 081-110 111-140 141-255 5 STROBE 000-255 WHITE MACRO White 1: 3200 K White 2: 3400 K White 3: 4200 K White 4: 4900 K White 5: 5600 K 000-050 051-080 081-110 111-140 141-255 Channel Function in SOLID mode DMX value 1 WHITE COLOR + MASTER DIMMER 000-255 2 Channel Function in W+D mode DMX value 1 MASTER DIMMER 000-255 Channel Function in STUD W mode DMX value 2 WARM WHITE 000-255 1 WARM WHITE 000-255 3 COOL WHITE 000-255 2 COOL WHITE 000-255 ARCMASTER 136 19 5.6 Configurazione STATIC Per creare combinazioni di colore entrare nella modalità Static: • Premere il tasto MENU fino a quando sul display non appare [STAT], quindi premere il tasto SET. • Selezionare cool, warm, dimmer e strobo (Cool - Warm - Dimm - Strob) attraverso i tasti UP e DOWN. • Per confermare premere il tasto SET. • Impostare i valori (000 - 255), attraverso i tasti UP e DOWN. 5.7 Mood Per impostare l’effetto sul bianco procedere come segue: • Premere il tasto MENU fino a quando sul display non appare [MOOD], quindi premere il tasto SET. • Selezionare l’effetto da regolare tra [WARM], [NATURAL] e [COOL]. • I valori (000 - 255) possono essere selezionati attraverso i tasti UP e DOWN. • Premere il tasto SET per salvare le modifiche. 5.8 Esecuzione della programmazione Per mandare in esecuzione la programmazione selezionare questo comando: • Premere il tasto MENU fino a quando sul display non appare [PLAY SCHEDULE] e attivare Schedule Playing. 5.9 Programmazione Per effettuare una programmazione entrare nella seguente modalità: • Premere il tasto MENU fino a quando sul display non appare [SCHED], quindi premere il tasto SET. • Selezionare il giorno dell’esecuzione della programmazione tra SUNDAY, MONDAY, TUESDAY, WEDNESDAY, THURSDAY, FRIDAY, SATURDAY e EVERYDAY. • Selezionare il programma tra White 1 e White 5. • Impostare sia l’orario di inizio che di fine esecuzione. Nota - Nel caso ci sia conflittualità nei periodi impostati, il primo evento programmato ha la priorità sul secondo evento. Inoltre nel caso ci sia contrasto tra la modalità Everyday e un giorno della settimana, questo ultimo avrà la priorità. 5.10 Impostazioni • Premere il tasto MENU e selezionare attraverso i tasti direzionali la voce [SET]; per confermare premere il tasto SET. È possibile accedere alle seguenti funzioni: PASSWORD • Entrare nella modalità [PASSWORD] per attivare o meno la password. -- Selezionando On, il funzionamento dell’unità sarà protetto da password dopo 30 secondi di inattività. -- Selezionando Off, è possibile in ogni momento operare liberamente. RESET • Questa funzione ripristina tutte le impostazioni originali di fabbrica. 20 ARCMASTER 136 CALL • Selezionando la funzione [CALL] è possibile regolare le differenti temperature colore bianco. • Ci sono 5 colori bianco pre-impostati (WHITE1-WHITE5), che si possono editare usando [WARM] e [COOL]. • Premere SET per impostare il valore (000-255). CLOCK • Selezionare la funzione [TIME NOW] per visualizzare la data e l’ora corrente. • Selezionare la funzione [EDIT TIME] per modificare la data e l’ora. GO RGB • Premere il tasto MENU e selezionare la funzione SET e scegliere [GO RGB], quindi premere SET. Quando appare YES premere nuovamente SET. Sull’unità comparirà OK è l’unità entrerà nella modalità RGB effect. ARCMASTER 136 21 - 6 - APPENDICE 6.1 Risoluzione dei problemi Possibile Causa Possibile rimedio Nessuna visualizzazione del display Problema • Errato collegamento dell’alimentazione • PCB principale danneggiato • Verificare connessione di alimentazione • Sostituire PCB principale Visualizzazione del display, ma nessuna risposta dai pulsanti • PCB principale danneggiato • Sostituire PCB principale Visualizzazione del display, ma nessuna risposta dal controller DMX • Connessioni di segnale errate • Indirizzo DMX errato • Scheda driver danneggiata • Verificare tutte le connessioni di segnale • Verificare il corretto indirizzo DMX • Sostituire scheda driver Nessun segnale DMX • Nessuna segnale DMX • Verificare tutte le connessioni di segnale Rivolgersi a un centro di assistenza tecnico autorizzato in caso di problema non riportato in tabella o che non possono essere risolti mediante la procedura riportata in tabella. 6.2 Vista esplosa 1 No 2 3 4 5 ITEM 1 Front cover 2 Display board 3 Power switch 4 Power socket 5 Metal base ARCMASTER 136 1 TABLE OF CONTENTS Safety General instructions Warnings and installation precautions General information 2 2 2 1 Description and technical specifications 1. 1 Operating elements and connections 1. 2 Description 1. 3 Technical specifications 3 4 4 2 Installation 2. 1 Mounting 2. 2 Connection cables 2. 3 Installation 5 5 6 3 Functions and settings 3. 1 Operation 3. 2 Basic 7 7 4 Operation mode RGB 4. 1 Menu structure RGB 4. 2 Operation in automatic mode 4. 3 Master/Slave Mode 4. 4 Easy play Mode 4. 5 DMX configurations 4. 6 DMX mode 4. 7 DMX control 4. 8 Special functions 4. 9 STATIC configuration 4. 10 Editing custom programs 4. 11 Running the program 4. 12 Programming 4. 13 Patch 4. 14 Settings 8 10 10 10 10 10 11 11 13 13 13 13 13 13 5 Operation mode WHITE 5. 1 Menu structure WHITE 5. 2 Master/Slave Mode 5. 3 DMX configurations 5. 4 DMX Mode 5. 5 DMX control 5. 6 STATIC configuration 5. 7 Mood 5. 8 Running the program 5. 9 Programming 5. 10 Settings 15 16 16 16 16 17 17 17 17 17 6 Appendix 6. 1 Trouble shooting 6. 2 Exploded view 19 19 Warranty PACKING CONTENT: • ARCMASTER136 • Power cord • User manual All rights reserved by Music & Lights S.r.l. No part of this instruction manual may be. Reproduced in any form or by any means for any commercial use. Design and specifications are subject to change without notice. ARCMASTER 136 2 WARNING! Before carrying out any operations with the unit, carefully read this instruction manual and keep it with cure for future reference. It contains important information about the installation, usage and maintenance of the unit. SAFETY General instructions • The products referred to in this manual conform to the European Community Directives and are therefore marked with . • The unit is supplied with hazardous network voltage (230V~). Leave servicing to skilled personnel only. Never make any modifications on the unit not described in this instruction manual, otherwise you will risk an electric shock. • Connection must be made to a power supply system fitted with efficient earthing (Class I appliance according to standard EN 60598-1). It is, moreover, recommended to protect the supply lines of the units from indirect contact and/ or shorting to earth by using appropriately sized residual current devices. • The connection to the main network of electric distribution must be carried out by a qualified electrical installer. Check that the main frequency and voltage correspond to those for which the unit is designed as given on the electrical data label. • This unit is not for home use, only professional applications. • Never use the fixture under the following conditions: - in places subject to vibrations or bumps; - in places with a temperature of over 40°C or -20°C. • Make certain that no inflammable liquids, water or metal objects enter the fixture. • Do not dismantle or modify the fixture. • All work must always be carried out by qualified technical personnel. Contact the nearest sales point for an inspection or contact the manufacturer directly. • If the unit is to be put out of operation definitively, take it to a local recycling plant for a disposal which is not harmful to the environment. Warnings and installation precautions • Every person involved with installation and maintenance of this device have to be qualified and follow the instructions of this manual. • Before starting any maintenance work or cleaning the projector, cut off power from the main supply. • Install the fixture in a well ventilated place. • Keep any inflammable material at a safe distance from the fixture. • When carrying out any work, always comply scrupulously with all the regulations (particularly regarding safety) currently in force in the country in which the fixture’s being used. • Always make sure that the supporting structure is solid and can support the combined weight of the products. • Do not touch the power cables if your hands are wet. GENERAL INFORMATION Shipments and claims The goods are sold “ex works” and always travel at the risk and danger of the distributor. Eventual damage will have to be claimed to the freight forwarder. Any claim for broken packs will have to be forwarded within 8 days from the reception of the goods. Warranty and returns The guarantee covers the fixture in compliance with existing regulations. You can find the full version of the “General Guarantee Conditions” on our web site www.musiclights.it. Please remember to register the piece of equipment soon after you purchase it, logging on www.musiclights.it. The product can be also registered filling in and sending the form available on your guarantee certificate. For all purposes, the validity of the guarantee is endorsed solely on presentation of the guarantee certificate. Music & Lights will verify the validity of the claim through examination of the defect in relation to proper use and the actual validity of the guarantee. Music & Lights will eventually provide replacement or repair of the products declining, however, any obligation of compensation for direct or indirect damage resulting from faultiness. The information provided in this manual has been carefully checked. However Music & Lights S.r.l. is not responsible for any possible inaccuracy. ARCMASTER 136 3 - 1 - DESCRIPTION AND TECHNICAL SPECIFICATIONS 1.1 Operating elements and connections 1 2 3 4 5 Fig.1 Front view Side view 6 7 8 9 1. 2. 3. 4. 5. 6. 7. 8. 9. DISPLAY LCD; BUTTON MENU; BUTTON SET: BUTTON UP: BUTTON DOWN; LINE OUT; DMX OUT DMX IN SOCKET RS232 ARCMASTER 136 4 1.2 Description ARCMASTER136 is a power supply and control board for management of LED lighting system. 1.3 Technical specifications Power supply • Output: 1 zone. • Max load each zone: 36x1W (12W per colour) • Max total load: 36x1W (12W per colour) • Connections: 1 x RJ45 connectors • Power consumption: 58W Electronics • LCD display user interface for easy access to menu functions and setting. • Auto mode: 10 built-in show selection. • Edit mode: creation and memorization of custom shows (up to 255 steps) directly from LCD user interface. • Static mode: Selection of static colour. • DMX addressing: assignment of DMX channel for remote controlling through universal DMX512 protocol. • Setting mode: Activate/Disable security systems against accidental changes, colour calibration, timer set. • Schedule mode: Timer and hours set for reproduction of built-in shows. • Several DMX configurations selectable (1, 3, 4, 6, 8 channels) for advanced or basic controlling. 1 ch: dimmer (RGB) 3 chs: RGB 3 chs: HSV 4 chs: RGB, dimmer 6 chs: RGB, dimmer, macro, strobo 8 chs: RGB, dimmer, macro, strobe, auto programs, programs speed Structure and power supply • Cooling: natural convection cooling • Working conditions: -20°C/+40°C • Power supply: 100-240V 50/60Hz • Dimensions: 145x250x50 mm • Weight: 1 kg 50 145 250 Fig.2 ARCMASTER 136 5 - 2 - INSTALLATION 2.1 Mounting The ARCMASTER136 should be placed on a non-flammable flat surface in any orientation and fixed by the two screws. There are two mounting holes on the housing. Fig.3 2.2 Connection cables RJ45 plug View facing pins DMX 512 XLR plug (male) Front view of the plug 1 2 3 Pin 1: Not used Pin 2: Not used Pin 3: Not used Pin 4: Not used Pin 5: +5V Pin 6: DATA + Pin 7: DATA Pin 8: GND 1 2 3 5 4 Pin 1: GND Pin 2: DATA Pin 3: DATA + Pin 4: Not used Pin 5: Not used The adapter cable RJ45/XLR connects ARCMASTER136 to the DMX controller. If the DMX controller has RJ45 socket for DMX output, use RJ45 cable category 5 wired as follows: Pin 1: Not used Pin 2: Not used Pin 3: Not used Pin 4: Not used Pin 5: +5V Pin 6: DATA + Pin 7: DATA Pin 8: GND Pin 1: Not used Pin 2: Not used Pin 3: Not used Pin 4: Not used Pin 5: +5V Pin 6: DATA + Pin 7: DATA Pin 8: GND ARCMASTER 136 6 2.3 Installation DMX CONTROLLER • Connect the DMX output OUT of the first unit with the DMX input IN of the second unit using a cable signal. • Connect the DMX output OUT of the second unit with the input of the DMX IN ‘next drive until all units are connected to form a chain. ARCMASTER136 ARCCELL3RGB ARCBAR12RGB ARCMASTER136 ARCCELL3RGB The table below shows the maximum number of LED modules that can be connected to ARCMASTER136. ARCBAR12RGB ARCMASTER136 Fig.4 ARCCELL3RGB ARCBAR12RGB Model Total LEDs Red LEDs Green LEDs Blue LEDs Max. number of connected modules ARCCELL3RGB 3 1 1 1 12 12 ARCCELL3TRI 3 1 1 1 ARCCELL6RGB 6 2 2 2 6 ARCCELL12RGB 12 4 4 4 3 ARCCELL12TRI 12 4 4 4 3 ARCBAR12RGB 12 4 4 4 3 ARCBAR24RGB 24 8 8 8 1 ARCBAR12WRGB 12 4 4 4 3 ARCMASTER 136 7 - 3 - FUNCTIONS AND SETTINGS 3.1 Operation Connect the supplied main cable to a socket (230 V~/50 Hz). Then the unit is ready for operation and can be operated via a DMX controller or it independently performs its show program in succession. To switch off, disconnect the mains plug from the socket. 3.2 Basic ARCMASTER136 has an LED display and 4 buttons to access the functions of the control panel (fig.5). Fig.5 Button MENU Instruction Used to access the menu. Used to return a previous menu option. SET Enter the currently selected menu or confirm the current function value UP Scroll UP through the menu list or increase the value of the current function DOWN Scroll DOWN through the menu list or decrease the value of the current function IMPORTANT ARCMASTER136 allows you to manage lighting systems with synthesis of RGB and White. So, depending on the type of projector to refer to the respective mode of operation; to switch from RGB mode operation to WHITE mode: • Press the MENU button and select the SET and choose [GO WHITE], then press SET. When [YES] appears, press SET again. When ok appears the unit has entered [WARM&COOL WHITE] mode. ARCMASTER 136 8 - 4 - MODE OPERATION RGB 4.1 Menu structure RGB RGB 1 Auto RGB 2 .. . RGB 10 CUSTOM 1 Custom CUSTOM 2 .. . CUSTOM 10 RED[000-255] GREE[000-255] Static BLUE[000-255] DIMM[000-255] STRO[000-20] MENU (1) Play schedule SCHEDULE PLAYING! Dmx [001-512] EFFECT RGB Person RGB + D RGB + DMS SOLID Edit Red (0-255) C-1 S1 Green (0-255) C-2 S2 Blue (0-255) .. . C-10 .. . S20 Strob (0-20) Time (0-255) Fade (0-255) ARCMASTER 136 Set PASSWORD ON/OFF ALL EDIT YES/NO RSET ALL YES/NO RSET CUS YES/NO RSET SCH YES/NO UPLOAD PASSWORD CLOCK EDIT TIM CALIBRAT WHITE 01 WHITE 02 .. . WHITE 09 RGB TO W MENU (2) RGB TO W YES/NO GO WHITE YES? 9 [SA] 11/06/2011 01:01:10 Red (0-255) Green (0-255) Blue (0-255) Dmx Run Slave Easy Play SUNDAY MONDAY TUESDAY Sched WEDNESDAY THURSDAY FRIDAY SATURDAY NO. (01-10) RGB (01-10) CSTM (01-10) STATIC PL NONE EVERY DAY Parch K1 RGB 1 K2 RGB 2 K6 RGB 10 .. . .. . cstm1 cstm2 .. . cstm10 00:00>> >>00:00 10 ARCMASTER 136 4.2 Operation in automatic mode If no DMX control signal is present at the DMX INPUT, the unit independently runs through its show programme provided that the blackout mode is switched off: • Press the button MENU so many times until the display shows [AUTO], then press the button SET. • Press the button UP and DOWN to switch between the programs 1 to 10 (RGB 01 - RGB 10 or CUSTOM1-CUSTOM10). • The unit will operate in automatic mode by executing the selected program. IMPORTANT: Programs RGB 01 - RGB 10 are fully pre-programmed and will not be altered by changes in EDIT mode. Programs CUSTOM01 - CUSTOM10 are fully pre-programmed and can be edited in EDIT mode. Note - If ALLOW EDIT from [SET] menu is Yes ,after selecting an [AUTO] program, the user then presses SET again, they can change the speed of the AUTO PROGRAMS. 4.3 Master/Slave Mode This mode will allow you to link up the units together without a controller. Choose a unit to function as the Master. The unit must be the first unit in line; other units will work as (SLAVE) with the same effect. • Press the button MENU so many times until the display shows [RUN], and press the button SET to confirm. • Press UP and DOWN to set the unit as [SLAVE]. • Select the desired program (see section 4.2). • Use the signal connectors to form a chain of units. Under certain conditions and lengths is recommended that a termination. 4.4 Easy play Mode For the management of LED projectors with simple controllers: • Press the button MENU until display show [RUN], then press the button SET to confirm. • Press UP or DOWN and select [EASY PLAY] mode. • Press the button SET to confirm. 4.5 DMX configurations ARCMASTER136 is equipped with 5 DMX configuration. • Press the button MENU so many times until shows [PERSON], and press the button SET to confirm. • Select the desired DMX configuration (EFFECT - RGB - RGB+D - RGB+DMS - SOLID) through the buttons UP and DOWN. The tables on page 11 indicate the operating mode and DMX value. 4.6 DMX Mode • Press the button MENU so many times until the display shows [RUN], • Press the button SET to confirm. • Press the buttons UP and DOWN to select [DMX] mode. • Then enter the [DMX] mode, press the buttons UP and DOWN to select the desired value [001 - 512]. • After the setting value is automatically saved. Note - When fixtures are under Auto program operation, the [RUN] mode does no works. ARCMASTER 136 11 4.7 DMX control without ID address In order to control units connected with a DMX controller, adjust the DMX start address for the first a DMX channel. If e. g. address 33 on the controller is provided for controlling the function of the first DMX channel, adjust the start address 33 on the unit. The other functions of the light effect panel are then automatically assigned to the following addresses. An example with the start address 33 is shown below and a configuration with 8 DMX channels: Numberof DMXchannels Start address (example) DMX Address occupied Next possible start address for unit No. 1 Next possible start address for unit No. 2 Next possible start address for unit No. 3 8 33 33-40 41 49 57 4.8 DMX control RGB Channel Function in EFFECT mode DMX value 1 RED 0-100% 000-255 2 GREEN 0-100% 000-255 3 BLUE 0-100% 000-255 4 MASTER DIMMER 000-255 Channel 5 6 000-010 011-035 036-060 061-085 086-110 111-135 136-160 161-185 186-210 211-215 216-220 221-225 226-230 231-235 236-240 241-245 246-250 251-255 STROBE No function 1-20 Hz 000-004 005-255 NOTE R*=Red G*=Green B*=Blue W*=White DMX value AUTO + CUSTOM PROGRAMS No function Auto RGB 1 Auto RGB 2 Auto RGB 3 Auto RGB 4 Auto RGB 5 NO FUNCTION NO FUNCTION NO FUNCTION NO FUNCTION NO FUNCTION CUSTOM 1 CUSTOM 2 CUSTOM 3 CUSTOM 4 CUSTOM 5 CUSTOM 6 CUSTOM 7 CUSTOM 8 CUSTOM 9 CUSTOM 10 NO FUNCTION 000-020 021-030 031-040 041-050 051-060 061-070 071-080 081-090 091-100 101-110 111-120 121-130 131-140 141-150 151-160 161-170 171-180 181-190 191-200 201-210 211-220 221-255 8 AUTO SPEED Slow to fast 000-255 Channel Function in SOLID mode DMX value 1 RGB + MASTER DIMMER 000-255 COLOR MACRO + No function R*: 100% / G*: Up / B*: 0% R: Down / G: 100% / B: 0% R: 0% / G: 100% / B: Up R: 0% / G: Down / B: 100% R: Up / G: 0% / B: 100% R: 100% / G: 0% / B: Down R: 100% / G: Up / B: Up R: Down / G: Down / B: 100% White 1: 3200 K White 2: 3400 K White 3: 4200 K White 4: 4900 K White 5: 5600 K White 6: 5900 K White 7: 6500 K White 8: 7200 K White 9: 8000 K Function in EFFECT mode 7 ARCMASTER 136 12 Channel 1 2 3 Function in RGB + D mode RED 0-100% GREEN 0-100% BLUE 0-100% DMX value 000-255 000-255 000-255 4 MASTER DIMMER 000-255 Channel Function in RGB + DMX mode DMX value 1 2 3 RED 0-100% GREEN 0-100% BLUE 0-100% 000-255 000-255 000-255 4 MASTER DIMMER 000-255 5 COLOR MACROS 000-255 6 STROBE 000-255 Channel Function in RGB DMX value 1 2 3 RED 0-100% 000-255 GREEN 0-100% 000-255 BLUE 0-100% 000-255 ARCMASTER 136 13 4.9 STATIC configuration To create color combinations enter in static mode: • Press the MENU button until the display shows [STAT], then press the SET button. • Select the red channel, green, or blue (Red - Green -Blue) using the UP and DOWN. • To confirm press SET button. • Set the values (000 - 255), through the UP and DOWN. • Finally, set the value of the functions [Dimm] and [Strobe] using the UP and DOWN. 4.10 Editing custom programs To make changes to the custom programs proceed as follows: • Press the MENU button until the display shows [EDIT], then press the SET button. • Select the program to be changed between C-1 and C-10. • For each program you can change 20 scenes, acting on the values of the red channel (Red), Green (Green), Blue (Blue) by changing the values of the function strobe (Strobe), the execution time of the scene (Time) and finally fade (Fade). • The values (000 - 255) can be selected using the UP and DOWN. 4.11 Execution of programming To run the program select this command: • Press the MENU button until the display shows [PLAY SCHEDULE], and activate Schedule Playing. 4.12 Programming To enter the programming mode the following: • Press the MENU button until the display shows [SCHED], then press the SET button. • Select the day of the execution of the programming of SUNDAY, MONDAY, TUESDAY, WEDNESDAY, THURSDAY, FRIDAY, SATURDAY e EVERYDAY. • Select the program RGB (1-10), CUSTOM (1-10), STATIC or Play none. • Set the start time and end that run. Note - If there is conflict in set periods, the first scheduled event has priority over the second event. Moreover, if there is no conflict between the Everyday mode and one day of the week, the latter shall prevail. 4.13 Patch Enter the mode in the case of patch management controller with simple LED headlamp. • Press the MENU button until the display shows [PATCH], then press the SET button. • Create programs from K1 to K6 selecting automated programs from RGB (1-10), CUSTOM (1-10). • Select the program RGB (1-10), CUSTOM (1-10), STATIC o Play none. Note - In the management controller to select the operating mode Easy play. 4.14 Settings • Press the MENU button and select the item using the arrow keys [SET] to confirm press the SET button. 14 ARCMASTER 136 PASSWORD • Enter the [PASSWORD] to enable or disable the password. -- If you select On, the unit’s operation will be password protected after 30 seconds of inactivity. -- If you select Off, you can operate freely at all times. ALL EDIT • This function enables or disables editing programs in the automatic mode. RESET ALL • This function resets all the original factory settings. RSET CUS • This function resets the custom programs. RSET SCH • This function resets the programming. UPLOAD • Selecting the [UPLOAD] you can load custom programs from the current Master to Slave units. To transfer you must enter the password that appears to be the same for the main entrance. • During the loading of programs, the Master and Slave units will light yellow. • If, during this process, an error occurs, the unit will light up red. • If the upload is successful programs of the units will light instead of green. Note - The default settings for the password corresponding to the combination of keys UP + DOWN + UP + DOWN. Press ENTER to confirm. CLOCK • Select the [TIME NOW] to display the current date and time. • Select the [EDIT TIME] to change the date and time. CALIBRAT • Enter mode [CALIBRAT] to set the white balance custom white color temperatures • Select one of 9 pre-programmed settings white. • The settings can be changed by acting on the values (000 - 255) relating to the red, green and blue (Red - Green -Blue), through the UP and DOWN. RGB TO W • When [RGB TO W] is set to Yes, RGB = 255, 255, 255 color is pure white with the calibration values adjusted and set. • Instead, when set to No, RGB = 255, 255, 255 color can not be adjusted and will show the maximum power output. Note - You can adjust the parameters in the [CALIBRAT] mode. GO WHITE • Press the MENU button and select the SET and choose [GO WHITE], then press SET. When [YES] by pressing the new set. LEDs appear on the “OK” and the unit will go into [WARM&COOL WHITE]. ARCMASTER 136 15 - 5 - MODE OPERATION WHITE 5.1 Menu structure WHITE WARM Mood NATURAL DIM [000-255] COOL Static COOL [000-255] WARM [000-255] DIMME [000-255] STROB [000-20] PLAY SCHEDULE SCHEDULE PLAYING Address [001-512] STUD W STUD W+D Person STUD 1 STUD 2 SOLID MENU Set Run PASSWORD ON/OFF RESET YES/NO CALL WHITE [1-5] Warm [000-255] Cool [000-255] CLOCK EDIT TIME SA/06/11 01:01:10 GO RGB? YES? DMX SLAVE SUNDAY MONDAY TUESDAY SCHEDU WEDNESDAY THURSDAY FRIDAY SATURDAY EVERY DAY NO.(01-10) WHITE (01-5) 00:00>> >>00:00 ARCMASTER 136 16 5.2 Master/Slave Mode This mode will allow you to link up the units together without a controller. The first unit will be set as master and the others work as slaves (SLAVE) with the same effect. • Press the button MENU so many times until the display shows [RUN], and press the button SET to confirm. • Press the UP or DOWN and select the mode (SLAVE) to set the drive as a slave. 5.3 DMX configurations ARCMASTER136 is equipped with 5 DMX configuration. • Press the button MENU so many times until shows [PERS], and press the buttonSET to confirm. • Select the desired DMX configuration (STUD W - STUD W+D - STUD1 - STUD2 - SOLID) through the buttons UP and DOWN. The following tables show the operating mode and DMX values. 5.4 DMX Mode • In order to enter the DMX mode, press the MENU button until the display shows [RUN]. • Press SET to confirm. • Press the UP or DOWN and select the [DMX]. • From the Home menu, to set the desired value, enter the [ADDRESS], and select the desired value [001 - 512]; and hold to scroll faster. • After setting the value is saved automatically. 5.5 Control DMX WHITE Channel Function in STUD 2 mode DMX value Channel Function in STUD 1 mode DMX value 1 MASTER DIMMER 000-255 1 MASTER DIMMER 000-255 2 WARM WHITE 000-255 3 COOL WHITE 000-255 4 WHITE MACRO White 1: 3200 K White 2: 3400 K White 3: 4200 K White 4: 4900 K White 5: 5600 K 000-050 051-080 081-110 111-140 141-255 5 STROBE 000-255 WHITE MACRO White 1: 3200 K White 2: 3400 K White 3: 4200 K White 4: 4900 K White 5: 5600 K 000-050 051-080 081-110 111-140 141-255 Channel Function in SOLID mode DMX value 1 WHITE COLOR + MASTER DIMMER 000-255 2 Channel Function in W+D mode DMX value 1 MASTER DIMMER 000-255 Channel Function in STUD W mode DMX value 2 WARM WHITE 000-255 1 WARM WHITE 000-255 3 COOL WHITE 000-255 2 COOL WHITE 000-255 ARCMASTER 136 17 5.6 STATIC configuration • To create color combinations enter in static mode: • Press the MENU button until the display shows [STAT], then press the SET button. • Select cool, warm, dimmer and strobe (Cool - Warm - Dimm - Strob) through the UP and DOWN. • To confirm press the SET button. • Set the values (000 - 255), through the UP and DOWN. 5.7 Mood To set the effect on the white proceed as follows: • Press the MENU button until the display shows [MOOD], then press the SET button. • Select the effect to be adjusted with [WARM], [NATURAL] and [COOL]. • The values (000 - 255) can be selected using the UP and DOWN. • Press the SET button to save your changes. 5.8 Running the program To run the program select this command: • Press the MENU button until the display shows [PLAY SCHEDULE] and activate Playing Schedule. 5.9 Programming To enter the programming mode the following: • Press the MENU button until the display shows [SCHED], then press the SET button. • Select the day of the execution of the programming of SUNDAY, MONDAY, TUESDAY, WEDNESDAY, THURSDAY, FRIDAY, SATURDAY and EVERYDAY. • Select the program from White 1 and White 5. • Set the start time and end that run. Note - If there is conflict in set periods, the first scheduled event has priority over the second event. Moreover, if there is no conflict between the Everyday mode and one day of the week, the latter shall prevail. 5.10 Settings • Press the MENU button and select the item using the arrow keys [SET] to confirm press the SET button. You can access the following functions: PASSWORD • Enter the [PASSWORD] to enable or disable the password. -- If you select On, the unit’s operation will be password protected after 30 seconds of inactivity. -- If you select Off, you can operate freely at all times. -RESET • This function restores all the original factory settings. 18 ARCMASTER 136 CALL • Selecting the [CALL], you can adjust the white different temperatures. • There are 5 pre-set white (WHITE1-WHITE5), that can be edited using [WARM] and [COOL]. • Press SET to change the value (000-255). CLOCK • Select the [TIME NOW] to display the current date and time. • Select the [EDIT TIME] to change the date and time. GO RGB • Press the MENU button and select the SET and choose [GO RGB], then press SET. When YES press new set. OK appears on the unit is the unit will go into effect RGB. ARCMASTER 136 19 - 6 - APPENDIX 6.1 Trouble shooting Trouble Possible cause Possible remedy No screen display • Wrong power connection • Main PCB damaged • Check power connection • Replace the main PCB Viewing the display, but no response from buttons • Main PCB damaged • Replace the main PCB Viewing the display, but no response from the controller DMX512 • Wrong signal connections • Wrong DMX address • Damaged driver board • Make sure all signal connections • Check the correct DMX address • Replace driver board No DMX signal • No DMX signal • Make sure all signal connections Contact an authorized service center in case of technical problems or not reported in the table can not be resolved by the procedure given in the table. 6.2 Exploded view 1 No ITEM 1 Front cover 2 Display board 3 Power switch 2 4 Power socket 3 5 Metal base 4 5 • Si prega, dopo l’acquisto, di procedere alla registrazione del prodotto sul sito www.musiclights.it. In alternativa il prodotto può essere registrato compilando e inviando il modulo riportato sul retro. • Sono esclusi i guasti causati da imperizia e da uso non appropriato dell’apparecchio. • La garanzia non ha più alcun effetto qualora l’apparecchio sia stato manomesso. • La garanzia non prevede la sostituzione dell’apparecchio. • Sono escluse dalla garanzia le parti esterne, le lampade, le manopole, gli interruttori e le parti asportabili. • Le spese di trasporto e i rischi conseguenti sono a carico del possessore dell’apparecchio. • A tutti gli effetti la validità della garanzia è avallata unicamente dalla presentazione del certificato di garanzia. Estratto dalle Condizioni Generali di Garanzia Il prodotto è coperto da garanzia in base alle vigenti normative. Sul sito www.musiclights.it è possibile consultare il testo integrale delle “Condizioni Generali di Garanzia”. • Please remember to register the piece of equipment soon after you purchase it, logging on www.musiclights.it. The product can be also registered filling in and sending the form available on your guarantee certificate. • Defects caused by inexperience and incorrect handling of the equipment are excluded. • The guarantee will no longer be effective if the equipment has been tampered. • The guarantee makes no provision for the replacement of the equipment. • External parts, lamps, handles, switches and removable parts are not included in the guarantee. • Transport costs and subsequent risks are responsibility of the owner of the equipment. • For all purposes, the validity of the guarantee is endorsed solely on presentation of the guarantee certificate. Abstract General Guarantee Conditions The guarantee covers the unit in compliance with existing regulations. You can find the full version of the “General Guarantee Conditions” on our web site www.musiclights.it. CERTIFICATO DI GARANZIA GUARANTEE CERTIFICATE " Place Stamp Here Affrancare Spett.le Music&Lights S.r.l. Via Appia Km 136.200 04020 Itri (LT) Italy " " SURNAME / COGNOME Purchased by / Acquistato da SERIAL N° / SERIE N° MODEL / MODELLO SURNAME / COGNOME Purchased by / Acquistato da SERIAL N° / SERIE N° MODEL / MODELLO CITY / CITTA’ ADDRESS / VIA NAME / NOME N. NAME / NOME ADDRESS / VIA CITY / CITTA’ Dealer’s stamp and signature Timbro e firma del Rivenditore Dealer’s stamp and signature ZIP CODE / C.A.P. Timbro e firma del Rivenditore Purchasing date Data acquisto PROV. Purchasing date Data acquisto FORM TO BE FILLED IN AND KEPT / CEDOLA DA COMPILARE E CONSERVARE ZIP CODE / C.A.P. FORM TO BE FILLED IN AND MAILED / CEDOLA DA COMPILARE E SPEDIRE N. PROV. ARCHWORK is a brand of Music & Lights S.r.l .company. ©2011 Music & Lights S.r.l. entertainment technologies Via Appia km 136,200 - 04020 Itri (LT) ITALY ISO 9001:2008 tel. +39 0771 72190 fax +39 0771 721955 Certified Company www.musiclights.it [email protected] ARCHWORK è un brand di proprietà della Music & Lights S.r.l. Music & Lights S.r.l.