1
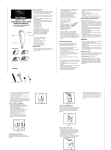
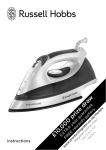
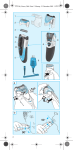
INSTRUCTIONS AND WARRANTY
MODEL NO. RHRS08
RUSSELL HOBBS WET & DRY SHAVER
1
Congratulations on purchasing our Russell Hobbs Wet & Dry Shaver. Each unit is
manufactured to ensure safety and reliability. Before using this appliance for the first time,
please read the instruction manual carefully and keep it for future reference.
FEATURES OF THE RUSSELL HOBBS WET & DRY SHAVER
•
Rechargeable shaver can be used with shaving gel
•
3 Floating rotary heads follows contours of the face for a closer smoother shave
•
Cutting blade with 13° angle for a better shave.
•
Universal voltage (100-240V)
•
High speed motor
•
Water proof
•
1.5 hour quick charge
•
Self-sharpening blades
•
Power: rechargeable/mains/charging base
•
Operating time: 45-50 minutes
•
LCD display charging indicator
•
Pop-up trimmer perfect for sideburns, moustaches and other small areas
•
Metallic coating
•
Cleaning brush included
IMPORTANT SAFEGUARDS
When using any electrical appliance, basic safety precautions should always be followed
including the following:
1. Please read the instructions carefully before using any appliance.
2. Always ensure that the voltage on the rating label corresponds to the mains voltage in
your home.
3. Incorrect operation and improper use can damage the appliance and cause injury to
the user.
4. The appliance is intended for household use only. Commercial use invalids the
warranty and the supplier cannot be held responsible for injury or damage caused
when using the appliance for any other purpose than that intended.
5. Avoid any contact with moving parts.
6. This appliance is not intended for use by persons (including children) with reduced
physical, sensory or mental capabilities, or lack of experience and knowledge, unless
they have been given supervision or instruction concerning use of the appliance by a
person responsible for their safety.
2
7. Children should be supervised to ensure that they do not play with the appliance.
8. Check the power cord and plug regularly for any damage. If the cord or the plug is
damaged, it must be replaced by the manufacturer or a qualified person in order to
avoid an electrical hazard.
9. Do not use the appliance if it has been dropped or damaged in any way. In case of
damage, take the unit in for examination and/or repair by an authorised service agent
10. To reduce the risk of electric shock, do not immerse or expose the battery charger,
plug or the power cord to water or any other liquid.
11. Never immerse the battery charger in water or any other liquid for cleaning purposes.
12. Remove the plug from the socket by gripping the plug. Do not pull on the cord to
disconnect the appliance from the mains. Always unplug the unit when not in use,
before cleaning or when adding or removing parts.
13. The use of accessory attachments that are not recommended or supplied by the
manufacturer may result in injuries, fire or electric shock.
14. A short cord is provided to reduce the hazards resulting from becoming entangled in
or tripping over a longer cord.
15. Do not let the cord hang over the edge of a table or counter. Ensure that the cord is
not in a position where it can be pulled on inadvertently.
16. Do not allow the cord to touch hot surfaces and do not place on or near a hot gas or
electric burner or in a heated oven.
17. Do not use the appliance on a gas or electric cooking top or over or near an open
flame.
18. Use of an extension cord with this appliance is not recommended. However, if it is
necessary to use an extension lead, ensure that the lead is suited to the power
consumption of the appliance to avoid overheating of the extension cord, appliance or
plug point. Do not place the extension cord in a position where it can be pulled on by
children or animals or tripped over.
19. This appliance is not suitable for outdoor use. Do not use this appliance for anything
other than its intended use.
20. DO NOT carry the appliance by the power cord.
21. Do not leave this appliance unattended during use. Always unplug the unit when not
in use or before cleaning.
22. Always operate the appliance on a smooth, even, stable surface. Do not place the
unit on a hot surface.
23. Ensure that the appliance is switched off after each use.
24. The manufacturer does not accept responsibility for any damage or injury caused by
improper or incorrect use, or for repairs carried out by unauthorised personnel.
25. In case of technical problems, switch off the machine and do not attempt to repair it
yourself. Return the appliance to an authorised service facility for examination,
adjustment or repair. Always insist on the use of original spare parts. Failure to
3
comply with the above mentioned pre-cautions and instructions, could affect the safe
operation of this machine.
ADDITIONAL SAFEGUARDS
•
Do not charge the shaver when the temperature is below 0°C (32°F) or above 40°C
(104°F), where it will be exposed to direct sunlight or a heat source, or where there is
a lot of moisture.
•
Put the protective cap on the shaver every time after use to prevent damage.
•
To avoid injury, do not use the shaver if it has a damaged cap or inner cutter.
•
Both the foil and the blade have a limited service life. It is recommended that you
replace the outer foil and inner cutter at regular intervals.
•
Wash the shaver in tap water. Do not use salt water or boiling water. Do not use
cleaning products that are designed for toilets, bathrooms or kitchen appliances. Do
not submerge the shaver in water for a long period of time.
•
Always use your shaver for its intended use, as described in this manual.
•
Please make sure that the old batteries are disposed of at an official designated
location.
4
PARTS DIAGRAM
1. Protective cap
2. Foil frame
3. Shaving head floating system:
A a. Cap-fixing frame
b. Shaving cap
c. Shaving head
B Floating frame
4. Release knob of floating system
5. Hair chamber
6. Foil frame release button
7. Switch
8. LCD display
9. Trimmer
10. Trimmer handle
11. Charging socket
12. Adaptor
13. Washable sign
14. Cleaning brush
5
LCD DISPLAY SYMBOLS
The LCD display indicates battery power by using numbers and bars on the display
Indicates battery is fully charged, all bars are
full.
Lower power such as 25%, is indicated with
two flashing bars to remind you to charge the
shaver
When the display indicates 0% it means
there is no more power and the shaver will
need to be charged for at least 1-2 minutes
before it can be turned back on.
While in operation the top two bars will flash
to indicate that the shaver is in use.
The empty bars will flash to indicate that the
shaver is charging. For example, if the unit
has 50% power, when charging 4 bars will
flash.
6
OPERATING INSTRUCTIONS
Using the shaver (see fig.2)
1. Remove the protective cap.
2. Depress the switch to turn the shaver on.
3. Move the shaver in straight or circular motions quickly over your skin and against the
growing direction of the beard.
4. Depress the switch to turn the shaver off.
5. Put the protective cap on the shaver after every use to prevent damage of shaving
cap
Using the trimmer
1. Slide the trimmer knob down to open the trimmer.
2. Place the trimmer at a right angle (90°) toward your skin and move it downward to
trim sideburns.
7
CLEANING AND MAINTENANCE
8
1. It is recommended that you regularly clean your shaver with water. This will aid in
keeping your shaver in good condition and assist in maintaining the cutting
performance while preventing odors or bacteria from developing.
2. Do not use bleach or other abrasive substance or solvents to clean your appliance as
it can be damaging to the finish.
3. Ensure the shaver is switched off.
4. Press the foil-frame release button and open the bracket.
5. The whole floating system and hair chamber can be cleaned in water (see fig3), by
separating the shaving head from the floating system (see fig4 and fig5) or by
cleaning with a brush (see fig6).
6. Reassemble the shaver parts in the reverse order.
Warning: To prevent electric shock or personal injury, disconnect the power cord
from the shaver and turn off the shaver before cleaning
9
CLEANING AND MAINTENANCE OF THE CUTTING SYSTEM
It is recommended that you replace shaving cap and shaving head at least every year to
maintain the shaver’s cutting performance.
•
Before cleaning the appliance, it must be switched off and unplugged.
•
Press down foil-frame release button and open the bracket.
•
Take apart the floating system from the bracket via the release knob of the floating
system (see fig4)
•
Rotate cap-fixing frame (see fig 5) then take shaving cap and shaving head out.
•
Reassemble the shaver parts in the reverse order.
•
This appliance is for household use only and is not user-serviceable.
•
The body of the appliance should be cleaned with a damp cloth.
•
Do not use bleach or other abrasive substance or solvents to clean your appliance as
it can be damaging to the finish. To remove stubborn spots/marks, wipe the surfaces
with a cloth slightly dampened in soapy water or mild non-abrasive cleaner. Rinse
and dry with a clean, dry, soft cloth.
•
Clean the appliance regularly to ensure continued performance.
Recycling the battery (see fig.7)
10
Batteries contain substances that may pollute the environment. The battery in this shaver is
not intended to be replaced by consumers. However, the batteries may be replaced at an
authorized service centre.
1.
The battery must be removed from the appliance before it is scrapped
2.
Only once the battery is exhausted should it be removed
3.
Do not remove the battery during charging
SERVICING THE APPLIANCE
There are no user serviceable parts in this appliance. If the unit is not operating correctly,
please check the following:
•
You have followed the instructions correctly
•
That the unit has been wired correctly and that the wall socket is switched on.
•
That the mains power supply is ON.
•
That the plug is firmly in the mains socket.
If the appliance still does not work after checking the above:
- Consult the retailer for possible repair or replacement. If the retailer fails to resolve the
problem and you need to return the appliance, make sure that:
•
The unit is packed carefully back into its original packaging.
•
Proof of purchase is attached.
•
A reason is provided for why it is being returned.
If the supply cord is damaged, it must be replaced by the manufacturer or an authorised
service agent, in order to avoid any hazard. If service becomes necessary within the
warranty period, the appliance should be returned to an approved Home of Living Brands
(Pty) Limited service centre. Servicing outside the warranty period is still available, but will,
however, be chargeable.
11
CHANGING THE PLUG
Should the need arise to change the fitted plug, Follow the instructions below.
This unit is designed to operate on the stated current only. Connecting to other power
sources may damage the appliance. Connect a three-pin plug as follows:
The wires in this mains lead are coloured in accordance with the following code:
Green/Yellow = Earth
Blue
= Neutral
Brown
= Live
12
PLEASE AFFIX YOUR PROOF OF PURCHASE/RECEIPT HERE
IN THE EVENT OF A CLAIM UNDER WARRANTY THIS RECEIPT MUST BE PRODUCED.
WARRANTY
1. Home of Living Brands (Pty) Ltd warrants to the original purchaser of this product (“the
customer”) that this product will be free of defects in quality and workmanship which
under normal personal, family or household use and purpose may manifest within a
period of 1 (one) year from the date of purchase (“warranty period”).
2. Where the customer has purchased a product and it breaks, is defective or does not work
properly for the intended purpose, the customer must notify the supplier from whom the
customer bought the product (“the supplier”) thereof within the warranty period. Any claim
in terms of this warranty must be supported by a proof of purchase. If proof of purchase
is not available, then repair, and/or service charges may be payable by the customer to
the supplier.
3. The faulty product must be taken to the supplier's service centre to exercise the warranty.
4. The supplier will refund, repair or exchange the product in terms of this warranty subject
to legislative requirements. This warranty shall be valid only where the customer has not
broken the product himself, or used the product for something that it is not supposed to
be used for. The warranty does not include and will not be construed to cover products
damaged as a result of disaster, misuse, tamper, abuse or any unauthorised modification
or repair of the product.
5. This warranty will extend only to the product provided at the date of the purchase and not
to any expendables attached or installed by the customer.
6. If the customer requests that the supplier repairs the product and the product breaks or
fails to work properly within 3 (three) months of the repair and not as a result of misuse,
tampering or modification by or on behalf of the customer, then the supplier may replace
the product or pay a refund to the customer.
7. The customer may be responsible for certain costs where products returned are not in the
original packaging, or if the packaging is damaged. This will be deducted from any refund
paid to the customer.
JOHANNESBURG
HOME OF LIVING BRANDS (PTY) LTD
TEL NO. (011) 490-9600
CAPE TOWN
TEL NO. (021) 552-5161
DURBAN
TEL NO. (031) 792-6000
www.russellhobbs.co.za
13