1
#
1.
2.
3.
4.
5.
6.
7.
8.
9.
10.
11.
12.
23.
22.
21.
20.
19.
18.
17.
16.
15.
14.
13.
35.
36.
37.
38.
39.
40.
41.
42.
43.
44.
45.
34.
33.
32.
10
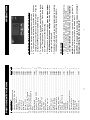
DESCRIPTION
Part # Qty.
Assembly HT400/600 Handle .................................. 10499
1
Assembly Link/Pin Main Arm .................................. 42110
1
Assembly Main Arm ............................................... 42404
1
Link Rocker ........................................................... 10502
2
Pin Rocker Link ..................................................... 42137
1
Nut 1/2" Push ........................................................ 20214 12
Knob Plastic .......................................................... 25143
1
Nut Jam 1/2-20 ...................................................... 25151
3
Block 2-1/2" Adj. Threaded ...................................... 25526
1
Pin Rocker Link Pivot ............................................. 41384
1
Assembly Top Adusting Rod ................................... 25208
1
Relay .................................................................................. 1
Terminal Board ....................................................... 72231
1
Screw #8x1/2 Tap-B PHPH ...................................... 21482 8
Bolt Lower Platen ................................................................. 2
Washer Spring ....................................................... 12378 12
Pin Main Arm Link .................................................. 41384
1
Spring #105 ........................................................... 49122
2
Nut 1/4-20 Hex .......................................................14548
4
Bolt 1/4-20x1-3/4 ....................................................10710
2
Switch ................................................................................ 1
Nut 1/2-20 Nyloc .................................................... 89078
1
Assembly Frame ....................................................41384
1
Washer 3/8" Hard ...................................................86504
4
Spacer Heatshield .................................................. 41384
4
Casting 1620 Lower ................................................ 82768
1
Pad 1/2" 1620 ........................................................ 50542
1
Casting Upper Heated .......................................................... 1
Heatshield ............................................................. 41384
1
Thermostat .......................................................................... 1
Thermometer ......................................................... 40345
1
Assembly Thermostat Cover .................................... 22640 1
Thermostat Knob ....................................................14217
1
Spacer Haysite ...................................................... 41384
2
Switch Rocker ..................................................................... 1
Lamp Red ........................................................................... 1
Decal Overlay ........................................................ 09970
1
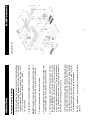
PARTS IDENTIFICATION
3
1. The pressure control knob, located on the top of the machine,
should be set so that the heat head will lock down firmly.
2. Pressure is reduced by turning knob (with machine open)
counter-clockwise and increased by turning it clockwise.
NOTE: Adjustments may be required from one garment to
another and will vary to achieve the desired result.
CAUTION: Excessive pressure can cause structural
damage, voiding the machine warranty!
PRESSURE
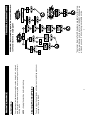
5. Wait for the machine to reach your preset temperature by monitoring
the display temperature until it matches the set temperature.
4. When you have your desired settings press the menu button
a third time to lock in your settings otherwise the previous
settings will still be used.
3. To change or set the time, press the menu button on the digital
control. The light next to “TIME” will light. Press the up ▲, or
down ▼, button to your desired setting.
1. Turn on the machine by pushing the on/off switch.
2. To change or set the temperature, press the menu button on
the digital control. The light next to “TEMP” will light. Press the
up ▲, or down ▼, button to your desired setting.
TEMPERATURE & TIME INSTRUCTIONS
OPERATION