1
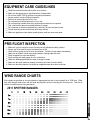
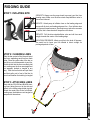
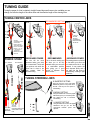
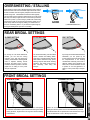
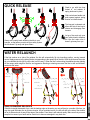
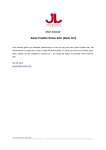
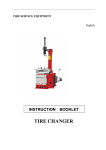
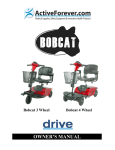
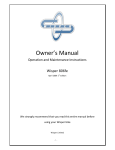
WARNING AND SAFETY PRECAUTIONS
WARNING:
KITE FLYING IS A POTENTIALLY HAZARDOUS SPORT
WARNING:
MIS-USE OF THIS PRODUCT CAN LEAD TO SERIOUS INJURY OR DEATH
WARNING:
YOU, ALONE, ARE RESPONSIBLE FOR YOUR SAFETY AND THE SAFE OPERATION OF YOUR EQUIPMENT
RELEASE OF LIABILITY, CLAIM WAIVER
AND ASSUMPTION OF RISK AGREEMENT
By inflationg the leading edge and assembling this
product, you are agreeing to be bound to the
terms set forth below, requiriing any one using this
product to be bound by such terms. If you are
unwilling to be bound by these terms, return this
product (before use) for a full refund.
ASSUMPTION OF RISK
Use of this product and any of its components
involves certain inherent risks, dangers, and
hazards, which can result in serious personal injury
or death. In using this product you may freely
agree to assume and accept all known and
unknown risk of injury while using this equipment.
The risks inherent in this sport can be greatly
reduced by abiding by the warning guidelines listed
in the suers guide, taking lessons from a certified
kitesurfing school and by using common sense.
RELEASE AND WAIVER OF
CLAIMS AGREEMENT
In consideration of the sale of this product, you
hereby agree to the following to the fullest extent
permitted by law:
To waive any and all claims that you have or may
in the future have against Caution Santa Cruz, or
any of its agents, resulting from use of this prod
uct and any of its components.
To release Caution Santa Cruz, or any of its
agents, from any and all liability for any loss,
damage, injury, or expense that you or any users
of this product may suffer as a result of the use
of this product, do to any cause whatsoever,
including negligence or breach of contract on the
part of Caution Santa Cruz, or any of its agents,
in the design or manufacture of this product.
EQUIPMENT CARE GUIDELINES
Wash kites with fresh water and dry after every session
Make sure the rigging area is smooth and free of sharp debris
Do not over inflate, 6 PSI is sufficient for highest performance
Always conduct a routine Preflight Inspection
Remove all valves when kite is not in use
Do not leave struts inflated when kite is not in use
Do not leave kites outside where they might receive excessive sun exposure
Find a cool and dry place for extended periods of storage
Do not expose to excessive temperatures, particuarly hot cars and space cases
Control bar and lines should be rinsed after every session
Make sure pigtails are clean before attaching lines; sand can cause early wear
PRE-FLIGHT INSPECTION
Make sure your are using the correct Caution bar with appropriate safety systems
Always use a kite leash to prevent accidental loss of kite
Check all lines during set-up for knots and abrasion - if either is found replace immediately
Make sure all inflation valves are properly seated in leading edge and struts
Check all pigtails for wear and abrasion
Check canopy and leading edge for cuts or abrasions
Make sure leading edge bridals are clear of tangles or wraps
Make sure the quick release is properly functioning and clear of sand or debris
Make sure the safety leash is not tangled or wrapped around other items on the bar
WIND RANGE CHARTS
Wind ranges are provided as a rough estimate of appropriate kite size for wind strength for a 165lb rider. Rider
size, wind strength, board size, and skill level are important factors in selecting the correct quiver. Feel free to
contact our sales team for sizing assistance.
2011 SPITFIRE RANGES
RIGGING GUIDELINES
A Quick-release body
B Trim loop
C Angry inch
D Leash attachment loop
E Left YELLOW steering line
attaches to YELLOW pigtail on trailing edge
F Right BLACK steering line
attaches to BLACK pigtail on trailing edge
G Right RED center line
H
attaches to bridal on leading edge
G
H Left RED center line
attaches to bridal on leading edge
I Power adjustment strap
F
E
J Slider stopper ball
K OS safety release
K
K
2011 QUICK RELEASE
B
J
D
A
B D
C
C
A
RIGGING GUIDE
STEP 1: INFLATING KITE
SECURITY: Always use the pump leash to prevent your kite from
blowing away. Make sure the dime sized dump/deflation valve is
closed and secured.
INFLATE: Attach pump to inflation vlave on the leading edge and
pump until all struts and leading edge are firm. Over inflation does
not improve kite performance. Some struts may take a few seconds
to inflate, this is normal and will stop after a few times.
DEFLATE: Pull the dime sized deflation valve and roll from each
wingtip towards the center of the leading edge.
INFLATION PRESSURE: Inflate your kite to the level of firmness.
Be careful not to leave your kite inflated in direct sunlight for
prolonged periods of time.
STEP 2: CLEARING LINES
Take the bar upwind of the kite and layout
the lines, separating each line from each
other. Place the yellow side of the bar on
the left as you look downwind at your kite.
Double check that the lines are clearly laid
out, making sure the lines are straight and
not wrapped, knotted or tangled in any
way. Take the front bridals and pull them
and their pulley out in front of the kite for
visual confirmation that nothing is tangled.
H
G
E
STEP 3: ATTACHING LINES
Start with the YELLOW and BLACK steering lines, taking them out to the side and
attach to the trailing edge bridal pig-tails.
Attach the center lines to the front bridal,
making sure the bridals are not tangled or
wraped with themselves.
K
I
K
J
B
D
F
A
TUNING GUIDE
Tuning the power of a kite is relatively straight forward because there are two variables you can
change, the effective length of the center lines and the effective length of the steering lines.
TUNING CENTER LINES
FIG 1
RECOMMENDED SETTING FIG 4
FIG 3
A
FIG 2
A
A
B
C
B
A
B
B
C
C
C
C
C
B
B
IF IN THIS
SETTING
THE KITE
OVERSHEETS
READJUST BACK
TO KNOT B
A
A
SECURE
CENTERLINE LARKS
HEAD KNOTS
FIRMLY AROUND
THE POWER STRAP
PIGTAIL CHOOSING
EITHER A B OR
C. SETTING B IS
THE RECOMMENDED FACTORY
SETTING.
POWER STRAP
DE-POWERED
DE-POWERED
POWERED
FULL POWER
DECREASES POWER
RECOMMENDED
INCREASES POWER
The kite will be more
depowered when your arms
are out stretched. The kite will
fly at optimum trim while the
control bar is close to the
quick release. Ideal for
unhooked riding.
This is the stock setting and
will allow you to be fully
powered when your arms are
in a comfortable position,
while giving you a good
amount of depower room
above the bar.
This setting powers up the kite
so that when your arms are
out stretched the kite is fully
sheeted. It may reduce the
bar’s depower ability and it
can make the kite prone to
oversheeting / stalling in light
conditions
TUNING STEERING LINES
III SHORTEST SETTING
Using the top knot on the rear pigtail
attachment gets the most power out of
the kite. Kite may be more prone to
oversheeting.
III
II MIDDLE SETTING
Using the middle knot on the rear pigtail
attachment gives you increased power
and without the risk of excessive
oversheeting.
PULL RED
LOOP TO
DEPOWER
PULL
YELLOW
LOOP TO
EXTEND POWER STRAP
AND POWER UP THE
KITE
III
II
I
II
I LONGEST SETTING
Using the bottom knot on the rear pigtail
attachment will get you the best
compromise between power and
depower.
I
OVERSHEETING / STALLING
Over sheeting is a term used in kiteboarding when a kite’s angle of
attack is closed off at such a dramatical angle that the kite looses
air flow and stalls, often times gravity will pull the kite backwards
towards the ground. Intermediate and advanced riders typically
can feel a stall occuring and often release tension on the bar (push
bar away from rider) to regain air flow over the foil and prevent the
stall’s loss of power. If you are having a problem with oversheeting,
see the tuning guide on the previous page. Start by pulling in your
power strap. If that isn’t enough try setting your center lines to A
and your rear steering lines to I. If you need more power begin by
moving the steering lines up to the II or III setting.
GOOD
BAD
( OVERSHEETED STALL)
REAR BRIDAL SETTINGS
SLOWER SETTING
STOCK SETTING
FAST SETTING
By moving the rear bridal attachment
forward, you can slow the turning
response of the kite and change the
sheeting characteristics. Attaching bridal
ends to adjacent webbing mounts
lengthens the bridal, and it is recommended to use the III position on the rear
pigtail and / or setting C on the power
strap to compensate.
The stock bridal setting uses the widest
spread between the webbing attachment points. This setting offers riders the
ideal ballance between turning speed,
steering response and smooth sheeting
dynamics. This setting works well for
both free-riding, wave riding and
freestyle.
By moving the forward bridal attachment
backwards, you can speed up the
turning response of the kite and increase
the responsiveness of the sheeting
characteristics. Attaching both ends to
adjacent webbing mount lengthens the
bridal, and it is recommended to use the
III position on the rear pigtail and / or
setting C on the power strap to compensate.
FRONT BRIDAL SETTINGS
STOCK SETTING
The stock setting uses the forward attachment point, which pushes
the effective bridal ballance point forward while offering the fastest
turning dynamics, largest amount of range and smooth handling
characteristics.
FORWARD SETTING
Riders can choose to move the front bridal attachment back
shifting the effective position of the front bridal ballance point back.
This will decrease the bar pressure and it will decrease the range
of the kite and deliver a more C-kite style performance.
QUICK RELEASE
Good to go, with trim loop
locked in, red release is
spring tensioned in place
Grab red release handle and
push upward against spring
tension to initiate release
Trim loop pin is released and
allows left side of trim loop to
release and disengage from
harness
Always use a safety leash attaching the kite to your
harness, so that when you activate your safety system
the kite doesn’t fly away and injure others
Let go of bar, and rely upon
your safety leash to depower
the kite and make sure it
doesn’t get away from you
WATER RELAUNCH
If the kite crashes on a side of the window, the kite will automatically flip into launching position, moving towards
neutral. Apply pressure to the side of the bar corresponding to the upward tip of the kite. Once the kite leaves the water
do not oversheet the kite (AKA: pull the bar in all the way). When the kite is relaunching the additional water draining
off the canopy adds weight to the kite, and aggressive sheeting or steering can cause the kite to stall and fall backwards into the water.
DEAD DOWNWIND RELAUNCH
If the kite is straight downwind of you, with the leading edge on the water, you can pull hard on one side of the bar, you
may also grab the leader line to get extra tension. As you maintain tension, the kite will shift to the side of the window,
roll on its side and work its way to the edge of the window. From there is will relaunch easily. Make sure that you never
wrap the line around your hand and be careful not to become entangled in any slack line.
SAFETY LEASH OPTIONS
OR
Attach your safety leash to
the red loop just below the
quick
release
handle.
Upon triggering the safety
system the trim loop will
release from your harness,
the rider will release the
bar, and the kite will
depower along the two
center lines.
Attache your safety leash
to the OS webbing loop on
either outside steering line.
(do not attache to stainless
rings) Upon triggering the
safety system the trim loop
will release from your
harness, the rider will let go
of the bar, and the kite will
depower along the ouside
steering line.
WARRANTY INFORMATION
Every Caution product is subjected to rigid pre-sales quality control tests and is backed by our comprehensive
warranty policy below.
Generally:
WHAT THIS WARRANTY COVERS
Caution Kites warrants this product to be free of major defects in materials and workmanship when this Product is used
for ordinary recreational activities by the original purchaser for a period of 90 days from the original date of purchase
(as evidenced by the relevant purchase receipt) subject to the following terms and conditions.
Specific Product Warranties:
This warranty is valid only when the warranty card accompanying the Product is properly filled out an returned to
Caution kites within seven (7) days from the original date of purchase.
Important Notice:
This Product is designed for, and is intended to be used by the purchaser for ordinary, recreational purpose, or use
only. This Product is not designed for commercial use where is is subject to continuous or high volum repetitive usage
over and extended period of time.
WARRANTY INFORMATION CONTINUES ON NEXT PAGE
WARRANTY INFORMATION
WHAT THIS WARRANTY DOES NOT COVER
This WARRANTY does not cover the following:
Costs of return shipments to Caution Kites
Damage caused by alterations, modification or changes not authorized or approved by Caution Kites in writing, or
due to service and/or repairs done by anyone other than Caution Kites or a Caution Kites authorized repair facility,
or due to accident, abuse, misuse or improper use, neglect, or failure to perform normal maintenance in accordance with the instructions set out below or in the user’s manual, available at www.cautionkites.com.
Damage Caused by extended or excessive exposure to sunlight (or ultraviolet radiation), improper handling or
storage, or failure to follow instructions in the user manual
Damage caused by anything otther than defects in materials or workmanship.
This Product when being used commercial, rental, teaching or instructional programs or activities or in competition
of any kind.
This product when being classified as second-hand.
Consequential and incidental damages or expense, including damages to property or for personal injury.
Damage caused by anny use of this Product as a toy.
Damage ccaused by the use of this product in waves or shore break.
Damage caused by the over-inflation of the bladders.
Normal wear and tear, including scratches, punctiures, riggin with components other than Caution components.
LIMITATIONS ON IMPLIED WARRANTIES
All warranties implied by State Law, including the implied warranties of merchantability and fitness for a particular
purpose, are hereby limited to the duration of this warranty. Some States do not allow limitations on how long an
implied warranty lasts, so the foregoing limitation may not apply to you. with the exception of any warranties implied
by state law (as hereby limited), this Warranty is exclusive and in lieu of all other warranties, guarantees, representations, agreements and similar obligations of manufacturer or reseller. This Warranty gives you specific legal rights,
which vary from state to state.
HOW TO MAKE A WARRANTY CLAIM
Caution kites will make the final and conclusive determination in relation to each claim uner this Warranty on a caseby-case basis, which may require inspection and/or photos of this Product which clearly show the defect(s), if any.
This information must be sent to the Caution Distributor of this Product in your country, postage prepaid (or viw your
local authorized Caution Kites Dealer). This Product can be returned only if the Caution Kites Distributor, in advance
of returning this Product, gives a return authorizaation number (RA). The RA number must be clearly labeled on the
outside of the package, failing to prop of the pourchase price of this product only (which alternative and/or the appropriate amount, if any , shall be decided by Caution Kites at its sole and absolute discretion.) CautionKites will not be
responsible for any costs, losses, or damages incurred as a result of loss of use of this Product.
THE ORIGINIAL PURCHASE RECEIPT MUST ACCOMPANY ALL WARRANTY CLAIMS. THE NAME OF THE
RETAILER AND THE DATE OF PURCHASE MUST BE CLEAR AND LEGIBLE ON SUCH RECEIPT.
WARRANTY INFORMATION CONTINUES ON NEXT PAGE
WARRANTY INFORMATION
HOW TO KEEP THIS WARRANTY IN EFFECT
The Warranty is voided if any unauthorized repair, change, alteration or modification has been made to any part of this
product. THe warranty for any repair or replacement product (as the case may be)
is good from the date of the original purchase only. There are no warranties, implied or otherwise, which extend
beyond the warranty specified herein.
WARNING
IT IS THE USER’S RESPONSIBILITY TO CAREFULLY READ THE ATTACHED USER’S GUID AND INSTRUCT ALL
USERS ON THE PROPER USAGE AND MAINTENANCE OF THIS PRODUCT
ADDITIONAL RIGHTS
This Warranty does not affect, and is in addtion to any statutory rights that you may have under or by virtue of any
applicable law.
HOW TO OBTAIN WARRANTY SERVICES
To obtain warranty service for this Product, or if you have any questions about any product of Caution Kites or their
respective user’s instructions, please visit www.cautionkites.com. or [email protected], or contact your local
Caution Kites Distributor.
THANK YOU FOR CHOOSING CAUTION !