1
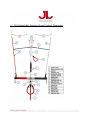
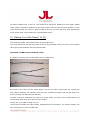
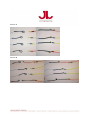
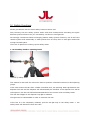
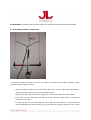
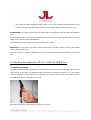
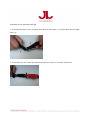
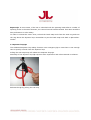
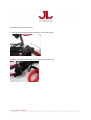
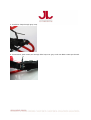
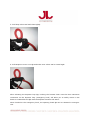
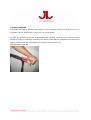
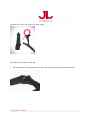
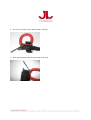
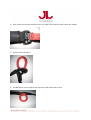
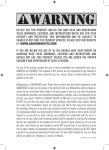
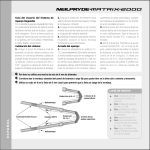
User manual
Semi Freddo Snow kite [Ram Air]
This manual gives you detailed instructions on how to use your new Semi Freddo kite. We
recommend you take your time to read the instructions. In case you have any further questions, please do not hesitate to contact us – we would be happy to provide more information.
The JN team
[email protected]
1.) JN Control Bar System Snow Product Overview
On Semi Freddo kites 9 and 12, the wizard line should be attached to the upper wizard
loops, while it should be attached to the lower loops nearer the bar on Semi Freddo 6. If the
lower wizard loops are used on Semi Freddo 9 and 12, the kite will drop with significantly
more power than it would with the recommended setup.
2.) Making Your Kite Ready To Fly
The JN Semi Freddo comes with factory preset bridle lines.
Your new CBS Snow will also be preset to the correct settings, so all you have to do is attach
the 4 flying lines between the kite and the CBS.
Assembly of CBS Snow and safety check
1. Attach all 4 flying lines to the leader lines on CBS Snow.
2. Check if all 4 lines are the same length, as this is a basic requirement for neutral kite
trim. When checking, the adjuster must be open (maximum length) and the bar fully powered (touching the depower loop handle).
In order to do this, thread all line ends on a string, which you then tie to a static object. Pull
the bar and check if all lines are the same length.
If they are, your CBS is ready for use.
If the lines are NOT the same length, adjustments are necessary. For further details, see
Fine Trimming Your Semi Freddo Kite
3. Attach all 4 flying lines to the kite.
Attach flying lines to the kite lines according to colour code.
Some Semi Freddo kites come as shown in picture A, while some come as in picture B.
The slight difference does not affect kite performance.
Picture A
Picture B
3.) Fine Trimming Your Semi Freddo Kite
If you are an experienced rider, you might try the following modifications to fine trim your
Semi Freddo in order to suit your personal style. Get help from a professional if necessary!
Reduce control line length => increase V leader line length
Option 1: Shorten the control lines by moving the knot at the end of the control leader
lines at the bar horn.
Option 2: Fix the control leader lines with a knot instead of threading them in as shown
above.
Reduce V leader line length => increase control line length
Fix the flying lines to the V leader lines with a knot instead of threading them in as
shown above.
4.) Adjusting Your Kite During Sessions
When all 4 flying lines are the same length we recommend the following CBS setups for the
4 wind situations described:
Situation 1:
Wind is strong enough for the kite to fly without effort
Adjuster is fully open (maximum length), bar touches the stopper ball at the upper
end of the depower line
Kite should have ideal aspect ratio (neutral position): it should develop optimal pull
and show no tendency to fall backwards in sufficiently strong wind
In this neutral position, there should only be light tension on the front lines. The kite
will react immediately to bar movements. It is very important riders find this basic
setup through fine trimming, as this gives them maximum kite performance and
power.
Situation 2:
Wind picks up strength and kite pull becomes too strong
Shorten depower adjuster when wind strength increases.
This will decrease the kite’s aspect ratio and, consequently, its pull. By pulling too
hard at the adjuster loop, the kite will loose too much pull and will be more difficult to
control for lack of tension on the control lines.
Situation 3:
Pull is too strong even if the kite is fully depowered (with adjuster at minimum
length)
Switch to a smaller kite size!
Situation 4:
Wind strength is at lowest point, kite barely flies
See situation 1. Also try pulling the bar further down in order to power up the kite
and increase tension on the front lines.
With the bar too far down, the kite will fall backwards.
Changing the neutral power position
The neutral power position can be changed by moving the adjuster. As described in situation
1, ‘neutral position’ means the adjuster is fully open and the bar is at its highest point.
Example: decreasing adjuster length by 5 cm means the bar’s neutral power position is now
5 cm below the upper stop.
Expert tips for perfect kite control during sessions
Tip 1:
If your kite tips bend slightly inward when making drastic control moves with a fully depowered kite on a wind window edge, there are two options to choose from:
1. slightly pull the bar towards your body or
2. slightly increase ClamCleat adjuster length.
Either one of these two options will keep the kite from the wind window edge and filled.
Tip 2:
Constantly trying to find the optimal aspect ratio by moving the bar up or down or slightly
moving the adjuster gives your Semi Freddo maximum pull during sessions.
If you feel the kite is flying fast but not developing sufficient pull, its aspect ratio might be
too flat => pull the bar down slightly or move the adjuster.
If you feel the kite is developing medium pull but heavily drifting leeward, you should try
flattening its aspect ratio => push the bar up or decrease adjuster length.
With a bit of exercise you will quickly develop a good sense for best pull and ideal fine trim.
5.) Safety Functions
Please get familiar with the kite’s safety functions before use!
Only knowing how the safety system works and what consequences activating the Quick
Release system will have can you successfully use them in emergencies.
We strongly recommend riders thoroughly practice safety system functions, use of the kite’s
release system and reassembly of said systems first on land, then in safe light winds with
enough leeward space.
There are 2 options for hooking up the safety leash:
1. Hook safety leash to spinning leash
Hooked-up safety leash
This method is also safe for riders who want to practice unhooked manoeuvres and spinning
jumps.
If the rider looses the bar after a failed unhooked trick, the spinning leash QR between the
depower line end and the adjuster will automatically be released the depower line will be
interrupted the kite will fall backwards attached to the control lines and safety leash.
This will also happen if the depower loop QR is released.
The QR must be reassembled in order to relaunch the kite.
If the kite is to be completely released, pull the red QR loop on the safety leash -> the
safety leash will disconnect from the rider.
ATTENTION: In strong winds, the kite might kite be blown away and injure bystanders!
2. Hook safety leash to wizard line
A convenient option for riders who do not need to unhook the bar after spinning jumps
(ideal for tours in open country).
Unhook depower loop from harness hook and let go of bar the kite will fall backwards attached to the control lines and safety leash.
Opening the spinning leash QR by pulling the red loop will have the same effect.
If the kite is to be relaunched, get hold of the bar (keep in mind there is a left and a
right side of the bar).
In order for the kite not to develop too much pull, we recommend you only take hold
of the ClamCleat and let the kite fly up to the zenith by putting tension on the centre
lines. Once the kite is parked at the zenith, let go of the ClamCleat and control it with
the bar (the spinning leash QR has to be reassembled before relaunching the kite).
ATTENTION: In strong winds, the kite might fall backwards but still develop considerable
pull.
In emergencies, we recommend completely disconnecting the kite from the rider, except if
there is any risk of injuring bystanders.
Land the kite in time if wind strength increases too quickly!
Expert tip: If you prefer the safety leash to be longer, just add a piece of strong line at the
safety leash’s lower end.
The safety leash is longer if attached to the front harness hook than to the back of the harness.
6. Handling And Assemby Of The 3 QRs On CBS Snow
1. Spinning Leash QR
This QR is automatically released if the safety leash is attached to the spinning leash and the
rider lets go of the bar. The spinning leash can also be manually released (e.g. if the safety
leash is attached to the wizard line) by pulling the red loop. If this loop is too small for you,
an additional, larger loop can be tied to it.
Release the spinning leash QR by pulling the red loop
Assembly of the spinning leash QR
1. Pull back Neoprene cover and push blue loop of lower part (1) through blue loop of upper
part (2).
2. Push cotter pin into cotter pin sheath through blue loop. Fix red loop with Velcro.
3. Push Neoprene cover up to red loop over connecting piece.
4. Fully assembled spinning leash QR
Expert tip: In most cases, if the bar is unhooked with the spinning leash after a number of
spinning tricks in the same direction, the centre lines will still be twisted. This does not affect
kite perfomance or rider safety.
In order to untwist the centre lines, unhook the leash snap hook from the steel ring and turn
the ring above the depower loop. Remember to put the leash snap hook back in place afterwards!
2. Depower loop QR
The additional depower loop safety function is an emergency QR in case there is not enough
time to quickly unhook from the depower loop.
Pulling the red strap loop will release the depower loop QR.
Assembly of the depower loop QR requires some experience and is best trained in advance.
Release the QR by pulling the red loop
Assembly of the depower loop
1. Pull open loop end through Neoprene cover from inside.
2. Widen grey loop with cotter pin, then remove cotter pin.
3. Push blue loop through grey loop.
4. From below, push cotter pin through blue loop over grey cord into black cotter pin sheath.
5. Fold loop Velcro seal and close tightly.
6. Pull Neoprene cover over QR and make sure Velcro seal is closed tight.
After releasing the depower loop QR, hooking the harness hook onto the blue transverse
connection on the depower loop (emergency hook) will allow you to safely return to the
beach to reassemble the QR with the depower function still active.
When hooked to the emergency hook, the spinning leash QR can be released in emergencies.
3. Safety Leash QR
The safety leash QR as a second step allows you to completely disconnect from the kite, e.g.
if a drifting kite is tangled up in yours and you loose control.
As with the depower loop QR, reassembling this QR also requires some experience and
should be trained in advance. Releasing the safety leash QR will completely disconnect the
rider from their kite and is a measure for extreme emergencies only.
Release safety leash QR
Harness part (left) and snap hook part (right)
Assembly of the Safety Leash QR:
1. Pull harness part through Neoprene tube with cotter pin sheath and seam facing up.
2. Fix Velcro to large Velcro patch under red loop.
3. Push harness part loop through snap hook loop.
4. Push cotter pin through harness loop over snap hook loop into black cotter pin sheath.
5. Tighten and seal Velcro.
6. Pull Neoprene cover towards red loop from both sides and fix well.
7.) Basics
ATTENTION: These directions can not be regarded as substitute for a kiteboarding course!
Theoretical and practical knowledge of kiteboarding required!
CBS and flying lines are already attached to the kite as described in Par. 2
Preparations
Unroll flying lines from the bar
Unroll lines downwind from the bar
Unroll kite at line ends with air inlets pointing leeward
Weigh down rear edge of kite with sand, snow or sand bags
Check if all bridle lines and steering system (yellow line with pulley) are free
Starting the Kite
Flying lines pointing upwind from the kite
Kite lying on back, air inlets pointing upward
Hook depower loop to harness hook and attach safety leash
Push bar towards kite [into neutral position]
In strong winds, put adjuster to minimum length for increased safety
Take ClamCleat and pull until kite rises to zenith [ATTENTION: Do not touch QR as
you might release it by accident]
Bring kite into safe neutral position through optimal depower settings [see Adjusting
Your Kite During Sessions].
Landing the Kite
Safest method: Let a partner catch the kite at the edge of the wind window and bring
it safely to the ground
If your safety leash is hooked to the wizard line, you can unhook the depower loop
from the harness hook and let go of the bar
If your safety leash is attached to the spinning leash pull hard at the wizard line
Kite will slowly fall backwards attached to the control lines
ATTENTION: Kite pull depends on wind strength
Further landing methods involve releasing the QR safety systems
Relaunch
If the kite is lying with its air inlets facing down, we recommend the folllowing steps:
Grab wizard line and pull as far as necessary
Kite will slowly rise backwards for 1–2 m and then make a 180° turn in the air. This
operation might need assistance, such as pulling a control line or moving the bar
Let the kite rise to the zenith by pulling the adjuster (NOT the QR!) as described
above
ATTENTION: Small kites will rise faster and turn around more quickly than larger
ones
Performing Jumps With the Kite
This kite’s jumping technique is similar to that of a tube kite – pull the bar towards
your body when taking off
ATTENTION: You have to take off at higher speed than with a tube kite!
Stowing Your Kite Away
Lay kite on its back
Arrange flying lines so they lead away from the kite over its trailing edge
Roll lines onto bar, leaving the last 5 m. Secure against slipping off.
Fold kite once, tip to tip
All bridle lines should be covered by the folded kite, with only the flying lines extending out from the trailing edge
Loosely roll up kite from tips to centre
Roll rest of flying lines onto bar, leaving the last 50 cm, and secure
Lay bar on kite horizontally and wrap kite around bar
Secure with Velcro straps supplied with the kite
Unroll kite at home and leave to dry
8. Safety Instructions
Ideal conditions for your first Semi Freddo sessions:
A large, free area with stable wind conditions, ideally with wind speeds around 7 –10 knots
(= 13-18 km/h = 3.6-5.1 m/s).
High trees upwind of you create turbulences and make for gusty winds with changing directions. Please keep a distance of several hundred metres.
Keep approximately the same distance downwind – every single obstacle is potentially dangerous as the kite might get tangled up or drag you against it!
Check your kite before every start
Check the entire system of your JN Semi Freddo for possible defects before each start.
Safety systems must work properly. If they are not replaced or repaired, damaged lines or
canopies may lead to consequential damage or material faults in dangerous situations.
Study the safety system functions in depth before your first session and practice the necessary moves in order to be prepared for emergency situations.
Avoid at all costs
- starting a faulty or damaged kite
- flying your kite near power lines, railway lines, motorways, cable cars
- steep slopes, as you might crash or get caught by uncontrollable wind currents
- do not use your kite as a weapon or flying device
- gusty winds with frequently changing direction make your first sessions more difficult and
constitute significant danger.