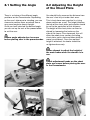
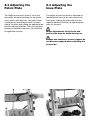
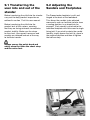
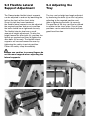
1
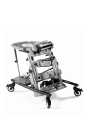
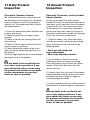
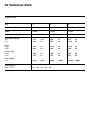
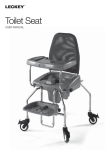
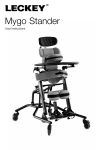
Pronestander
USER MANUAL
The Leckey Pronestander has been
designed to promote weight bearing and
mid line symmetry. This manual shows you
how you can quickly and easily make use
of all the functions. The instructions on the
safety and maintenance of the product will
ensure that you will enjoy the use of this
product for a long time.
Contents
01. Intended use
02. Declaration of conformity
03. Terms of warranty
04. Product history record
05. Product training record
06. Safety information
07. How to unpack and assemble
08. Clinical setup for postural management
09. Frequent adjustments for daily use
10. Cleaning & care information
11. Daily product inspection
12. Annual product inspection
13. Reissuing Leckey products
14. Product servicing
15. Technical information
1 Intended Use
The Leckey Pronestander has been
designed for use at home or school.
The range of prone angles available allow
the gradual increases of weight bearing
as tolerance increases. The Leckey
Pronestander is intended for children with
disabilities such as cerebral palsy from the
ages 1-17 years. Standing can help the
normal development of the hips, it will help
promote muscle formation, and can help
provide psychological well being.
2 Declaration of Conformity
James Leckey Design Ltd. as
manufacturer with sole responsibility
declares that the Leckey Freestander
conforms to the requirements of the 93/42/
EEC Guidelines and EN12182 Technical aids
for disabled persons. General requirements
and test methods.
3 Terms of Warranty
The warranty applies only when the
product is used according to the
specified conditions and for the intended
purposes, following all manufacturers’
recommendations (also see general terms
of sales, delivery and payment). A two
year warranty is provided on all Leckey
manufactured products and components.
4 Product History Record
Your Leckey product is classified as a Class
1 Medical device and as such should only
be prescribed, set up or reissued for use
by a technically competent person who
has been trained in the use of this product.
Leckey recommend that a written record is
maintained to provide details of all setups,
reissue inspections and annual inspections
of this product.
5 Product Training Record (Parents,
Teachers & Carers)
Your Leckey product is a prescribed
Class 1 Medical Device and as such Leckey
recommend that parents, teachers and
carers using the equipment should be made
aware of the following sections of this user
manual by a technically competent person:
Section 6 Safety Information
Section 9
Frequent Adjustments for Daily use
Section 11
Daily Product Inspection
Leckey recommend that a written record
is maintained of all those who have been
trained in the correct use of this product.
6 Safety information
6.1 Always read instructions fully
before use.
6.2 To improve safety we recomend that
users should not be left unattended
at any time whilst using Leckey
equipment.
6.3 Only use Leckey approved
components with your product.
Never modify the product in any way.
Failure to follow instructions may
put the user or carer at risk and will
invalidate the warranty on the product.
6.4 If in any doubt to the continued
safe use of your product or if any parts
should fail, please cease using the
product and contact our customer
services department or local dealer
as soon as possible.
6.5 We would recommend that users
are never transferred straight from
seating to standing without preparation
and stretching. This is best done whilst
lying on a mat but can be carried out
in a wheelchair or seating system if
required.
6.6 Carry out all positional adjustments
and ensure that they are securely
fastened before you put the user into
this product.
6.7 When placing the user into a
standing frame, for safety reasons,
always secure the pelvic band first. The
chest and knee straps should then be
fastened.
6.8 When the product is stationary
ensure that all castors are locked and
facing away from the base as this will
improve product stability.
6.9 Never adjust either the angle of the
Pronestander or overall height of the
chestplate while the frame is in use.
Other finer positional adjustments may
be carried out safely when the user is
in the frame.
6.10Never leave the product on a
sloping surface, greater than 5 degrees.
Always remember to lock all the
castors.
6.11 The product contains components
which could present a choking hazard
to small children. Always check that
locking knobs and bolts within the
child’s reach are tightened and secure
at all times.
6.12 Leckey products comply with
fire safety regulations in accordance
with EN12182. However the product
contains plastic components and
therefore should be kept away from all
direct sources of heat including naked
flames, cigarettes, electric and gas
heaters.
6.13 Do not place hot items on the tray
greater than 40 degrees.
6.14 Clean the product regularly. Do
not use abrasive cleaners. Carry out
maintenance checks on a regular
basis to ensure your product is in good
working condition.
6.15 The product is designed for
indoor use and when not in use should
be stored in a dry place that is not
subjected to extremes of temperature.
6.16 The safe operating temperature
range of the product is +5 to +40 deg
Celsius.
How to
unpack and
assemble
7
Check Parts
Congratulations on purchasing your Leckey
Pronestander. When you receive your
Pronestander it will be boxed and packed
flat. The tray will be in a separate parcel.
The pronestander will come as standard
with chest plate including flexible laterals,
knee plate, pelvic plate including belt,
hinged foot plate, sandals and activity
tray including bowl.
Safety first
Keep polythene bags away from
children
Ensure angle adjuster bar is secure
before placing the user in the
pronestander.
Assembling the Pronestander
To assemble the Pronestander, two people
should firstly lift the Pronestander out of its
box or alternatively remove the packaging
and wheel the Pronestander out on its
castors. The castors should then be locked
into position, facing out of the frame
at 45 degrees.
7.1 Setting the Angle
7.2 Attaching the
Tray
In order to fix the Pronestander at the
desired angle, you should firstly hold the
chest plate and gently swing the main frame
of the stander upright. Then loosen
the three bolts (a) as shown and the angle
adjuster bar (b) can then be positioned to
the desired angle. The plate should then be
placed back into position and the three bolts
(a) re-attached and tightened securely.
The Pronestander tray is attached by sliding
the outer poles already attached to the tray
over the inner poles already attached to the
frame and then tightening the bolts (a).
The tray is then secured with a tray pin into
one of the slots (b) on the side of the frame.
Never attempt to adjust the angle of the
pronestander when the frame is in use.
a
a
a
a
a
b
b
Clinical setup
for postural
management
The clinical setup of the product should be
completed by a technically and clinically
competent person who has been trained in
the use of the product. Leckey recommend
a written record is maintained of all clinical
setups for this product.
8
8.1 Setting the Angle
8.2 Adjusting the Height
of the Chest Plate
There is a choice of five different angle
positions on the Pronestander. Depending
on the user’s tolerance to standing, you can
choose to position them anywhere from a
very prone angle to almost upright.
Once you have selected the desired angle,
you can set up the rest of the pronestander
to suit the user.
You should firstly measure the distance from
the user’s feet to just under their arms.
This is best done were practical in a lying
down position on a mat. The height between
the top of the chest plate and sandals should
be set to the equivalent of this distance.
The height of the chest plate can then be
altered by loosening the knobs on the
side of the frame. Once loosened, this will
allow the whole inner section (including
chest plate, pelvic plate and knee plate) to
move up and down. Once the required
height is obtained, the knobs should be
re-tightened securely.
Ensure angle adjuster bar is secure
before placing user in the pronestander.
Never attempt to adjust the height of
the main frame when the stander is in
use.
Check adjustment knobs on the chest
plate are secure before placing the user
in the Pronestander.
a
a
b
a
8.3 Adjusting the
Pelvic Plate
8.4 Adjusting the
knee Plate
The height of the pelvic plate is set to the
equivalent distance between the top of the
user’s pelvis and their feet. The pelvic plate
is adjusted by loosening the bolt, on each
side of the plate and sliding the padded plate
into the required position. Once the required
position is obtained, the bolts, (a) should be
re-tightened securely.
The height of the knee plate is adjusted by
loosening the bolts (a) on each side of the
knee plate, sliding the knee plate into the
required position and then re-tightening the
bolts (a) securely.
Minor adjustments to the knee and
pelvic plate may be made during use.
Always use caution to ensure fingers do
not become trapped when adjusting the
knee plate.
a
a
8.5 Adjusting the
knee cups
8.6 Attaching the
Pelvic Band
The knee cups can be moved from left to
right and each knee cup is fixed by a single
bolt at the back of the knee plate. To adjust
the knee cup loosen the bolt, position the
knee cup as required, then re-tighten the
bolt (a) securely.
The pelvic band should be attached to the
user first, again if practical on a mat.
The pelvic straps are attached around the
user’s pelvis and the longer straps are
slipped through the D-Rings on the pelvic
plate and secured firmly behind the user with
Velcro on the belt. To ensure that you can
easily identify the strap that goes around the
user and the one that attaches to the frame,
a Leckey label is sewn on to the one that
goes around the frame.
Always use caution to ensure fingers
do not become trapped when adjusting
the knee cups.
Always secure the pelvic band and
safety strap first then the chest strap
and the users feet.
Frequent
adjustments
for daily use
Parents and carers should be shown how
to make frequent adjustments and made
aware of the safety checks in section 6 by a
technically and clinically competent person
who has been trained in the use of the
product. Leckey recommend that a written
record is maintained of all parent and
carers who have been trained in the use
of this product.
9
9.1 Transferring the
user into and out of the
stander
9.2 Adjusting the
Sandals and Footplates
Before transferring the child into the stander
carry out the daily product inspection as
outlined in section 11 of this user manual.
The Pronestander footplate is split and
hinged at the back of the footboard.
This allows the sandals to be adjusted
more easily and can facilitate transfer from
a seating position, to a wheelchair for
example. Each sandal is attached to the
individual footplate with Velcro and a single
fixing bolt. If you wish to rotate the sandal
laterally, simply loosen the bolt (a), place in
the required position and then re-tighten
the bolt securely.
Before transferring the child into the
product lock all the castors, ensuring
that they are facing outwards to maximise
product stability. Make sure the straps
on the chest, hip support harnesses and
sandals are released and out of the way
to facilitate transfer.
Always secure the pelvic band and
safety strap first then the chest strap
and the users feet.
9.3 Flexible Lateral
Support Adjustment
9.4 Adjusting the
Tray
The Pronestander flexible lateral supports
can be adjusted in and out by loosening the
bolt on the back of the chest plate.
Once this bolt has been loosened,
the flexible lateral supports can be adjusted
the required position and once in position
the bolts should be re-tightened securely.
The flexible laterals also have a small
amount of height adjustment. To alter the
height loosen the allen bolts (b), position the
laterals as required and then re-tighten the
allen bolts (b) securely. The flexible lateral
supports are secured around the user by
tightening the safety strap into position.
Fasten the safety strap immediately.
The tray can be height and angle adjusted
by loosening the bolts (a) on the tray poles,
adjusting to the required position and
then re-tightening the bolts (a) securely.
The position of the tray can also be altered
in relation to the chest plate. One of three
positions can be selected to help facilitate
good hand function.
Always use caution to ensure fingers do
not become trapped when adjusting the
lateral supports.
b
9.5 Attaching the Pelvic
Band
The pelvic band should be attached to the
user first, again if practical on a mat.
The pelvic straps are attached around the
user’s pelvis the longer straps are slipped
through the D-Rings on the pelvic plate and
secured firmly behind the user with Velcro
on the belt. To ensure that you can easily
identify the strap that goes around the user
and the
one that attaches to the frame, a Leckey
label is sewn on to the one that goes
around the frame.
Always secure the pelvic band and
safety strap first then the chest strap
and the users feet.
10 Cleaning & Care
Information
How to Maintain
When cleaning the product we
recommend that you use only warm water
and a non-abrasive detergent. Never use
organic solvents or dry cleaning fluids.
Upholstery and fabrics
1. The upholstery and fabrics can be cleaned
by hand whilst in place. When cleaning we
recommend that you use only warm water
and a nonabrasive detergent.
Metal and plastic and wooden
components
1. Soap and water or antibacterial spray can
be used for daily cleaning.
2. For deep cleaning a low pressure steam
cleaner can be used.
3. Do not use solvents to clean plastic
wooden or metal components.
4. Make sure the product is dry before use.
2. Staining should be removed as quickly
as possible with absorbent cloth,
towels or a sponge. Routine soap and
warm water sponging is effective for
ordinary soiling and minor spills. Be careful
not to over wet the fabric, as this will cause
the staining to spread.
3. Antiseptic cleaning agents can be used
on more stubborn stains. These may require
a safe solvent such as Isopropyl Alcohol
or Mineral Spirit. A half cup of household
bleach to 5 litres of water can also be used
as a useful disinfectant.
4. Always ensure the product is dry
before use.
5. Check all wooden components regularly
to ensure there are no cracks or splitters.
11 Daily Product
Inspection
12 Annual Product
Inspection
(Therapists, Parents & Carers)
We recommend that daily visual checks of
the equipment are carried out by therapists,
carers or parents to ensure the product is
safe for use. The recommend daily checks
are detailed below.
(Therapist, Technician, Leckey Product
Advisor, Dealer)
Leckey recommend that each product
should be subject to a detailed inspection at
least once a year and every time the product
is reissued for use. This inspection should
be carried out by a technically competent
person who has been trained in the use of
the product and should include the following
checks as a minimum requirement.
1. Ensure all adjustment knobs and bolts are
in place and secure.
2. Check all upholstery for signs of wear
and tear.
3. Check all castors are moving freely and
lock securely.
4. Check all Velcro strips and brush fluff to
ensure straps secure firmly.
5. Check adjustment knobs on the chest
plate are secure before placing the user in
the product.
6. Ensure angle adjuster bar is secure before
placing the user in the product.
If in any doubt to the continued safe
use of your Leckey product or if any
parts should fail, please cease using
the product and contact our customer
services department or your local
dealer as soon as possible.
1. Check all knobs, nuts, bolts and plastic
buckles are in place, replacing any missing
items. Paying particular attention to the
following items;
- Chest and hip height and
angle adjustments
- Knee cups adjustment knobs
2. Lift the base to check each castor
individually. Make sure they are moving
freely and remove any dirt from the rubber
wheels. Check that the brakes lock the
wheels securely.
3. Visually check the structure of the product
paying attention to weld points on the frame
ensuring there are no signs of fatigue or
cracking around the welds.
4. Leckey recommend that a written record is
maintained of all annual product inspections.
If in any doubt to the continued safe
use of your Leckey product or if any
parts should fail, please cease using
the product and contact our customer
services department or your local
dealer as soon as possible.
13 Re-issuing Leckey
Products
14 Product Servicing
Most Leckey products are assessed and
ordered to meet the needs of an individual
user. Before reissuing a product we
recommend that the therapist prescribing
the product has carried out an equipment
compatibility check for the new user and
has ensured that the product being
re-issued contains no modifications or
special attachments.
Servicing of all Leckey products should
only be carried out by technically competent
persons who have been trained in the use of
the product.
A detailed technical inspection should be
carried on the product prior to re-issuing.
This should be carried out by a technically
competent person who has been trained in
the use and inspection of the product.
Please refer to section 12 for the required
checks to be carried out.
Ensure the product has been cleaned
thoroughly in accordance with section
11 of this manual.
Ensure a copy of the user manual is
supplied with the product. A copy can
be downloaded from our website
www.leckey.com.
Leckey recommend that a written record is
maintained of all product inspections carried
out during the reissue of the product.
If in any doubt to the continued safe
use of your Leckey product or if any
parts should fail, please cease using
the product and contact our customer
service department or your local dealer
as soon as possible.
In the UK & ROI please contact the Leckey
Service Centre on UK 0800 318265 or ROI
1800 626020 and our customer service
department will be delighted to assist you
with your servicing requirements.
All international service enquiries should be
directed to the appropriate Leckey distributor
who will be delighted to assist you.
For further information on Leckey distributors
please visit our website www.leckey.com.
15 Technical Information
Product Codes
LPS/#/Pronestander
ACCESSORY CODES
LPS/#/G
LPS/#/H
Grab/suspension Rail
Grab Posts
# Please select a size
The Freestander comes in 2 fabrics. Size 1
comes as standard in Meadow fabric and
size 2 and 3 in Mondeo blue fabric.
Head Support Options are available with this
product please contact the Leckey Service
Centre or local dealer for further information.
15 Technical Data
Product sizing
Size
1
2
3
Age
1-5
4 - 9 1/2
9 - 17
Codes
LPS/1
LPS/2
LPS/3
mm
inches
mm
inches
mm
inches
Chest Plate Height
min
max
470
680
18.5
27
680
975
27
38
975
1350
38
53
Base
lenght
width
820
600
32
24
1070
650
42
26
1270
700
50
28
Activity Tray
depth
width
400
525
16
21
450
575
18
23
500
625
20
25
User Weigth
max
30kg
66lbs
60kg
132lbs
100kg
220lbs
Prone Angles
from vertical
0º
20º
10º
30º
40º
Leckey
19 Ballinderry Road
Lisburn
BT28 2SA
Northern Ireland
United Kingdom
T: 028 9260 0750
E:[email protected]
W:www.leckey.com
24 hour postural
care for babies,
kids & adults.
Sleeping, Sitting,
Standing, Walking,
Moving, Bathing,
Toileting.
LS164-04