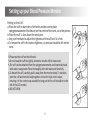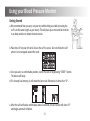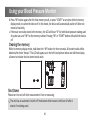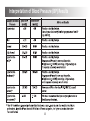
1
By Paul Aylett at 12:40 pm, Aug 10, 2011
Wrist Type Blood Pressure Monitor
User Manual
BPM2 Series
CONTENT
Introduction
2
Parts
3
Setting up your Blood Pressure Monitor
4-5
Using your Blood Pressure Monitor
6-10
Additional Information on Blood Pressure
11
Specification
12
Interpretation of Blood Pressure (BP) Results
13
Troubleshooting
14-15
Maintenance
16
Blood Pressure Record Table
17
Explanation of Symbols on Unit
18
Introduction
Thank you for purchasing and using the Kinetik Medical Wrist Type Blood Pressure Monitor.
This monitor is an easy to use and accurate way to measure your blood pressure. Before you
start, it is important that you read this instruction manual.
Blood pressure testing is easy. To get the most out of this product, please follow the
recommendations that follow.
We hope you will be satisfied with your Wrist Type Blood Pressure Monitor. If you have
any questions, please contact your local pharmacist or healthcare professional.
2
Parts
Memory
Systolic
LCD
Diastolic
Pulse
Start
inflate to measure
pulse detected (appears during testing)
deflate to measure (deflate air in cuff)
low battery
Wrist Cuff
3
Setting up your Blood Pressure Monitor
Loading Batteries
a. Open battery cover at the back of the device (cover slides off).
b. Insert two "AAA" batteries, observing correct polarity.
c. Close the battery door.
Non-rechargeable batteries are not to be recharged.
Always remove exhausted batteries from the monitor.
The supply terminals are not to be short circuited.
Do not mix old and new batteries or different types of batteries. Do not use
rechargeable batteries. Only batteries of the same or equivalent type as
recommended are to be used. Batteries must be handled with care under adult
supervision. If batteries leak and come into contact with skin or eyes, wash
immediately with copious amounts of water.
Replacing Batteries
When the LCD screen displays 'low battery'
, new batteries must be
inserted immediately to ensure accurate results.
Rechargeable batteries with a voltage of 1.2V are not suitable for this product.
Please dispose of batteries according to battery manufacturer's instructions.
4
Setting up your Blood Pressure Monitor
Putting on the Cuff :
a. Place the cuff on bare skin of left wrist and be sure to place
sphygmomanometer (the device) on the centre of the wrist, as in the picture.
b. Place the cuff 1~2cm above the wrist joint.
c. Use your free hand to adjust the tightness of the cuff until it is firm.
d. To ensure the cuff is the correct tightness, no tension should be felt on the
wrist.
Please put the cuff on the left wrist.
Do not wrap the cuff too tightly, otherwise results will be inaccurate.
The cuff can be detached from the sphygmomanometer and cleaned by hand
with warm, soapy water. Rinse thoroughly with cold water and towel dry.
To detach the cuff, carefully pull it away from the monitor body. To reattach,
push the cuff and monitor body together so that the clips lock in place,
ensuring it is the correct way around (the long part of the cuff should be to the
left of the LCD screen).
DO NOT IRON.
5
Using your Blood Pressure Monitor
Getting Started
a. We recommend that you carry out your test whilst sitting at a table (ensuring the
cuff is at the same height as your heart). This will place your wrist and the monitor
in an ideal position to obtain the best results.
b. Place the cuff on your left wrist. Ensure the cuff is secure. Do not inflate the cuff
when it is not wrapped around the wrist.
c. Once you are in a comfortable position, switch the unit on by pressing “START” button.
The device will beep.
d. If it already has memory, it will show the last result. Otherwise it shows four “0”.
e. After the self-verification which takes about 2 seconds, the LCD screen will show “0”
and begin automatic inflation.
6
Using your Blood Pressure Monitor
There are 4 pre-programmed pressurisation values which are set at 187mmHg, 225mmHg, 263mmHg
and 300mmHg.
When automatic inflation begins, the unit will inflate to 187mmHg. If a pulse is not detected, the unit
will continue to inflate automatically to the next pressurisation level. This will continue to a maximum
level of 300mmHg.
If you feel any discomfort or pain during this time, turn the unit off and remove the cuff
immediately. Consult your local pharmacist or healthcare professional for advice.
Once automatic inflation begins, you can choose to inflate the cuff to the next pressurisation level by
pressing the “start” button just before the cuff reaches the pre-set pressurisation level.
Measuring Process
a. Once the cuff has automatically inflated, the LCD screen will display “
gradually reduced and the monitor takes an automatic measurement.
” whilst the pressure is
b. The monitor will beep when the automatic measurement has finished.
If there is an error or abnormal reading, please refer to the “ Troubleshooting ” section.
7
Using your Blood Pressure Monitor
What the results mean
a. The LCD screen will automatically display the systolic and diastolic pressure
reading in mmHg and the pulse rate in pulse/min after each measurement.
b. Record date, time, systolic reading, diastolic reading and pulse rate on your record card
which you will find in the pack (including anything that may have influenced
your blood pressure reading, e.g. stress or anxiety). This will help you monitor
trends. Please take this record card with you on your visits to your doctor,
pharmacist or healthcare professional.
Measurements should ideally be taken at the same time, under the same conditions and in the same
position each time.
Please be aware that blood pressure can fluctuate since it responds to minute changes in the body. It is unusual for it to
continuously remain at the same value, hence it is recommended that the blood pressure be determined based on an
average of multiple measurements. If you experience a higher than normal reading, do not panic as this can happen.
Relax and take a break for at least 10 minutes before measuring your blood pressure again. Low blood pressure
(Hypotension) and high blood pressure (Hypertension) can only be diagnosed by a qualified healthcare professional,
such as a doctor or pharmacist. If you have any concerns or questions, please contact your pharmacist or healthcare
professional.
To get an accurate value:
Measure one hour after eating and avoid measuring immediately after bathing.
Measure at least one hour after smoking or drinking alcohol/coffee.
Relax for 10-20 minutes before taking a measurement and remain relaxed whilst measuring.
Do not move or talk during measurement, as this will affect the accuracy.
Do not use this monitor if you suffer from atrial or ventricular premature beats or atrial fibrillation.
8
Using your Blood Pressure Monitor
Re-measuring
If you want to measure again, just press the
button.
Leave at least three minutes between measurements to allow blood circulation to the arm
to return to normal.
Do not measure your blood pressure too many times in one session as it may cause
discomfort in the arm.
If you feel any discomfort or pain, turn the monitor off and remove the cuff immediately.
Reading stored results from the memory
a. Press button “M” when the monitor is off to enter the memory mode. The LCD will show the number of
results stored, then the most recent result will be displayed (the “01” in the top left of the LCD is the
memory number), as in the picture. Continue pressing the “M” button to progress through the stored
results (memory number will increase by one each time)..
9
Using your Blood Pressure Monitor
b. Press “M” button again after the final memory result, or press “START” at any time whilst in memory
display mode, to switch the device off. In this mode, the device will automatically switch off after one
minute of inactivity.
c. If there are no results stored in the memory, the LCD will show “0” for both blood pressure readings and
for pulse rate, and “00” for the memory number. Pressing “M” or “START” button will switch the device
off.
Clearing the memory
Whilst in memory display mode, hold down the “M” button for three seconds. All stored results will be
deleted after three “beeps”. The LCD will appear as in the left hand picture below and will then display
all zeros to indicate that no stored results exist.
Shut Down
Please turn the unit off after measurement if not re-measuring.
The unit has an automatic ‘switch off’ mechanism which means it will turn off after 1
minute if not being used.
10
Additional Information on Blood Pressure
Your heart is just like a pump which works all the time to make the blood flow through all of your body’s
blood vessels. Blood pressure measures the force exerted on the wall of the blood vessels by the pressure
of the blood. The output of blood from the heart when it pushes blood around the body is called systolic
blood pressure. Diastolic blood pressure is the measurement of the blood returning to the heart.
120 (systolic)
Blood pressure is normally written as, for example:
80 (diastolic)
Fluctuation of Blood Pressure
Blood pressure fluctuates constantly during the day. Its value in
the daytime is higher than in the evening with the lowest level
being at midnight. The pressure begins to rise again at 03:00am
and reaches its highest level any time during the day – so it is
impossible to get a consistent reading. For this reason, please
take your measurements at the same time of day.
Systolic
11
Diastolic
Specification
1. Product Name: Wrist Type Blood Pressure Monitor
2. Model: BPM 2 Series
3. Measuring method: Oscillometric method, automatic
inflation, automatic measurement, 60 times memory
4. Wrist cuff size: 300mm x 70mm
5. Unit size: 92mm x 65mm x 30mm
6. Measuring accuracy: within 3mmHg (0.4KPa)
7. Blood pressure measuring range:
0mmHg~300mmHg (0KPa~40KPa)
8. Pulse rate range: 40~180/min
9. Pulse rate accuracy: within 5%
10. Power source: Two AAA size batteries
11.
12.
13.
14.
15.
16.
17.
18.
Classification: Internal powered Equipment Type B
Pressurisation: automatic air inflation by an air pump
Deflation: Automatic exhaust
Automatic power off: Device automatically switches off
after 1 minute of non-use to save energy.
Environmental temperature for using: 5°C~40°C
Environmental temperature for storage: -20°C~55°C
Environmental humidity for using: <80%
Environmental humidity for storage: <95%
This is a class IIa medical device and fulfils the provisions of the medical devices directive 93/42/EEC.
Blood pressure measurements determined with this device are equivalent to those obtained by a trained
observer using the cuff/stethoscope auscultation method, within the limits prescribed by the American
National Standard for electronic or automated sphygmomanometers.
12
Interpretation of Blood Pressure (BP) Results
13
Troubleshooting
socket
socket
.
Socket
.
socket
.
.
.
Adjust your position – refer to page 6.
.
.
.
LCD shows “Er 0”
Pressure system is unstable before
measurement.
LCD shows “Er1”
Systolic pressure detect fail.
LCD shows “Er 2”
Diastolic pressure detect fail.
14
Don‘t move and try again.
Troubleshooting
LCD shows “Er 3”
Pneumatic system blocked or cuff is too
tight during inflation.
LCD shows “Er 4”
Pneumatic system leakage or cuff is too
loose during inflation.
LCD shows “Er 5”
Inflation above 300mmHg.
LCD shows “Er 6”
Over 3 minutes while pressure above
15 mmHg.
LCD shows “Er 7”
EEPROM accessing error.
LCD twinkling all
Device parameter check error.
LCD shows “Er 9”
MCU self-verity error.
LCD shows “Er A”
Span error.
LCD shows “Er b”
EEPROM backup error.
15
Position the cuff correctly and try again.
Measure again after 5 minutes. If the monitor
is still abnormal, please contact the local
distributor or the factory.
Maintenance
1. Do not drop this blood pressure monitor or subject it to heavy impact.
2. Avoid exposure to high temperatures, direct sunlight and contact with water.
3. If the monitor is stored at temperatures below freezing, do not use immediately.
Leave at room temperature for at least one hour before use.
4. Do not attempt to disassemble the monitor.
5. Do not leave the batteries in the monitor if it is not in use for a long period of time.
16
Blood Pressure Record Table
Please log the date, time and your SYS (systolic) and DIA (Diastolic) blood pressure levels.
We recommend you share this information with your Doctor
17
Explanation of Symbols on Unit
This symbol indicates that this product is a Type B device.
Symbol for "Environment Protection" – Waste electrical products should not be disposed
of with household waste. Please recycle where facilities exist. Check with your local
Authority or retailer for recycling advice.
Symbol for “Manufacturer”.
0197
This product complies with MDD93/42/EEC requirements.
Symbol for “European Representative”.
Harvard Medical Devices Ltd.
Unit 1301-2, 13th Floor, Railway Plaza,
39 Chatham Road South, Tsimshatsui,
Kowloon, Hong Kong.
European Community Design Registration No 000992490-0001
US Design Patent No. 29/319,246
Kinetik Medical Devices Ltd.
Harvard House, The Waterfront, Elstree Road,
Elstree, Herts WD6 3BS, UK
Made in PRC
18
0197
Kinetik BPM2 UK IB 20110801