1
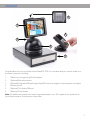
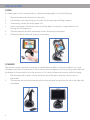
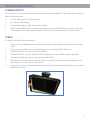
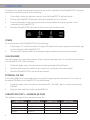
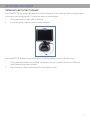
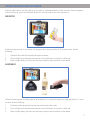
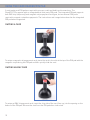
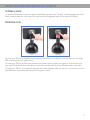
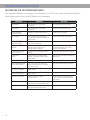
IPAD AIR MOUNT
USER GUIDE
TABLE OF CONTENTS
OVERVIEW.............................................................................................................................. 3
INSTALLATION........................................................................................................................ 4
Paper...................................................................................................................................................4
Scanner...............................................................................................................................................4
Tablet..................................................................................................................................................5
CONNECTIONS........................................................................................................................ 6
Power..................................................................................................................................................6
Cash Drawer........................................................................................................................................6
External PIN Pad.................................................................................................................................6
Connection Ports – Maximum Ratings.................................................................................................6
ADJUSTING THE TABLET........................................................................................................ 7
Swiveling and Tilting the Base.............................................................................................................7
TEARING RECEIPTS................................................................................................................ 8
USING THE BARCODE SCANNER............................................................................................. 9
Mounted...............................................................................................................................................9
Handheld.............................................................................................................................................9
USING THE CARD READER/PIN PAD..................................................................................... 10
Swiping a Card...................................................................................................................................10
Swiping an EMV Card.........................................................................................................................10
Tapping a Card...................................................................................................................................11
Entering a PIN...................................................................................................................................11
TROUBLESHOOTING............................................................................................................. 12
Tablet Installation Difficulties...........................................................................................................12
Tablet Does Not Function..................................................................................................................12
Scanner Difficulties...........................................................................................................................12
Printer Difficulties.............................................................................................................................12
External PIN Pad Difficulties.............................................................................................................13
Cash Drawer Difficulties....................................................................................................................13
Swiveling the PowaPOS T25..............................................................................................................13
Integrated PIN Pad Error Messages..................................................................................................14
WARRANTY AND SUPPORT................................................................................................... 15
2
OVERVIEW
3
1
5
2
4
6
Congratulations on your purchase of the PowaPOS T25! You now have what you need to make your
business a success, including:
1.
Tablet mount supporting iPad Air tablets
2.
(Optional) Barcode scanner
3.
(Optional) Integrated PIN pad supporting EMV chip and magnetic stripe payment card types
4.
Receipt printer
5.
(Optional) Third party PIN pad
6.
(Optional) Cash drawer
Note: For additional product information see www.powapos.com. All images in this guide are for
illustrative purposes. Actual product may differ.
3
INSTALLATION
PAPER
To install paper for the receipt printer or replace an empty paper roll, do the following:
1.
Remove the barcode scanner from the base.
2.
Lift the base cover by placing your thumbs into the opening and lifting upwards.
3.
If necessary, remove the empty paper roll.
4.
Insert a new paper roll with the loose end of the paper coming from underneath the roll
through the front opening.
5.
Close the base lid and tear downwards to tear off excess printer paper.
6.
If desired, place the barcode scanner on the base.
SCANNER
The scanner can be used as a mounted or a handheld device. When used as a handheld, you must
hold down the button to scan an item. If the scanner does not appear to be functioning, press and hold
the button for five seconds to turn the scanner on. To mount the barcode scanner, do the following:
1.
Place the barcode scanner into the slot at the top of the base using the notch to secure
placement.
2.
The barcode scanner can be placed with the scan window facing either the left or the right side
of the base.
4
INSTALLATION (CONT’D)
SCANNER (CONT’D)
If the scanner is not functioning it may need to be paired with the tablet. To pair the scanner with the
tablet, do the following:
1.
On your tablet, go to the Settings menu.
2.
Go to Bluetooth settings.
3.
Turn on Bluetooth to make devices discoverable.
4.
Select the PowaPOS device. If there are multiple scanners within Bluetooth range, select your
unit’s specific scanner as identified by the ID number located on the bottom of the scanner.
TABLET
To install an iPad Air, do the following:
1.
Tighten (turn clockwise) the two screws on the bottom of the tablet mount bezel to loosen the
bezel.
2.
Firmly hold the tablet bezel and slide the bezel up vertically by 0.25” (6.35 mm).
3.
Lift the front bezel to remove it from the stand.
4.
Insert the iPad Air onto the stand with the charging port of the iPad facing the right side.
5.
Connect the lightning cable on the right side of the iPad.
6.
Take the front bezel and hold it slightly higher, press back onto the stand, and slide the front
bezel down to secure it back on the stand.
7.
Loosen (turn counter-clockwise) the two screws until they push against the bezel to secure the
tablet bezel in place.
5
CONNECTIONS
Connections for power and external accessories are on the underside of the PowaPOS T25. To access
any of these connection ports, do the following:
1.
If mounted, remove the barcode scanner from the PowaPOS T25 and set it aside.
2.
Pick up the PowaPOS T25 with two hands and carefully turn it on its side.
3.
Connect the cables to the correct ports and route the cables through the groove on the
underside of the PowaPOS T25.
4.
Place the PowaPOS T25 right-side up and mount the barcode scanner.
POWER
To connect power to the PowaPOS T25, do the following:
1.
Follow steps 1-3 under Connections. Plug the DC cable of the power supply into the Power port
on the underside of the PowaPOS T25.
2.
Connect the AC power cable into the power supply socket and into an electrical outlet.
CASH DRAWER
The cash drawer is an optional accessory used to support cash payments. To connect the cash drawer
to the PowaPOS T25, do the following:
1.
Follow the steps under Connections and use the port labeled Cash Drawer.
2.
Plug the other end of the cable into the connection on the top of the cash drawer.
3.
Place the PowaPOS T25 on top of the cash drawer.
EXTERNAL PIN PAD
A third party PIN Pad is an optional accessory used to support payment transactions. To connect a
third party PIN Pad to the PowaPOS T25, do the following:
1.
Follow the steps under Connections and use the 5V, 1.0A USB 1 port to connect a third party
PIN Pad.
2.
Plug the other end of the cable into the PIN Pad.
CONNECTION PORTS – MAXIMUM RATINGS
The maximum ratings for the connection ports are:
CONNECTION
Cash Drawer
Tablet
PIN Pad
Scanner
6
MAX RATING
24V @ 1.0A
5V @ 2.1A
5V @ 0.5A
5V @ 0.5A
CONNECTION
USB 1
USB 2
DC Input
MAX RATING
5V @ 1.0A
5V @ 0.5A
24V @ 4.0A
ADJUSTING THE TABLET
SWIVELING AND TILTING THE BASE
The PowaPOS T25 can rotate 180 degrees counterclockwise from the starting (cashier facing) position
to the consumer facing position. To swivel the base, do the following:
1.
Place your hands on each side of the base.
2.
Firmly but gently rotate the base counterclockwise.
The PowaPOS T25 display screen can be tilted. To tilt the display screen, do the following:
1.
Firmly hold both tablet sides or place one hand on the top or bottom of the mount with the
other hand holding down the base.
2.
Press forward or back to adjust the tilt of the display screen.
7
TEARING RECEIPTS
After the PowaPOS T25 prints a receipt, you must tear it off to hand it to the customer. To tear a
receipt, do the following:
1.
Firmly grip the receipt in your hand.
2.
Pull the receipt quickly at a downward angle towards either the left or right.
8
USING THE BARCODE SCANNER
The barcode scanner can be used as a mounted or a handheld device. If the scanner does not appear
to be functioning, press and hold the button for five seconds to turn the scanner on.
MOUNTED
If the barcode scanner is mounted, it is always active during checkout. To scan an item, do the
following:
1.
Hold the item with its barcode facing the scanner.
2.
The red light from the barcode scanner should be seen on the item’s barcode.
3.
After a slight delay, the item should scan properly and be visible on the tablet.
HANDHELD
If the barcode scanner is being used as a handheld, it is only active when you hold the button. To scan
an item, do the following:
1.
Hold the button and point the scanner at the item’s barcode.
2.
The red light from the barcode scanner should be seen on the item’s barcode.
3.
After a slight delay, the item should scan properly and be visible on the tablet.
9
USING THE CARD READER/PIN PAD
A card reader and PIN pad are required to process credit and debit card transactions. The
PowaPOS T25 supports both an integrated and third party PIN pads. The integrated PIN pad supports
both EMV chip (swipe only) and magnetic stripe payment card types, but an external PIN pad is
required to support contactless payments. The instructions and images below describe the integrated
PIN pad where supported.
SWIPING A CARD
To swipe a magnetic stripe payment card, place the card in the slot at the top of the PIN pad with the
magnetic stripe facing the PIN pad and then quickly slide the card.
SWIPING AN EMV CARD
To swipe an EMV chip payment card, insert the chip side of the card, face up, into the opening on the
bottom of the PIN pad. Remove the card from the PIN pad when instructed.
10
USING THE CARD READER/PIN PAD (CONT’D)
TAPPING A CARD
An external PIN pad is required to tap a contactless payment card. To tap a contactless payment card,
when requested tap the chip side of the card onto the designated area of the external PIN pad.
ENTERING A PIN
To enter your PIN for a magnetic stripe payment card, after you swipe your card enter your four digit
PIN and then press the green check.
To enter your PIN for an EMV chip payment card when swiping, after you insert your card enter your
four digit PIN and then press the green check. Remove the card from the PIN pad when instructed.
To enter your PIN for a contactless payment card when tapping, after you tap your card enter your four
digit PIN when requested and then press the green check.
11
TROUBLESHOOTING
TABLET INSTALLATION DIFFICULTIES
If you are having difficulty installing the tablet or removing the bezel from the mount, try the following:
•
Verify the tablet is an iPad Air – other tablets are not supported.
•
Press your thumbs on each side of the bezel and slide up firmly, by 0.25” (6.35 mm).
TABLET DOES NOT FUNCTION
If the PowaPOS T25 is not functioning properly, try the following:
•
Verify the PowaPOS T25’s power cable is connected to an electrical outlet and the Power port
on the underside of the PowaPOS T25.
•
Verify the tablet’s power cable is connected to the tablet’s charging port beneath the bezel.
•
Insert a pin through a small hole on the top left of the bezel to depress the tablet’s power button.
If the tablet is not connected to the internet, refer to the tablet’s user manual for instructions on
enabling wireless and connecting to a network.
SCANNER DIFFICULTIES
If you are having difficulties with powering on the scanner, hold the scanner’s button for five seconds
to power it on. If the scanner does not power on, then the scanner’s internal battery is discharged.
If you need to charge the scanner, place the scanner on the PowaPOS T25 scanner mount and make
sure it is properly seated to begin charging.
If you are having difficulty scanning a barcode, try to scan the barcode at a different range between 8
and 20 inches.
Use the following table for descriptions of the light around the scanner button:
LIGHT
blinking red
solid red
blinking blue
solid blue
DESCRIPTION
The scanner battery is low. Place the scanner on the PowaPOS T25 scanner
mount and make sure it is properly seated to begin charging.
The scanner is charging.
The scanner does not have a bluetooth connection with the tablet. Refer to
the tablet’s user manual for instructions on enabling bluetooth and pairing
the tablet with the scanner. The scanner is identifiable by its serial number.
The battery is fully charged.
PRINTER DIFFICULTIES
If the receipt printer is not functioning properly, try the following:
•
Verify the PowaPOS T25’s AC power cable is connected to an electrical outlet and the Power
port on the underside of the PowaPOS T25.
•
Open the base of the PowaPOS T25 and verify that the receipt printer is not out of paper and the
paper is not jammed. If necessary, remove the damaged paper or add more paper by following
the instructions in Paper Installation.
•
If you are still having trouble, power down the tablet and remove the power from the
PowaPOS T25. Plug power back into the PowaPOS T25 and power on the tablet. Try again to
print the receipt.
If receipts do not tear evenly, tear receipts with a quick and firm downward motion, towards either the
left or right side.
12
TROUBLESHOOTING (CONT’D)
EXTERNAL PIN PAD DIFFICULTIES
If the external PIN pad is not functioning properly, try the following:
•
Verify the USB cable is connected to the external PIN pad and the 5V, 1.0A USB 2 port on the
underside of the PowaPOS T25.
•
Power on the external PIN pad.
CASH DRAWER DIFFICULTIES
If the cash drawer does not open, try the following:
•
Verify the cable is connected to both the cash drawer and the Cash Drawer port on the
underside of the PowaPOS T25.
•
Verify the cash drawer key lock is in the operating position, not the locked position.
•
If you are still having trouble, power down the tablet and remove the power from the
PowaPOS T25. Plug power back into the PowaPOS T25 and power on the tablet. Try again to
open the cash drawer.
SWIVELING THE PowaPOS T25
The PowaPOS T25 rotates approximately 180 degrees in each direction from the neutral position, the
center, and soft clicks at three locations, the center and both endpoints. If you are having difficulty
swiveling the PowaPOS T25, place both of your hands on the base and firmly try to rotate the base in
either direction. If the base will not rotate in the first direction, try the other direction. The base can be
difficult to swivel when it is in one of the soft click locations.
13
TROUBLESHOOTING (CONT’D)
INTEGRATED PIN PAD ERROR MESSAGES
The integrated PIN pad can display error messages on its LCD screen. Use the following table for
descriptions and solutions of the PIN pad error messages:
MESSAGE
DECLINED
CANCELED
CARD ERROR
REMOVE CARD
TRY AGAIN
NOT ACCEPTED
REMOVE CARD
COMMUNICATION
ERROR
COMM. PROBLEM
OK TO RETRY
UPDATING
DATA
PIN INCORRECT
MAX TRANSACTION
RATE EXCEEDED
UNIT TAMPER
RETURN TO BASE
* DO NOT USE *
CALL HELPDESK
No APP to launch
TMS fail
RKIS fail
14
REASON
The transaction has been
declined.
The transaction has been
cancelled.
Failed to read card properly.
The transaction cannot be
processed using the selected
application.
The card was read successfully
but is not accepted.
Problem with data returned
during authorization or a
configuration update.
Timeout during configuration
update.
Shown during configuration
update. Cannot be used until
completed.
Incorrect PIN entered.
The unit has performed too
many transactions in a small
amount of time.
Tamper detected. The unit has
been wiped.
Tamper detected. The unit has
been wiped.
There is an error with
configuration.
ACTION
Use another payment type.
Process another payment.
Swipe the card again.
Select a different application.
Use another payment type.
Wait a short time to see if
functionality returns. If not,
restart the PIN pad.
Press green button to try again.
Wait for the PIN pad to display
“Welcome.”
Re-enter the PIN.
Wait 30 seconds and try again.
Return the unit to the reseller.
Return the unit to the reseller.
Restart the unit to download
a new version of the payment
application.
Restart the unit.
The new version of the payment
application failed to download.
The remote key injection process Restart the unit.
has encountered an error.
WARRANTY AND SUPPORT
For warranty and support information please contact your PowaPOS T25 reseller.
Do not try to repair the PowaPOS T25 terminal or S10 barcode scanner. All repairs, including battery
replacement, must be coordinated with the manufacturer.
15