1
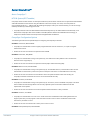
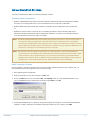
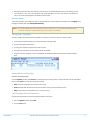
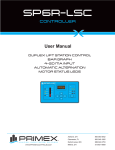
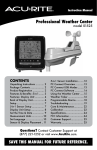
COMPU SYNC™ NTP TIME SYNCHRONIZATION
NIST - TRACEABLE COMPUSYNC SYSTEM
INSTALLATION & USER GUIDE
Doc Part No.: 140148 08.12.14
Legal Notice
Copyright ©2014 Primex Wireless, Inc. All rights reserved.
SNS is a trademark of Primex Wireless, Inc.
U.S. Patents 6,873,573; 7,352,657. Other Patents Pending.
Printed in the USA.
Information in this document is subject to change without notice. The software described in this document is furnished
under a license agreement or nondisclosure agreement. The software may be used or copied only in accordance with the
terms of those agreements. No part of this publication may be reproduced, stored in a retrieval system, or transmitted in
any form or by any means, electronic, mechanical or otherwise, for any purpose, without the prior written permission of
Primex Wireless.
Primex Wireless
Address
United States
Canada
United Kingdom
965 Wells Street
1310 Kerrisdale Blvd.
Unit G420 Dean Clough
Lake Geneva WI 53147
Unit #4
Halifax, West Yorkshire HX3 5AX
Newmarket, ON L3Y 8V6
Primex Wireless
Email
[email protected]
[email protected]
[email protected]
Web
www.primexwireless.com
www.primexwireless.ca
primexwireless.co.uk
Telephone
(800) 537-0464
(800) 330-1459
0800-3896996
Fax
(262) 248-0061
(905) 952-0134
01422-349462
CompuSync™ NTP Time Synchronization Installation & User Guide
2
CONTENTS
About CompuSync™
4
About CompuSync™
4
CompuSync Configuration Options
4
GPS Receiver (NTP-18 System)
5
Install CompuSync™ Hardware
6
Install GPS Receiver (NTP-18 System)
Install CompuSync Software
8
Operating System Compatibility
8
Install CompuSync Software
8
CompuSync Log
10
Configure CompuSync Software
Primex Wireless
6
11
Configure GPS Receiver (NTP-18 System)
11
Set Time Source to use CompuSync Receiver as Time Source
11
Set CompuSync Backup External Time Server
12
Set Auto Startup
13
Set Log Level - CompSync
13
Activate Service in CompuSync
13
Test CompuSync Receiver Connection
13
Grant CompuSync Access to Additional Personnel
14
Ways to Synchronize a Network Using CompuSync™
15
Synchronizing a Client Computer to CompuSync Over a Network
15
Running CompuSync Using the 'at' Command
15
Support
17
Warranty
18
CompuSync™ NTP Time Synchronization Installation & User Guide
3
A BOUT COMPUS YNC™
About CompuSync™
NTP-18 System (GPS Traceable)
CompuSync offers the total solution for enterprise-wide time synchronization. Precise time is acquired from GPS satellites
and made available over the network using the Network Time Protocol (NTP). As a result, client computers are
synchronized typically to +/- 0.02 seconds. By installing CompuSync within your network firewall, you can ensure high
reliability and security in delivering precise time.
l
CompuSync derives time from GPS satellites and automatically tracks up to twelve satellites simultaneously. Time
derived from CompuSync NTP-18 is traceable to the NIST (National Institute of Standards and Technology). A
simple user interface makes initial setup and use straightforward and effective.
CompuSync Configuration Options
The following scenarios list the possible ways of configuring the CompuSync software.
Scenario 1: Casual User, Manual Mode
l
l
CompuSync is installed and runs like a regular program whenever the user thinks of it, or as part of a regular
maintenance routine.
Profile: For this user accurate time is important when needed.
Scenario 2: Power User, Daily Mode
l
l
CompuSync is installed and running in the system tray. The mode is set to daily and the time is set when the
Internet connect is typically up.
Profile: For this user accurate time is important and CompuSync makes the setting daily.
Scenario 3: Mission Critical, Periodic Mode
l
l
CompuSync is installed and running in the system tray (or as a Windows service) in the Periodic mode. The user
has selected an interval that in practice has proven to keep the clock within a comfortable level of accuracy.
Profile: For this user accurate time is of the essence. Since the system utilization varies over the day, the
CompuSync software checks that the clock is correct several times each day.
Scenario 4: File Server, Auto Mode
l
l
CompuSync is installed and running in the system tray (or as a service) in the Auto Mode. CompuSync calculates
when to make the next setting based on the accuracy required by the user and the traditional clock drift
experienced on that system.
Profile: For this user accurate time is critical and system load and utilization is fairly consistent.
Scenario 5: Scientific, Once Mode
l
l
CompuSync is installed and runs in the “once” mode. The time is scheduled to make a setting before the user
begins a particularly critical program or test when time must be correct or when coordination without side
machines or processes is critical.
Profile: For this user accurate time at a certain point in time is critical.
Scenario 6: Dial Up Desktop User, Manual Mode
Primex Wireless
CompuSync™ NTP Time Synchronization Installation & User Guide
4
l
l
This user uses CompuSync whenever they're logged onto the network, which might be once a day or a few times
a week.
Profile: For this user convenience and ease of use is key.
Scenario 7: Embedded Application, Batch Mode
l
l
CompuSync is configured in the Windows 98 Task Scheduler or the user's System Assistant in Microsoft Plus+
profile, which is part of their regular maintenance routine. This task is set to run every night at 3 a.m. when
Internet access is first available.
Profile: For this user accurate time is as simple as set it and forget it.
Scenario 8: Embedded Application, Batch Mode
l
l
CompuSync is configured in the Windows 98 Task Scheduler or the user's System Assistant in Microsoft Plus+
profile, which is part of their regular maintenance routine. This task is set to run every night at 3 a.m. when
Internet access is first available.
Profile: For this user accurate time is as simple as set it and forget it.
GPS Receiver (NTP-18 System)
The Global Positioning System (GPS) Receiver has a sensitive antenna that receives the precise time (UTC) from the GPS
satellite transmission. The receiver is required to be installed where it has an unobstructed, clear view of the sky to receive
a signal.
Primex Wireless
l
Bracket Dimensions: 4.2" L (10.67 cm) x 3.9" W (9.91 cm) x 2.0"D (5.08 cm)
l
Mounting bracket and hardware included
l
Operating Range: -22° - 176° F (-30° - 80° C)
l
Connects to computer serial port
CompuSync™ NTP Time Synchronization Installation & User Guide
5
I NSTALL COMPUS YNC™ HARDWARE
This section provides the procedures to install the CompuSync hardware.
Install GPS Receiver (NTP-18 System)
Location is extremely important to ensure the best operation of the system. You must consider the following:
Clear view of the sky
l
GPS Receiver requires a clear view of the sky to receive the GPS signal. Typical locations of the GPS Receiver are
on the inside of a window (not a Low E glass window), an exterior pole, or on rooftop.
CAUTION: GPS Receiver should installed away from metal objects, satellite dishes, etc.
Protected from weather
WARNING: It is imperative that the GPS Receiver and the connection to the GPS cable be above any potential
standing water, snow depth, leaves or other obstructions. Connections outside must be sealed with
a high quality silicone sealant.
l
Refer to Figure 1 for an illustration of the recommended installation.
l
The GPS Receiver and the attached cable are weatherproof and may be mounted outside.
l
l
If additional cable is required, the connection must be sealed with a high quality silicone sealant (such as Radio
Shack Sealant 2781645 for Outdoor RF Connections) to weatherproof the connection.
Various lengths of cable are available from Primex Wireless.
Installation steps
1. Attach the GPS Receiver to the inside of a non LowE glass window, outside pole, or rooftop that has a clear view of
the sky, as shown in Figure 1.
Primex Wireless
CompuSync™ NTP Time Synchronization Installation & User Guide
6
Figure 1: GPS Installation Illustration
2. Route the GPS Receiver cable as needed. When attaching the GPS Receiver to the inside of a window, clean the
windowpane before using the suction cups for attachment.
3. Plug the power connection from the GPS Receiver into an AC outlet.
Primex Wireless
CompuSync™ NTP Time Synchronization Installation & User Guide
7
I NSTALL COMPUS YNC S OFTWARE
The section provides the procedures to install the CompuSync software.
Operating System Compatibility
l
l
l
Windows 7/2003/2000/XP: May require reboot after installation. Administrator rights are required for installation.
Can either run as a background service or can be started when the local user logs in to Windows.
Windows 98/Me: May require reboot after installation. CompuSync can be configured to start on system boot
up.
Windows NT 4: Service Pack 3 or above for NT v. 4.x Updating of older DLLs may be necessary. May require
reboot after installation Administrator rights are required for installation. Can either run as a background service
or can be started when the local user logs in to Windows.
NOTE: Windows NT/2000/XP/2003 users should consider using the service. The “service” option shows the status of
the CompuSync Service and allows you to stop and start the service. In Windows, a service is a separate
process that runs independently of any application and is normally active whenever the computer is running.
When enabled, the CompuSync Service runs whenever the computer is running. It functions identically to the
application in checking the clock and keeping the time correctly set.
NOTE: Windows may incorrectly identify the GPS Receiver as a “Microsoft Serial” or “Microsoft Serial BallPoint”
mouse. If this occurs, Windows may then install software that inhibits communication with the GPS, or which
causes the mouse cursor to respond erratically. You can check for this by looking in the Windows Device
Manager to see if a second “Serial” or “BallPoint” mouse is assigned to the same COM port that is utilized by
the GPS Receiver. If it is installed on the same port, disable that mouse in the Device Manager.
Install CompuSync Software
Prior to installation, uninstall any previous version of the CompuSync Software installed on your computer. Also, it is
recommended to close all other applications you may have running.
1. Verify operating system compatibility.
2. Insert the CompuSync CD into your computer’s CDROM drive.
3. Click on the Start button, scroll up and select Run. Type d:\setup, where ”d” is your CDROM drive letter. If “d” is
not your CDROM drive letter, substitute the correct letter. Press Enter or click OK.
4. The Install Shield Wizard opens to guide you through the program setup progress. Once the Install Shield Wizard is
installed, it is ready to install the Primex Wireless CompuSync Software on your computer. Click Next.
Primex Wireless
CompuSync™ NTP Time Synchronization Installation & User Guide
8
5. The software will ask if the program is to be installed for all users or just one. Select the desired option and click
Next.
6. The software will ask if CompuSync is to be installed as a service. Select the desired option and click Next.
7. The software will ask for a key code. This code is located on the back of the CD jacket. If using the trial version,
enter TRIAL as the Key. Type in the key and click Next.
Primex Wireless
CompuSync™ NTP Time Synchronization Installation & User Guide
9
8. A Registration Information screen will appear with the option to enter a User Name and Organization. Type in the
Name and Organization and click Next.
9. Verify that all information is correct and click Next.
10. The Setup will ask you where to install the CompuSync files. Click Next to accept the default directory or click
Browse to select a different directory.
11. The software will ask if you want to backup replaced files. To back them up, click Yes. If backup files are not
required, click No.
12. If the backup option is selected, the setup will place the files in the location listed on the screen. Click Next to
continue.
13. Setup will now begin installing the CompuSync Software. Click Next to continue. The Install Shield will copy the
CompuSync files to your computer.
14. If Windows Time Service is running, the software will recommend that you stop it. This is a required step if you
plan to use CompuSync as an NTP timeserver.
15. When installation is completed, the following screen will appear. Click Finish to exit Install Shield.
16. On certain versions of Windows you may be asked to restart to complete the installation. If so, click Yes to restart
your computer. CompuSync is now installed on your computer.
NOTE: When installing on a Windows 2000 or XP computer, the GPS receiver may be incorrectly identified as a
“Microsoft Serial BallPoint” mouse. If asked, do not install the “Serial BallPoint Mouse” when prompted.
CompuSync Log
The log provides a record of all the settings made by CompuSync. Once a log file is specified, the system adds data to the
log file each time the program is activated and a setting is made.
l
l
Primex Wireless
Action log: a summary view of all current time setting activity. Data is displayed in a list on the main screen and
actions are added as they occur. Entries include the origination of the action and the result. Upon starting, the
list shows the five most recent events (if available). After the program closes, the action detail can be found in
the individual logs.
Event log: allows you to write selected action to a text file and/or the NT/2000/XP/2003 event log. This log
captures major time setting activities as well as warnings for when there may be a system or time setting
problem.
CompuSync™ NTP Time Synchronization Installation & User Guide
10
CONFIGURE COMPUS YNC S OFTWARE
This section provides the procedures required to configure the CompuSync software settings.
Configure GPS Receiver (NTP-18 System)
Complete the steps below to configure the GPS receiver.
1. Open the CompuSync software.
2. Select Options, and drop down to GPS.
3. Be sure the Sync time is set to Continuous.
4. Check Enable GPS as time base.
5. Click the Setup button.
6. From the drop down menu, select Garmin 18LVC.
7. Select the COM port in the GPS Setup window.
8. Click OK when finished.
Set Time Source to use CompuSync Receiver as Time Source
The GPS Options tab in CompuSync sets how often the computer's clock is updated from the GPS or CompuSync Receiver.
It can be found from the main Options menu of CompuSync.
Complete the steps below to set CompuSync to use GPS as its time source.
1. From the Options menu, click the GPS Options tab.
2. To set the GPS Receiver as the time source, select the check box Enable GPS as time base. When enabled,
CompuSync will synchronize the operating system time to the GPS time at the interval specified.
NOTE: When this setting is enabled, CompuSync accesses the GPS at the interval specified, independent of the
timserver settings selected (e.g. Manual, Periodic, Auto).
Primex Wireless
CompuSync™ NTP Time Synchronization Installation & User Guide
11
3. Set the Sync frequency in minutes. Sets the number of minutes between GPS time readings. Updating the
operating system clock from the GPS stabilizes a system with erratic time keeping.
4. Set the SyncTime to continuous, as the GPS should be continuously sending data.
5. To connect to an external timeserver when GPS is unavailable, select the check box Use external timeserver as a
backup when GPS is unavailable.
NOTE: This is not recommended as Internet time servers may not be synchronized to the Primex Wireless System.
l
l
l
CompuSync will get the time from a backup external timeserver specified in the settings in the Timeserver tab.
In the Timeserver tab you can choose to use either an Internet based timeserver or contact the NIST directly via
modem (Direct Modem).
Set the warning level under the Settings tab to determine when the backup timeserver should be used.
Set CompuSync Backup External Time Server
When GPS is not available, an external timer server can be used as a backup.
1. From the CompuSync software, select the “Timeserver” tab in the “Options” window to view the current server
settings, including server, protocol and port number used to communicate with the timeserver.
l
Primex Wireless
The current settings are used to set the initial test conditions. The default timeserver is set to the NIST
in Boulder, Colorado. A list of alternative timeservers can be accessed by clicking the “Directory”
button. Default settings are also selected for “Connection” and “Protocol”, but can be updated
according to your preferences.
CompuSync™ NTP Time Synchronization Installation & User Guide
12
2. Pressing the test button will verify that the communication can be established with the current settings. To test
your connection, click “Test”. The “Timeserver Test” screen will appear. Click the “Test” button in the lower left
corner. The results are displayed on the bottom of the window.
Set Auto Startup
To set the CompuSync user interface to start-up automatically each time the system is rebooted, click the Display tab of
the Options window and check Startup Automatically.
NOTE: On Windows 98/Me machines, CompuSync starts on system boot up. On Windows NT/2000/XP/2003
machines, CompuSync is started when the local user logs on to Windows.
Set Log Level - CompSync
The log provides a record of all the settings made on the system. This can be useful in a variety of ways:
1. To store previous setting attempts for use by the Previous Settings Graph.
2. As a record of system performance.
3. As a long term indicator of system clock drift over time.
4. As a source of information on when Internet access is available.
5. As an input to other programs, such as a spreadsheet or database programs, where further analysis would be
done.
Activate Service in CompuSync
(Windows NT/2000/XP/2003)
From the Options window, select Service. You have the option to start, pause, or stop the execution of the CompuSync
service. Select Start to activate your CompuSync system.
l
Start: Starts the CompuSync service that is not running.
l
Pause: Suspends and resumes the clock synchronization activity of the CompuSync service.
l
Stop: Stops a version of CompuSync that is currently running.
Test CompuSync Receiver Connection
Complete the steps below to test the CompuSync Receiver connection.
1. From the Options window, select GPS.
2. Click the Test button.
Primex Wireless
CompuSync™ NTP Time Synchronization Installation & User Guide
13
3. The GPS Test window will open. Click Open to connect to the GPS. You should be able to observe the data coming
in from the GPS Receiver.
Grant CompuSync Access to Additional Personnel
You can add new CompuSync users for Windows NT/2000/XP/2003 on the same computer. Each user will have their own
settings. There will be a single copy of the CompuSync application files installed on the computer.
Steps to add a user:
1. As an administrator, first install the full application on the computer and confirm it works.
2. Grant Change the system time right to the intended user, in the User Rights Policy section.
3. Login to the computer as the intended user.
4. Run the new user program, Add New User.
5. Use the same key code to register the software for the user.
6. Start CompuSync.
Primex Wireless
CompuSync™ NTP Time Synchronization Installation & User Guide
14
WAYS TO S YNCHRONIZE A NETWORK USING COMPUS YNC™
The two most common methods of synchronizing networks using CompuSync are the Client/Server mode and distributing
time over a Domain Server. Due to the many variations of network topologies that exist, not all possible ways of
configuring the CompuSync to synchronize a network can be described in this guide.
l
In Client/Server mode, the computer that the CompuSync software is installed on becomes an NTP Server. Once
installed, client computers can be pointed to this NTP server for synchronization. For additional information, see
"Synchronizing a Client Computer to CompuSync Over a Network" located on page 15.
NOTE: All Windows 2000 and newer PC's have an SNTP Client installed by default.
l
When using CompuSync to distribute time over a Domain Server, the CompuSync software is installed on a
domain server. This mode synchronizes the server's internal clock. The Domain Server can then be used to
distribute synchronized time over the network. For additional information, see "Running CompuSync Using the
'at' Command" located on page 15. Additional information can also be found on www.microsoft.com.
Synchronizing a Client Computer to CompuSync Over a Network
A remote computer can synchronize with the computer running CompuSync using the net time command available in
Windows 95/98/Me or Windows NT/2000/XP/2003.
The syntax for this to be run from a remote computer not running CompuSync is:
net time \\<CompuSync> /set /yes
Where:
l
net time = the network command
l
\\<CompuSync> = the name of the computer with the correct time. (i.e. \\SERVER_MAIN)
l
/set = synchronizes the clock on computer you are executing the command from, with the computer specified.
l
/yes = runs the command without verification
Running CompuSync Using the 'at' Command
Under Windows NT/2000/XP/2003 CompuSync will not run as a Network Service for the server it is installed on, however it
can run automatically in the background on a Windows network by using the at command.
The “at” service must first be started from the net start command or by using the service applet in the Control panel.
Syntax for the at command is:
at \\anyconnectedcomputer time /every day command option
Where:
Primex Wireless
l
at = the command
l
anyconnectedcomputer = the computer where CompuSync is installed
l
time = is the time to run the command
l
/every day = is an option to run the command every day at the day and time specified
l
command = the name of the executable to run
l
option = the command line argument for the executable.
CompuSync™ NTP Time Synchronization Installation & User Guide
15
For example:
at \\primexnt 01:30 /every:Th,S c:\Program Files\Primex Wireless\CompuSync\CompuSync.exe once Runs CompuSync
with the once option every Thursday and Saturday at 01:30 AM on the computer namedprimexnt.
Primex Wireless
CompuSync™ NTP Time Synchronization Installation & User Guide
16
S UPPORT
Primex Wireless Technical Support
Technical Support responds to specific questions about product features, system configuration, and troubleshooting. All
support services will be delivered in accordance with your organization's support agreement, end user licenses
agreements, and warranties.
Contact Primex Wireless Technical Support
Before contacting Technical Support, make sure you have satisfied the system requirements that are listed in your product
documentation. Also, you should be at the computer on which the problem occurred, in case it is necessary to replicate
the problem.
When you contact Technical Support, please have the following information available:
l
Customer ID
l
Problem description
l
Device hardware information
l
Error messages
l
Troubleshooting performed before contacting Primex Wireless
l
Recent network changes (SNS products only)
Technical Support
Primex Wireless
Telephone
(800) 404-8112
Email
[email protected]
Fax
(262) 248-0061
Hours
7:00 am to 7:00 pm CST | Monday through Friday
Web
www.primexwireless.com
CompuSync™ NTP Time Synchronization Installation & User Guide
17
WARRANTY
One Year Limited Warranty
Primex Corporation warrants this product to be free from defects in materials and workmanship for a standard of one year
from the date of purchase. Primex will at its sole option, repair or replace any components that fail in normal use. Such
repairs or replacements will be made at no charge to the customer for replacement parts. The customer will be responsible
for any transportation costs. This warranty does not cover failures due to misuse, abuse, accidental or unauthorized
alterations or repairs.
The warranties and remedies contained herein are exclusive and in lieu of all other warranties express or implied or
statutory, including any liability arising under any warranty or merchantability or fitness for a particular purpose, implied,
statutory or otherwise. In no event shall Primex be liable for any incidental, special, indirect or consequential damages,
whether resulting from the use, misuse or inability to use this product or from defects in the product. Some states do not
allow this exclusion or limitation of incidental or consequential damages so the above limitations or exclusion may not
apply to you.
To obtain warranty service: If after following the instructions in the product guide, you are certain the product is defective,
please contact Primex Wireless Technical Support to assist with troubleshooting the issue. If the issue cannot successfully
be resolved and the product is under warranty, an RMA (Return Material Authorization) will be generated. The RMA form
will be provided via email with detailed instructions for the return. All merchandise returned must be shipped to Primex
Wireless, Attn: Returns Dept., N3211 County Road H, Lake Geneva, WI 53147.
Primex Wireless retains the exclusive right to repair or replace the unit at its sole discretion. All merchandise returned must
be shipped to Primex Wireless, Attn: Returns Dept., N3211 County Road H, Lake Geneva, WI 53147. Primex Wireless retains
the exclusive right to repair or replace the unit at its sole discretion. Such shall be your sole exclusive remedy for any
breach of warranty.
Primex Wireless
CompuSync™ NTP Time Synchronization Installation & User Guide
18