1
INSTALLATION GUIDE
FOR
AMC-BANKING
FOR
DYNAMICS AX 2009
English edition
AMC Consult A/S
2015.07.07
Version V7
INDHOLD
1
Introduction................................................................................................................................... 4
1.1 System requirements ............................................................................................................ 4
1.2 Criticism appreciated ............................................................................................................ 4
1.3 Further information............................................................................................................... 4
2
Installing AMC Banking.................................................................................................................. 5
2.1 What should you use for installation? .................................................................................. 5
2.2 Copy label files ...................................................................................................................... 5
2.3 Import module ...................................................................................................................... 5
2.4 Creating maps........................................................................................................................ 6
2.5 Install the latest patch ........................................................................................................... 6
2.6 Compile AMC Banking ........................................................................................................... 6
2.7 Access rights to the module .................................................................................................. 6
2.8 Create a menu item ............................................................................................................... 7
2.9 Import bank rules .................................................................................................................. 8
3
Registering for the AMC Banking web service .............................................................................. 9
3.1 Communication via web services .......................................................................................... 9
3.1.1
AMC Banking Classic ............................................................................................... 9
3.1.2
AMC Banking Enterprise ......................................................................................... 9
3.2 Registration ......................................................................................................................... 10
3.3 Setup of XTendLink address and test of connection ........................................................... 11
4
Troubleshooting .......................................................................................................................... 13
4.1 Compile errors in banking elements ................................................................................... 13
4.2 Missing labels in screens ..................................................................................................... 13
4.3 Warnings following completion of compiling ..................................................................... 13
4.4 Error in payment journal ..................................................................................................... 14
4.5 Error when opening AMC journals ...................................................................................... 14
5
Delete old elements .................................................................................................................... 15
| Introduction
2
6
Upgrading AMC-Banking from 4.x or previous versions ............................................................. 17
6.1 Importing XML tool in the previous version........................................................................ 17
6.2 Exporting data from a previous version .............................................................................. 17
6.3 Importing data to AMC-Banking 2009 ................................................................................ 19
6.4 Converting payment types .................................................................................................. 20
6.5 General setup ...................................................................................................................... 22
7
Appendix ..................................................................................................................................... 23
7.1 Automatic creation of new vendors in AMC Banking ......................................................... 24
7.2 How to set up a link from a vendor to AMC Banking .......................................................... 27
7.3 How to add payment type and bank account in the invoice register journal ..................... 29
7.4 Use of AX standard payment modes with AMC-Banking .................................................... 36
7.4.1
Select default bank ............................................................................................... 36
7.4.2
Activate the support of standard AX payment modes ......................................... 37
7.4.3
Adjustments in the invoice register journal ......................................................... 38
| Introduction
3
1 INTRODUCTION
Thank you for choosing AMC Banking. We hope you enjoy using the module and its facilities.
1.1 SYSTEM REQUIREMENTS
To be able to run AMC Banking, you need Axapta 3.0 or later, RUN-TIME BUS installer or the
MorphX development pack and X++ source text. However, this guide refers only to the installation
of AMC Banking in Dynamics AX version 2009.
Some Dynamics AX service packs do not satisfactorily support the import of external modules, and
it will not be possible to install AMC Banking on these. Service packs are tested by AMC as they are
released by Microsoft, and the results of these tests will be published on the AMC website.
Therefore, make sure that AMC Banking supports the service pack you are using.
1.2 CRITICISM APPRECIATED
If AMC Banking fails to live up to your expectations, you are always welcome to contact your
reseller and tell why. We will then work in consultation with the reseller to help you get the most
out of AMC Banking.
We will appreciate any criticism of AMC Banking, as such criticism provides us with an ideal basis
for our efforts to optimise the facilities and user-friendliness of the AMC Banking module.
1.3 FURTHER INFORMATION
You can also visit our website at:
www.amcbanking.com
where you will find further information on AMC-Consult A/S and our products.
As this manual will be updated regularly, it will also be possible to download it from our website.
Ask your reseller.
| Introduction
4
2 INSTALLING AMC BANKING
2.1 WHAT SHOULD YOU USE FOR INSTALLATION ?
You have to use the following elements:
1.
The latest basic version of AMC Banking.
2.
The latest patch from the AMC website, if this is later than the above.
3.
The latest set of bank rules from the AMC website.
4.
The latest set of language files from the AMC website.
2.2 COPY LABEL FILES
Before starting Dynamics AX, you have to copy the supplied label files to the application folder on
the server. When you download the label files, you will receive a zip file which contains files for the
languages supported by AMC Banking.
Unzip the files, then copy them directly to your Dynamics AX application library, e.g. X:\Dynamics
AX\appl\standard. You should copy only the languages that are relevant to your Dynamics AX
installation. The language is obvious from the filename. For instance, the Danish label file is named
axABADa.ald.
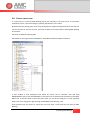
2.3 IMPORT MODULE
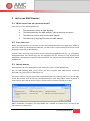
Start Dynamics AX in the development layer where you want to install AMC Banking.
The file AMC_Banking_2009_V7.xpo which you have received from AMC-Consult should be
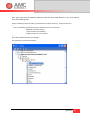
imported now. This is done via AOT (CTRL + D).
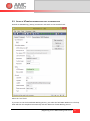
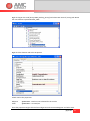
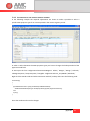
The import function can be found under Command/Import or by selecting the icon on the far right
of the AOT toolbar. Find the file using the Browse button, then select Open. Select the boxes as
shown below, then click OK. Run the import at least twice to prevent compile errors later.
When installation is complete, you will probably see a number of compile errors. Proceed to the
next section to resolve these.
| Installing AMC Banking
5
2.4 CREATING MAPS
AMC Banking uses standard maps in the Dynamics AX application, but these are not supplied with
the AMC Banking module as there would be a risk of any changes to the existing maps being
overwritten by the installation process.
Instead, AMC-Consult has developed a script which makes the necessary changes in the
application. You have to start this operation before you will be able to compile AMC Banking
without errors.
Go to AOT (CTRL + D) and find the class AMCBankMapNeededCreate. Run this class by right-clicking
and selecting Open.
The operation is terminated with a confirmation that three new mappings have been added.
2.5 INSTALL THE LATEST PATCH
If there is a patch for AMC Banking, this has to be installed now. You can find patches at
www.amcbanking.com.
Patches are imported in exactly the same way as when installing the basic module (see section 2.2).
2.6 COMPILE AMC BANKING
When installing both the basic module and any patches, you may find compile errors are generated
which have to be rectified.
When importing the basic module, a project is created which you can find under Projects / Shared.
Compile the project a couple of times and check that the compile has been executed without
errors.
2.7 ACCESS RIGHTS TO THE MODULE
To access the module, you now have to give the relevant user groups access to AMC Banking’s
security keys.
It may be a good idea to create a user group especially for the AMC module. This can be done here:
Administration / Setup / User groups
Now select Administration / Setup / Security / User group permissions.
Select the group, and domain Id, you want to add permissions to, then click on the Permissions tab.
Select the security key called AMC Banking. Click on Full control on the right of the screen.
You can also choose only to allocate partial rights to the user group in question. AMC Banking is
divided into a number of sublevels, which you can see by extending your security key.
| Installing AMC Banking
6
2.8 CREATE A MENU ITEM
It is necessary to create the AMC Banking menu tab manually in the main menu, as automatic
installation of this, risks overwriting any existing adjustments to the menu.
Be aware that the existing main menu may be adjusted in a higher development layer than the one
you are currently in. If this is the case, you have to switch to this layer before creating AMC Banking
in the menu.
The menu is added by opening AOT.
Select Menus, then right-click on MainMenu. Select New followed by Menu reference.
A new window is now displayed from which all menus can be selected. Click and drag
AMCBankMenu over to the AOT MainMenu. The menu item is positioned in the botton of the Main
Menu tree. If you then want to move the menu item, you can do this using ALT + arrow up/arrow
down. Save your changes by right-clicking on MainMenu and selecting save.
Close Dynamics AX and restart it. Check that you now have a new menu by the name of AMC
Banking.
| Installing AMC Banking
7
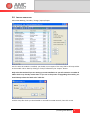
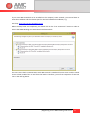
2.9 IMPORT BANK RULES
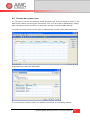
Select AMC Banking / Periodic / Change / Export/Import.
The first time the module is installed, you should run an import of the setup file for all setup tables
in the module. This is done by clicking on “Setup” followed by the “Import” button.
Only select this method if you are setting up a new installation as you will overwrite a number of
tables which may already contain data. If you are in the process of upgrading the module, you
should always select the “Bank rules” table list.
Find the setup file which you downloaded or received from AMC-Consult, then click on OK.
| Installing AMC Banking
8
3 REGISTERING FOR THE AMC BANKING WEB SERVICE
3.1 COMMUNICATION VIA WEB SERVICES
AMC Banking is designed to communicate with XTendLink via web services. There are two options
to choose from: AMC Banking Classic and AMC Banking Enterprise.
3.1.1 AMC BANKING C LASSIC
AMC Banking Classic is based on web services that can be accessed via the AMC webserver. This
means that there must be Internet access via port 80 from the Axapta server. AMC Banking will use
these URL’s when running file conversions etc.
http://classic.amcbanking.com
http://license.amcbanking.dk
The first time you come to register your module, this takes place via the AMC-Consult A/S website
which will be accessed from the Axapta client you are using.
3.1.2 AMC BANKING ENTERPRISE
AMC Banking Enterprise is based on web services that can be accessed via a separately installed
XTendLink server. This means that there will be access to one or more XTendLink servers on any
port you choose, within your own network or VPN. However, we suggest port 8030 for production
and port 8040 for testing.
| Registering for the AMC Banking web service
9
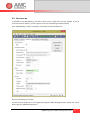
3.2 REGISTRATION
To be able to use AMC Banking, you have to have set up a valid licence for the module. If you do
not have a licence already, you can register a new one by following the points below:
Go to AMC Banking / setup / Parameters, and switch to the XTendLink tab.
Click on the ‘Signing up” button
You will now be guided on to the registration page for AMC Banking Services. Follow the online
help to get your AMC-Banking license.
| Registering for the AMC Banking web service
10
3.3 SETUP OF XTENDLINK ADDRESS AND TEST OF CONNECTION
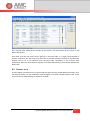
Go back to AMC Banking / Setup / Parameters and switch to the XTendLink tab.
Select the “Use” field.
If you want to use the hosted AMC Banking Service, just select the field AMC-Webservice. The http
fields will then be completed automatically with the addresses of AMC Banking Service.
| Registering for the AMC Banking web service
11
If you want AMC XTendLink to be installed on the company’s own network, you instead have to
state the IP address and the relevant port for the local XTendLink installation, e.g.
First http: http://10.101.101.50:8030/amcxml
When the http fields are completed, you should click on the “Test connection” button in order to
ensure that AMC Banking can communicate with XTendLink.
This test covers both communication with AMC-Consult’s XTendLink licence server and the actual
service which handles files to and from the banks. Therefore, you will see responses of two test
runs in the info log above.
| Registering for the AMC Banking web service
12
4 TROUBLESHOOTING
4.1 COMPILE ERRORS IN BANKING ELEMENTS
If you experience compile errors in one or more AMC Banking elements following compilation, you
can attempt the following:
Try importing the missing elements once more from the XPO file.
Verify that MAPs in JournalNameMap, JournalTableMap and JournalTransMap are set up correctly.
Verify that the above MAPs are “saved”. Try leaving and going back into Axapta, and they should
continue to exist and not be highlighted red.
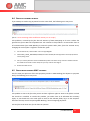
4.2 MISSING LABELS IN SCREENS
If one or more labels are missing from screens, you can try the following:
Verify that the label file (axABAda.ald and/or axABAEN-US.ald) is located in the Axapta application
library (in the same place as the rest of the Axapta label files).
Delete all files which match axABAda.* and axABAEN-US.*, except for the above. Then restart the
Axapta AOS service.
4.3 WARNINGS FOLLOWING COMPLETION OF COMPILING
If you see warnings, but no compile errors following completion of compiling, this is absolutely fine.
AMC is aware of the problem and will rectify it in a future patch. These warnings are of no
significance to the operation of the module.
| Troubleshooting
13
4.4 ERROR IN PAYMENT JOURNAL
If you attempt to send many payments from the same draft, the following error may arise:
(en-us = Error executing code: Insufficient memory to run script.)
This problem is caused by the fact that the amount of data attempting to be sent is above the
general limit for an XML call in Dynamics AX. The solution to this problem is to extend this limit. As
all communication from AMC Banking to external systems takes place from the AX AOS server,
changing the value of this is sufficient. Follow this guide.
1. On the AOS server, select START > Run and type Regedit
2. Select HKEY_LOCAL_MACHINE\SYSTEM\CurrentControlSet\Services\Dynamics Server\4.0\instance
name\config name
3. Set up a new key with the name maxbuffersize (lower case letters only) and set a suitable value for
this. AMC recommends a value of 40, but you may need to set it higher.
4. Restart the AOS service.
4.5 ERROR WHEN OPENING AMC JOURNALS
The first time you open one of the two payment journals in AMC Banking (the deposit or payment
draft), the following error may occur:
This problem is due to the fact that you do not have sufficient rights to write to the folder in which
the AX client is installed. To resolve this problem, you either have to be allocated the necessary
rights, or you should ask a user with rights to write to the relevant folder, log in to the computer
and then start AX, as well as opening AMC-Banking / Journal outgoing payments.
This only has to be done once for the client in question.
| Troubleshooting
14
5 DELETE OLD ELEMENTS
If your installation of AMC Banking is an upgrade from an earlier version 2009, you may have
elements in AX after installation, which are no longer used by AMC Banking. These elements should
be deleted to prevent compile errors in the application. The following elements have been deleted
from AMC Banking version 2009 V7 compared with version 2009 V2/V3/V4/V5/V6.
Notice: You might not have all elements listed below in your installation.
Data Dictionary
Tables
AmcBankJournalPaymentCompany
AmcBankReconcileSurgest
AmcBankSummaryTable
AmcBankSummaryTrans
AmcBankTmpCremulJournalTransSpec
AmcBankTmpJournalTrans
Extended Data Types
AmcBankOutputTypeId
AmcBankSummaryId
Base Enums
AmcBankHandleJournal
AmcBankmarkUnMark
AmcBankOutPutType
AmcBankPrimarySecondary
AmcBankSummaryAccountType
AmcBankSummaryAccountTypes
AmcBankSummaryCashDiscType
AmcBankSummaryReference
AmcBankSummaryStatus
AmcBankSummaryUtilization
AmcBankUpdateOverwrite
Macros
AmcBankJob
AmcBankOCR
AmcBankPatch
AmcBankSerial
AmcBankXTFieldsFixedValues
Classes
AmcBankDemoMake
AmcBankImportTable
AmcBankJournalCremulTmpTransSpecCreate
AmcBankJournalEnter
AmcBankJournalEnter_Check
AmcBankJournalEnter_CheckPost
AmcBankReconcileChequeSettlement
AmcBankReconcileSettleDelete
AmcBankReconcileSurgestAdd
AmcBankReconcileSurgestDiff
AmcBankReconcileSurgestionDelete
AmcBankReconcileSurgestTransfer
AmcBankReferenceSearch
AmcBankSummary2Ledger
AmcBankSummaryMain
AmcBankSummaryPostpone
AmcBankSummarySearch
AmcBankXTBatch
AmcBankXTInterpreter
AmcBankXTJournalDelete
Forms
AmcBankBeta
AmcBankDemoCreate
AmcBankDemoDialog
AmcBankDemoTableListPage
AmcBankSummary2Ledger
AmcBankSummarySearch
AmcBankSummaryTable
AmcBankSummaryTrans
AmcBankJournalPaymentCompany
AmcBankReconcileSurgestTransferLookUp
AmcBankVendPaymentCreateManually
AmcBankXTMessageImport
| Delete old elements
15
Queries
AmcBankReconcileSurgestDelete
AmcBankSummary2Ledger
AmcBankSummarySearch
AmcBankSummaryTrans
Menu Items
Display
AmcBankJournalPaymentCompany
AmcBankDemoTableListPage
AmcBankVendWizardTable
AmcBankSummaryTable
AmcBankSummaryTrans
Action
AmcBankDemoBanstaCreate
AmcBankDemoBaseDataCreate
AmcBankDemoBaseDataCustUpdate
AmcBankDemoBaseDataVendUpdate
AmcBankDemoContrlCreate
AmcBankDemoDebmulCreate
AmcBankDemoFinstaCreate
AmcBankDemoPaymentIncommingCreate
AmcBankDemoPaymentOutgoingCreate
AmcBankJournalChangeMultiMark
AmcBankReconcileSettleDelete
AmcBankReconcileSurgestAdd
AmcBankReconcileSurgestDelete
AmcBankReconcileSurgestDiff
AmcBankReconcileSurgestTransfer
AmcBankSummary2Ledger
AmcBankSummaryPostpone
AmcBankSummarySearch
Output
AmcBankXTMessageLog
Reports
AmcBankReconcileLedgerSettleStatus
AmcBankXTMessageLog
| Delete old elements
16
6 UPGRADING AMC-BANKING FROM 4.X OR PREVIOUS VERSIONS
If your installation is an upgrade of an earlier version of AMC Banking, you have to be aware that a
number of changes have been made to the table structure. Several tables in this version have been
shared across companies, which is why you have to review your existing data in the module in
order to ensure that you can continue to use the module.
Data from old versions of AMC Banking can be imported to version 2009 v4, but you have to assess
in each individual case which tables you should transfer.
Converting data from previous versions of the module is not fully supported due to a change in the
general structure of AMC-banking and a change of names for all tables in the module. Most
essential is the Bank Vendor Table where the vendors’ payment types and account information are
found. The chapter below will assist you in successfully converting these data.
Please note that it is not possible to transfer journals from versions prior to 2009.
You should ask for assistance for this upgrade from AMC-Consult if you are in any doubt.
6.1 IMPORTING XML TOOL IN THE PREVIOUS VERSION
Since the new version of AMC-Banking is limited to importing files in XML-format, it is required to
install an application into the former version of the program. The application can be found at
www.amc.dk or requested directly at AMC-Consult.
The file AMC_Banking_ExportXMLTool_460_481.xpo is to be imported into the previous version of
AMC-Banking by AOT / Import or CTRL + D.
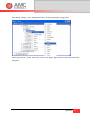
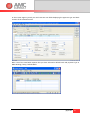
6.2 EXPORTING DATA FROM A PREVIOUS VERSION
After completing the import, open the form AmcBankExportImport. The form is found directly in
AOT under Forms. The following screen will appear:
| Upgrading AMC-Banking from 4.x or previous versions
17
Select the tables you wish to transfer to the new version. If Bank Table Vendor is all you need,
select the tables labelled BankIntfVendTable* or simply select all tables by pressing the button on
the right. It is possible to import only specific tables in the new version afterwards.
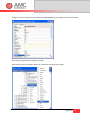
After selecting Export, the following window will appear:
Choose filename and location in the first subject field and the type of data you wish to export in
the second. You will have to choose between Customer data or Vendor data, since several tables in
the previous version of AMC-Banking had more than one function. Choose Vendor if you need data
for the new version of AMC-Banking. Choose Customer if you need the exported data for a new
version of AMC Direct Debit.
In this case, choose Vendor.
| Upgrading AMC-Banking from 4.x or previous versions
18
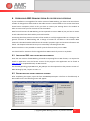
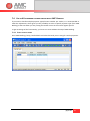
6.3 IMPORTING DATA TO AMC-BANKING 2009
It is possible to import some data from the previous version into AMC-Banking 2009.
The basic assumption is that the essential data from the previous version is the Bank Table Vendor.
It can be imported and converted by following these steps.
Choose AMC-Banking / periodic / Edit / Export/Import.
First, choose User then the three tables labelled AMCBankVendTable*.
Then press Import and choose the file exported in 6.2.
| Upgrading AMC-Banking from 4.x or previous versions
19
6.4 CONVERTING PAYMENT TYPES
It is necessary to convert the imported vendor payment types, due to a change of names in the
2009 version. Before converting your information, enter your own bank at AMC-Banking / Setup /
Main information. Further assistance can be found in the user’s manual for AMC-Banking.
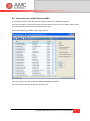
It is easiest to convert vendor account types at AMC-Banking / Periodic / Edit / Multi Edit Vendor.
Choose Selection / Selection (bank table).
It is not necessary to further specify your selection. Choose OK, in the following window.
| Upgrading AMC-Banking from 4.x or previous versions
20
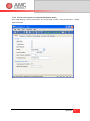
Now all vendors and their affiliated bank and payment types will appear.
To change bank and payment type, press Change.
The left side of the Edit window will show the valid bank and payment type of the vendor chosen in
the Multi Edit window at the time the Change button was clicked. Choose new values for each
previous bank and payment type possible in AMC-Banking 2009. For each payment type,
individually start the Change window. The values in the Multi Edit window will change after
pressing the OK button.
| Upgrading AMC-Banking from 4.x or previous versions
21
Press Transfer after editing all the vendors in the window. This will transfer all new values to the
Bank Table Vendor.
Since both new and old values will be present in the bank table, it is highly recommended to
perform a clean up. The best way to go about this is to delete existing selections in the Multi Edit
window and to run a new selection from the bank table, specifically on the previous bank
information. When the new selection appears in the Multi Edit window, press Delete/ Delete from
Bank Table.
6.5 GENERAL SETUP
It comes highly recommend that you go through the general setup of AMC-Banking manually, since
the general structure of the module has been changed. For further assistance please refer to the
user’s manual for AMC-Banking for Dynamics AX 2009.
| Upgrading AMC-Banking from 4.x or previous versions
22
7 APPENDIX
This Appendix to the installation guide contains a summary of a range of options available to help
you make AMC Banking even easier to use.
AMC-Consult has developed a range of supplementary functions which all influence the standard
application in Dynamics AX. Therefore, it is necessary to make a number of adjustments if you wish
to use these supplementary functions.
The adjustments should be implemented by an experienced system administrator or Dynamics AX
consultant, and this person should be very aware that the adjustments will not conflict with other
functions in AX.
This guide is written only with a view to giving users of AMC Banking a more functional solution by
undertaking simple adjustments based on elements in the AMC module. AMC-Consult is not
responsible for any consequences of these adjustments in AX.
It is recommended unconditionally that you export a backup of the elements concerned before
making any adjustments.
Adjustments of the type specified in this appendix are not covered by AMC-Consult’s general
support agreements for AMC modules.
Unless stated otherwise, the descriptions in this appendix are based on Dynamics AX version 2009.
| Appendix
23
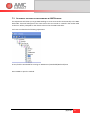
7.1 AUTOMATIC CREATION OF NEW VENDORS IN AMC BANKING
This adjustment will allow you to get AMC Banking to create new vendors automatically in the AMC
bank table. These will take place at the same time as the new vendor is created in the vendor table
as the user will be prompted for the details to be used in the AMC bank table.
You have to undertake the following adjustment:
In AOT, find the VendTable form and go to DataSources/VendTable/Methods/write
Press ENTER to open the method.
| Appendix
24
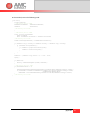
In the method, insert the following code:
void write()
{
boolean newRecord;
// AMC Banking section START
AmcBankDefaultBankAPI
amcBankDefaultBankAPI;
VendTable
amcVendTable;
//AMC Banking section END
;
// AMC Banking section START
select firstonly amcVendTable
index AccountIdx
where amcVendTable.AccountNum == vendTable.AccountNum;
//AMC Banking section END
element.numberSeqFormHandler().formMethodDataSourceWrite();
if (vendTable.orig().Currency && vendTable.Currency != vendTable.orig().Currency)
{
if (vendTable.existOpenOrders())
{
if (VendTable::promptConvertCurrencyCode())
{
vendTable.convertCurrencyCode();
}
}
}
newRecord = (vendTable.orig().RecId == 0) ? true : false;
super();
if (newRecord)
{
DirParty::showHideMessageBar(element,vendTable);
}
// AMC Banking sectioni START
if (amcVendTable.RecID == 0)
{
amcBankDefaultBankAPI=amcBankDefaultBankAPI::findDefaultBank(amcBankAccountType::Vendor);
if(!amcBankAPI::isVendActiveInAMCbanking(vendTable.AccountNum,amcBankAccountType::Vendor,
amcBankDefaultBankAPI.Bank))
AMCBankAPI::createVendInAMCbanking(vendTable.AccountNum,AMCBankAccountType::Vendor);
}
//AMC Banking section END
}
| Appendix
25
Note: You have to select a default bank/payment type in AMC Banking/Setup/Default bank before
the adjustment will take effect.
Here, set up which bank and payment type are to be used by default, when new vendors are
created.
When the user then creates new vendors in the vendor table, this prompt box will be displayed.
When actually setting up a new vendor, it will be possible to change the payment type and specify
the vendors bank or giro account, as well as a SWIFT code where applicable (for use for foreign
payments to vendors).
| Appendix
26
7.2 HOW TO SET UP A LINK FROM A VENDOR TO AMC BANKING
To facilitate maintenance of the AMC Banking bank table, it may be a good idea to set up a menu
item in the vendor table. This will allow you to jump directly from the vendor table to the relevant
vendors payment information in AMC Banking.
To set up this menu item, you have to open AOT (the Application Object Tree).
You then find the element type “Forms” and the form “VendTable”.
Expand
the element by selecting Designs/Design/ButtonGroup and right-clicking on MenuButton: Setup
Select “New control and “MenuItemButton”
Your new menu item will be placed at the bottom of the “Setup” menu in the vendor table, but you
can move this by holding down the ALT key and moving the menu item to the required location
using the arrow keys.
To adjust the new menu item setup, you have to select properties by right-clicking or by pressing
ALT + ENTER.
| Appendix
27
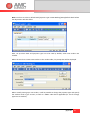
You then have to complete the properties as shown below.
In the two fields HelpText and Text, you have to input the values @ABA20003 and @ABA20000.
When you leave the field, the text will be converted as shown above.
To save your new menu item, you have to right-click on VendTable Form and select “Save”. Then
check that the form compiled without errors.
You can then close AOT.
| Appendix
28
7.3 HOW TO ADD PAYMENT TYPE AND BANK ACCOUNT IN THE INVOICE REGISTER
JOURNAL
To ensure that you have the correct payment information in AMC-Banking you can use this
adjustment to display the payment type and bank account of a certain vendor in the vendor invoice
register journal. The new fields only displays the information, it cannot be changed in the journal
form.
In AOT open the form LedgerJournalTransinvoiceRegister
Go to Data Sources / LedgerJournalTrans and right click the Methods node. Select New Method.
In the new method, insert the following code:
display AMCBankPaymType dispAMC_PaymentType(LedgerJournalTrans _ledgerJournalTrans)
{
return AMCBankAPI::getPaymentType(_ledgerJournalTrans.AccountNum,
AmcBankAccountType::Vendor,
_ledgerJournalTrans.PaymMode,
_ledgerJournalTrans.currencyCode);
}
Close the method and save the changes.
| Appendix
29
Once again right click the Methods Methods node and select New Method. In the new method,
insert the following code:
display AmcBankPaymNum dispAMC_PaymentNumber(LedgerJournalTrans _ledgerJournalTrans)
{
return AmcBankAPI::getPaymentNumber(_ledgerJournalTrans.AccountNum,
AmcBankAccountType::Vendor,
_ledgerJournalTrans.PaymMode,
_ledgerJournalTrans.currencyCode);
}
Close the method and save the changes.
You should now see these methods:
| Appendix
30
Go to Design / Design / Tab / Tabpage:Overview / Group:GroupHeader og right click.
Select New Control / Group, which will create a new group. Right click the new group and select
Properties.
| Appendix
31
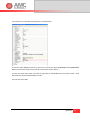
Change the name of the group and add the label @ABA20000 in the Caption field as shown below.
Close the group properties and right click again.
Select New Control / String Edit. Name the new element PaymentType_AMC.
| Appendix
32
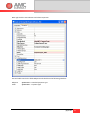
Now right click the new element and select Properties.
The two labels used in the fields HelpText and Label have the following numbers:
HelpText
Label
@ABA30224 Standard payment type
@ABA20011 Payment type
| Appendix
33
Right click again the node [Group:AMC_Banking_Group] and select New Control / String Edit. Name
the new element PaymentNumber_AMC
Right click the element and select Properties
Labels used in the properties:
HelpText
Label
@ABA20291 Bank account selected for the vendor
@ABA20022 Account/No.
Close the properties. Right click the form LedgerJournalTransInvoiceRegister and select Save.
| Appendix
34
In the Invoice register journal you now have two new fields displaying the payment type and bank
account of the selected vendor.
Note: Use of the new fields requires that you have selected a default bank and payment type in
AMC-Banking / Setup / Default Bank.
| Appendix
35
7.4 USE OF AX STANDARD PAYMENT MODES WITH AMC-BANKING
If you need to handle multiple payment types/account number per vendor, it is recommanded to
make this adjustment, which gives you the possibility to select a specific payment type (from AMC
Banking) at the time when you are posting the vendor invoice in the invoice register journal.
To get anvantage of this functionality, you have to to some additional setup of AMC Banking.
7.4.1 SELECT DEFAULT BANK
Go to AMC-Banking / Setup / Default bank and select the bank you are using for vendor payments.
| Appendix
36
7.4.2 ACTIVATE THE SUPPORT OF STANDARD AX PAYMENT MODES
Go to AMC-Banking / Setup / Parameters. On the tab page ”Vendor” mark the check box ”Axapta
payment modes”
| Appendix
37
7.4.3 ADJUSTMENTS IN THE INVOICE REGISTER JOURNAL
In the following example the required adjustments are shown to make it possible to select a
specific AMC payment type for an invoice posted in the invoice register journal.
In order to select between the AMC payment types you have to change the lookup method of the
payment mode field.
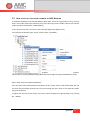
In AOT open the form LedgerJournalTransInvoiceRegister. Select / Designs / Design / Tab:Tab /
TabPage:Payment / Group:Payment / StringEdit: LedgerJournalTrans_PaymMode / Methods /
Right click the metods node and select Overwrite method / Lookup and insert the following code:
void lookup()
{
;
if(AmcBankParameters::find().VendUsePaymModeStandard)
AmcBankVendTablePaymType::lookupPaymentType(this,ledgerJournalTrans);
else
super();
}
Close the window and save the changes.
| Appendix
38