1
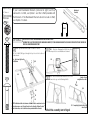
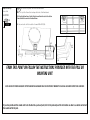
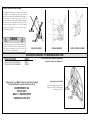
1
7/02/2012
VISIT THE LIFETIME WEB SITE:
WWW.LIFETIME.COM
**For U.S. and Canada Customers ONLY:**
IF ASSISTANCE IS NEEDED,
DO NOT CONTACT THE STORE!!!
CALL OUR CUSTOMER SERVICE DEPARTMENT at 1 (800) 225-3865
PY
HOURS: 7:00 a.m. to 5:00 p.m. Monday through Friday (Mountain Standard Time)
**Customers outside the U.S. or Canada, please contact the store.**
BACKBOARD AND RIM COMBO
MODEL #71526
CO
ASSEMBLY INSTRUCTIONS AND
OWNER’S MANUAL
WARNING
Failure to comply with any of the warnings in
these instructions may result in serious personal
injuries such as cuts, broken bones, nerve
damage, paralysis, brain injury, or death. Failure
to comply may also result in property damage.
Please heed all warnings and cautions. To
ensure your safety, do not attempt to assemble
this system without reading and following all
instructions carefully. Identify and inventory the
parts using the Parts List.
**A MINIMUM OF TWO ADULTS ARE REQUIRED
FOR ASSEMBLY**
Save this instruction in the event that the manufacturer has to be contacted for replacement parts.
INSTRUCTION #1030942 D
2
HARDWARE IS ACTUAL SIZE
PARTS LIST
(unless otherwise indicated)
Qty
1
1
1
1
1
1
1
1
1
2
RB
RC
RD
RE
RF
RH
FA
PY
4
2
2
2
2
2
2
6
2
1
RA
RG
10
CO
ID
Part #
Description
AA
825619
Rim
AB
1030727
Backboard
AC
502005
Net
AD
502056
Plastic Guard
AE
800165
Rim Cover Plate
AF
804018
Rim Pivot Bracket
AG
804033
Spring Retainer Plate
AH
CA00299
Frame Pad Left
AF
CA00399
Frame Pad Right
AG
CA00999
Bottom Frame Pad
Rim Hardware (HD9136B)
RA
BS01000
#7 x 3/8” Screw
RB
300104
3/8” Push Nut
RC
300106
5/16” x 2” Carriage Bolt
RD
300114
5/16” Push Nut
RE
302011
5/16” x 1 1/4” Carriage Bolt
RF
302014
5/16” Flat Washer
RG
302061
5/16” x 5” Hex Bolt
RH
302090
5/16” Nylock Flange Nut
RI
502060
Compression Spring
RJ
510038
3/8” x 5 1/2” Axle
Frame Pad Hardware (HH00700)
FA
BS00100
#10 x 7/8” Screw
1. The Backboard can be mounted to any Lifetime Products® brand pole or most other commercially available poles. If using other than a Lifetime Products® pole, the mounting
CSBDLFUEFTJHONVTUQSPWJEFBEFRVBUFTVQQPSUCFIJOEUIF3JNNPVOUJOHIPMFTBTXFMMBTUIFVQQFS#BDLCPBSENPVOUJOHIPMFT*GBEFRVBUFTVQQPSUJTOPUQSPWJEFEUIF
Backboard may be damaged and the warranty will be void. Lifetime Products, Inc.® offers a pole system with a height adjusting mechanism that can be used to safely mount
this Backboard. Please Call Customer Service at the number on Page One for more information.
2. If using an existing pole system that does not include extension arms, or if a pole system is not being used, see Page 8.
SAFETY INSTRUCTIONS
Failure to follow these safety instructions may result in serious injury or property damage and will void the warranty. The owner must ensure that all players
know and follow these rules for safe operation of the system. Proper and complete assembly, use, and supervision is essential for proper
operation and to reduce the risk of accident or injury. A high probability of serious injury exists if this system is not installed, maintained, or
operated properly.
t*GVTJOHBMBEEFSEVSJOHBTTFNCMZVTFFYUSFNFDBVUJPO'PMMPXBMMXBSOJOHTBOEDBVUJPOTPOUIFMBEEFSDBSFGVMMZt5XPQFPQMFBSFSFRVJSFE
GPSBTTFNCMZt$MJNBUFDPSSPTJPOPSNJTVTFDPVMESFTVMUJOTZTUFNGBJMVSFt*GUFDIOJDBMBTTJTUBODFJTSFRVJSFEDPOUBDUUIFNBOVGBDUVSFS
Most injuries are caused by misuse and/or failure to follow instructions. Use caution when using the system.
Tools and Materials Required for
Assembly
(Not Included)
1.
2.
3.
4.
Adjustable Wrench
1/2” Wrenches (2)
Electric Drill
1/2” Socket Wrench
BEFORE BEGINNING ASSEMBLY
A. Identify and inventory all parts using the checklist boxes on the Parts List. Keep the hardware bags and their contents separate. If any parts
are missing, call our Customer Service Department.
B. Test fit all Bolts by inserting them into their respective holes. If necessary, carefully scrape away any excess powder coating buildup from inside
the holes. Do not scrape away all of the powder coating. Bare metal may rust.
ATTENTION: This Backboard is not designed for custom installations. The Backboard is
designed for use with a Lifetime Products® Pole Mounting Unit or Universal Mounting
Bracket. If a Pole or Mounting Bracket is being used, mount the Backboard and Rim
using the hardware included with the Pole system or Mounting kit and according to
the directions included with that product. Depending upon which mounting method
is used, you will follow either Option 1 or 2 according to indications on the next page.
The Pole or Mounting Bracket will include a set of Backboard Brackets.
Note: A Universal Mounting Bracket will allow you to install the Backboard to a wall,
roof, or 3 1/2” Pole.
REGISTER YOUR PRODUCT ONLINE AT WWW.LIFETIME.COM
At Lifetime, we are committed to providing innovative and quality products. While registering, you will have the opportunity
to give us your feedback. Your input is valuable to us.
t:PVDBOBMTPPQUJOUPSFDFJWFOFXQSPEVDUOPUJmDBUJPOTPSQSPNPUJPOT
t*OUIFVOMJLFMZFWFOUPGBQSPEVDUSFDBMMPSTBGFUZNPEJmDBUJPOZPVSSFHJTUSBUJPOQSPWJEFTUIFJOGPSNBUJPO
we need to notify you directly.
t3FHJTUSBUJPOJTGBTUFBTZBOEDPNQMFUFMZWPMVOUBSZ
LIFETIME’S PROMISE TO YOU:
Maintaining your privacy is our long-standing policy at Lifetime. And you can rest assured that Lifetime
will not sell or provide your personal data to other third parties, or allow them to use your personal data
for their own purposes.
We invite you to read our privacy policy at www.lifetime.com
REGISTER today!
NOTE: Do not mount the Rim directly to the Backboard. The strike plate on the
Backboard is not designed to hold the weight of the Rim, and will not be able to
support it. If you need to mount the Rim to the Backboard without using a Pole
system or Universal Bracket system, you must place a metal support plate behind
the Backboard. Failure to use a support plate will result in damage to the Backboard.
Support must also be provided at the top of the Backboard using the Carriage Bolts
in the slots as shown on Page 5 in these instructions.
WARNING
The Rim and Backboard Combo kit must be mounted and
supported properly. Damage will occur if sufficient Rim
support is not provided.
3
4
Required for this page:
1/2” Wrench
HD9136B
RH (4)
If you have Backboard Brackets (pictured at right) and they
come with a U-Bolt, use Option 1 and the U-Bolt provided with
the Brackets. If the Backboard Brackets do not include a U-Bolt,
use Option 2 instead.
Backboard
Brackets
U-Bolt
RC (2)
OPTION 1
1A
THIS OPTION IS FOR USE WITH BACKBOARD BRACKETS WITH A U-BOLT.
ASSEMBLE THE U-BOLT (PROVIDED WITH THE BACKBOARD BRACKETS) TO THE BACKBOARD BRACKETS ACCORDING TO THE INSTRUCTIONS PROVIDED IN
THE POLE OR MOUNTING BRACKET UNIT.
1A.1 Lay the Backboard (AB) on a table or bench.
1B
1B.1 Slide the Carriage Bolt (RE) into the
crimped slot in each Backboard channel.
1A.2 The U-Bolt (UB) goes through the top holes in the bottom of
the Backboard.
Note: Only hand tighten the
Nuts (RH) now.
AB
RE
RH
RE
RE
UB
1C
RE
(2)
1C.1 Bend the Backboard Brackets out so the
lower holes go over the Carriage Bolts.
Caution: Do not
overtighten these Nuts.
RH
RH
AD
AF
RC
NOTE: The Backboard Brackets shown are Lifetime Products® models and are for
illustration purposes only. If using Brackets other than the Lifetime Products®
models shown here, refer to the instructions provided with the Brackets.
1C.2 Completely tighten the Nuts (RH)
from Step 1A.
To finish the assembly, turn to Page 6
Required for this page:
1/2” Wrench
HD9136B
RF (2)
RH (4)
OPTION 2
1A
THIS OPTION IS FOR ASSEMBLY WITH BACKBOARD BRACKETS BUT WITHOUT A U-BOLT.
1A.1 Lay the Backboard (AB) on a table or bench.
1A.2 The 5/16” x 5” Hex Bolts (RG) go through
the top holes in the bottom of the Backboard.
1B
1B.1 Slide a Carriage Bolt (RE) into the
crimped slot in each backboard channel.
RG
RF
Note: Only hand tighten the Nuts
(RH) now.
RH
RE
RE
AB
RC (2)
RE
RG
(2)
AD
AF
RC
®
NOTE: The Backboard Brackets shown are Lifetime Products models and are for
illustration purposes only. If using Brackets other than the Lifetime Products® models
shown here, refer to the instructions provided with the Brackets.
1C
1C.1 Bend the Backboard Brackets out so the
lower holes go over the Carriage Bolts.
RE (2)
1C.2 Completely tighten the Nuts
(RH) from Step 1A.
RH
RH
Note: Do not overtighten these
Nuts (RH).
To finish the assembly, turn to Page 6
5
6
Required For This Page:
1/2” Wrench
2.1 Use the 1/2” socket head from
the socket head wrench to press
one Push Nut (RD) onto one end of the
Axle (RJ).
2
3
3.1 Turn the Backboard over so it faces up.
3.1 Slide the end of the Axle (RJ) through the Rim (AA) and the Rim Pivot Bracket (AF). Press
the Push Nut (RD) onto the end of the Axle. Use the 1/2” socket head to secure the Push Nut if
needed.
1/2” Socket
Wrench
Screwdriver
HD9136B
RJ
RD
RH (2)
AA
RJ
RA (4)
Note: The Push Nut should rest about 1/4” from the end
of the Axle. If the Push Nut slips on too far, continue
sliding it to the other end of the Axle to remove it and try
again.
RJ
RD
AF
RD (2)
4.1 If the unit with the U-Bolt
includes Jam Nuts (pictured
actual size below) they are to be secured
onto the ends of the U-Bolt or Hex Bolts
here.
4
5
5.1 Slide the Compression
Springs (RI) onto the legs
of the U-Bolt or Hex Bolts.
JN
JN
JN
6.1 Tighten the Nylock
Flange Nuts (RH) until
the Rim is under the desired
tension.
6
RH
RI
RH
7
7.1 Fasten the Rim Cover Plate
(AE) to the Rim (AA) using the
#7 x 3/8” Screws (RA).
RA
AG
AE
Required for This Page:
Electric Drill
8.1 Remove the plastic film from the Backboard.
8
Note: The lip of the Frame Pad overlaps the front of the Backboard.
HH00700
FA
(8)
8.2 Attach the Bottom Frame Pad first. Align the small line in the back of the Bottom
Frame Pad with the seam in the Backboard frame.
8.3 Use an electric drill to insert the Screws #10 x 7/8“ (FA).
AF
AH
FA
AG
FA
AF
FROM THIS POINT ON FOLLOW THE INSTRUCTIONS PROVIDED WITH THE POLE OR
MOUNTING UNIT.
NOTE: FAILURE TO PROVIDE ADEQUATE SUPPORT BEHIND THE BACKBOARD WILL VOID THE PRODUCT WARRANTY. FOLLOW ALL ASSEMBLY INSTRUCTIONS CAREFULLY.
If you have purchased this combo unit to be attached to a pole-only unit, refer to the pole-only unit for instructions on how to assemble and attach
the combo unit to the pole.
7
8
ROOF MOUNT, WALL MOUNT, EXISTING POLE MOUNT
If mounting the Backboard to a roof mount, wall mount
or existing pole mount that does not have an extension
provided, you must use a Mounting Bracket Kit designed
for this purpose. Lifetime Products, Inc. ® offers a
Universal Extension Bracket, Model #9594, through
our Customer Service Department. Figures A, B and
C show the Bracket mounted to a roof mount, a wall
mount and an existing pole mount. Please see below
for ordering information.
WARNING
Use extreme caution when standing on ladders to
perform assembly steps. Follow all warnings and
cautions on the ladder. Failure to follow all of these
instructions and warnings could lead to serious
personal injury or property damage.
FIGURE A, ROOF MOUNT
FIGURE B, WALL MOUNT
ACCESSORIES AVAILABLE FOR MORE BASKETBALL FUN!
PRODUCT DESCRIPTION
Universal Extension Bracket
Intermediate Size Basketball
MODEL #
9594
594201
To place orders, use a Master Card or Visa and call our Customer
Service Department or send check or money order to:
LIFETIME PRODUCTS, INC.
P.O. BOX 160010
BLDG. D-11, FREEPORT CENTER
CLEARFIELD, UT 84016-0010
Call the Customer Service Department at the number
on Page One for prices and shipping costs.
Universal Extension Bracket #9594
Ideal for mounting Backboard and Rim
sets to a pole, wall or roof. (Backboard
and Rim not included.)
FIGURE C, EXISTING POLE MOUNT
LIFETIME BASKETBALL EQUIPMENT
5-YEAR LIMITED FACTORY WARRANTY
THE MANUFACTURER RESERVES THE RIGHT TO MAKE SUBSTITUTIONS TO WARRANTY CLAIMS IF PARTS ARE UNAVAILABLE OR OBSOLETE.
1.
Lifetime basketball systems are warranted to the original purchaser to be free from defects in material or workmanship for a period of
five years from the date of original retail purchase. The word “defects” is defined as imperfections that impair the use of the product.
Defects resulting from misuse, abuse or negligence will void this warranty. This warranty does not cover defects due to improper
installation, alteration or accident. This warranty does not cover damage caused by vandalism, rusting, “acts of nature” or any other
event beyond the control of the manufacturer.
2.
This warranty is nontransferable and is expressly limited to the repair or replacement of defective basketball equipment. If the equipment
is defective within the terms of this warranty, Lifetime Products, Inc. will repair or replace defective parts at no cost to the purchaser. Shipping
charges to and from the factory are not covered and are the responsibility of the purchaser. Labor charges and related expenses for removal,
installation or replacement of the basketball system or its components are not covered under this warranty.
3.
This warranty does not cover scratching or scuffing of the product that may result from normal usage. In addition, defects resulting from
intentional damage, negligence, unreasonable use or hanging from the net or rim will void this warranty.
4.
Liability for incidental or consequential damages is excluded to the extent permitted by law. While every attempt is made to embody the highest
degree of safety in all equipment, freedom from injury cannot be guaranteed. The user assumes all risk of injury resulting from the use of this
product. All merchandise is sold on this condition, and no representative of the company may waive or change this policy.
5.
This product is not intended for institutional or commercial use; Lifetime Products, Inc. does not assume any liability for such use. Institutional
or commercial use will void the warranty.
6.
This warranty is expressly in lieu of all other warranties, expressed or implied, including warranties of merchantability or fitness for use. Neither
Lifetime Products, Inc., nor any representative assumes any other liability in connection with this product.
ALL WARRANTY CLAIMS MUST BE ACCOMPANIED BY A SALES RECEIPT.
REPORT PRODUCT DEFECTS IN WRITING TO:
Lifetime Products, Inc., PO Box 160010 Clearfield, UT 84016-0010
or call (800) 225-3865 M-F 87 a.m. to 5 p.m. MST.
Please include your dated sales receipt and photographs of damaged parts.
To Register Your Product, Visit Our Website at www.lifetime.com
9