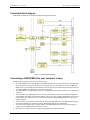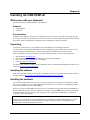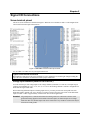
1
USB-TEMP-AI Temperature and Voltage Measurement User's Guide Document Revision 6 March 2013 © Copyright 2013 Your new Measurement Computing product comes with a fantastic extra — Management committed to your satisfaction! Thank you for choosing a Measurement Computing product—and congratulations! You own the finest, and you can now enjoy the protection of the most comprehensive warranties and unmatched phone tech support. It’s the embodiment of our mission: To provide data acquisition hardware and software that will save time and save money. Simple installations minimize the time between setting up your system and actually making measurements. We offer quick and simple access to outstanding live FREE technical support to help integrate MCC products into a DAQ system. Limited Lifetime Warranty: Most MCC products are covered by a limited lifetime warranty against defects in materials or workmanship for the life of the product, to the original purchaser, unless otherwise noted. Any products found to be defective in material or workmanship will be repaired, replaced with same or similar device, or refunded at MCC’s discretion. For specific information, please refer to the terms and conditions of sale. Harsh Environment Program: Any Measurement Computing product that is damaged due to misuse, or any reason, may be eligible for replacement with the same or similar device for 50% of the current list price. I/O boards face some harsh environments, some harsher than the boards are designed to withstand. Contact MCC to determine your product’s eligibility for this program. 30 Day Money-Back Guarantee: Any Measurement Computing Corporation product may be returned within 30 days of purchase for a full refund of the price paid for the product being returned. If you are not satisfied, or chose the wrong product by mistake, you do not have to keep it. These warranties are in lieu of all other warranties, expressed or implied, including any implied warranty of merchantability or fitness for a particular application. The remedies provided herein are the buyer’s sole and exclusive remedies. Neither Measurement Computing Corporation, nor its employees shall be liable for any direct or indirect, special, incidental or consequential damage arising from the use of its products, even if Measurement Computing Corporation has been notified in advance of the possibility of such damages. Trademark and Copyright Information Measurement Computing Corporation, InstaCal, Universal Library, and the Measurement Computing logo are either trademarks or registered trademarks of Measurement Computing Corporation. Refer to the Copyrights & Trademarks section on mccdaq.com/legal for more information about Measurement Computing trademarks. Other product and company names mentioned herein are trademarks or trade names of their respective companies. © 2013 Measurement Computing Corporation. All rights reserved. No part of this publication may be reproduced, stored in a retrieval system, or transmitted, in any form by any means, electronic, mechanical, by photocopying, recording, or otherwise without the prior written permission of Measurement Computing Corporation. Notice Measurement Computing Corporation does not authorize any Measurement Computing Corporation product for use in life support systems and/or devices without prior written consent from Measurement Computing Corporation. Life support devices/systems are devices or systems that, a) are intended for surgical implantation into the body, or b) support or sustain life and whose failure to perform can be reasonably expected to result in injury. Measurement Computing Corporation products are not designed with the components required, and are not subject to the testing required to ensure a level of reliability suitable for the treatment and diagnosis of people. HM USB-TEMP-AI.docx 2 Table of Contents Preface About this User’s Guide ....................................................................................................................... 5 What you will learn from this user's guide ......................................................................................................... 5 Conventions in this user's guide ......................................................................................................................... 5 Where to find more information ......................................................................................................................... 5 Chapter 1 Introducing the USB-TEMP-AI ............................................................................................................. 6 Functional block diagram ................................................................................................................................... 7 Connecting a USB-TEMP-AI to your computer is easy ..................................................................................... 7 Chapter 2 Installing the USB-TEMP-AI ................................................................................................................. 8 What comes with your shipment? ....................................................................................................................... 8 Hardware .......................................................................................................................................................................... 8 Documentation .................................................................................................................................................................. 8 Unpacking........................................................................................................................................................... 8 Installing the software ........................................................................................................................................ 8 Installing the hardware ....................................................................................................................................... 8 Configuring the hardware ................................................................................................................................... 9 Calibrating the USB-TEMP-AI .......................................................................................................................... 9 Chapter 3 Signal I/O Connections .......................................................................................................................10 Screw terminal pinout ....................................................................................................................................... 10 Voltage input terminals (±V0H/V0L to ±V3H/V3L) .......................................................................................................10 Sensor input terminals (T0H/T0L to T3H/T3L) ...............................................................................................................11 Current excitation output terminals (±I1 and ±I2) ...........................................................................................................11 Four-wire, two sensor common terminals (4W01 and 4W23) .........................................................................................11 Sensor common terminals (IT01 and IT23) .....................................................................................................................11 Digital terminals (DIO0 to DIO7) ....................................................................................................................................11 Counter terminal (CTR) ...................................................................................................................................................11 Ground terminals (GND) .................................................................................................................................................11 Power output (+5V) .........................................................................................................................................................12 CJC sensor .......................................................................................................................................................................12 Thermocouple connections ............................................................................................................................... 12 Wiring configuration........................................................................................................................................................12 RTD and thermistor connections ...................................................................................................................... 13 Two-wire configuration ...................................................................................................................................................13 Three-wire configuration .................................................................................................................................................14 Four-wire configuration ...................................................................................................................................................14 Semiconductor sensor measurements ............................................................................................................... 15 Wiring configuration........................................................................................................................................................16 Digital I/O connections ..................................................................................................................................... 16 Configuring the DIO channels to generate alarms ...........................................................................................................16 Chapter 4 Functional Details ...............................................................................................................................17 Thermocouple measurements ........................................................................................................................... 17 Cold junction compensation (CJC) ..................................................................................................................................17 Data linearization .............................................................................................................................................................17 Open-thermocouple detection (OTD) ..............................................................................................................................17 RTD and thermistor measurements .................................................................................................................. 17 Data linearization .............................................................................................................................................................18 3 USB-TEMP-AI User's Guide External components ........................................................................................................................................ 18 Screw terminals................................................................................................................................................................18 USB connector .................................................................................................................................................................18 LEDs ................................................................................................................................................................................18 Chapter 5 Specifications ......................................................................................................................................19 Analog input ..................................................................................................................................................... 19 Channel configurations ..................................................................................................................................... 20 Compatible sensors: T0x-T3x ..........................................................................................................................................21 Accuracy ........................................................................................................................................................... 21 Thermocouple measurement accuracy: T0x-T3x .............................................................................................................21 Semiconductor sensor measurement accuracy: T0x-T3x .................................................................................................22 RTD measurement accuracy: T0x-T3x ............................................................................................................................22 Thermistor measurement accuracy: T0x-T3x ..................................................................................................................23 Absolute Accuracy: V0x-V3x ..........................................................................................................................................24 Settling time: V0x-V3x ....................................................................................................................................................24 Analog input calibration ................................................................................................................................... 25 Throughput rate ................................................................................................................................................ 25 Digital input/output........................................................................................................................................... 25 Counter ............................................................................................................................................................. 26 Memory ............................................................................................................................................................ 26 Microcontroller ................................................................................................................................................. 26 USB +5V voltage ............................................................................................................................................. 26 Power ................................................................................................................................................................ 27 USB specifications ........................................................................................................................................... 27 Current excitation outputs (±Ix, T0x-T3x) ....................................................................................................... 27 Environmental .................................................................................................................................................. 27 Mechanical ....................................................................................................................................................... 28 Screw terminal connector ................................................................................................................................. 28 Declaration of Conformity ..................................................................................................................29 4 Preface About this User’s Guide What you will learn from this user's guide This user's guide describes the Measurement Computing USB-TEMP-AI data acquisition device and lists device specifications. Conventions in this user's guide For more information Text presented in a box signifies additional information related to the subject matter. Caution! Shaded caution statements present information to help you avoid injuring yourself and others, damaging your hardware, or losing your data. bold text Bold text is used for the names of objects on a screen, such as buttons, text boxes, and check boxes. italic text Italic text is used for the names of manuals and help topic titles, and to emphasize a word or phrase. Where to find more information Additional information about USB-TEMP hardware is available on our website at www.mccdaq.com. You can also contact Measurement Computing Corporation with specific questions. Knowledgebase: kb.mccdaq.com Phone: 508-946-5100 and follow the instructions for reaching Tech Support Fax: 508-946-9500 to the attention of Tech Support Email: [email protected] 5 Chapter 1 Introducing the USB-TEMP-AI The USB-TEMP-AI is a USB 2.0 full-speed, temperature measurement module that is supported under popular Microsoft® Windows® operating systems. The USB-TEMP-AI is fully compatible with both USB 1.1 and USB 2.0 ports. The USB-TEMP-AI provides eight analog input channels that are configured as four differential temperature inputs and four differential or single-ended voltage inputs. A 24-bit analog-to-digital (A/D) converter is provided for each pair of analog inputs. Eight independent, TTL-compatible digital I/O channels are provided to monitor TTL-level inputs, communicate with external devices, and to generate alarms. The digital I/O channels are software programmable for input or output. The temperature input channels are configured as two channel pairs that accept temperature sensor type inputs. You can take measurements from four sensor categories. The sensor category is software programmable for each channel pair: Thermocouple – types J, K, R, S, T, N, E, and B Resistance temperature detectors (RTDs) – 2, 3, or 4-wire measurements of 100 Ω platinum RTDs Thermistors – 2, 3, or 4-wire measurements Semiconductor temperature sensors – LM35, TMP35 or equivalent You can connect a different category of sensor to each temperature channel pair, but you cannot mix sensor categories between the channels that constitute a channel pair. You can, however, mix thermocouple types within channel pairs. Each voltage input channel is software configurable for differential or single-ended mode. The voltage input range is software programmable for ±10 V, ±5 V, ±2.5 V, ±1.25 V. The USB-TEMP-AI provides a integrated cold junction compensation (CJC) sensor for thermocouple measurements, and built-in current excitation sources for resistive sensor measurements. An open thermocouple detection feature lets you detect a broken thermocouple. An on-board microprocessor automatically linearizes the measurement data according to the sensor category. The USB-TEMP-AI features eight independent temperature alarms. Each alarm controls an associated digital I/O channel as an alarm output. The input to each alarm is one of the temperature input channels. The output of each alarm is software configurable as active high or low. You set up the temperature threshold conditions to activate each alarm. When an alarm is activated, the associated DIO channel is driven to the output state. The USB-TEMP-AI is a standalone plug-and-play module which draws power from the USB cable. No external power supply is required. All configurable options are software programmable. The USB-TEMP-AI is fully software calibrated. 6 USB-TEMP-AI User's Guide Introducing the USB-TEMP-AI Functional block diagram USB-TEMP-AI functions are illustrated in the block diagram shown here. Figure 1. Functional block diagram Connecting a USB-TEMP-AI to your computer is easy Installing a data acquisition device has never been easier: The USB-TEMP-AI relies upon the Microsoft Human Interface Device (HID) class drivers. The HID class drivers ship with every copy of Windows that is designed to work with USB ports. We use the Microsoft HID because it is a standard, and its performance delivers full control and maximizes data transfer rates for your USB-TEMP-AI. No third-party device driver is required. The USB-TEMP-AI is plug-and-play. There are no jumpers to position, DIP switches to set, or interrupts to configure. You can connect the USB-TEMP-AI before or after you install the software, and without powering down your computer first. When you connect an HID to your system, your computer automatically detects it and configures the necessary software. You can connect and power multiple HID peripherals to your system using a USB hub. You can connect your system to various devices using a standard USB cable. The USB connector replaces the serial and parallel port connectors with one standardized plug and port combination. You do not need a separate power supply module. The USB automatically delivers the electrical power required by each peripheral connected to your system. Data can flow two ways between a computer and peripheral over USB connections. 7 Chapter 2 Installing the USB-TEMP-AI What comes with your shipment? The following items are shipped with the USB-TEMP-AI. Hardware USB-TEMP-AI USB cable Documentation In addition to this hardware user's guide, you should also receive the Quick Start Guide. This booklet provides an overview of the MCC DAQ software you received with the device, and includes information about installing the software. Please read this booklet completely before installing any software or hardware. Unpacking As with any electronic device, you should take care while handling to avoid damage from static electricity. Before removing the USB-TEMP-AI from its packaging, ground yourself using a wrist strap or by simply touching the computer chassis or other grounded object to eliminate any stored static charge. If any components are missing or damaged, contact us immediately using one of the following methods: Knowledgebase: kb.mccdaq.com Phone: 508-946-5100 and follow the instructions for reaching Tech Support Fax: 508-946-9500 to the attention of Tech Support Email: [email protected] For international customers, contact your local distributor. Refer to the International Distributors section on our website at www.mccdaq.com/International. Installing the software Refer to the Quick Start Guide for instructions on installing the software on the MCC DAQ CD. This booklet is available in PDF at www.mccdaq.com/PDFmanuals/DAQ-Software-Quick-Start.pdf. Installing the hardware To connect the USB-TEMP-AI to your system, turn your computer on, and connect the USB cable to a USB port on your computer or to an external USB hub that is connected to your computer. The USB cable provides power and communication to the USB-TEMP-AI. When you connect the USB-TEMP-AI for the first time, a notification message opens as the USB-TEMP-AI is detected. When the message closes, the installation is complete. The upper LED (Activity) blinks when initially connected and then stays on. The lower LED (USB) turns on to indicate that communication is established between the device and computer. If the USB LED turns off If the LED is lit but then turns off, the computer has lost communication with the USB-TEMP-AI. To restore communication, disconnect the USB cable from the computer, and then reconnect it. This should restore communication, and the LED should turn back on. 8 USB-TEMP-AI User's Guide Installing the USB-TEMP-AI Configuring the hardware All hardware configuration options on the USB-TEMP-AI are programmable with software. Use InstaCal to set the sensor type for each temperature channel, the range and input configuration of each voltage channel, and the alarm conditions. Any channel you don’t intend to use should be left disabled. The configurable options dynamically update according to the selected sensor category. Configuration options are stored on the USB-TEMP-AI 's isolated microcontroller in EEPROM, which is non-volatile memory on the USB-TEMP-AI module. Configuration options are loaded on power up. Default configuration The factory default configuration is Disabled. The Disabled mode disconnects the analog inputs from the terminal blocks and internally grounds all of the A/D inputs. This mode also disables each of the current excitation sources. Warm up Allow the USB-TEMP-AI to warm up for 30 minutes before taking measurements. This warm up time minimizes thermal drift and achieves the specified rated accuracy of measurements. For analog, RTD or thermistor measurements, this warm-up time is also required to stabilize the internal current reference. Calibrating the USB-TEMP-AI The USB-TEMP-AI is fully calibrated via software. InstaCal prompts you to run its calibration utility when you change from one sensor category to another. Allow the USB-TEMP-AI to operate for at least 30 minutes before calibrating. This warm up time minimizes thermal drift and achieves the specified rated accuracy of measurements. 9 Chapter 3 Signal I/O Connections Screw terminal pinout The device screw terminals are identified in Figure 2. Between screw terminals 10 and 11 is the integrated CJC sensor used for thermocouple measurements. Figure 2. USB-TEMP-AI screw terminal pin numbers Use 16 AWG to 30 AWG wire for your signal connections. Tighten screw terminal connections When making connections to the screw terminals, be sure to tighten the screw until tight. Simply touching the top of the screw terminal is not sufficient to make a proper connection. Voltage input terminals (±V0H/V0L to ±V3H/V3L) You can connect up to four voltage inputs to the voltage channels (V0H/V0L to V3H/V3L). The input range is software programmable for ±10 V, ±5 V, ±2.5 V, or ±1.25 V. Each voltage channel is software configurable for differential or single-ended mode. When connecting differential inputs to floating input sources, you must provide a DC return path from each differential input to ground. One way to do this is to connect a resistor from one side of each of the differential inputs to GND. A value of approximately 100 kΩ can be used for most applications. Caution! All ground pins are common and isolated from earth ground. If a connection is made to earth ground when using digital I/O and conductive thermocouples, the thermocouples are no longer isolated. In this case, thermocouples must not be connected to any conductive surfaces that may be referenced to earth ground. 10 USB-TEMP-AI User's Guide Signal I/O Connections Sensor input terminals (T0H/T0L to T3H/T3L) The USB-TEMP-AI supports the following temperature sensor types: Thermocouple – types J, K, R, S, T, N, E, and B Resistance temperature detectors (RTDs) – 2, 3, or 4-wire measurement modes of 100 Ω platinum RTDs. Thermistors – 2, 3, or 4-wire measurement modes. Semiconductor temperature sensors – LM35, TMP35 or equivalent Sensor selection The type of sensor you select will depend on your application needs. Review the temperature ranges and accuracies of each sensor type to determine which is best suited for your application. You can connect up to four temperature sensors to the differential sensor inputs (T0H/T0L to T3H/T3L). Supported sensor categories include thermocouples, RTDs, thermistors, or semiconductor sensors. Do not mix sensor categories within channel pairs. You can mix thermocouple types (J, K, R, S, T, N, E, and B) within channel pairs, however. Do not connect two different sensor categories to the same channel pair The USB-TEMP-AI provides a 24 bit A/D converter for each channel pair. Each channel pair can monitor one sensor category. To monitor a sensor from a different category, connect the sensor to a different pair of sensor input terminals. Current excitation output terminals (±I1 and ±I2) The USB-TEMP-AI has two dedicated pairs of current excitation output terminals (±I1 and ±I2). These terminals have a built-in precision current source to provide excitation for the resistive sensors used for RTD and thermistor measurements. Each current excitation terminal is dedicated to one pair of sensor input channels: I1+ is the current excitation source, and I1- is the current excitation return for channel 0 and channel 1 I2+ is the current excitation source, and I2- is the current excitation return for channel 2 and channel 3 Four-wire, two sensor common terminals (4W01 and 4W23) The 4W01 and 4W23 terminals are used as the common connection for four-wire configurations with two RTD or thermistor sensors. Sensor common terminals (IT01 and IT23) The IT01 and IT23 terminals are used as the common connection for two-wire configurations with two RTD or thermistor sensors. Digital terminals (DIO0 to DIO7) You can connect up to eight digital I/O lines to the screw terminals labeled DIO0 to DIO7. Each terminal is software configurable for input or output. Counter terminal (CTR) The CTR terminal (pin 40) is the input to the 32-bit event counter. The internal counter increments when the TTL level transitions from low to high. The counter can count events at frequencies of up to 1 MHz. Caution! All ground pins are common and isolated from earth ground. If a connection is made to earth ground when using digital I/O and conductive thermocouples, the thermocouples are no longer isolated. In this case, thermocouples must not be connected to any conductive surfaces that may be referenced to earth ground. Ground terminals (GND) The nine ground terminals (GND) provide a common ground for the input channels and DIO bits and are isolated (500 VDC) from the USB GND. 11 USB-TEMP-AI User's Guide Signal I/O Connections Power output (+5V) The +5V output terminal is isolated (500 VDC) from the USB +5V. Caution! The +5V terminal is an output terminal. Do not connect to an external power supply or you may damage the USB-TEMP-AI and possibly the computer. CJC sensor The USB-TEMP-AI has one built-in high-resolution temperature sensor. The CJC sensor measures the ambient temperature at the terminal block so that the cold junction voltage can be calculated. Thermocouple connections A thermocouple consists of two dissimilar metals that are joined together at one end. When the junction of the metals is heated or cooled, a voltage is produced that correlates to temperature. The USB-TEMP-AI makes fully differential thermocouple measurements without requiring ground-referencing resistors. A 32-bit floating point value in either a voltage or temperature format is returned by software. An open thermocouple detection (OTD) feature is available for each thermocouple input. This feature automatically detects an open or broken thermocouple. Use InstaCal to select the thermocouple type (J, K, R, S, T, N, E, and B) on one or more sensor input channels to connect the thermocouple. Wiring configuration Connect the thermocouple to the USB-TEMP-AI using a differential configuration, as shown in Figure 3. Figure 3. Typical thermocouple connection The USB-TEMP-AI GND pins are isolated from earth ground. You can connect thermocouple sensors to voltages referenced to earth ground as long as the isolation between the GND pins and earth ground is maintained. When thermocouples are attached to conductive surfaces, the voltage differential between multiple thermocouples must remain within ±1.4 V. For best results, we recommend the use of insulated or ungrounded thermocouples when possible. Maximum input voltage between analog input and ground The absolute maximum input voltage between an analog input and the isolated GND pins is ±25 VDC when the USB-TEMP-AI is powered on, and ±40 VDC when the USB-TEMP-AI is powered off. If you need to increase the length of your thermocouple, use the same type of thermocouple wires to minimize the error introduced by thermal EMFs. 12 USB-TEMP-AI User's Guide Signal I/O Connections RTD and thermistor connections A resistance temperature detector (RTD) measures temperature by correlating the resistance of the RTD element with temperature. A thermistor is a thermally-sensitive resistor that is similar to an RTD in that its resistance changes with temperature — thermistors show a large change in resistance that is proportional to a small change in temperature. The main difference between RTD and thermistor measurements is the method used to linearize the sensor data. RTDs and thermistors are resistive devices that require an excitation current to produce a voltage drop that can be measured differentially across the sensor. The USB-TEMP-AI features two built-in current excitation sources (±I1 and ±I2) for measuring resistive type sensors. Each current excitation terminal is dedicated to one channel pair. The USB-TEMP-AI makes two, three, and four-wire measurements of RTDs (100 Ω platinum type) and thermistors. Use InstaCal to select the sensor type and the wiring configuration. Once the resistance value is calculated, the value is linearized in order to convert it to a temperature value. A 32-bit floating point value in either temperature or resistance is returned by software. RTD maximum resistance Resistance values greater than 660 Ω cannot be measured by the USB-TEMP-AI in the RTD mode. The 660 Ω resistance limit includes the total resistance across the current excitation (±Ix) pins, which is the sum of the RTD resistance and the lead resistances. Thermistor maximum resistance Resistance values greater than 180 kΩ cannot be measured by the USB-TEMP-AI in the thermistor mode. The 180 kΩ resistance limit includes the total resistance across the current excitation (±Ix) pins, which is the sum of the thermistor resistance and the lead resistance. Two-wire configuration The easiest way to connect an RTD sensor or thermistor to the USB-TEMP-AI is with a two-wire configuration, since it requires the fewest connections to the sensor. With this method, the two wires that provide the RTD sensor with its excitation current also measure the voltage across the sensor. Since RTDs exhibit a low nominal resistance, measurement accuracy can be affected due to the lead wire resistance. For example, connecting lead wires that have a resistance of 1 Ω (0.5 Ω each lead) to a 100 Ω platinum RTD will result in a 1% measurement error. With a two-wire configuration, you can connect either one sensor per channel pair, or two sensors per channel pair. Two-wire, single-sensor A two-wire single-sensor measurement configuration is shown in Figure 4. Figure 4. Two-wire, single RTD or thermistor sensor measurement configuration When you select a two-wire single sensor configuration with InstaCal, connections to T#H and T#L are made internally. 13 USB-TEMP-AI User's Guide Signal I/O Connections Two-wire, two sensor A two-wire, two-sensor measurement configuration is shown in Figure 5. Figure 5. Two-wire, two RTD or thermistor sensors measurement configuration When you select a two-wire, two sensor configuration with InstaCal, connections to T#H (first sensor) and T#H/T#L (second sensor) are made internally. When configured for two-wire mode, both sensors must be connected to obtain proper measurements. Three-wire configuration A three-wire configuration compensates for lead-wire resistance by using a single voltage sense connection. With a three-wire configuration, you can connect only one sensor per channel pair. A three-wire measurement configuration is shown in Figure 6. Figure 6. Three-wire RTD or thermistor sensor measurement configuration When you select a three-wire sensor configuration with InstaCal, the USB-TEMP-AI measures the lead resistance on the first channel (T#H/T#L) and measures the sensor itself using the second channel (T#H/T#L). This configuration compensates for any lead-wire resistance and temperature change in lead-wire resistance. Connections to T#H for the first channel and T#H/T#L of the second channel are made internally. Three-wire compensation For accurate three wire compensation, the individual lead resistances connected to the ±I# pins must be of equal resistance value. Four-wire configuration With a four-wire configuration, connect two sets of sense/excitation wires at each end of the RTD or thermistor sensor. This configuration completely compensates for any lead-wire resistance and temperature change in leadwire resistance. Connect your sensor with a four-wire configuration when your application requires very high accuracy measurements. Examples of a four-wire single-sensor measurement configuration are shown in Figure 7 and Figure 8. You can configure the USB-TEMP-AI with either a single sensor per channel or two sensors per channel pair. 14 USB-TEMP-AI User's Guide Signal I/O Connections Four-wire, single-sensor A four-wire, single-sensor connected to the first channel of a channel pair is shown in Figure 7. Figure 7. Four-wire, single RTD or thermistor sensor measurement configuration A four-wire, single-sensor connected to the second channel of a channel pair is shown in Figure 8. Figure 8. Four-wire, single RTD or thermistor sensor measurement configuration A four-wire, two-sensor measurement configuration is shown in Figure 9. Figure 9. Four-wire, two RTD or thermistor sensors measurement configuration When configured for four-wire, two sensor mode, both sensors must be connected to obtain proper measurements. Semiconductor sensor measurements Semiconductor sensors are suitable over a range of approximately –40 C to 125 C, where an accuracy of ±2 C is adequate. The temperature measurement range of a semiconductor sensor is small when compared to thermocouples and RTDs. However, semiconductor sensors can be accurate, inexpensive and easy to interface with other electronics for display and control. The USB-TEMP-AI makes high-resolution measurements of semiconductor sensors, and returns a 32-bit floating point value in either voltage or temperature. Use InstaCal to select the sensor type (LM35, TMP35 or equivalent) and the sensor input channel to connect the sensor. 15 USB-TEMP-AI User's Guide Signal I/O Connections Wiring configuration Connect the semiconductor sensor to the USB-TEMP-AI using a single-ended configuration, as shown in Figure 10. The device provides +5V and GND pins for powering the sensor. Figure 10. Semiconductor sensor measurement configuration The software outputs the measurement data as a 32-bit floating point value in either voltage or temperature. Digital I/O connections You can connect up to eight digital I/O lines to the screw terminals labeled DIO0 to DIO7. You can configure each digital bit for either input or output. All digital I/O lines are pulled up to +5V with a 47 kΩ resistor (default). You can request the factory to configure the resistor for pull-down to ground if desired. When you configure the digital bits for input, you can use the USB-TEMP-AI digital I/O terminals to detect the state of a TTL-compatible device. Refer to the schematic shown in Figure 11. If you set the switch to the +5V input, DIO0 reads TRUE (1). If you move the switch to GND, DIO0 reads FALSE (0). Figure 11. Schematic showing switch detection by digital channel DIO0 Caution! All ground pins on the USB-TEMP-AI (pins 9, 19, 22, 27, 30, 33, 36, 39, 49) are common and are isolated from earth ground. If a connection is made to earth ground when using digital I/O and conductive thermocouples, the thermocouples are no longer isolated. In this case, thermocouples must not be connected to any conductive surfaces that may be referenced to earth ground. For general information regarding digital signal connections and digital I/O techniques, refer to the Guide to DAQ Signal Connections (available on our website at www.mccdaq.com/signals/signals.pdf). Configuring the DIO channels to generate alarms The USB-TEMP-AI features eight independent temperature alarms. All alarm options are software configurable. When a digital bit is configured as an alarm, that bit will be configured as an output on the next power cycle and assume the state defined by the alarm configuration. Each alarm controls an associated digital I/O channel as an alarm output. The input to each alarm is one of the temperature input channels. You set up the temperature conditions to activate an alarm, and the output state of the channel (active high or low) when activated. When an alarm is activated, its associated DIO channel is driven to the output state specified. The alarm configurations are stored in non-volatile memory and are loaded on power up. The temperature alarms function both in data logging mode and while attached to the USB port on a computer. 16 Chapter 4 Functional Details Thermocouple measurements A thermocouple consists of two dissimilar metals that are joined together at one end. When the junction of the metals is heated or cooled, a voltage is produced that correlates to temperature. The USB-TEMP-AI hardware level-shifts the thermocouple’s output voltage into the A/D’s common mode input range by applying +2.5 V to the thermocouple’s low side at the C#L input. Always connect thermocouple sensors to the USB-TEMP-AI in a floating fashion. Do not attempt to connect the thermocouple low side C#L to GND or to a ground referencing resistor. Cold junction compensation (CJC) When you connect the thermocouple sensor leads to the sensor input channel, the dissimilar metals at the USBTEMP-AI terminal blocks produce two additional thermocouple junctions. This junction creates a small voltage error term which must be removed from the overall sensor measurement using a cold junction compensation technique. The measured voltage includes both the thermocouple voltage and the cold junction voltage. To compensate for the additional cold junction voltage, the USB-TEMP-AI subtracts the cold junction voltage from the thermocouple voltage. The USB-TEMP-AI has one high-resolution temperature sensor integrated into the design. The CJC sensor measures the average temperature at the terminal block so that the cold junction voltage can be calculated. A software algorithm automatically corrects for the additional thermocouples created at the terminal blocks by subtracting the calculated cold junction voltage from the analog input's thermocouple voltage measurement. Increasing the thermocouple length If you need to increase the length of your thermocouple, use the same type of thermocouple wires to minimize the error introduced by thermal EMFs. Data linearization After the CJC correction is performed on the measurement data, an on-board microcontroller automatically linearizes the thermocouple measurement data using National Institute of Standards and Technology (NIST) linearization coefficients for the selected thermocouple type. The measurement data is then output as a 32-bit floating point value in the configured format (voltage or temperature). Open-thermocouple detection (OTD) The USB-TEMP-AI is equipped with open-thermocouple detection for each analog input channel. With OTD, any open-circuit or short-circuit condition at the thermocouple sensor is detected by the software. An open channel is detected by driving the input voltage to a negative value outside the range of any thermocouple output. The software recognizes this as an invalid reading and flags the appropriate channel. The software continues to sample all channels when OTD is detected. RTD and thermistor measurements RTDs and thermistors are resistive devices that require an excitation current to produce a voltage drop that can be measured differentially across the sensor. The USB-TEMP-AI measures the sensor resistance by forcing a known excitation current through the sensor and then measuring (differentially) the voltage across the sensor to determine its resistance. After the voltage measurement is made, the resistance of the RTD is calculated using Ohms law – the sensor resistance is calculated by dividing the measured voltage by the current excitation level (±Ix) source. The value of the ±Ix source is stored in local memory. Once the resistance value is calculated, the value is linearized in order to convert it to a temperature value. The measurement is returned by software as a 32-bit floating point value in either temperature or resistance. 17 USB-TEMP-AI User's Guide Functional Details Data linearization An on-board microcontroller automatically performs linearization on RTD and thermistor measurements. RTD measurements are linearized using a Callendar-Van Dusen coefficients algorithm (you select DIN, SAMA, or ITS-90). Thermistor measurements are linearized using a Steinhart-Hart linearization algorithm (you supply the coefficients from the sensor manufacturer's data sheet). External components The USB-5203 has the following external components, as shown in Figure 12. 1 2 Screw terminal pins 1 to 26 Screw terminal pins 27 to 52 3 4 LEDs: Activity (top) and Power (bottom) USB connector Figure 12.External component locations Screw terminals Use the screw terminals for connecting temperature sensors and digital I/O lines. These terminals also provide ground and power output connections. Refer to the "Error! Reference source not found." chapter for screw erminal descriptions. USB connector The USB connector provides +5V power and communication. No external power supply is required. LEDs USB-TEMP-AI has two LEDs –Activity and Power. The Activity LED (top) blinks when data is transferred. The Power LED (bottom) turns on when the device is receiving power from the USB cable . 18 Chapter 5 Specifications All specifications are subject to change without notice. Typical for 25 °C unless otherwise specified. All specifications apply to all temperature and voltage input channels unless otherwise specified. Specifications in italic text are guaranteed by design. Analog input Table 1. Generic analog input specifications Parameter Conditions Specification A/D converter type T0x to T3x, V0x toV3x Number of channels Voltage input; V0x toV3x AD42_321 Dual 24-bit Sigma-Delta 4 differential, 4 single-ended Temperature input; T0x toT3x Input isolation Channel configuration T0x toT3x V0x toV3x Analog input modes Power up and reset state Thermocouple; T0x toT3x Factory default configuration is Disabled mode. Once configured, each channel reverts to the mode previously set by the user. Vx_H inputs are connected directly to their screw terminal pins. Vx_L inputs are disconnected from their screw terminal pins and internally connected to GND. Vx_H and Vx_L inputs are connected directly to their screw terminal pins. Tx_H and Tx_L inputs are connected directly to their screw terminal pins. ±0.080 V RTD; T0x toT3x Thermistor; T0x toT3x Semiconductor sensor; T0x toT3x Voltage; V0x toV3x 0 to 0.5 V 0 to 2 V 0 to 2.5 V ±10 V, ±5 V, ±2.5 V, ±1.25 V; software selectable T0x to T3x relative to GND (pins 9, 19, 22, 27, 30, 33, 36, 39, 49) V0x to V3x relative to GND (pins 9, 19, 22, 27, 30, 33, 36, 39, 49) T0x to T3x ±25 V max (power on) ±40 V max (power off) ±25 V max (power on) ±15 V max (power off) 5 GΩ (power on) 1 MΩ (power off) 10 GΩ (power on) 2.49 kΩ (power off) 30 nA max Single-ended Differential Input ranges Absolute maximum input voltage Input impedance V0x to V3x Input leakage current Input bandwidth (–3 dB) 4 differential 500 VDC minimum between field wiring and USB interface Temperature input. Software programmable to match sensor type Voltage input T0x to T3x, with open thermocouple detect disabled. T0x to T3x, with open thermocouple detect enabled. V0x to V3x T0x to T3x V0x to V3x 19 105 nA max ±1.5 nA typ, ±25 nA max 50 Hz 3 kHz USB-TEMP-AI User's Guide Specifications Parameter Conditions Specification Maximum working voltage (signal + common mode) Common mode rejection ratio V0x to V3x ±10.25 V max T0x to T3x, fIN = 60 Hz V0x to V3x, fIN = 60 Hz, all input ranges 100 dB 83 dB ADC resolution ADC No missing codes Input coupling Warm-up time Open thermocouple detect CJC sensor accuracy 24 bits 24 bits DC 30 minutes min Automatically enabled when the channel pair is configured for thermocouple sensor. The maximum open detection time is 3 seconds. ±0.25 °C typ, ±0.5 °C max –1.0 to +0.75 °C max T0x to T3x T0x to T3x, 15 °C to 35 °C T0x to T3x, 0 °C to 70 °C Channel configurations Table 2. Channel configuration specifications Channel Category Conditions Max number of sensors (all channels configured alike) T0x-T3x Disabled All temperature input channels are disconnected from screw terminals and internally connected to GND. See Note 4 T0x-T3x Thermocouple (Note 1) Semiconductor sensor (Note 1) RTD and Thermistor (Note 1) T0x-T3x T0x-T3x V0x-V3x Disabled V0x-V3x Differential (Note 2) Single-ended V0x-V3x 4 differential channels 4 differential channels 2-wire input configuration with a single sensor per channel pair 2-wire input configuration with two sensors per channel pair 3-wire configuration with a single sensor per channel pair 4-wire input configuration with a single sensor per channel pair 4-wire input configuration with two sensors per channel pair All voltage input channels are disconnected from screw terminals and internally connected to GND. 2 differential channels 4 differential channels 2 differential channels 2 differential channels 4 differential channels See Note 4 4 differential channels 4 single-ended channels Note 1: Internally, the device has four, dual-channel, fully differential A/Ds providing a total of eight input channels. The temperature input channels are configured as two channel pairs with T0x/T1x and T2x/T3x accepting temperature sensor type inputs. This "channel-pairing" requires T0x/T1x, and T2x/T3x to be configured to monitor the same category of temperature sensor. Mixing different sensor types of the same category (such as a type J thermocouple on temperature channel 0 and a type T thermocouple on temperature channel 1) is valid. Note 2: The voltage input channels V0x, V1x, V2x, and V3x are not configured as channel pairs. Therefore each channel can be configured independently. When connecting differential inputs to floating input sources, you must provide a DC return path from each differential input to ground. To do this, simply connect a resistor from each of the differential inputs to GND. A value of approximately 1 MΩ can be used for most applications. 20 USB-TEMP-AI User's Guide Specifications Note 3: Channel configuration information is stored in the EEPROM of the isolated microcontroller by the firmware whenever any item is modified. Modification is performed by commands issued over USB from an external application, and the configuration is made non-volatile through the use of the EEPROM. Note 4: The factory default configuration is Disabled. The Disabled mode disconnects the temperature and voltage inputs from the terminal blocks, and internally connects ground (GND) to all of the A/D inputs. This mode also disables each of the current excitation sources. Compatible sensors: T0x-T3x Table 3. Compatible sensor type specifications Parameter Conditions Thermocouple J: -210 °C to 1200 °C K: -270 °C to 1372 °C R: -50 °C to 1768 °C S: -50 °C to 1768 °C T: -270 °C to 400 °C N: -270 °C to 1300 °C E: -270 °C to 1000 °C B: 0 °C to 1820 °C 100 Ω PT (DIN 43760: 0.00385 ohms/ohm/°C) 100 Ω PT (SAMA: 0.003911 ohms/ohm/°C) 100 Ω PT (ITS-90/IEC751:0.0038505 ohms/ohm/°C) Standard 2,252 Ω through 30,000 Ω LM35, TMP35 or equivalent RTD Thermistor Semiconductor / IC Accuracy Thermocouple measurement accuracy: T0x-T3x Table 4. Thermocouple accuracy specifications, including CJC measurement error. All specifications are (±). Sensor Type Sensor temperature range (°C) Accuracy error maximum (°C) Accuracy error Typical (°C) Tempco (°C/°C) J –210 0 1200 –210 0 1372 –50 250 1768 –50 250 1768 250 700 1820 –200 0 1000 –200 2.028 0.835 0.783 2.137 0.842 0.931 1.225 0.554 0.480 1.301 0.549 0.400 2.193 0.822 0.469 1.976 0.954 0.653 2.082 0.707 0.278 0.288 0.762 0.280 0.389 0.435 0.195 0.157 0.458 0.190 0.134 2.185 0.819 0.468 0.684 0.321 0.240 0.744 0.031 K S R B E T 21 0.035 0.021 0.019 0.001 0.030 0.035 USB-TEMP-AI User's Guide Specifications Sensor Type Sensor temperature range (°C) Accuracy error maximum (°C) Accuracy error Typical (°C) Tempco (°C/°C) N 0 400 –200 0 1300 0.870 0.568 2.197 0.848 0.653 0.290 0.208 0.760 0.283 0.245 0.028 Note 5: Thermocouple measurement accuracy specifications include polynomial linearization, cold-junction compensation and system noise. These specs are for one year, or 3000 operating hours, whichever comes first, and for operation of the device between 15 °C and 35 °C. There is a CJC sensor on each temperature sensor input side of the module. The accuracy listed above assumes the screw terminals are at the same temperature as the CJC sensor. Errors shown do not include inherent thermocouple error. Contact your thermocouple supplier for details on the actual thermocouple accuracy error. Note 6: Thermocouples must be connected to the device such that they are floating with respect to GND (pins 9, 19, 22, 27, 30, 33, 36, 39, 49). The device GND pins are isolated from earth ground. You can connect thermocouple sensors to voltages referenced to earth ground as long as the isolation between the GND pins and earth ground is maintained. Note 7: When thermocouples are attached to conductive surfaces, the voltage differential between multiple thermocouples must remain within ±1.4 V. For best results, we recommend using insulated or ungrounded thermocouples when possible. Semiconductor sensor measurement accuracy: T0x-T3x Table 5. Semiconductor sensor accuracy specifications Sensor type Temperature Range Accuracy Error maximum LM35, TMP35 or equivalent –40 °C to 150 °C ±0.50 °C Note 8: Error shown does not include errors of the sensor itself. These specifications are for one year while operation of the device is between 15 °C and 35 °C. Contact your sensor supplier for details on the actual sensor error limitations. RTD measurement accuracy: T0x-T3x Table 6. RTD measurement accuracy specifications, Ix+ = 210 µA. All specifications are (±). RTD Sensor temperature range (°C) Accuracy error (°C) maximum Accuracy error (°C) typical Tempco (°C/°C) PT100, DIN, US or ITS-90 –200 –150 –100 0 100 300 600 2.913 1.201 0.482 0.261 0.269 0.287 0.318 2.784 1.070 0.349 0.124 0.127 0.136 0.150 0.001 0.001 0.001 0.001 0.001 0.001 0.001 Note 9: The error shown does not include errors of the sensor itself. The sensor linearization is performed using a Callendar-Van Dusen linearization algorithm. The accuracy and tempco specifications include the accuracy of the Callendar-Van Dusen linearization algorithm. These specifications are for one year while operation of the device is between 15 °C and 35 °C. The specification does not include lead resistance errors for 2-wire RTD connections. Please contact your sensor supplier for details on the actual sensor error limitations. Note 10: Resistance values greater than 660 Ω cannot be measured by the device in the RTD mode. The 660 Ω resistance limit includes the total resistance across the current excitation (±Ix) pins, which is the sum of the RTD resistance and the lead resistances. 22 USB-TEMP-AI User's Guide Note 11: Specifications For accurate three wire compensation, the individual lead resistances connected to the ±Ix pins must be of equal ohmic value. To ensure this, use connection leads of equal lengths. Thermistor measurement accuracy: T0x-T3x Table 7. Thermistor measurement accuracy specifications, Ix+ = 10 µA. All specifications are (±) Thermistor Sensor temperature range Accuracy error maximum (°C) Accuracy error typical (°C) Tempco (°C/°C) 2252 Ω -40 °C 0 °C 0.001 0.021 0.0007 0.008 0.001 0.001 50 °C 120 °C 0.263 3.473 0.130 1.750 0.001 0.001 -35 °C 0 °C 0.001 0.009 0.0006 0.004 0.001 0.001 50 °C 120 °C 0.115 1.535 0.049 0.658 0.001 0.001 -25 °C 0 °C 0.001 0.005 0.0005 0.002 0.001 0.001 50 °C 120 °C 0.060 0.771 0.028 0.328 0.001 0.001 -10 °C 0 °C 0.001 0.002 0.0005 0.001 0.001 0.001 50 °C 120 °C 0.019 0.267 0.009 0.128 0.001 0.001 5000 Ω 10000 Ω 30000 Ω Note 12: Error shown does not include errors of the sensor itself. The sensor linearization is performed using a Steinhart-Hart linearization algorithm. The accuracy and tempco specifications include the accuracy of the Callendar-Van Dusen linearization algorithm. These specifications are for one year while operation is between 15 °C and 35 °C. The specification does not include lead resistance errors for 2-wire thermistor connections. Contact your sensor supplier for details on the actual sensor error limitations. Total thermistor resistance on any given channel pair must not exceed 180 kΩ. Typical resistance values at various temperatures for supported thermistors are shown in Table 8. Table 8. Typical thermistor resistance measurement range Temp °C 2252 Ω thermistor 3000 Ω thermistor 5 kΩ thermistor 10 kΩ thermistor 30 kΩ thermistor –40 –35 76 kΩ 55 kΩ 101 kΩ 73 kΩ 168 kΩ 121 kΩ 240 kΩ (Note 13) 179 kΩ 885 kΩ (Note 13) 649 kΩ (Note 13) –30 –25 40 kΩ 29 kΩ 53 kΩ 39 kΩ 88 kΩ 65 kΩ 135 kΩ 103 kΩ 481 kΩ (Note 13) 360 kΩ (Note 13) –20 –15 22 kΩ 16 kΩ 29 kΩ 22 kΩ 49 kΩ 36 kΩ 79 kΩ 61 kΩ 271 kΩ (Note 13) 206 kΩ (Note 13) –10 –5 12 kΩ 9.5 kΩ 17 kΩ 13 kΩ 28 kΩ 21 kΩ 48 kΩ 37 kΩ 158 kΩ 122 kΩ 0 7.4 kΩ 9.8 kΩ 16 kΩ 29 kΩ 95 kΩ Resistance values greater than 180 kΩ cannot be measured by the device in the thermistor mode. The 180 k Ω resistance limit includes the total resistance across the current excitation (±Ix) pins, which is the sum of the thermistor resistance and the lead resistances. Note 14: For accurate three wire compensation, the individual lead resistances connected to the ±Ix pins must be of equal ohmic value. To ensure this, use connection leads of equal lengths. Note 13: 23 USB-TEMP-AI User's Guide Specifications Absolute Accuracy: V0x-V3x Table 9. Calibrated absolute accuracy specifications Range Absolute Accuracy (mV) ±10 V ±5 V ±2.5 V ±1.25 V ±2.779 ±1.398 ±0.707 ±0.362 When connecting differential inputs to floating input sources, the user must provide a ground return path from each differential input to ground. To do this, simply connect a resistor from each of the differential inputs to GND. A value of approximately 1 M Ω can be used for most applications. Note 16: All ground pins are common and are isolated from earth ground. If a connection is made to earth ground when using both voltage inputs and conductive thermocouples, the thermocouples are no longer isolated. In this case, thermocouples must not be connected to any conductive surfaces that may be referenced to earth ground Note 17: Unused voltage inputs should not be left floating. These inputs should be placed in the Disabled mode or connected to GND. Note 15: Table 10. Accuracy components. All values are (±) Range Gain error (% of reading) Offset error (µV) INL error (% of range) Gain Temperature Coefficient (ppm/°C) Offset Temperature Coefficient (µV/°C) ±10 V ±5 V ±2.5 V ±1.25 V 0.0246 0.0246 0.0246 0.0246 16.75 16.75 16.75 16.75 0.0015 0.0015 0.0015 0.0015 3.68 3.68 3.68 3.68 0.42 0.42 0.42 0.42 Table 11. Noise performance specifications Range Peak to peak noise (µV) RMS noise (µVrms) Noise-Free resolution (bits) ±10 V ±5 V ±2.5 V ±1.25 V 41.13 30.85 17.14 11.14 6.23 4.67 2.60 1.69 19.09 18.51 18.36 17.98 Table 11 summarizes the noise performance for the device. Noise distribution is determined by gathering 1000 samples with inputs tied to ground at the user connector. Samples are gathered at the maximum specified sample rate of 2 S/s. Settling time: V0x-V3x Table 12. Settling time specifications Range Accuracy ±0.0004% (seconds) ±10 V ±5 V ±2.5 V ±1.25 V 15.0 0.40 0.40 0.40 24 USB-TEMP-AI User's Guide Specifications Settling time is defined as the time required for a channel to settle within a specified accuracy in response to a full-scale (FS) step input. Analog input calibration Table 13. Analog input calibration specifications Parameter Specifications Recommended warm-up time Calibration Calibration interval Calibration reference 30 minutes min Firmware calibration 1 year +10.000 V, ±5 mV max. Actual measured values stored in EEPROM Tempco: 5 ppm/°C max Long term stability: 30 ppm/1000 h Throughput rate Table 14. Throughput rate specifications Number of Input Channels Maximum throughput 1 2 3 4 5 6 7 8 2 Samples/second 2 S/s on each channel, 4 S/s total 2 S/s on each channel, 6 S/s total 2 S/s on each channel, 8 S/s total 2 S/s on each channel, 10 S/s total 2 S/s on each channel, 12 S/s total 2 S/s on each channel, 14 S/s total 2 S/s on each channel, 16 S/s total Note 18: The analog inputs are configured to run continuously. Each channel is sampled twice per second. The maximum latency between when a sample is acquired and the voltage/temperature data is provided by the USB unit is approximately 0.4 seconds. Digital input/output Table 15. Digital input/output specifications Parameter Specification Digital type Number of I/O Configuration 5V CMOS 8 (DIO0 through DIO7) Independently configured for input or output. Power on reset is input mode unless bit is configured for alarm. All pins pulled up to +5 V via 47 K resistors (default). Contact MCC factory for pull-down to ground (GND) capability. Digital input – 50 port reads or single bit reads per second typ Digital output – 100 port writes or single bit writes per second typ Pull-up/pull-down configuration Digital I/O transfer rate (software paced) Input high voltage Input low voltage Output low voltage (IOL = 2.5 mA max) Output high voltage (IOH = –2.5 mA max) 2.0 V min, 5.5 V absolute max 0.8 V max, –0.5 V absolute min 0.7 V max 3.8 V min 25 USB-TEMP-AI User's Guide Note 19: Specifications All ground pins are common and are isolated from earth ground. If a connection is made to earth ground when using both digital I/O and conductive thermocouples, the thermocouples are no longer isolated. In this case, thermocouples must not be connected to any conductive surfaces that may be referenced to earth ground. Counter Table 16. CTR I/O specifications Parameter Specification Pin name Number of channels Resolution Counter type Input type Input source Counter read/writes rates (software paced) CTR 1 32-bits Event counter TTL, rising edge triggered CTR screw terminal Counter read: System dependent, 33 to 1000 reads per second. Counter write: System dependent, 33 to 1000 reads per second. 20 mV to 100 mV ±1.0 µA typ 1 MHz max 500 nS min 500 ns min 4.0 V min, 5.5 V absolute max 1.0 V max, –0.5 V absolute min Schmidt trigger hysteresis Input leakage current Input frequency High pulse width Low pulse width Input high voltage Input low voltage Note 20: All ground pins are common and are isolated from earth ground. If a connection is made to earth ground with both the counter (CTR) and conductive thermocouples, the thermocouples are no longer isolated. In this case, thermocouples must not be connected to any conductive surfaces that may be referenced to earth ground. Memory Table 17. Memory specifications Parameter Specification EEPROM 1,024 bytes isolated micro reserved for sensor configuration 256 bytes USB micro for external application use Microcontroller Table 18. Microcontroller specifications Parameter Specification Type Two high-performance 8-bit RISC microcontrollers USB +5V voltage Table 19. USB +5V voltage specifications Parameter Specification USB +5V (VBUS) input voltage range 4.75 V min to 5.25 V max 26 USB-TEMP-AI User's Guide Specifications Power Table 20. Power specifications Parameter Conditions Specification Supply current Supply current (Note 21) User +5V output voltage range (terminal block pin 21) User +5V output current (terminal block pin 21) Isolation USB enumeration Quiescent mode with all inputs configured for Disabled mode <100 mA 270 mA typ Note 21: 4.9 V min to 5.1 V max Bus-powered and connected to a self-powered hub. (Note 21) 5 mA max Measurement system to PC 500 VDC min This is the total current requirement for the device which includes up to 10 mA for the status LED. USB specifications Table 21. USB specifications USB device type Device compatibility Device power capability USB cable type USB cable length USB 2.0 (full-speed) USB 1.1, USB 2.0 Self-powered A-B cable, UL type AWM 2725 or equivalent (min 24 AWG VBUS/GND, min 28 AWG D+/D–) 3 meters max Current excitation outputs (±Ix, T0x-T3x) Table 22. Current excitation output specifications Parameter Specification Configuration 2 dedicated pairs: ±I1: T0x/T1x ±I2: T2x/T3x Thermistor: 10 µA RTD: 210 µA ±5.0% 200 ppm/°C 2.1 ppm/V max 0.3 ppm/V 3.90 V max –0.03 V min Current excitation output ranges Tolerance Drift Line regulation Load regulation Output compliance voltage (relative to GND pins) The device has two current excitation outputs, with ±I1 dedicated to the T0x/T1x analog inputs, and ±I2 dedicated to T2x/T3x. The excitation output currents should always be used in this dedicated configuration. Note 23: The current excitation outputs are automatically configured based on the sensor (thermistor or RTD) selected. Note 22: Environmental Table 23. Environmental specifications Operating temperature range Storage temperature range Humidity 0 °C to 55 °C max –40 °C to 85 °C max 0% to 90% non-condensing max 27 USB-TEMP-AI User's Guide Specifications Mechanical Table 24. Mechanical specifications Dimensions (L × W × H) User connection length 128.52 x 88.39 × 35.56 mm (5.06 × 3.48 × 1.43 ft) 3 m (9.84 ft) max Screw terminal connector Table 25. Screw terminal connector specifications Connector type Wire gauge range Screw terminal 16 AWG to 30 AWG Table 26. Screw terminal pinout Pin 1 2 3 4 5 6 7 8 9 10 Signal Name I1+ NC T0H T0L 4W01 IT01 T1H T1L GND I1– Pin Description T0/T1 current excitation source No connection T0 sensor input (+) T0 sensor input (–) T0/T1 4-wire, 2 sensor common T0/T1 2-sensor common T1 sensor input (+) T1 sensor input (–) Ground T0/T1 current excitation return Pin 27 28 29 30 31 32 33 34 35 36 T2/T3 current excitation source 37 38 39 40 41 42 43 44 45 46 47 48 49 50 51 52 Signal Name GND V3L V3H GND V2L V2H GND V1L V1H GND Pin Description Ground V3 voltage input (–) V3 voltage input (+) Ground V2 voltage input (–) V2 voltage input (+) Ground V1 voltage input (–) V1 voltage input (+) Ground CJC sensor 11 12 13 14 15 16 17 18 19 20 21 22 23 24 25 26 I2+ NC T2H T2L 4W23 IT23 T3H T3L GND I2– +5V GND NC NC NC NC T2 sensor input (+) T2 sensor input (–) T2/T3 4-wire, 2 sensor common T2/T3 2 sensor common T3 sensor input (+) T3 sensor input (–) Ground T2/T3 current excitation return +5V output Ground No connection No connection No connection No connection 28 V0L V0H GND CTR DIO7 DIO6 DIO5 DIO4 DIO3 DIO2 DIO1 DIO0 GND NC NC NC V0 voltage input (–) V0 voltage input (+) Ground Counter Input DIO channel 7 DIO channel 6 DIO channel 5 DIO channel 4 DIO channel 3 DIO channel 2 DIO channel 1 DIO channel 0 Ground No connection No connection No connection Declaration of Conformity Manufacturer: Address: Category: Measurement Computing Corporation 10 Commerce Way Suite 1008 Norton, MA 02766 USA Electrical equipment for measurement, control and laboratory use. Measurement Computing Corporation declares under sole responsibility that the product USB-TEMP-AI EU EMC Directive 89/336/EEC: Electromagnetic Compatibility, EN 61326 (1997) Amendment 1 (1998) Emissions: Group 1, Class A EN 55011 (1990)/CISPR 11: Radiated and Conducted emissions. Immunity: EN61326, Annex A IEC 61000-4-2 (1995): Electrostatic Discharge immunity, Criteria C. IEC 61000-4-3 (1995): Radiated Electromagnetic Field immunity Criteria A. IEC 61000-4-8 (1994): Power frequency magnetic field immunity Criteria A. Declaration of Conformity based on tests conducted by Chomerics Test Services, Woburn, MA 01801, USA in July, 2007. Test records are outlined in Chomerics Test Report #EMI4833.07. We hereby declare that the equipment specified conforms to the above Directives and Standards. Carl Haapaoja, Director of Quality Assurance Measurement Computing Corporation 10 Commerce Way Suite 1008 Norton, Massachusetts 02766 (508) 946-5100 Fax: (508) 946-9500 E-mail: [email protected] www.mccdaq.com