1
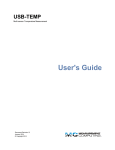
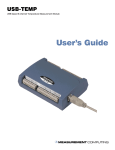
MADE IN
User’s Guide
Shop online at
omega.com
e-mail: [email protected]
For latest product manuals:
omegamanual.info
TJ-USB
Probe
OMEGAnet ® Online Service
omega.com
Internet e-mail
[email protected]
Servicing North America:
U.S.A.:
ISO 9001 Certified
Canada:
One Omega Drive, P.O. Box 4047
Stamford, CT 06907-0047
TEL: (203) 359-1660
FAX: (203) 359-7700
e-mail: [email protected]
976 Bergar
Laval (Quebec) H7L 5A1, Canada
TEL: (514) 856-6928
FAX: (514) 856-6886
e-mail: [email protected]
For immediate technical or application assistance:
U.S.A. and Canada: Sales Service: 1-800-826-6342/1-800-TC-OMEGA®
Customer Service: 1-800-622-2378/1-800-622-BEST®
Engineering Service: 1-800-872-9436/1-800-USA-WHEN®
Mexico:
En Espan˜ol: (001) 203-359-7803
e-mail: [email protected]
FAX: (001) 203-359-7807
[email protected]
Servicing Europe:
Czech Republic:
Frystatska 184, 733 01 Karviná, Czech Republic
TEL: +420 (0)59 6311899
FAX: +420 (0)59 6311114
Toll Free: 0800-1-66342
e-mail: [email protected]
Germany/Austria: Daimlerstrasse 26, D-75392 Deckenpfronn, Germany
TEL: +49 (0)7056 9398-0
FAX: +49 (0)7056 9398-29
Toll Free in Germany: 0800 639 7678
e-mail: [email protected]
United Kingdom:
ISO 9002 Certified
One Omega Drive, River Bend Technology Centre
Northbank, Irlam, Manchester
M44 5BD United Kingdom
TEL: +44 (0)161 777 6611
FAX: +44 (0)161 777 6622
Toll Free in United Kingdom: 0800-488-488
e-mail: [email protected]
It is the policy of OMEGA Engineering, Inc. to comply with all worldwide safety and EMC/EMI
regulations that apply. OMEGA is constantly pursuing certification of its products to the European New
Approach Directives. OMEGA will add the CE mark to every appropriate device upon certification.
The information contained in this document is believed to be correct, but OMEGA accepts no liability for any
errors it contains, and reserves the right to alter specifications without notice.
WARNING: These products are not designed for use in, and should not be used for, human applications.
Table of Contents
Table of Contents
Section .............................................................................. Page
Section 1 Introduction .......................................................... 1-1
1.1 Precautions ..................................................................................................... 1-1
1.2 Safety Warnings and IEC Symbols ............................................................. 1-1
1.3 Statement on CE Marking ............................................................................ 1-1
1.4 General Description ...................................................................................... 1-1
Section 2 Hardware ............................................................. 2-2
2.1 Package Inspection ....................................................................................... 2-1
2.2 Included Items................................................................................................ 2-1
Section 3 Software .............................................................. 3-1
3.1 Getting Started ............................................................................................... 3-1
3.2 Software Installation ..................................................................................... 3-1
3.3 USB Driver Installation ................................................................................ 3-5
3.4 USB-TEMP Measurement and Recording Program ................................ 3-7
Section 4 Specifications ........................................................ 4-1
4.1 Specifications ................................................................................................. 4-1
i
TJ-USB Probe
List of Figures
Figure Description: .......................................................... Page
1. I.E.C. Symbols ........................................................................................... 1-1
2. Welcome Screen ........................................................................................ 3-1
3. Add Desktop Icon .................................................................................... 3-2
4. Select Installation Folder Screen ............................................................. 3-2
5. Confirm Installation Screen .................................................................... 3-3
6. License Agreement Screen ....................................................................... 3-3
7. Installing USB-Temp Screen .................................................................... 3-4
8. Installation Complete Screen .................................................................. 3-4
9. Welcome To The Found New Hardware Wizard Screen .................... 3-5
10. Install Software Automatically Screen ................................................. 3-6
11. Completing The Found New Hardware Wizard Screen ..................... 3-6
12. Start Button/Launch Program Screen ................................................... 3-7
13. Main Tab Screen ........................................................................................ 3-7
14. Graph Tab Screen ...................................................................................... 3-8
15. Data Acquisition Tab Screen ................................................................... 3-9
ii
Introduction
1
Section 1 - Introduction
Please read this manual completely before installing and operating your TJ-USB
Probe.
It’s important read and follow all notes, cautions, warnings and safety
precautions before operating this device.
1.1
Precautions
• This device is not designed for use in any medical or nuclear applications.
• Do not operate this device in flammable or explosive environments.
• Do not operate this device outside of the recommended use outlined in this
manual.
NOTE:
There are no user serviceable parts inside your unit. Attempting to repair or service
your unit may void your warranty.
1.2
Safety Warnings and IEC Symbols
This device is marked with international safety and hazard symbols in
accordance with IEC 1010. It is important to read and follow all precautions and
instructions in this manual before operating or commissioning this device as it
contains important information relating to safety and EMC. Failure to follow all
safety precautions may result in injury and or damage to your calibrator. Use of
this device in a manner not specified by the manufacturer may impair protection
provided within the unit.
IEC symbols
Description
Caution, refer to accompanying documents
Waste Electrical and Electronic Equipment
Compliance
Figure 1. IEC Symbol
1.3
Statement on
Marking
It is the policy of OMEGA to comply with all world-wide safety and EMI/EMC
regulations that apply. OMEGA is constantly pursuing certification of its
products to the European New Approach Directives. OMEGA will add the CE
mark to every appropriate device upon certification.
1.4
General Description
Omega’s new USB-TC Series of thermocouple probes with direct USB connection
feature a rugged transition joint construction, 2 m (6') of shielded output cable
and free user software that converts your PC into a temperature meter, chart
recorder or data logger.
1-1
2
Hardware
Section 2 – Hardware
It is important that you read this manual completely and follow all safety
precautions before operating this instrument.
2.1 Package Inspection
Remove the packing list and verify that you have received all your equipment. If
you have any questions about the shipment, please call our Customer Service
Department at 1-800-622-2378 or 203-359-1660. We can also be reached on the
Internet at www.omega.com, e-mail: [email protected]
When you receive the shipment, inspect the container and equipment for any
signs of damage. Note any evidence of rough handling in transit. Immediately
report any damage to the shipping agent.
NOTE:
The carrier will not honor any damages unless all shipping material is saved for
inspection. After examining and removing contents, save packing material and
carton in the event reshipment is necessary.
2.2 Included Items
The following items are supplied in the box.
• 1 TJ-USB Probe Assembly
• 1 User’s Manual
• 1 Software Disk
2-1
Software
3
Section 3 – Software
3.1 Getting Started
The following program files are included on the TJ-USB User Software CD
supplied with your Probe. These files can be downloaded from the omega.com
website should you misplace your CD.
• USB-TEMP Measurement and Data Logging Program
• TJ-USB Series Manual (pdf format)
3.2 Software Installation
3.2.1 System Requirements
Your PC should meet the following minimum requirements:
• Pentium Class or higher processor
• Hard Drive Space: 30 meg
• Ram: 256 meg
• 1 Available USB Port
• 1 CD-ROM Drive
• Windows 2000, XB, or Vista (32bit) Operating System
3.2.2 Software Installation
Insert the USB-Temp Series User CD that was included with your unit into the
CD-ROM drive on your PC. Your system should begin the installation process
automatically.
Figure 2. Welcome Screen
This welcome screen should be visible on your computer screen. To continue
with installing the program click the “Next >” button.
3-1
3
Software
Figure 3. Add Desktop Icon Screen
From this screen you select the folder were you want the program files installed
on your PC. The default setting will install the software under your “Program”
folders in a new folder named “Omega” To continue with installing the program
click the “Next >” button.
Figure 4. Select Installation Folder Screen
The setup wizard now has all the information to complete the installation of the
software on your PC. To continue with installing the program click the “Next >”
button.
3-2
Software
3
Figure 5. Confirm Installation Screen
Figure 6. License Agreement Screen
From this screen you must select “Agree” to continue installing your program.
After making your selection click the “Next >” button. The setup wizard will
now install the software.
3-3
3
Software
Figure 7. Installing USB-Temp Screen
Figure 8. Installation Complete Screen
Congratulations! You have just successfully installed the USB-Temp Program on
your PC. To end installing the program and close the setup wizard click the
“Close” button.
3-4
Software
3
3.3 USB Driver Installation
To install the USB software drivers that are required for your TJ-USB probe to
operate correctly follow these procedures.
NOTE:
You need to have the User Software CD that was supplied with your probe loaded
into the CD drive on your PC.
1.
Connect your TJ-USB probe to your computer. You should get a notice box
that indicates that your computer “Has Found New Hardware”
2.
Your computer will then launch the Found New Hardware Wizard. Follow
the instructions indicated on the Wizard boxes and the additional
instructions noted in this manual with each box.
NOTE:
After completing the Found New Hardware Wizard your system will ask that you
repeat this process. This is normal. You should repeat the steps outlined here
twice. After the second driver is installed you should then get the “New Hardware
Ready For Use” notice.
Figure 9. Welcome To The Found New Hardware Wizard Screen
From this box you should check the “No, not at this time” button. Then click the
“Next >” button to continue with the driver installation process.
3-5
3
Software
Figure 10. Install Software Automatically Screen
Next, check the “Install the software automatically” button. Then click the
“Next>” button to continue.
Figure 11. Completing The Found New Hardware Wizard Screen
This screen will be displayed to indicate that the software drivers have been
installed. You should click the “Finish” button to complete the process.
3-6
Software
3
3.4 USB-Temp Measurement and Recording Program
To launch the USB-Temp program on your PC begin by accessing the
“Programs” list under your “Start Menu” Next, scroll through the list of
program folders to find the “USB-Temp” folder. Inside the “USB-Temp” folder
click on the “USB-Temp” program link. This will start the software running.
Figure 12. Start Button/Launch Program Screen
3.4.1 Main Tab
Figure 13. Main Tab Screen
Main Tab
The “Main” tab is the default screen that is displayed when you run the
program. This screen provides a real-time digital reading of temperature in
either °F or °C. You can change from °F to °C by clicking with your pointer the
on screen °F or °C buttons.
3-7
3
Software
3.4.2 Graph Tab
Figure 14. Graph Tab Screen
The Graph View provides Real-Time X-Y plotting of temperature data and also
plotting of data loaded from a saved file. Click on the "Graph" tab to select this
view.
The “Start” button will display a dialog box allowing you to select the data
plotting interval and the number of points to plot. You can also change the line
color.
The interval should be set as desired for your particular needs. The total logging
time is displayed for the interval setting and the number of points selected.
You can choose to have the data logging/chart recording session end after the
total number data points have been plotted, or have the session run
continuously. After the total number of data points have been collected in the
continuous mode, the oldest data point is shifted out on the left, and the newest
data point is added to the right. Data will continue to be collected and displayed
until you click on the “Stop” button above the chart.
If you click the OK button, the data logging session will start, and “DAQ in
Progress” will be shown in the status bar. The “Start” button above the chart
will change to “Stop”, indicating that if you click it again, the charting session
will be terminated.
You can also start or stop a data recording session from the File menu. Once
data has been collected, you can save it in a (*.csv) (comma separated values) file
and open it in Microsoft Excel for further analysis. It is recommended that you
“Save As” in Excel as a Microsoft Excel Workbook (*.xls). If you do not modify
the (*.csv) version of the file, you can open it from USBTemp’s File menu, and
display it in the chart and data log.
The “Clear” button will delete all data from the chart and the data log.
The C and F buttons allow you to change units of degrees displayed on the chart,
and on the data log.
3-8
Software
3
The Y Axis Min and Y Axis Max controls allow you to adjust the viewable range
of temperatures to suit your particular application. The narrower the range
between min and max, the more detail can be seen on the chart.
The Graph tab has a context (popup) menu, which can be accessed by rightclicking on the chart. You can access all of the options in the context menu from
the Graph menu in the menu bar.
3.4.3 Data Acquisition Tab
Figure 15. Data Acquisition Tab Screen
Data Acquisition Tab
The “Data Acquisition” tab allows you to view received data in a table format.
of any data as it is being recorded, or data retrieved from a file. The Start and
Clear button perform the same function as the Start and Clear buttons on the
Chart Tab. See Chart Tab above. The adjust button resizes the columns to the
smallest size necessary to fit the data in the columns. You can also change the
engineering units of the data from C to F using the C/F buttons. The Auto Scroll
Rows checkbox causes the data to be scrolled up one line each time a new row of
data is added to the grid.
Menus
File Menu
The Open menu item displays a dialog box which allows you to choose a data file
to open and display on the graph and in the data log. This file must be a file that
was saved by the Save menu item in USB-Temp. If the file has been modified
externally, you may not be able to open it.
The Save menu item displays a dialog box which allows you to save the data
currently displayed on the graph and in the data log. The file format is (*.csv)
(comma separated values), which can be opened by Microsoft Excel for further
analysis and charting. It is strongly recommended that you do not modify this file,
or you may not be able to open it again in USB-Temp. Use Excel’s “Save As”
option to save it as a Microsoft Excel Workbook (*.xls), which you can then modify.
3-9
3
Software
The Export Graph menu item displays a dialog box that allows you to either
save an image of the current graph on the Graph Tab, or copy it to the clipboard.
The Print Preview menu item displays a standard Windows Print Preview
dialog, allowing you to view the item(s) as they would be printed on a printer.
You can also print from this dialog by clicking the printer icon in the upper left
corner. If the Graph Tab is displayed before choosing this option, the current
graph image will be previewed. If the Data Acquisition Tab is displayed, the
data table in grid style format will be previewed.
The Print menu item displays a standard Windows Print dialog box. This allows
you to select printers, printer preferences, page ranges, number of copies, etc. If
you click the “Print” button, the specified page(s) will be sent to the printer. If
you click the “Apply” button, you can then select the Print Preview menu to
view your changes without printing.
The Exit menu option exits the USB-Temp program.
View Menu
The Show Toolbar menu allows you to display an optional toolbar for file open,
save, print, and graph positioning.
The Show Most Recently Used menu option displays the most recently used
(opened/saved) filenames in the File menu.
The Clear Most Recently Used menu option removes all recently used filenames
from the File menu.
Graph Menu
Graph Tools Cursor
Floating Cursor, when checked, will display a crosshair type cursor that you can
move with the mouse. You can use the Floating Cursor to pinpoint a particular
temperature and time. The status bar displays the data point number, the time,
and the temperature, where the crosshairs meet.
Tracking Cursor, when checked, will perform similarly to the Floating Cursor,
except that it will lock on to the plot line. With this option enabled, you can
move the mouse left and right without regard to up and down, and the
horizontal cursor will remain pointing to the plot line.
Data (Box) Zoom, when checked, allows you to use the mouse to click and drag
a rectangle around a line of data to magnify that portion of the chart. The chart
size will remain the same, but the axes will be expanded as well and the data
line(s) to allow viewing more detail. Click and drag the left mouse button to the
right and downwards. A bluish translucent rectangle will appear showing the
area that will be displayed when the mouse button is released. Note that moving
the mouse in the opposite direction Zooms Out. To cancel data zoom select
"Reset Axes" from either the context menu or Graph menu options.
Zoom allows you to change the overall zoom factor of the chart. This is achieved
by clicking the left mouse button anywhere on the chart and dragging the
mouse. Dragging the mouse toward the bottom of the chart area zooms out
while dragging toward the top zooms in. If you have a wheel mouse you can
zoom in/out by clicking on the chart then use the wheel to zoom in/out.
3-10
Software
3
Configure
The Configure Axes menu allows you to adjust the viewable range of
temperatures to suit your particular application. The narrower the range
between minimum and maximum, the more detail can be seen on the chart.
The Graph Area menu allows you to change the color and/or style of the chart
background, lines and markers.
The Show Gridlines option displays or hides gridlines on the graph.
The Show Markers option displays or hides data point markers on the plotted
data line.
Cancel Zoom will cancel and uncheck Data (Box Zoom) or Zoom if either is
enabled.
Reset Axes returns the graph to its original size.
Data Menu
The Auto Fit Columns menu option resizes the columns to the smallest size
necessary to fit all the data in the columns.
The Auto Scroll menu option causes the data to be scrolled up one line each time
a new row of data is added to the grid.
3-11
4
Specifications
4.0 Specifications
Integral Thermocouple:
Type- K (ungrounded)
Measurement Range:
K1:
K2:
-73 to 315°C (-100 to 600°F)
-200 to 1000°C (-354 to 1832°F)
NOTE: For 304 stainless steel max temperature is 850°C (1562°F)
4-1
Accuracy:
K1: ±1°C (1.8°F) K2: ±3°C (5.4°F)
Resolution:
USB-TC-K1: 0.1°, USB-TC-K2: 1°
Stability:
USB-TC-K1: ±0.25°C, USB-TC-K2: ±0.5° C
Cold Junction Compensation:
(Automatic)
-10 to 70°C
Operating Environment:
-10 to 70°C, 0-95% relative humidity
(non-condensing)
PC Interface:
USB
USB Cable:
Integral to probe, (6' shielded) Type A.
Software (Included):
Requires 2000, XP, or Vista operating
Weight:
70 g (2.5 oz)
WARRANTY/DISCLAIMER
OMEGA ENGINEERING, INC. warrants this unit to be free of defects in materials and workmanship for a
period of 13 months from date of purchase. OMEGA’s WARRANTY adds an additional one (1) month
grace period to the normal one (1) year product warranty to cover handling and shipping time. This
ensures that OMEGA’s customers receive maximum coverage on each product.
If the unit malfunctions, it must be returned to the factory for evaluation. OMEGA’s Customer Service
Department will issue an Authorized Return (AR) number immediately upon phone or written request.
Upon examination by OMEGA, if the unit is found to be defective, it will be repaired or replaced at no
charge. OMEGA’s WARRANTY does not apply to defects resulting from any action of the purchaser,
including but not limited to mishandling, improper interfacing, operation outside of design limits,
improper repair, or unauthorized modification. This WARRANTY is VOID if the unit shows evidence of
having been tampered with or shows evidence of having been damaged as a result of excessive corrosion;
or current, heat, moisture or vibration; improper specification; misapplication; misuse or other operating
conditions outside of OMEGA’s control. Components in which wear is not warranted, include but are not
limited to contact points, fuses, and triacs.
OMEGA is pleased to offer suggestions on the use of its various products. However,
OMEGA neither assumes responsibility for any omissions or errors nor assumes liability for any
damages that result from the use of its products in accordance with information provided by
OMEGA, either verbal or written. OMEGA warrants only that the parts manufactured by the
company will be as specified and free of defects. OMEGA MAKES NO OTHER WARRANTIES OR
REPRESENTATIONS OF ANY KIND WHATSOEVER, EXPRESSED OR IMPLIED, EXCEPT THAT OF
TITLE, AND ALL IMPLIED WARRANTIES INCLUDING ANY WARRANTY OF MERCHANTABILITY
AND FITNESS FOR A PARTICULAR PURPOSE ARE HEREBY DISCLAIMED. LIMITATION OF
LIABILITY: The remedies of purchaser set forth herein are exclusive, and the total liability of
OMEGA with respect to this order, whether based on contract, warranty, negligence,
indemnification, strict liability or otherwise, shall not exceed the purchase price of the
component upon which liability is based. In no event shall OMEGA be liable for
consequential, incidental or special damages.
CONDITIONS: Equipment sold by OMEGA is not intended to be used, nor shall it be used: (1) as a “Basic
Component” under 10 CFR 21 (NRC), used in or with any nuclear installation or activity; or (2) in medical
applications or used on humans. Should any Product(s) be used in or with any nuclear installation or
activity, medical application, used on humans, or misused in any way, OMEGA assumes no responsibility
as set forth in our basic WARRANTY/DISCLAIMER language, and, additionally, purchaser will indemnify
OMEGA and hold OMEGA harmless from any liability or damage whatsoever arising out of the use of the
Product(s) in such a manner.
RETURN REQUESTS/INQUIRIES
Direct all warranty and repair requests/inquiries to the OMEGA Customer Service Department. BEFORE
RETURNING ANY PRODUCT(S) TO OMEGA, PURCHASER MUST OBTAIN AN AUTHORIZED RETURN
(AR) NUMBER FROM OMEGA’S CUSTOMER SERVICE DEPARTMENT (IN ORDER TO AVOID
PROCESSING DELAYS). The assigned AR number should then be marked on the outside of the return
package and on any correspondence.
The purchaser is responsible for shipping charges, freight, insurance and proper packaging to prevent
breakage in transit.
FOR WARRANTY RETURNS, please have the
following information available BEFORE
contacting OMEGA:
1. Purchase Order number under which the product
was PURCHASED,
2. Model and serial number of the product under
warranty, and
3. Repair instructions and/or specific problems
relative to the product.
FOR NON-WARRANTY REPAIRS, consult OMEGA
for current repair charges. Have the following
information available BEFORE contacting OMEGA:
1. Purchase Order number to cover the COST
of the repair,
2. Model and serial number of the product, and
3. Repair instructions and/or specific problems
relative to the product.
OMEGA’s policy is to make running changes, not model changes, whenever an improvement is possible. This affords
our customers the latest in technology and engineering.
OMEGA is a registered trademark of OMEGA ENGINEERING, INC.
© Copyright 2008 OMEGA ENGINEERING, INC. All rights reserved. This document may not be copied, photocopied,
reproduced, translated, or reduced to any electronic medium or machine-readable form, in whole or in part, without the
prior written consent of OMEGA ENGINEERING, INC.
Where Do I Find Everything I Need for
Process Measurement and Control?
OMEGA…Of Course!
Shop online at omega.com SM
TEMPERATURE
䡺
⻬
䡺
⻬
䡺
⻬
䡺
⻬
䡺
⻬
Thermocouple, RTD & Thermistor Probes, Connectors, Panels & Assemblies
Wire: Thermocouple, RTD & Thermistor
Calibrators & Ice Point References
Recorders, Controllers & Process Monitors
Infrared Pyrometers
PRESSURE, STRAIN AND FORCE
䡺
⻬
䡺
⻬
䡺
⻬
䡺
⻬
Transducers & Strain Gages
Load Cells & Pressure Gages
Displacement Transducers
Instrumentation & Accessories
FLOW/LEVEL
䡺
⻬
䡺
⻬
䡺
⻬
䡺
⻬
Rotameters, Gas Mass Flowmeters & Flow Computers
Air Velocity Indicators
Turbine/Paddlewheel Systems
Totalizers & Batch Controllers
pH/CONDUCTIVITY
䡺
⻬
䡺
⻬
䡺
⻬
䡺
⻬
pH Electrodes, Testers & Accessories
Benchtop/Laboratory Meters
Controllers, Calibrators, Simulators & Pumps
Industrial pH & Conductivity Equipment
DATA ACQUISITION
䡺
⻬
䡺
⻬
䡺
⻬
䡺
⻬
䡺
⻬
Data Acquisition & Engineering Software
Communications-Based Acquisition Systems
Plug-in Cards for Apple, IBM & Compatibles
Datalogging Systems
Recorders, Printers & Plotters
HEATERS
䡺
⻬
䡺
⻬
䡺
⻬
䡺
⻬
䡺
⻬
Heating Cable
Cartridge & Strip Heaters
Immersion & Band Heaters
Flexible Heaters
Laboratory Heaters
ENVIRONMENTAL
MONITORING AND CONTROL
䡺
⻬
䡺
⻬
䡺
⻬
䡺
⻬
䡺
⻬
䡺
⻬
Metering & Control Instrumentation
Refractometers
Pumps & Tubing
Air, Soil & Water Monitors
Industrial Water & Wastewater Treatment
pH, Conductivity & Dissolved Oxygen Instruments
M4603/0308