1
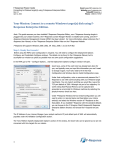
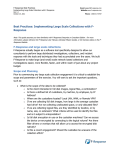
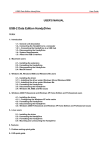
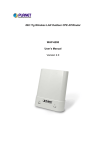
F-Response Mission Guide
Connecting to Linux target(s) using F-Response Enterprise Edition
Rev 6.0
April 2, 2013
Email:[email protected]
Website:www.f-response.com
YahooIM:fresponse_s
Phone: 1-800-317-5497
Your Mission: Connect to a remote Linux target(s) disk using F-Response
Enterprise Edition.
Note: This guide assumes you have installed F-Response Enterprise Edition, your F-Response licensing dongle is
plugged into your analyst machine, the F-Response License Manager Monitor is installed and running, and the FResponse Enterprise Management Console (FEMC) has been started. For more information, please reference the FResponse User Manual, or the F-Response Enterprise Edition Training Video on the F-Response Website.
F-Response supports deployment to Linux (Glibc 2.3.5+ and Intel/i386) platforms via the F-Response Enterprise
Management Console (FEMC). The easiest way to deploy the F-Response target code is by using the FEMC as
demonstrated below.
Step 1: Ready the Console!
Before using the FEMC some configuration is required.
You will need to configure the Deployment Options
Configure, and Credentials Configure windows. The
details can be found in the F-Response Manual, but to
accomplish our mission as quickly as possible here are
some quick configuration suggestions:
In the FEMC go to File – Configure Options… and the
Deployment Options Configure window will open.
Good news, some of the work here has already been
done for you, and typically once you input this
information you won’t need to change it again. You’ll
only need to fill in the Host Configuration and Windows
Service Install Configuration sections.
Under Host Configuration, enter a username and
password for F-Response to use while communicating
with your Linux target machine(s). You can make it
anything you would like. Leave the TCP port default at
3260 and ignore the box for Physical Memory as this is
not an option for Linux targets.
In order to unlock all the scanning options you will need to configure the Windows Service Install and Windows
Service Executable. While these will not be used to deploy to Linux they must be completed to allow scanning or
direct connection options to be made available.
To do this, under F-Response Windows Service Install Configuration you will need to create a Service Name (your
choice entirely) and select the Windows version of F-Response as the Executable. If you installed F-Response with
the standard defaults you can browse to the C:\Program Files\F-Response\F-Response Enterprise Edition directory
and choose the f-response-ent.exe file.
The Linux executable will be dynamically selected and deployed by the FEMC console with no further configuration or
intervention on your part.
F-Response Mission Guide
Connecting to Linux target(s) using F-Response Enterprise Edition
Rev 6.0
April 2, 2013
Email:[email protected]
Website:www.f-response.com
YahooIM:fresponse_s
Phone: 1-800-317-5497
The IP Address of your License Manager (your analyst machine’s IP) and default port of 5681 will automatically
populate under the Validation Configuration section.
The “Unix Platform Specific Deployment Options” portion of the window (the lower half) allows you to make
temporary exceptions to the Linux firewall for your environment, run scripts, and set additional targets. The defaults
provided here should be sufficient such that no action is needed unless you suspect the need to reset to the factory
defaults. You can do this by selecting Linux from the platform list and clicking the Reset Current button.
Configuration of the firewall, scripts, and additional targets is beyond the scope of this mission guide.
Next you need to configure your Linux login credentials to deploy to your Linux target machine(s). In the FEMC go
to File – Configure Credentials… and the Credentials Configure
window will open:
Here we are only concerned with the Unix Credentials, the lower half
of the window.
F-Response uses SSH/SFTP to access Linux targets. Unix Credentials
are covered in detail in Appendix E of the F-Response Manual, but
here is a quick overview to accomplish your mission.
Generally there are two types of Linux accounts for our purposes:
the all powerful administrator “root” account, and a general user
account that can assume root privileges for a time.
If you have the password for the Root account for the Linux target the process is very simple:
Check the box next to Root under User Account, then check the box
for Root Password and enter the password.
Click the Add button and the information is added to the list of
credentials F-Response will use to access the Linux targets (choosing
targets will be explained in the Procedure section of this document).
Given the power of the Root account, it is more likely you will be
using a general user account that will assume root privileges. The
two possibilities for accomplishing this with your user account are su and sudo.
Su is used to assume root level privileges on your Linux target. To configure F-Response to deploy to your Linux
target using su:
Check the box for User in the User Account section and enter your
account name.
Choose su from the Assume Root drop down box.
F-Response Mission Guide
Connecting to Linux target(s) using F-Response Enterprise Edition
Rev 6.0
April 2, 2013
Email:[email protected]
Website:www.f-response.com
YahooIM:fresponse_s
Phone: 1-800-317-5497
Check the box for both User Password and Root Password and enter the passwords.
Click the Add button to add the account to the list of credentials for F-Response.
Sudo, or “SuperUser Do”, is used to execute a command as Root. To configure F-Response to deploy to your Linux
target using sudo:
Check the box for User in the User Account section and enter your
account name.
Choose sudo from the Assume Root drop down box.
Check the box for both User Password and enter the password.
Click the Add button to add the account to the list of credentials for FResponse.
Once you have configured your deployment settings and login credentials you are ready to use F-Response to
connect to your Linux target(s).
Step 2: Scan for target Linux machines
In the FEMC there are several ways to scan for your Linux
target machine(s). For our purposes, we assume you
already have a list of machines you would like to connect
to so we are going to use the custom scan option.
In the FEMC choose Custom Scan from the Scan menu,
enter your Linux machine(s) name or IP address each
separated by a comma. This data is retained so you may
need to clear out any old information first. Click OK to
have F-Response start scanning.
Step 3: Deploy and start F-Response on your target
When the scan completes, Linux machines can be identified in the list by the F-Response Linux icon:
To deploy the F-Response target code to a
Linux machine, highlight and right click on it,
then select Install/Start F-Response. If you
have several Linux targets you need to install
F-Response on, you can highlight them all
under the deployment tab and choose
Install/Start F-Response from the deployment
drop down menu. The F-Response Badge icon
will appear green
now running.
indicating F-Response is
F-Response Mission Guide
Connecting to Linux target(s) using F-Response Enterprise Edition
Rev 6.0
April 2, 2013
Email:[email protected]
Website:www.f-response.com
YahooIM:fresponse_s
Phone: 1-800-317-5497
F-Response Mission Guide
Connecting to Linux target(s) using F-Response Enterprise Edition
Rev 6.0
April 2, 2013
Email:[email protected]
Website:www.f-response.com
YahooIM:fresponse_s
Phone: 1-800-317-5497
Step 4: Connect to disk(s) on your Linux target(s)
Once F-Response is installed and running on your target machines, as seen by the icons with green badges
can find, connect, and open a write-blocked connection to the disk(s).
, you
To find possible disks on the Linux machines:
In the FEMC, under the Connect tab, you will find a
list of potential target disks on the Linux machine(s).
Here you can pick what disk(s) to connect to by
highlighting and choosing Login to F-Response Disk
from the Connect drop down or right click menus.
Once you log into the target disk the F-Response badge icon will change from gray to blue and the Connected status
column will show as Connected. .
Step 5: Fire up the tool of your choice!
F-Response is a vendor neutral product. Once F-Response presents the remote target disk as a write blocked local
connection, we step out of your way so that you can select the right tool to get your job done. At this point, you can
reach into your toolbox and apply the tool of your choice to the target disk(s).
F-Response Mission Guide
Connecting to Linux target(s) using F-Response Enterprise Edition
Rev 6.0
April 2, 2013
Email:[email protected]
Website:www.f-response.com
YahooIM:fresponse_s
Phone: 1-800-317-5497
Understanding F-Response Disk Naming
F-Response uses the following naming convention for target disks:
iqn.2008-02.com.f-response.HOSTNAME.O/S disk name
We are only concerned with the “HOSTNAME.O/S disk name” portion of the name.
HOSTNAME is the name of your Linux target machine. If you only know the IP address a quick glance back at the
Active Clients tab will help you tie the hostname to the address.
For the “O/S disk name,” Linux identifies hard disks using the format hdx or sdx. An “hd” prefix tells us this is a IDE
or PATA disk and an “sd”prefix is used for SCSI, SATA, or USB drives. The ‘x’ portion is a letter, starting with ‘a’,
representing the order the Linux O/S added the drive. For example:
This target is the first SCSI,SATA,or USB drive on the new-host-10 Linux machine. If the last part of the name said
“sdb” or “sdc” it would be the second or third physical disk on the new-host-10 machine.
Troubleshooting
F-Response says I’m connected to the remote disk, yet I cannot see it in Explorer? Correct, while your
Windows analysis machine can only read FAT and NTFS, Linux can use these file systems and more. Most likely the
target disk is using the one of the Linux standard ext2 or ext3 file system formats. To view the disk you will need
use one of your third party tools.
My Linux target shows in the scan list, yet it does not appear under the deployment tab? You just need
to refresh the full view by double-clicking the root of the scan tree.
I am unable to connect to the remote F-Response Linux target, it just shows up with a question mark.
Check the Messages tab. It’s possible the credentials are configured incorrectly.