1
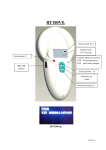
LIVESTOCK ID
BLUESTICK
USER MANUAL
Version 1.1
Corporate Headquarters:
Via ai Prati
6930 Bedano-Lugano
Switzerland
Phone: +41 91 935 73 80
Fax: +41 91 945 03 30
[email protected]
www.datamars.com
.
© 2011 DATAMARS
Contents:
1
DESCRIPTION ................................................................................................................................ 4
2
OPERATION .................................................................................................................................... 6
2.1
2.2
3
SWITCH ON/OFF THE BLUESTICK............................................................................................... 6
READ A TRANSPONDER ................................................................................................................ 7
MANAGING THE MENU .................................................................................................................. 8
3.1
FIND YOUR WAY IN THE MENU....................................................................................................... 8
3.2
LANGUAGE.................................................................................................................................. 8
3.3
CONFIGURATION ......................................................................................................................... 8
3.3.1
Reading Timeout ............................................................................................................... 9
3.3.2
Continuos Read ................................................................................................................. 9
3.3.3
EIC/CIC Format ................................................................................................................. 9
3.3.3.1
EIC format .................................................................................................................. 9
3.3.4
Send EIC via Bluetooth ................................................................................................... 10
3.3.5
Reading Sound ................................................................................................................ 10
3.3.6
Reading Vibro .................................................................................................................. 10
3.3.7
Autotuning ....................................................................................................................... 10
3.4
SETUP ...................................................................................................................................... 10
3.4.1
Timeout backlight ............................................................................................................ 11
3.4.2
Auto Shutdown ................................................................................................................ 11
3.4.3
Display Contrast .............................................................................................................. 11
3.4.4
Display brightness ........................................................................................................... 11
3.4.5
Keyboard sound .............................................................................................................. 11
3.4.6
Send version .................................................................................................................... 11
3.4.7
RS232 Baudrate .............................................................................................................. 11
3.5
DATE & TIME ............................................................................................................................ 12
3.5.1
Format ............................................................................................................................. 12
3.5.2
Set date ........................................................................................................................... 12
3.5.3
Set time ........................................................................................................................... 12
3.6
DATA FILES MENU ..................................................................................................................... 12
3.6.1
New File ........................................................................................................................... 12
3.6.2
Open File ......................................................................................................................... 12
3.6.3
Delete File ....................................................................................................................... 13
3.6.4
Store in File ..................................................................................................................... 13
3.7
UTILITY ..................................................................................................................................... 13
3.7.1
Cyclic Delay ..................................................................................................................... 13
3.7.2
Cyclic Read ..................................................................................................................... 13
3.7.3
CNT Reading ................................................................................................................... 13
3.7.4
Save RF ........................................................................................................................... 14
3.7.5
Save HDX ........................................................................................................................ 14
3.7.6
Save FDX-B ..................................................................................................................... 14
3.7.7
Boot Update ..................................................................................................................... 14
3.8
SEARCH GROUP ........................................................................................................................ 14
3.8.1
Select a search file .......................................................................................................... 14
3.8.2
Searching a group ........................................................................................................... 14
3.9
SHUTDOWN .............................................................................................................................. 15
4
CONNECT YOUR BLUESTICK TO A PC ..................................................................................... 16
4.1
HOW TO CONNECT THE BLUESTICK READER TO A PC THROUGH THE USB CABLE ...................... 16
4.2
HOW TO CONNECT THE BLUESTICK READER TO A PC THROUGH THE RS232 CABLE .................. 16
4.3
BLUETOOTH INSTALLATION GUIDE FOR W INDOWS XP OS ............................................................ 16
4.3.1
Configure BLUESTICK for the Bluetooth connection ...................................................... 16
4.3.2
Search for and recognize the BLUESTICK by a host PC ............................................... 16
4.4
REAL-TIME COMMUNICATION ...................................................................................................... 20
5
BATTERY MANAGEMENT............................................................................................................ 21
5.1
BATTERY LEVEL INDICATOR........................................................................................................ 21
Bluestick Manual – v. 1.1 July 2012
2
5.2
HOW TO RECHARGE THE BATTERY.............................................................................................. 21
6
TAKE CARE OF YOUR READER ................................................................................................. 22
7
SPECIFICATIONS ......................................................................................................................... 23
8
SOFTWARE RUMISOFT ............................................................................................................... 24
8.1
8.2
8.3
9
INTRODUCTION.......................................................................................................................... 24
HOW TO INSTALL RUMISOFT....................................................................................................... 24
CONFIGURATION OF BLUESTICK ................................................................................................. 24
DO YOU HAVE A PROBLEM IDENTIFYING AN ANIMAL? ......................................................... 25
9.1
9.2
9.3
THE READING DISTANCE IS TOO SHORT ....................................................................................... 25
THE READER DOES NOT READ THE TRANSPONDER ...................................................................... 25
THE READER DOES NOT WORK ................................................................................................... 25
10 ADVANCED USER INSTRUCTIONS ............................................................................................ 26
10.1
CONSOLE COMMANDS DESCRIPTION ....................................................................................... 26
10.1.1 Get firmware version command ...................................................................................... 26
10.1.2 Get all the information recorded ...................................................................................... 26
11 CERTIFICATIONS ......................................................................................................................... 27
12 END OF LIFE ................................................................................................................................. 28
12.1
12.2
12.3
DISASSEMBLY INSTRUCTIONS FOR BLUESTICK READER ........................................................ 28
TOOLS REQUIRED ................................................................................................................. 28
PRODUCT DISASSEMBLY PROCESS ........................................................................................ 29
Bluestick Manual – v. 1.1 July 2012
3
1
Description
Antenna
Keyboard
Display
Back Cap to access
USB connector
and RS232
Bluestick Manual – v. 1.1 July 2012
4
Status LED
Bluetooth LED
Select button
Right button
Left button
ON/OFF and READ button
Bluestick Manual – v. 1.1 July 2012
5
2
Operation
Although the BLUESTICK has been designed to plug and play, we recommend you read this manual
carefully in order to take advantage of all its useful features and functions.
2.1
Switch on/off the BLUESTICK
Press the
button, which is located on the lower center of the panel.
The display shows the following start-up figures:
FIRMWARE VERSION
(1.1)
1.0.1
* DATAMARS SA *
BLUESTICK RFID
You can see on the right the firmware version and on the left the bootloader version.
After a few seconds the main screen shot appears:
ON FOR READING
S TO ENTER MENU
DATE: 01/01/2011
BATTERY LEVEL
TIME: 15:35:52
Click
Click
Hold 1 sec
Hold 1 sec
BLUETOOTH
FIRMWARE VERSION
(1.1)
1.
2.
1.0.1
Hold 2 sec
ON
Shutdown
Check the battery level before using the device.
Bluetooth indicator is blinking when the Bluetooth is on and lit when connected.
Bluestick Manual – v. 1.1 July 2012
6
3.
4.
Date format can be selected between EU/US/TIMESTAMP.
Clock time is in 24 hour mode.
5.
Press
to enter the Menu features.
6.
Press
to start a single read.
After a period of non-use the device will go on an automatic “pause mode”, which means the
backlight of the display turns down and the keyboard is disabled. In order to “unlock” your
reader, please press the
button.
button for 2 seconds. The reader has
In order to manually switch off the reader, hold the
also an automatic shutdown function activated after a period of non-use.
2.2
Read a transponder
Place the BLUESTICK near the animal to be read, then press the
activate the reading mode.
button in order to
READING …
PRESS ON TO STOP
During the reading mode, move the reader along the animal to scan the transponder ID.
To stop the reading mode press the
button again.
The following figure shows the result of a successful reading session:
HDX
A000000
999 000000000001
1.
2.
1. Transponder type + Field bits info
2. Country Code + ID Code
There are two types of transponder: FDX-B and HDX, which are the ISO standard
11784/5. When the reader displays the word “H NOANIMAL” as Field bits, it means that
this transponder is not coded for animals, but for the Industry.
The Alpha country code is according to ISO 3166; ISO 11784/5.The Identity Code number
is according to ISO 11784/5.
The following figure shows the result of an unsuccessful reading session:
TAG NOT FOUND
ON FOR READING
After a while the reading mode times out. The reader stops and shows the message “TAG NOT
FOUND”.
Bluestick Manual – v. 1.1 July 2012
7
3
3.1
Managing the menu
Find your way in the menu
button (please refer to chapter 2.1).
Switch on the reader by pressing the
on the keypad to enter menu
Press the
The display shows the following figure:
MAIN MENU
< PRESS ARROWS >
You can scroll through the menu by pressing
In order to enter a sub menu, press the
or
which are the navigation keys.
button while it is shown
button is used to select and confirm the changes made through the
Generally the
parameters of the menu. While the menu is selected, the
button is used to cancel the
changes and go back to a previous menu level to exit the main menu.
3.2
< CONFIGURATION>
< READ TIMEOUT >
SUBMENU
10s
Language
This menu allows you to select the language on your device. With this example is possible
change the language in the Italian version.
< LANGUAGE
>
LANGUAGE
ENGLISH
LANGUAGE
<ENGLISH>
< LINGUA
<ITALIANO>
3.3
>
ITALIANO
Configuration
The Configuration menu allows you to manage all the RFID-related options.
There are various features in the Configuration menu.
< CONFIGURATION >
SUBMENU
Bluestick Manual – v. 1.1 July 2012
8
3.3.1 Reading Timeout
The Reading timeout feature defines the maximum period while the reader stays in reading
mode.
< READ TIMEOUT >
10s
3.3.2 Continuos Read
The Continuous Read feature allows the user to read several animals without starting a new
reading session each time an animal is read.
3.3.3 EIC/CIC Format
The EIC/CIC format menu defines how to send over Bluetooth and RS232, the transponder
information.
< EIC FORMAT
>
ISO-LONG
3.3.3.1
EIC format
Allows five different EIC download formats to be defined:
• ISO Long (default):
- Animal:
- Industrial =
"A0000000964000000123456" (23 char)
"R00060000000000123456"
(21 char)
• ISO Short:
- Animal:
- Industrial:
"964 000000123456"
"0006 0000000000123456"
(16 char)
(21 char)
• ISO Tiris (Texas Instruments):
- Animal:
- Industrial:
"A 00000 0 964 000000123456" (26 char)
"R 0006 0000000000123456" (23 char)
• F-210:
- Animal:
- Industrial:
"A 00000 0 0999 000000123456"(27 char)
"R 0006 0000000000123456"
(23 char)
• BDN-Ita:
- Animal:
- Industrial:
"10000000964000000123456" (23 char)
"R00060000000000123456"
(21 char)
Bluestick Manual – v. 1.1 July 2012
9
• ISO Short South America (SA):
- Animal:
- Industrial:
"964000000123456"
"0006 0000000000123456"
(15 char)
(21 char)
• ISO HEX:
- Animal:
- Industrial:
"8000F1000001E240"
"006000000001E240”
(16 char)
(16 char)
3.3.4 Send EIC via Bluetooth
When the BT send EIC feature is on, the TAG ID is sent through Bluetooth (Bluetooth has to be
enabled and connected).
< BT SEND EIC
>
ON
3.3.5 Reading Sound
The Reading sound feature enables or disables the acoustic signal when a tag is found/not
found. When the key feature is OFF, the sound is disabled. When it is ON, the sound is
enabled.
3.3.6 Reading Vibro
The Reading vibro feature enables or disables the vibro signal when a tag is found/not found.
When this feature is OFF, the vibro is disabled. When it is ON, the vibro is enabled.
3.3.7 Autotuning
The Autotuning RFID test shows the values of tuning position and power.
3.4
< AUTOTUNING >
< AUTOTUNING >
PRESS S TO START
POS: 7 POW: 3504
Setup
The Setup menu allows you to manage all the configuration options of the reader
< SET UP
>
SUBMENU
You can enter the set-up menu by pressing
pressing the narrow buttons.
Bluestick Manual – v. 1.1 July 2012
. Than scroll through the ‘set-up’ features by
10
3.4.1 Timeout backlight
The Timeout backlight feature allows you to decide how many seconds the display has to stay
on.
3.4.2 Auto Shutdown
The Auto Shutdown feature defines the maximum period that the reader stays on while no
buttons are pressed. After this period the reader automatically switches off.
< AUTOSHUTDOWN >
30s
3.4.3 Display Contrast
The Display contrast feature defines the level of the contrast of the display.
< LCD CONTRAST >
30
3.4.4 Display brightness
The Display brightness feature defines the level of the brightness of the display.
< LCD BRIGHTNESS >
MID
3.4.5 Keyboard sound
The Keyboard sound feature enables or disables the acoustic signal when a button is pressed.
When the key feature is OFF, the sound is disabled. When it is ON, the sound is enabled.
3.4.6 Send version
As a confirm that the Bluetooth is enabled and connected, when the Send version feature is
on, the version of the firmware will be read in the window of the communication program (i.e.:
HyperTerminal).
< BT SEND VERSION >
ON
3.4.7 RS232 Baudrate
This feature allows you to set the correct Baudrate, according to the Baudrate on your PC for
the communication program (eg: HyperTerminal).
< RS232 BAUDRATE >
9600
Bluestick Manual – v. 1.1 July 2012
11
3.5
Date & Time
The Date & Time menu allows you to manage all the options of the clock of the reader.
3.5.1 Format
This menu allows you to adjust the date and time including the date format (EU format if you
prefer to have the day before the month, US format if you prefer to have the month before the
day, and the TIMESTAMP format).
< DATE FORMAT >
EU
3.5.2 Set date
To set the date, press
button and insert the current date.
< DATE dd/mm/4y >
01/01/2011
3.5.3 Set time
To set the clock, press
button and insert the current time.
< TIME hh:mm:ss >
12:00:05
3.6
Data Files menu
This menu allows you to manage all the data files in the device.
3.6.1 New File
To create a new file, press the
< NEW FILE
>
S TO CREATE FILE
button. The new file has the format BS+yymmdd_hh:mm
NEW FILE
BS+110926_1239
3.6.2 Open File
To open an existing file, press the
< OPEN FILE
S TO BROWSE
Bluestick Manual – v. 1.1 July 2012
>
button to browse the file list.
OPEN FILE
BS+110926_1239
12
3.6.3 Delete File
To delete an existing file, press the
< DELETE FILE
S TO BROWSE
>
button to browse the file list.
DELETE FILE
BS+110926_1239
3.6.4 Store in File
The “Store in File” function allows the device to write the EIC code of the tags read in a file.
< STORE EIC DATA >
ON
When this feature is active, in addition, the reader shows a counter corresponding to the
number of TAGs read and stored in the current file. The following picture shows this behavior.
Tag Type
Field Bits
TAG Counter
Country
Code
000001 F A000000
999 270920100011
ID Code
Moreover, when this feature is active, the reader adds to the file just the TAG’s codes which are
not already included in the file. In other word it does not add to the file multiple EIC of the same
TAG. When a new TAG has been read, the device signals with 2 beeps (or vibros), while a
already in file TAG has been found, the device signals it with 1 beep (or vibro).
3.7
Utility
3.7.1 Cyclic Delay
This feature allows changing the time duration of one reading cycle. The Cyclic Delay has to take
longer than the Reading Timeout (1 up to 100 minutes).
3.7.2 Cyclic Read
This feature starts the reading cyclic test, that is based on:
- Reading time
- Pause
3.7.3 CNT Reading
This feature starts a reading test and indicates the percentage of the readings done.
Bluestick Manual – v. 1.1 July 2012
13
3.7.4 Save RF
This feature allows saving information about RF analogic signal.
3.7.5 Save HDX
This feature allows saving HDX info about analogic signal.
3.7.6 Save FDX-B
This feature allows saving FDX-B info about analogic signal.
3.7.7 Boot Update
Special command used on by Datamars engineers.
3.8
Search group
In order to enter this menu, press the
button.
< SEARCH GROUP >
SUBMENU
Remember that the search file must be previously loaded into the reader by using the RumiSoft
program. Please refer to the Rumisoft user manual to know how to load the search file into the reader.
3.8.1 Select a search file
In order to select a search file press the
button.
SEL SEARCH FILE
S TO BROWSE
In order to browse the search files press the narrow button.
SEL SEARCHFILE
< EXAMPLE.rsc>
Once the search file has been found press the
button to select it.
3.8.2 Searching a group
In order to start the searching session, press the
button.
< SEARCH GROUP >
PRESS S TO START
Bluestick Manual – v. 1.1 July 2012
14
At this point you can proceed with the searching session.
When the reader find a TAG, which is in the searching list and is not already read, the device signals
this TAG with two beeps (or vibro). If the TAG read is not in the search list or has been already found,
the device signals this TAG with one beep (or vibro).
When the first TAG is found the reader shows a counter of the TAGs found over the total TAGs to be
found.
SEARCHING…
FOUND 0001/0005
When the reader has found all the TAG listed in the search file selected, the reader signals the end of
the searching session with three beeps (or vibro).
3.9
Shutdown
In order to switch off your reader, hold the
Bluestick Manual – v. 1.1 July 2012
button for 2 seconds
15
4
Connect your BLUESTICK to a PC
This section describes how to connect the BLUESTICK to a personal computer (PC). The
BLUESTICK can be connected to a PC in 3 ways: the first is a wired USB connection, the second a
wireless Bluetooth connection, the third is a wired RS232 connection.
4.1
How to connect the BLUESTICK reader to a PC through the USB cable
An USB cable is provided so you can connect your reader to a computer.
Insert the mini USB plug of the USB cable in the connector of the BLUESTICK reader; insert the
other cable’s plug into the computer’s USB port.
The BLUESTICK reader will automatically switch on in Mass Storage Device mode, the
connection between the reader and the PC is now established, and a pop-up window will
appear on your computer’s monitor, showing the contents of the BLUESTICK’ embedded
Memory Card.
4.2
How to connect the BLUESTICK reader to a PC through the RS232 cable
The RS-232 interface version does not require any software installation. Plug in the RS-232
cable between your reader and the PC. Then refer to chapter 4.4 and follow the instructions to
open a new HyperTerminal session.
4.3
Bluetooth installation guide for Windows XP OS
Any reader has a Bluetooth module, in order to turn on the Bluetooth press and hold the
button for 1 second.
On the other hand, verify that your PC is equipped with Bluetooth hardware too.
4.3.1 Configure BLUESTICK for the Bluetooth connection
During the Bluetooth discovery process done by the PC, it is important that the BLUESTICK
reader is ON and the Bluetooth LED is blinking.
4.3.2 Search for and recognize the BLUESTICK by a host PC
From the control panel choose Bluetooth Device. The following dialog window appears.
Bluestick Manual – v. 1.1 July 2012
16
Select the Options tab, and then check the feature Turn discovery on.
Select the Devices tab.
Check that the BLUESTICK reader is switched on.
The welcome window for the configuration guide of the new Bluetooth peripheral appears.
Press Next; in order to start the search and recognize the procedure.
Bluestick Manual – v. 1.1 July 2012
17
The result of the search and recognition procedure shows all Bluetooth devices which are
nearby.
At this point select from the Bluetooth device list the one named “BLUESTICK_Sxxx” and press
Next.
Bluestick Manual – v. 1.1 July 2012
18
Select the option Let me choose my own passkey and input the number zero (just one 0
character). Press Next to continue.
Finally the BLUESTICK reader has been recognized and installed in your PC as a Bluetooth
device. Press the Finish button.
Bluestick Manual – v. 1.1 July 2012
19
At this point select the COM Ports tab and verify that two COM ports have been created:
One called Outgoing and the other called Incoming.
The Outgoing COMxx allows a connection between the reader and the pc, but when one of the
2 devices is switched off or you lose the connection because of bluetooth out of range, the
Outgoing Port get closed and you need to repeat the procedure next time you need the
connection.
The Incoming COMxx allows the connection between the reader and the pc and it remains
active, so that the connection starts automatically in case you switch off the reader or you loose
the connection because of bluetooth out of range.
The COM numbering depends on your host PC, this number may be different from the one
shown in the example.
4.4
Real-time communication
•
•
Once the BLUESTICK has been found by your PC through Bluetooth connection, a new
port COM will be added to your PC. Please verify that your BLUESTICK Bluetooth LED
is blinking, if is not the case, hold the
button during one second. Select this port
COM from any program which is supposed to communicate to the reader.
Once the BLUESTICK has been plugged through the RS-232 cable to your PC open a
new HyperTerminal session.
In order to test the port COM, a HyperTerminal session (in Windows) can be opened.
To open a new HyperTerminal session:
1. Select the Start menu.
2. Choose Programs.
3. Choose Accessories.
4. Choose Communication.
5. Launch HyperTerminal.
6. A dialog box appears.
7. Input a session name, (i.e. BLUESTICK).
8. Press the ok button.
9. Select the COM port assigned to the BLUESTICK.
10. Input the corresponding BAUD rate.
11. Select the following options: Baud rate= 115200, data bits = 8, parity = none, stop bits = 1,
flow control = none.
12. Press the ok button.
13. Now the HyperTerminal session is ready to start, just click on the calling icon or select Call
under the Call menu.
14. At this point you are ready to receive the codes read directly on your PC.
15. Press the
button and read a transponder.
16. The ID code will be shown on the HyperTerminal window.
Bluestick Manual – v. 1.1 July 2012
20
5
Battery management
The BLUESTICK is equipped with high quality Li-Ion cells battery.
BATTERY LEVEL
5.1
Battery level indicator
The battery level is shown by the bars as shown in the previous image.
5.2
How to recharge the battery
In order to recharge the battery simply plug the USB cable into the corresponding connector on
the bottom of the reader and connect it to a PC or a wall mount adapter with USB plug. With the
adapter for DC car/truck power source is possible charge the reader even on the road.
Once the cable has been plugged in, the BLUESTICK charges the battery in a few hours.
Bluestick Manual – v. 1.1 July 2012
21
6 Take care of your reader
Ensure that the reader does not get damaged. Do not drop it onto a hard surface or subject it to
very wet conditions.
If the outer casing of the reader becomes soiled it can be cleaned with a damp cloth. First
ensure that it is not connected to the charger.
If for any reason the reader is not working please do not attempt to repair it, but return it for
repair to your local dealer.
The BLUESTICK reader is equipped with Li-Ion type battery. This battery lasts longer and does
not contain Cadmium or lead, which makes it much safer for the environment. If the reader has
to be destroyed, please return it to a battery specialist for battery recycling.
The display of the reader BLUESTICK may change color if exposed to temperatures higher
than 50°C. It will return to its original color as soon as the temperature gets below 50°C.
At very low temperatures the display may lose its contrast but at normal temperatures it will
return to its normal contrast.
Caution: if the reader has to be transported by air, the USB connector cap has to be open
during the flight.
Bluestick Manual – v. 1.1 July 2012
22
7 Specifications
1.
Storage temperature: -20 to +65 °C, 85% RH, non-condensing
2.
Normal operating temperature: -5 to +55 °C, 85% RH non condensing
3.
Charging temperature: +5°C to +40°C, 85% RH, non-condensing
4.
Standards: ISO11784/5, ISO11784-AMD1 and ISO24631-2
5.
External power supply : USB cable
6.
Dimensions: 500 x 80 mm TAG compatibility: FDX-B, HDX
7.
Transmission frequency: 134.2 kHz
8.
Battery life: >500 cycles
9.
Weight: 620 g
10. Interfaces to host PC: USB and Bluetooth, RS232
Bluestick Manual – v. 1.1 July 2012
23
8
8.1
Software Rumisoft
Introduction
Rumisoft is a software tool that can be used to manage controls and search files for your
device. It also allows the user to configure the reader in a user friendly graphic environment.
8.2
How to install Rumisoft
Rumisoft application can be found on the SD Memory card embedded in the reader.
To install it, connect the Bluestick to the PC (see chapter 4.1) and when the pop-up window
appears, select “SD Memory Card”. Click on the Doc folder and then select “setup.exe”.
After that operation, follow the instructions on the screen to complete the installation of the
Rumisoft.
For more information please refer to the “Rumisoft manual”, the manual is also in the same
folder into the SD Memory Card.
8.3
Configuration of Bluestick
Configuration of Bluestick can be changed through the SW RumiSoft. For details refer to the
Rumisoft User Manual.
Bluestick Manual – v. 1.1 July 2012
24
9
9.1
Do you have a problem identifying an animal?
The reading distance is too short
The maximum reading distance is obtained with the transponder (tag) perpendicular to the
antenna and aimed at the centre of the antenna coil. If the tag is implanted into an animal its
orientation may not be optimal and therefore the reading distance may be reduced.
You might be close to a source of electromagnetic disturbances like video or TV. Move a few
meters away and try again.
Do not use the reader on a steel table. The metal will reduce the performance of the antenna.
9.2
The reader does not read the transponder
Change the angle of the reader and try again.
Some types of transponders from other manufacturers are disturbed if placed in the centre of
the reader-antenna. It is possible that some tags will not function if placed in parallel and at the
centre of the antenna. Change the direction of the tag or of the antenna.
9.3
The reader does not work
Charge the reader for at least 30 minutes and try again (recommended time for full battery
recharge = 2 hours).
Check the ambient temperature: It has to be between -5ºC and +55º C.
If you’re still having problems, please contact your dealer.
The BLUESTICK reader is a product developed and produced by DATAMARS, Switzerland.
Should you have any suggestions or require information regarding this or other DATAMARS
products, please contact your dealer.
Bluestick Manual – v. 1.1 July 2012
25
10
Advanced user instructions
10.1 Console commands description
This section is meant to describe the console commands implemented in the BLUESTICK in
order to remote control the features and the functions of the reader.
”answer string” [CR][LF]
10.1.1 Get firmware version command
• Command syntax:
• Command answer:
[CSV]
“FW Vx.x.x (Vx.x)”
[CSVOK] <CR><LF>
Description: this command returns the firmware version.
10.1.2 Get all the information recorded
• Command syntax:
• Command answer:
[CSW]
[(register1)]<CR><LF>
[(register2)]<CR><LF>
…
[(register)]<CR><LF>
[CSWOK]<CR><LF>
Description: this command returns all the information of the readings recorded, the register is
based on the EIC format.
Bluestick Manual – v. 1.1 July 2012
26
11
Certifications
European directives
Datamars, Via ai Prati, CH-6930 Bedano declares, under its own responsibility, that the product
BLUESTICK is in accordance with the following standard (pending):
ETSI EN 300 330-1 /
ETSI EN 300 330-2
Electromagnetic compatibility and Radio spectrum matters
(ERM) - Short Range Devices.
ETSI EN 301 489-1 /
ETSI EN 301 489-3
Electromagnetic compatibility (EMC) standard for radio
equipment and services.
IEC/EN 61000-4-2 /
IEC/EN 61000-4-3/
IEC/EN 61000-4-4/
IEC/EN 61000-4-6
Electrostatic discharge, electromagnetic field, electrical fast
transient/burst, radio-frequency fields’ immunity.
BLUESTICK satisfies the essential requirements of directives 99/5/EC
Bluestick Manual – v. 1.1 July 2012
27
12
End of life
12.1 Disassembly Instructions for BLUESTICK reader
Product Name / Model
Description
BLUESTICK / Any models
Universal portable reader
Only authorized recyclers are permitted to use these disassembly instructions. Any attempted
disassembly by a user or unauthorized party will void the product warranty and may irreparably
damage the product.
12.2 Tools Required
Tool Description
Tool Size (if applicable)
Nipper
Medium
Philips screwdriver (0)
Small
Cutter pliers
Medium
Hot Air Gun
Big
Bluestick Manual – v. 1.1 July 2012
28
12.3 Product Disassembly Process
1
• All external plastics have to be removed from
the reader. (Use Philips screwdriver to remove
all screw)
• The Keypad has to be removed from the top
cover casing. (Use the Hot Air Gun with the
cutter pliers in order to easily remove the
keypad)
• The battery, the vibro, the USB and RS232
cable and the battery have to be removed from
the bottom cover casing.
• PCBA are to be removed from casing.
2
3
4
Dispose plastic parts of the reader in accordance
with local recycling laws.
Dispose electronics parts of the
accordance with local recycling laws.
reader
in
• Remove cables from batteries. (Use the nipper
to do this operation)
Dispose batteries of the reader in accordance with
local recycling laws.
5
Dispose crews and the aluminum disc of the reader
in accordance with local recycling laws.
Bluestick Manual – v. 1.1 July 2012
29