1
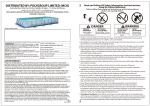
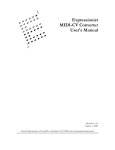
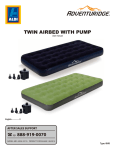
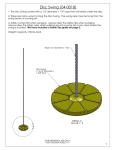
DISTRIBUTED BY: POLYGROUP LIMITED (MCO)
2
Avenida Xian Xing Hai, Centro Golden Dragon, 11 Andar M, Macau
Read and Follow All Safety Information and Instructions.
Keep for Future Reference.
Failure to follow these warnings and instructions can result in serious injury or
death to user, especially children.
Customer Service: (888) 919-0070 • www.polygroup.com
PRO-SERIES ABOVE GROUND ROUND FRAME QUICK SET® SWIMMING POOL
OWNER’S MANUAL
“Splash Guard” Technology
DANGER
PREVENT
DROWNING
System Info Label
Watch children
at all times.
Observe all Safety Rules.
WARNING: DO NOT overfill the pool and / or allow
people to lay over or sit on pool wall- DOING SO CAN
CAUSE PERMANENT INJURY!
DRAIN pool to the proper level after a heavy rain.
NOTE: DO NOT attempt to assemble this pool in
adverse weather conditions, windy conditions or when
the temperature is below 60°F.
NOTE: This is a storable pool, which should be
disassembled and stored when temperatures are
expected to fall below 32°F.
SAFETY INFORMATION
2
CONSUMER AWARENESS BOOKLETS
3
SITE PREPARATION
4
POOL INSTALLATION
4
DISASSEMBLY AND STORAGE
6
PARTS & ACCESSORIES
6
POOL COVER SAFETY
8
LIMITED WARRANTY
Polygroup Limited (Macao Commercial Offshore), (hereinafter “Polygroup”) warrants to the original purchaser only,
the ProSeries™ Metal Frame Pool (frame and liner) against defects in material and workmanship for 90 days from
the date of purchase. Original Purchaser must retain proof of such purchase in the form of an original store sales
receipt and must produce such upon request by Polygroup or its designated agents. Warranty claims cannot be
processed without a valid proof of purchase.
This Limited Warranty applies only to the original purchaser of the product and is limited solely to the repair or
replacement of the product, to be decided in Polygroup’s sole discretion. Consequential damages, including claims
for loss of water, pool chemicals, damage, or labor are not covered under this Limited Warranty.
This Warranty will be declared invalid should the Purchaser modify or repair the product themselves or by
unauthorized persons; use non-Polygroup parts or accessories with the product; use the product in contravention
of the Manufacturers Instructions; use improper voltage; abuse the product in any way; or through accident or
negligence. Normal wear-and-tear is not covered under this Warranty, nor are acts of God outside the control of
Polygroup.
IN NO EVENT SHALL POLYGROUP, THEIR AUTHORIZED AGENTS, RELATED ENTITIES, OR EMPLOYEES BE LIABLE TO THE
BUYER OR ANY OTHER PARTY FOR DIRECT OR CONSEQUENTIAL DAMAGES. Some states or countries, or others
jurisdictions do not allow the exclusion or limitation of incidental or consequential damages, so the above
limitation or exclusion may not apply to you.
Should you encounter a problem with your Polygroup Product, please do not return the product to the place or
purchase. All Warranty claims must be made directly to Polygroup. Prior to contacting Customer Service, please
first review the Troubleshooting Guide in the Installation Manual, or review the FAQ at www.polygroup.com . If you
are still unable to correct the problem, please contact Polygroup customer service at (888) 919-0070. Have the
product type and your purchase receipt ready. Our Customer Service Representative will assist you in resolving the
problem. You may be asked to return all or part of the product for inspection and/or repair. Do not return any
2012
product to Polygroup without a Return Authorization number.
084-120202
NO DIVING!
NO JUMPING!
Shallow Water - You can
be permanently injured.
WARNING
DO NOT SIT ON
OR LAY OVER
POOL WALL
You can be permanently
injured
AVOID
ENTRAPMENT
Stay away from
suction fi ttings You may drown
1. Children, especially children younger than five years, are at high risk of drowning. Drowning occurs silently and
quickly and can occur in as little as 2 in. (5 cm) of water.
2. Keep children in your direct sight, stay close, and actively supervise them when they are in or near this pool and
when you are filling and emptying this pool.
3. When searching for a missing child, check the pool first, even if the child is thought to be in the house.
4. Very Important: Swimming pool barriers, which restrict access to the pool by small children, may be required by
law. A barrier is necessary to provide protection against potential drowning and near drowning. Barriers are not a
substitute for constant supervision of children. Check state or local laws and codes before setting up pool.
5. The use of artificial pool lighting is at the discretion of the pool owner. Lighting, when installed, should be in
accordance with Article 680 of the National Electrical Code (NEC) or its latest approved edition and in consultation
with a licensed electrical professional.
6. During nighttime pool use, artificial lighting shall be used to illuminate all safety signs, ladders, steps, deck
surfaces and walks.
7. The floor of the pool shall be visible at all times from the outside perimeter of the pool.
8. Local building codes may require obtaining a building or electrical permit. Installer shall follow regulations on
setback, barriers, devices and other conditions.
9. Post a list of emergency telephone numbers such as the nearest available police, fire, ambulance and/or rescue
unit. These numbers are to be kept near the telephone, which is closest to the pool.
10. Toys, chairs, tables or similar objects that a young child could climb shall be at least four feet (4’) [121.92 cm]
from the pool. The pump filter system shall be positioned so as to prevent it being used as a means of access
to the pool by young children. Do not leave toys inside pool when finished using, since toys and similar items
might attract a child to the pool.
11. Basic lifesaving equipment, including one of the following should be on hand at all times:
* A light, strong, rigid pole (shepherds crook) not less than twelve feet (12’) [365.76 cm] long.
* A minimum one-fourth inch (1/4”) [6.35 mm] diameter rope as long as one and one half (1-1/2) times the
maximum width of the pool or fifty feet (50’) [15.24 meters], whichever is less, which has been firmly attached to a
Coast Guard-approved ring buoy having an outside diameter of approximately fifteen inches (15”) [38.1 cm], or
similarly approved flotation device.
12. Entrapment Avoidance: There shall be no protrusions or other obstruction in the swimming area, which may
cause entrapment or entanglement of the user. If a suction outlet cover is missing or broken, do not use the pool.
Suction can cause body part entrapment, hair and jewelry entanglement, evisceration, or drowning. Repair or
replace the suction outlet cover before allowing the pool to be used.
2
3
13. The pool is subject to wear and deterioration. If not maintained properly, certain types of excessive or accelerated
deterioration can lead to failure of the pool structure that might release large quantities of water that could cause
bodily harm and property damage.
14. Above ground / onground residential swimming pools are for swimming and wading only. No diving boards,
slides or other equipment are to be added to an above ground / onground pool that in any way indicates that an
above ground / onground pool may be used or intended for diving or sliding purposes.
15. Never allow horseplay, diving or jumping into or around the pool. Serious injury, paralysis or death, could result
when this rule is disregarded. DO NOT ALLOW anyone to swim alone without supervision.
16. Safety signs shall comply with requirements of ANSI-Z535 and to use signal wording.
17. The pool is to be assembled by an adult; care should be taken in the unpacking and assembly of the pool, this
pool may contain accessible potentially hazardous sharp edges or sharp points that are a necessary part of the
function of the pool.
18. Become certified in cardiopulmonary resuscitation (CPR). In the event of an emergency, immediate use of CPR
can make a lifesaving difference.
19. Keep all electrical lines, radios, speakers and other electrical appliances away from the pool.
20. Do not place pool near or under overhead electrical lines.
21. Remove pool ladders before leaving the pool. Children as young as 2 years have climbed up ladders and into
pools and drowned.
NOTICE: CUSTOMERS THAT PURCHASE POOLS MAY BE REQUIRED BY LOCAL OR STATE LAW TO
INCUR ADDITIONAL EXPENSES WHEN INSTALLING A POOL, IN ORDER TO COMPLY WITH STATE OR LOCAL
LAWS REGARDING FENCING AND OTHER SAFETY REQUIREMENTS. CUSTOMERS SHOULD CONTACT THEIR
LOCAL BUILDING CODE ENFORCEMENT OFFICE FOR FURTHER DETAILS.
FRAME POOL SETUP INSTRUCTION SHEET
SITE PREPARATION
WARNING - VERY IMPORTANT! SITE MUST BE LEVEL, STABLE, COMPACTED SOIL.
• The pool must be assembled on a smooth and level site of firm soil that is free of stones, gravel, sticks, blacktop
or other oil base compounds. Do not install pool on a wooden deck or any type of wooden surface. You can not
use sand and/or uncompacted soil to provide a level surface for this pool; it will only wash out.
• FAILURE TO FOLLOW THE INSTRUCTIONS BELOW WILL CAUSE POOL TO COLLAPSE AND WILL VOID THE
WARRANTY!
1. Select a level area, and completely remove all debris, twigs, stones, etc. DO NOT select an area under overhead
electrical lines, trees or within 15 feet of a house, building, etc. The area should also be at least 10 feet away, and no
more than 21 feet away, from a 110 volt AC outlet, protected by a Ground Fault Circuit Interrupter.
2. Contact your local utilities, checking that no underground cables, telephone lines, gas lines, etc. run beneath the
area you have selected.
POOL INSTALLATION
WARNING: DO NOT overfill the pool and / or allow people to lay over or sit on pool wall doing so can cause
permanent injury. DRAIN pool to the proper level after a heavy rain.
TIP: It will be much easier to install your pool if you unfold it and let it lay in direct sunlight for about 2 hours prior to
installation. This will help to insure a wrinkle-free fit because the pool material will be more pliable allowing it to
form into shape during installation.
1. Carefully unfold the Quick Set® pool and inspect seams for manufacturing
defects. Lay the pool out flat on the ground, positioning the power filter
mounting area of the pool wall so that it is 10 to 21 feet from the electrical
outlet you plan to use for the pool pump. You should have at least three
people to assist with the assembly of this pool.
CONSUMER AWARENESS BOOKLETS
Contact: U.S. Consumer Product Safety Commission at www.CPSC.gov/cpscpub/pubs/pool/pdf, Pub. #362 “Safety
Barrier Guidelines for Home Pools”.
Contact: ASSOCIATION OF POOL & SPA PROFESSIONALS ( formerly NSPI) at - www.apsp.org/164/index.aspx
These titles are now available: “The Sensible Way To Enjoy Your Aboveground / Inground Swimming Pool”,
“Children Aren’t Waterproof”, “Pool and Spa Emergency Procedures For Infants’, Layers of Protection”, and the
“ANSI /NSPI-8 Model Barrier Code for Residential Swimming Pools, Spas, and Hot Tubs”.
92
FIG. 1
2. Locate the metal pipe and Tee Fittings for the frame section of the pool. The shorter
pipe sections with the larger diameter and the pair of holes at both ends are the Horizontal Beams (91). The longer
pipe sections with the smaller diameter and the Spring Pin (95) at
one end are the Vertical Legs (94). Take the Horizontal Beams (91)
91
and insert them into the pockets stitched along the top edge of
the pool wall. Rotate it in the pocket so that the holes are on the
92
91
top and bottom of the pipe protruding from each end of the pockets.
Take one end of the pipe and insert it into a Tee Fitting aligning the
FIG. 2
holes with the holes in the Horizontal Beam. Do NOT install any of
the Pins (93) at this time. Continue around the pool in either direction
installing all of the Tee Fittings onto the Horizontal Beams. See Fig 1.
DANGER:
Competent supervision and knowledge of the safety requirements
is the only way to prevent drowning or permanent injury
in the use of this product!
Never leave young children unattended.
3. When you get to the last connection, install the last Tee Fitting on
the end of one of the beams. Lift up on both of the last two Beams
in order to get them to insert into the Tee Fitting. Angle them towards
each other and guide the Beam into the Fitting as you lower them
both down together. See Fig. 2. This step may require two people.
Now, begin inserting the Pins (93) / Grommets (97) down through
the top of the Tee Fittings until the Pin snaps into place on the lower
side of the Fitting as shown in Fig. 3.
DANGER: POOL SET-UP
Do not attempt to assemble this pool in adverse weather conditions, such
as in high winds, strong gusts or when the temperature is below 60°F.
Should you encounter any problems, contact the Customer Service at (888) 919-0070 from 8 AM to 5 PM Mon. thru Fri. EST. Extended
operating days and hours during peak season requirements.
4
3
4
97
93
FIG. 3
Should you encounter any problems, contact the Customer Service at (888) 919-0070 from 8 AM to 5 PM Mon. thru Fri. EST. Extended
operating days and hours during peak season requirements.
4. Once the top frame is assembled, locate the Vertical Legs (94). The Vertical Leg sections will have a Spring Pin 5
(95) pre-installed at the top end. First, insert the leg down through the belt that runs around the middle of the
pool, see Fig. 4. Now, to connect them into the top frame, push the buttons in as you insert the Leg up into the Tee
Fitting. Look through the hole in the Fitting as you insert and rotate the pipe until the buttons align with the holes
and pop out, locking the leg in place. Finally, take one of the Leg Caps (96) and insert the bottom of the Vertical
Leg into it until it stops.
6
DISASSEMBLY AND STORAGE
1. GENERAL INFORMATION: Pool must be stored if temperatures are expected to fall below 32°F.
A. All parts should be cleaned with a mild soap and lukewarm water only - DO NOT use detergent or hot water.
B. Make sure all parts are dry before storing to help prevent mildew from forming.
C. Store all parts in a dry heated area where temperatures do not go below 32° F or above 125° F.
5. Go around and check all of the Fittings, Legs, and Beams for proper fit, making sure that all the Pins have been
securely fastened in all of the holes. Grab the Vertical Legs at the bottom and gently pull them out making sure
that they remain vertical and perpendicular to the top ring.
D. Failure to follow the proper storage instructions could cause damage to pool parts and void warranty.
6. Make sure the drain fitting is plugged securely and the cap is in place. Start filling the pool with water.
NOTE: AFTER ABOUT 1-INCH OF WATER IS ON THE BOTTOM, STOP FILLING AND SMOOTH WRINKLES OUT OF THE
BOTTOM OF THE POOL MAKING SURE THE POOLS BOTTOM IS FLAT AND ROUND EQUALLY IN ALL DIRECTIONS.
SEE FIG. 4 BELOW
E. YOU MUST FOLLOW THE ASSEMBLY INSTRUCTIONS TO REASSEMBLE YOUR POOL NEXT SEASON. Pool site
must be cleared and leveled again before setting up your pool.
2. QUICK-SET® POOL:
A. To drain the pool, locate the drain plug on the outside of the pool wall and remove the drain cap. A standard
garden hose will thread onto the drain fitting. Extend the hose to the area where the water is to be drained.
When you have placed the garden hose where desired, the drain plug on the inside of the pool can be opened.
7. NOTE: IF MORE THAN 1-2 INCHES OF WATER COLLECTS ON ANY ONE SIDE BEFORE THE POOL STARTS FILLING IN
THE CENTER, THE POOL IS NOT LEVEL ENOUGH, AND MUST BE CORRECTED, SEE “SITE PREPARATION”, PAGE 4.
NOTE: THE WEIGHT OF THE WATER WILL PREVENT ANY ADJUSTMENT AFTER THIS POINT.
B. Once you have drained as much water as possible out of the pool, using the hose connected to the drain fitting,
open the air valve and deflate the top ring. Then, carefully push the sides of the pool wall down to allow
remaining water to run out.
8. Continue to check the Vertical Legs and pull them out at the bottom if necessary, making sure they remain vertical
and perpendicular to the top ring.
C. Remove any remaining water as you wash and completely dry pool using a soft cotton cloth. Push the drain
plug into the fitting and replace the cap.
9. Following the instructions under “Power Filter Installation” in the “Swimming Pool Filter System” owner’s manual,
begin installing your power filter unit according to it’s manual.
D. Frame Pools: If your pool has metal frame work, disassemble those pieces by depressing the plastic buttons
sliding those pieces apart or by removing the plastic pins holding them together again sliding those pieces
apart, clean them and wipe them dry. If in doubt of proper disassembly refer to the pools set-up sheet and
reverse those steps. Place them all together in a safe storage place for reassembly next season. Order replace
ment parts for any damaged, broken, or worn parts
E. Solar blankets, leaf covers, ladders, etc., should be cleaned and dried before storing
97
93
92
FLOOR MUST BE FREE OF WRINKLES AND ROUND
EXTENDING OUT TO EACH VERTICAL LEG SUPPORT
REPLACEMENT PARTS
95
KEY
DESCRIPTION
ID NUMBER
QTY
LBS
COST
QUICK-SET POOL
94
30
PRO-SERIES QUICK-SET POOL
CALL PARTS DEPT. FOR REPLACEMENT
GFP ACCESSORIES
*
*
*
*
*
80
81
82
96
94
FIG.4
PRO-SERIES LADDER w/BARRIER (36” POOL)
PRO-SERIES LADDER w/BARRIER (42” POOL)
PRO-S ERIES LADDER w/BARRIER (48” POOL)
PRO-SERIES LADDER w/BARRIER (52” POOL)
DUAL MAINTENANCE KIT (LEAF NET & VACUUM)
LEAF COVER (NOT A SAFETY COVER)
SOLAR BLANKET (NOT A SAFETY COVER)
SOLAR COVER (NOT A SAFETY COVER)
097-020013
1
21
097-020014
1
24
097-020015
1
28
097-020016
1
33
096-050024
1
3
CALL PARTS DEPT. FOR REPLACEMENT
CALL PARTS DEPT. FOR REPLACEMENT
CALL PARTS DEPT. FOR REPLACEMENT
50.00
55.00
60.00
75.00
15.00
96
Should you encounter any problems, contact the Customer Service at (888) 919-0070 from 8 AM to 5 PM Mon. thru Fri. EST. Extended
operating days and hours during peak season requirements.
5
6
Should you encounter any problems, contact the Customer Service at (888) 919-0070 from 8 AM to 5 PM Mon. thru Fri. EST. Extended
operating days and hours during peak season requirements.
7
PRO-SERIES
ROUND FRAME POOL
IF YOU ARE GOING TO USE A POOL COVER, SOLAR COVER OR SOLAR
BLANKET, PLEASE READ THIS INFORMATION.
CALL PARTS DEPT. FOR REPLACEMENT PARTS or see ORDER SHEET
for ordering instruction and shipping information
(91) HORIZONTAL BEAM
POOL
MODEL
QTY
WGT
(lbs)
(94) VERTICAL LEG
COST
EA.
PART NO.
QTY
WGT.
(lbs)
(92) T-FITTING
COST
EA.
PART NO.
QTY
WGT.
(lbs)
POOL
SIZE
PART NO.
PS20-0827
8’ x 27”
090-380092
8
1-1/2
3.00
090-380093
8
1-1/4
3.00
090-380099
8
1/2
3.00
PS20-1030
10’ x 30”
090-380092
10
1-1/2
3.00
090-380094
10
1-1/4
3.00
090-380100
10
1/2
3.00
PS20-1230
12’ x 30”
090-380092
12
1-1/2
3.00
090-380094
12
1-1/4
3.00
090-380101
12
1/2
3.00
COST
EA.
PS20-1236
12’ x 36”
090-380092
12
1-1/2
3.00
090-380095
12
1-1/4
4.00
090-380101
12
1/2
3.00
PS20-1336
13’ x 36”
090-380092
13
1-1/2
4.00
090-380095
13
1-1/4
4.00
090-380102
13
1/2
3.00
PS20-1442
14’ x 42”
090-380092
14
1-1/2
4.00
090-380096
14
1-1/4
5.00
090-380103
14
1/2
3.00
PS20-1536
15’ x 36”
090-380092
15
1-1/2
5.00
090-380095
15
1-1/4
5.00
090-380104
15
1/2
3.00
PS20-1542
15’ x 42”
090-380092
15
1-1/2
5.00
090-380096
15
1-1/4
5.00
090-380104
15
1/2
3.00
PS20-1548
15’ x 48”
090-380092
15
1-1/2
5.00
090-380097
15
1-1/4
6.00
090-380104
15
1/2
3.00
PS20-1642
16’ x 42”
090-380092
16
1-1/2
5.00
090-380096
16
1-1/4
5.00
090-380105
16
1/2
3.00
PS20-1648
16’ x 48”
090-380092
16
1-1/2
5.00
090-380097
16
1-1/4
6.00
090-380105
16
1/2
3.00
PS20-1652
16’ x 52”
090-380092
16
1-1/2
5.00
090-380098
16
1-1/4
6.00
090-380105
16
1/2
3.00
PS20-1842
18’ x 42”
090-380092
18
1-1/2
5.00
090-380096
18
1-1/4
5.00
090-380106
18
1/2
3.00
PS20-1848
18’ x 48”
090-380092
18
1-1/2
5.00
090-380097
18
1-1/4
6.00
090-380106
18
1/2
3.00
PW20-1848
18’ x 48”
090-380128
18
1-1/2
5.00
090-380129
18
1-1/4
6.00
090-380130
18
1/2
3.00
PS20-1852
18’ x 52”
090-380092
18
1-1/2
5.00
090-380098
18
1-1/4
6.00
090-380106
18
1/2
3.00
PW20-1852
18’ x 52”
090-380128
18
1-1/2
5.00
090-380132
18
1-1/4
6.00
090-380130
18
1/2
3.00
PS20-1952
19’ x 52”
090-380092
19
1-12
5.00
090-380098
19
1-1/4
6.00
090-380107
19
1/2
3.00
PS20-2048
20’ x 48”
090-380092
20
1-1/2
6.00
090-380097
20
1-1/4
6.00
090-380108
20
1/2
3.00
PS20-2252
22’ x 52”
090-380092
22
1-1/2
6.00
090-380098
22
1-1/4
6.00
090-380127
22
1/2
3.00
PS20-2448
24’ x 48”
090-380092
24
1-1/2
6.00
090-380097
24
1-1/4
6.00
090-380109
24
1/2
3.00
PS20-2452
24’ x 52”
090-380092
24
1-1/2
6.00
090-380098
24
1-1/4
6.00
090-380109
24
1/2
3.00
(96) LEG CAP
POOL
MODEL
POOL
SIZE
PART NO.
PS20-0827
8’ x 27”
PS20-1030
PS20-1230
COST
EA.
(93) PIN & (97) Grommet
( w/2 extra)
QTY WGT.
COST
PART NO.
(lbs)
EA.
POOL COVER WARNING
SOLAR COVER WARNING
!
WGT
(lbs)
QTY
WGT.
(lbs)
097-080031
8
1/4
0.50
097-080032
18
1/4
0.35
097-080033
9
1/4
0.25
10’ x 30”
097-080031
10
1/4
0.50
097-080032
22
1/4
0.35
12’ x 30”
097-080031
12
1/4
0.50
097-080032
26
1/4
0.35
097-080033
11
1/4
0.25
097-080033
13
1/4
PS20-1236
12’ x 36”
097-080031
12
1/4
0.50
097-080032
26
1/4
0.25
0.35
097-080033
13
1/4
PS20-1336
0.25
13’ x 36”
097-080031
13
1/4
0.50
097-080032
28
1/4
.035
097-080033
14
1/4
0.25
PS20-1442
14’ x 42”
097-080031
14
1/4
0.50
097-080032
30
1/4
0.35
097-080033
15
1/4
0.25
PS20-1536
15’ x 36”
097-080031
15
1/4
0.50
PS20-1542
15’ x 42”
097-080031
15
1/4
0.50
097-080032
32
1/4
0.35
097-080033
16
1/4
0.25
097-080032
32
1/4
0.35
097-080033
16
1/4
PS20-1548
15’ x 48”
097-080031
15
1/4
0.25
0.50
097-080032
32
1/4
0.35
097-080033
16
1/4
PS20-1642
16’ x 42”
097-080031
16
0.25
1/4
0.50
097-080032
34
1/4
0.35
097-080033
17
1/4
PS20-1648
16’ x 48”
097-080031
0.25
16
1/4
0.50
097-080032
34
1/4
0.35
097-080033
17
1/4
PS20-1652
16’ x 52”
0.25
097-080031
16
1/4
0.50
097-080032
34
1/4
0.35
097-080033
17
1/4
0.25
PS20-1842
PS20-1848
18’ x 42”
097-080031
18
1/4
0.50
097-080032
38
1/4
0.35
097-080033
19
1/4
0.25
18’ x 48”
097-080031
18
1/4
0.50
097-080032
38
1/4
0.35
097-080033
19
1/4
0.25
PW20-1848
18’ x 48”
090-380031
18
1/4
0.50
090-380135
38
1/4
0.35
090-380136
19
1/4
0.25
PS20-1852
18’ x 52”
097-080031
18
1/4
0.50
097-080032
38
1/4
0.35
097-080033
19
1/4
0.25
PW20-1852
18’ x 52”
090-380031
18
1/4
0.50
090-380135
38
1/4
0.35
090-380136
19
1/4
0.25
PS20-1952
19’ x 52”
097-080031
19
1/4
0.50
097-080032
40
1/4
0.35
097-080033
20
1/4
0.25
PS20-2048
20’ x 48”
097-080031
20
1/4
0.50
097-080032
42
1/4
0.35
097-080033
21
1/4
0.25
PS20-2252
22’ x 52”
097-080031
22
1/4
0.50
097-080032
46
1/4
0.35
097-080033
23
1/4
0.25
PS20-2448
24’ x 48”
097-080031
24
1/4
0.50
097-080032
50
1/4
0.35
097-080033
25
1/4
0.25
PS20-2452
24’ x 52”
097-080031
24
1/4
0.50
097-080032
50
1/4
0.35
097-080033
25
1/4
0.25
PART NO.
!
STAY OFF COVER - WILL NOT SUPPORT WEIGHT.
KEEP CHILDREN AWAY. CHILDREN OR OBJECTS CAN
NOT BE SEEN UNDER COVER.
REMOVE STANDING WATER - CHILD CAN DROWN ON
TOP OF COVER.
REMOVE COVER COMPLETELY BEFORE ENTRY OF
BATHERS - ENTRAPMENT POSSIBLE.
NON-SECURED OR IMPROPERLY SECURED COVERS
ARE A HAZARD.
FAILURE TO FOLLOW ALL INSTRUCTIONS MAY
RESULT IN INJURY OR DROWNING.
THIS IS NOT A SAFETY COVER.
TYPE OC COVER CLASSIFICATION.
INSTALL COVER WITH LABELS FACING UP.
USE DRAWSTRING TO SECURE COVER TO POOL.
THIS COVER MEETS REQUIREMENTS DESCRIBED
IN SPECIFICATION F-1346 (ASTM).
COST
EA.
7
SOLAR BLANKET WARNING
WARNING
AVOID DROWNING RISK
(95) V-SHAPE SPRING PIN (w/ 1 extra)
QTY
POOL COVER SAFETY
8
WARNING
AVOID DROWNING RISK
STAY OFF COVER - WILL NOT SUPPORT WEIGHT.
KEEP CHILDREN AWAY. CHILDREN OR OBJECTS CAN
NOT BE SEEN UNDER COVER.
REMOVE STANDING WATER - CHILD CAN DROWN ON
TOP OF COVER.
REMOVE COVER COMPLETELY BEFORE ENTRY OF
BATHERS - ENTRAPMENT POSSIBLE.
NON-SECURED OR IMPROPERLY SECURED COVERS
ARE A HAZARD.
FAILURE TO FOLLOW ALL INSTRUCTIONS MAY
RESULT IN INJURY OR DROWNING.
THIS IS NOT A SAFETY COVER.
TYPE OC COVER CLASSIFICATION.
INSTALL COVER WITH LABELS FACING UP.
LAY COVER ON TOP SURFACE OF WATER.
THIS COVER MEETS REQUIREMENTS DESCRIBED
IN SPECIFICATION F-1346 (ASTM).
VERY IMPORTANT
DO NOT USE A POOL COVER, SOLAR COVER OR SOLAR
BLANKET ON THIS POOL IF IT DOES NOT HAVE THIS TYPE OF
WARNING LABEL ON THE COVER.
DANGER:
Competent supervision and knowledge of the safety requirements
is the only way to prevent drowning or permanent injury
in the use of this product!
Never leave young children unattended.
8
Should you encounter any problems, contact the Customer Service Representative/Parts Department at (888) 919-0070
from 8 AM to 5 PM Mon. thru Fri. EST. Extended operating days and hours during peak season requirements.