1
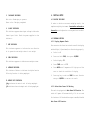
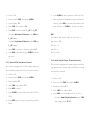
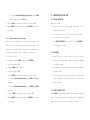
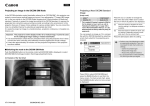
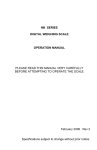
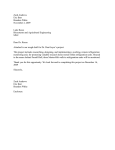
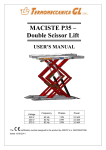
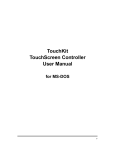
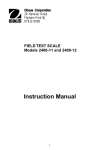
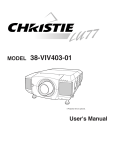
AFW/APF
CONTENTS
ELECTRONIC WEIGHING INDICATOR
1. INSTALLATION
2. SPECIFICATIONS
OPERATION MANUAL
3. KEYBOARD LAYOUT AND DESCRIPTION
4. INITIAL SETUP
PLEASE READ THIS MANUAL VERY CAREFULLY BEFORE
ATTEMPT TO OPERATE THIS INDICATOR
5. INSTRUCTION FOR USE
6. TROUBLE SHOOTING
7. DAILY CARE AND MAINTENANCE
APPENDIX: APPEARANCE
JUNE 2003 REV 2
Specifications subject to change without prior notice
1. INSTALLATION
2. SPECIFICATIONS
Because of metrological legislation, installation/some
metrological parameter settings are limited to be done
by authorized personnel only. Do not attempt to change
any of the built-in parameters. Contact your dealer for
installation and technical assistance.
CAUTION:
This unit is legal for trade only when it is sealed (and/or
stamped) and bearing a serial number. Do not attempt
to break the seal (or stamp) affixed to this indicator
or remove the serial number. Contact your dealer for
more information and after sales service.
For most accurate weighing result, do not use the
indicator in where or when the environment condition
Model No.
Max.
nmax
Tare Range
Power-on Zero Range
Zero Range
Min. Load
Max. measuring range
Min. signal voltage per
verification scale interval
AFW/APF INDICATOR
USER DEFINED
3000 (NOTE 1)
1/3 Max. ¡ e (NOTE 2)
¡Ó10% Max.
¡Ó2% Max.
20e (NOTE 3)
9.0mV
1.5 V
6.0 VDC (BY EXTERNAL POWER
Power voltage requirements ADAPTOR OR RECHARGEABLE
BATTERY)
Minimum battery voltage
5.5 V DC
Load cell Excitation voltage
5 V DC
Minimal load cell impedance
85
Maximal load cell impedance
1000
Load cell connection
4 wires
Operation
0o~40oC
Environment
Non-condensed. R.H.¡ 85%
Specifications subject to change without notice.
falls beyond as those listed on SPECIFICATIONS.
NOTE 1:
Do not attempt to open this unit or conduct any trouble
The recommend division when application is legal for
shootings other than those listed on TROUBLE SHOOTING.
trade (OIML mode) is 3000 and 6000 to 7500 when
application is not legal for trade (normal mode). The
maximum display division under OIML mode when Extended
Display function engaged is 30000, the same as under
non-OIML mode.
NOTE 2:
3. KEYBOARD LAYOUT AND DESCRIPTION
When under OIML mode, for Multi range or interval, change
e to e1. When under non-OIML mode, the default setting
is full tare range.
NOTE 3:
For Multi range or interval, change e to e1.
(MODEL SHOWN: AFW)
1. OFF KEY
Press this key to turn indicator off.
2. ON/ZERO KEY
Press this key to turn on scale or to set weight displayed
to zero.
3. TARE KEY
Press this key to tare off the weight of a container.
4. MODE KEY
Press this key to shift among metric/ avoirdupois weight
unit and turn on/off backlight (optional).
5. IN-CHARGE INDICATOR
4. INITIAL SETUP
Red color: Recharging on process
4.1 PLACING THE SCALE
Green color: Charging completed
In order to obtain an accurate weighing result, the
complete weighing instrument (hereinafter referred as
6. LO-BAT INDICATOR
This indicator appears when input voltage is below the
the scale) must be placed on a strong and level surface.
lowest input limit. Check the power supplied to the
indicator.
4.2 INTERNAL SETTING
4.2.1 Display Segment Check
7. NET INDICATOR
This indicator appears to indicate the tare function
is in operation and weight shown is net weight.
8. ZERO INDICATOR
This indicator appears to indicate zero weight status.
9. AVERAGE INDICATOR
User can enter this function to check to see if the display
and backlight (if purchased) are functioning properly.
a.
Scale is off
b.
Press and hold TARE, then press ON/ZERO
c.
Scale displays F.1
d.
Press TARE once to F.2
e.
Press MODE and all segments will light up to allow
This indicator flashes to indicate the digital motion
filtering function is being employed.
10. WEIGHT UNIT INDICATOR
user to check the condition of display
f.
Press any key to exit and TARE for next function
setup or ON/ZERO to restart the scale
¡§kg¡indicates the metric unit is being employed.
¡§lb indicates the avoirdupois unit is being employed.
4.2.2 Select Auto Power Off Setting
The scale is equipped with Auto Power Off Function. The
scale will power off automatically if it is not used
for 4 minutes. Follow the below steps to enable/disable
Auto Power Off Function.
a.
Scale is off
h.
Press ON/ZERO to select protocol of P=N81 or P=E71
b.
Press and hold TARE, then press ON/ZERO
i.
When the preferred transmission protocol shows on
c.
Scale displays F.1
display, press TARE to confirm and proceed to the
d.
Press TARE three times to F.4
next selection or ON/ZERO to restart the scale
e.
Press MODE to shift between 0._OFF or 4._OFF
-To enable Auto Power Off Function, press TARE when
NOTE:
4._OFF appears
The default data output format of the scale is
-To disable Auto Power Off Function, press TARE when
Baud Rate = 9600
0._OFF appears
Data Bit = 8
f.
After TARE is pressed, indicator display F.5
Stop Bit = 1
g.
Press MODE to enter next set up or ON/ZERO to restart
Parity = None
the scale
4.2.4 Select Digital Motion Filtering Function
4.2.3 Select RS-232 Baud Rate & Protocol
This scale is equipped with 3 RS232C output baud rate
and 2 transmission protocol settings for user to select.
a.
Scale is off
b.
Press and hold TARE, then press ON/ZERO
c. Scale displays F.1
d.
Press TARE four times to F.5
e.
Press MODE to enter
f.
Press ON/ZERO to select baud rate of 4800, 9600 or
19200
g.
Press MODE again to enter transmission protocol
setup
This indicator equipped with animal weighing function
that enables user to select when the indicator is using
for weighing livestock.
a.
Scale is off
b.
Press and hold TARE, then press ON/ZERO
c.
Indicator displays F.1
d.
Press TARE five times to F.6
e.
Press MODE to shift between Filt.0 or Filt.1
- To enable Animal Weighing Function, press TARE
when display shows Filt.1
- To disable Animal Weighing Function, press TARE
when display shows Filt.0
5. INSTRUCTION FOR USE
5.1 BEFORE WEIGHING
f. After TARE is pressed, indicator display F.9
Make sure that:
g. Press MODE to enter next set up or ON/ZERO to restart
a.
the scale
Connect the load cell signal and power to the
indicator properly.
b.
Place the scale on a level and strong surface.
4.2.7 Select Auto Tare Function
c.
The indicator is turned on.
This scale is equipped with auto tare function which
d.
The ZERO INDICATOR is on. If not, press ON/ZERO to
tares off the initial weight automatically when this
set display to zero.
function is engaged. The tare weight is automatically
cleared when everything is removed from platter.
5.2 WEIGHING
a.
Scale is off
a. Always place an object onto the scale gently.
b.
Press and hold TARE, then press ON/ZERO
Excessive force applied to platter may cause damages
c.
Scale displays F.1
to weight sensor.
d.
Press TARE eight times
e.
Scale displays F.9
f.
Press MODE to select between Tr_on or TroFF
b. The weight of the object is displayed on the indicator
automatically.
c. It is a good practice to remove all loads from scale
-To enable Auto Tare Function, press TARE when Tr_on
after weighing. It would prolong the lifetime of
appears
weight sensor.
-To disable Auto Tare Function, press TARE when TroFF
appears
5.3 SELECT WEIGHT UNIT
g.
After TARE is pressed, scale display F.1
Press MODE to shift between metric or avoirdupois weight
h.
Press MODE to enter next set up or ON/ZERO to restart
units. The weight unit used before power off would be
the scale
employed when the scale is turned on again.
NOTE:
To comply with the law of certain countries and certain
NOTE:
approval requirements, the avoirdupois weight units may
-When scale is set at OIML and application is legal for
be disabled. Contact your dealer for more information.
trade. User only needs to press ON/ZERO once when setting
the value to zero. The re-zero function will take place
5.4 TURN BACKLIGHT (OPTIONAL) ON/OFF
when reading is stabled
Follow the below steps to turn on and off backlight (if
-When scale is set at Normal and application is not legal
purchased).
for trade. User can set the value to zero at anytime
a.
Scale is on
when pressing ON/ZERO
b.
Press and hold ON/ZERO until backlight is activated;
or press MODE to shift between metric and avoirdupois
5.6 TARE OFF THE WEIGHT OF A CONTAINER
weight to turn on and off backlight
When a container is used, follow the below steps to
manually tare off the weight of container and get the
Even
though
the
backlight
function
is
employed,
net weight.
backlight will be automatically turned off when a stable
a. Remove all loads away from platter.
weight remained for 25 seconds or a zero weight is
b. Make sure that the ZERO INDICATOR is on.
detected and remains stable for 10 seconds
c. Place the container on the platter.
d. Press TARE.
Backlight will be automatically turned on again when
a new weight is detected or when any key is pressed.
After TARE is pressed, the NET INDICATOR would appear.
5.5 SET DISPLAYED VALUE TO ZERO WHEN UNLOADED
Refer to 5.2 for weighing procedures. Weight displayed
By pressing ON/ZERO, weight displayed will be set to
under is the net weight of the subject matter. Refer
zero and ZERO INDICATOR appears.
to SPECIFICATIONS for maximum tare range.
Refer to SPECIFICATIONS for maximum zero range.
NOTE:
5.9 RECHARGE SCALE
- When scale is set at OIML and application is legal
The indicator is equipped with a built-in rechargeable
for trade. User only needs to press TARE once when tare
battery. When the LO-BAT INDICATOR appears, recharge
off a weight. The tare function will take place when
the scale immediately. Failure to do so may cause
reading is stabled
unrecoverable damage to the rechargeable battery.
- When scale is set at Normal and application is not
Charging is completed when the color of the IN-CHARGE
legal for trade. User can tare off the weight anytime
INDICATOR turns green.
when pressing TARE
5.7 CLEAR THE TARE FUNCTION
a.
Remove all loads from platter
b.
The tare effect will be cancelled:
-Automatically if automatic tare function is
employed, or
-By pressing TARE
c.
After TARE is pressed, the NET INDICATOR would
disappear
5.8 EXTENDED DISPLAY
This indicator is equipped with extended display for
reference when it is operating under OIML mode. Press
and hold MODE for 2 seconds and display will show the
extended digit for 5 seconds before return to normal.
6. TROUBLE SHOOTING
-----
Syndrome
Indicator displays
Check
Is the load cell signal cables connected
to the indicator properly?
Syndrome
Indicator cannot be turned on
Check:
Is the indicator powered properly?
Action
Recheck signal cable connections.
Action:
Check power supply to indicator.
Check
Is load cell working properly?
Action
Check load cell input/output.
Syndrome
Indicator turned off automatically
Check
Is Auto Power Off Function employed?
Syndrome
Display shows 00000 after counting down
Action
Refer to 4.2.2 to disable Auto Power Off
Check
Is the load applied to platter excess the
rated capacity of scale?
Function.
Check
Is the LO-BAT INDICATOR on?
Action
Check power supply.
Action
Remove all loads from platter and try again.
Syndrome
Weighing result is not accurate
Syndrome
Rated capacity cannot be reached
Check
Is the scale placed in a level condition?
Check
Is the NET INDICATOR on?
Action
Obtain a level condition.
Action:
Turn the indicator off. Remove all loads
Check
Is the scale affected by airflow, vibration
and turn on again.
or RFI?
Check
Is there anything obstructing the scale?
Action:
Place the scale away from all disturbances.
Action
Remove all obstacles.
Check
Is the indicator calibrated correctly?
Action
Contact your dealer.
Syndrome
Blank display with only "kg" or "lb"
Check
Is the load applied to scale excess the rated
capacity?
Action
Remove all loads and try again.
7. DAILY CARE AND MAINTENANCE
APPENDIX: APPEARANCE
7.1
MODEL SHOWN: APF
Clean the indicator with a soft and damp cloth.
If necessary, apply a mild detergent.
7.2
Do not use any harsh, abrasive material, acetone,
volatile solvent, thinner or alcohol for
cleaning.
7.3
Verify the accuracy of indicator periodically.
Re-calibrate the indicator if necessary.
NOTE: In some countries, calibration requires
authorized/qualified
agent.
Contact
your
dealer for more information.
7.4
Store indicator scale in a dry and clean place.
CAPACITY STICKER:
KONFORMITATSERKLARUNG
Declaration of conformity
Declaration de conformite
Die ichtselbsttatigen Waage
The non-automatic weighing instrument
L'instrument de pesage a fonctionnement non automatique
Hersteller:
Manufacturer:
Fabricant
Typ/Modell:
Type/Model:
Type/modele:
Nr. der EG-Bauartzulassung (gegebenen falls):
No of the EC type-approval certificate (where applicable):
No du certificat d'approbation CE de type (le cas echeant):
Universal Weight
Enterprise
Co., Ltd.
AFW/APF
T6126
entspricht dem in der Bescheinigung uber die Bauartzulassung beschriebenen
Baumuster, sowie den Anforderungen der EG-Richtlinie 90/384/EWG in der jeweils
geltenden Fassung und den Anforderungen folgender EG-Richtlinien:
corresponds to the production model described in the EC type-approval certificate and
to the requirements of the Council Directive 90/384/EEC as amended and to the
requirements of the following EC directives:
correspond au modele decrit dans le certificat d'approbation CE de type, aux exigences
de la directive 90/384/CEE modifiee et aux exigences des directives CE suivantes:
*Diese Erklarung gilt nur in Verbindung mit einer Konformitatsbescheinigung einer
benanten Stelle.
*This Declaration of conformity is only valid with a certificate of conformity issued by a
notified body
*Cette declaration est valide seulement avac une aattestation de conformite d¡un
organisme notlfle.
Anmerkung 1: Der mit * gekennzeichnete Satz entfailt, wenn die nichtselbsttatige
Waage vom Hersteller geeicht wurde.
Note 1: The sentence marked with * does not apply, if the non-automatic weighing
instrument was verified by the manufacturer.
Note 1: La phrasa marquie avac * ne s¡applique pas au cas ou linstrument de passage
a fonctionnement non automatique a eie vaifie par ie fabricant.
Unterschrift
Signature
Signature
Datum
Date
Date