1
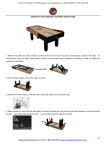
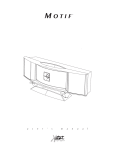
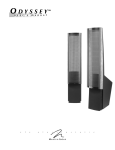
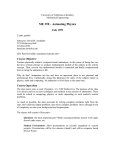
To Purchase This Item, Visit BMI Gaming | www.bmigaming.com | (800) 746-2255 | +1.561.391.7200
Users Manual TAVERN MODEL TWICE THE FUN IN HALF THE SPACE To Purchase This Item, Visit BMI Gaming | www.bmigaming.com | (800) 746-2255 | +1.561.391.7200
ASSEMBLY INSTRUCTIONS Congratulations on your purchase of a fine Snap‐Back Shuffleboard®! To make it as easy as possible to assemble your table, we have prepared these pages to walk you through the assembly process, step by step. In order to assemble the table you will need METRIC wrenches to tighten the screws. The wrench is included in your box, so you should be able to assemble the table with the tools provided. First, notice there are two boxes. These boxes contain a cradle box and an accessories box. The cradle box includes a cradle, a playing surface (already assembled on the cradle), ramps(already assembled), Small V‐shaped ramp (already assembled) and the tools. Also enclosed are the manufacturer's assembly instructions, which include schematics of the table game, parts list, game rules and the attaching screws. The accessory box include a scoreboard, 4 legs, 4 leg levelers, 2 shelves, a bottle of powder, a box of pucks, a brush, screws, and other accessories. UNPACK BOXES When you open the boxes, be sure you are careful with any boxes cutter you might be using to ensure you don't cut the table by mistake. A Philips screwdriver is included in the cradle box; it can be used to open the accessory box. Carefully remove the legs, the shelves, the scoreboard box, the brush, and the screws from the box. Try not to bump these parts against the wood finish on the table to prevent scratching. The pucks, powder, screws, brush, 502 glue and leg levelers are in the shelves box. Next, you will notice that there are several plastic bags of screws. It was intended that each bag would contain all the screws and washers for each purpose. For example, one bag is labeled "LEG SCREWS." and contains all the screws and washers needed to attach the legs to the bottom of the table. Another bag is labeled "SHFLF SCREWS." Take the assembled cradle out of the box and place it upside down on something soft, like a rug or a carpet. A heavy corrugated cardboard will do if you are careful not to scratch the 1 To Purchase This Item, Visit BMI Gaming | www.bmigaming.com | (800) 746-2255 | +1.561.391.7200
surface against the floor. ASSEMBLE LEGS The legs are assembled to the table by inserting the legs into the square wooden receptacles. There are 4 such square receptacles in the bottom of the table, one for each leg. Insert the legs into the receptacles but do not bolt them on yet. Note that there are 2 threaded holes on one side of each leg. These holes are for attaching the shelves, so the legs should be inserted into the receptacles with these holes facing the other leg. The shelves need to be screwed onto the legs before the legs are screwed to the table. Do not skip attaching the shelves, even if you don't plan to use the shelves for storage. The shelves are an integral part of the structure of the legs, and are needed to ensure stability of the table. The small shelf is inserted between the rear legs, which are located at the narrow end of the table. The shelf surface should face the outside of the table. Find the shelf screws in one of the plastic bags. Insert the shelf screw through the hole on side of shelf into the threaded hole in the leg. Hand tightens screw and repeat with other shelf screws. The large shelf is installed in the same way, hand tightened between the front legs, located at the wide end of the table. The shelf surface should face the outside of the table. After both the shelves are attached to the legs, you can screw the legs to the table receptacle by inserting the leg bolt, with washer, through the receptacle hole into the threaded hole in the leg. Hand tightens each leg screws to the legs. Once all leg screws are on, use the Allen wrench to tighten the leg screws and the shelf screws. Next, install the leg levelers on the bottom of the leg. The leg leveler bolt should be hand tightened so the round base engages the threaded bolt when rotated. Insert the threaded bolt into the threaded hole in the middle of the leg bottom, and turn it clockwise until it is nearly all the way threaded into the hole. Then back off about 2 turns. Repeat for the three other leg levelers. Now the table can be turned over, right side up. The table is a little heavy, you’d better have two or more people carefully lift one side of the table and set it up on its legs. INSTALLING SCOREBOARD Remove the scoreboard unit from the small box. Check the scoreboard to make sure no 2 To Purchase This Item, Visit BMI Gaming | www.bmigaming.com | (800) 746-2255 | +1.561.391.7200
components were dislodged during shipping. To do this, open the back of the scoreboard and inspect the inside. If any of the wood brackets are loose, use glue to reattach them to ensure the display glass and the PCB are secured to the front of the scoreboard. If you need to glue anything, wait until the glue is dried before proceeding with the rest of the assembly. Find the scoreboard attaching screws and have them ready. Set the scoreboard on the back (Narrow end) of the table, and insert the scoreboard screws through the holes in the bottom of the scoreboard, into the threaded holes in the back of the table. Tighten both screws with the Allen wrench. Next, connect the 9‐pin connectors. Please pay attention to the direction of the male and the female connectors. Close the back of the scoreboard, and plug the unit in. Your scoreboard should be ready to use. Turn on the electrical power by using the switch located under the front of the table. That switch allows you to turn the unit on during play, and turn it off when finished. The score for the red is increased by pushing the red button closest to the scoreboard and reduced by pushing the other red button. Of course, the blue works the same way. The score is reset to “00 00” by holding any of the buttons in for 2 seconds. FINAL STEPS Place the table in the location you plan to use it. Wipe off the surface with the brush to remove any stray pieces of paper, plastic or cardboard. Then sprinkle some shuffleboard powder on the playing surface. We recommend that you use a fine shuffleboard powder product. You can purchase it from Mega Mania Diversions, LLC and we will ship it out to you immediately. Or you can get it from most billiard supply stores. You should level the table by using a level and adjusting the leg levelers. Or you can level the table by sliding the weight on the playing surface and watching if it moves to one side or another. Either way, the leg leveler can be adjusted by turning the leveler clockwise or counter clockwise to move the leg up or down. You will need 2 people to level the table ‐ one to raise the table while the other rotates the adjuster on the bottom of the leg. 3 To Purchase This Item, Visit BMI Gaming | www.bmigaming.com | (800) 746-2255 | +1.561.391.7200
HOW TO USE THE CLIMATIC ADJUSTER The table comes from the factory in a level state. You will want to maintain the surface as level as possible, or perhaps just slightly concave. Over time, however, changing humidity conditions sometimes cause the playing surface to become slightly concave or convex. This condition can be corrected by tightening the adjusting nuts on the climatic adjuster. These climatic adjusters are customarily found on fine shuffleboard tables, and all work in the same way. Moving the adjusting nuts outward will tend to make the surface more concave, and moving the adjusting nuts inward will tend to make the surface more convex. Adjustments should be made gradually. Make an adjustment, and let the playing surface adjust over a day or two. Then check it, and adjust further if necessary. FEEDBACK We would like to hear from you regarding your table. Any suggestions you may have to improve the experience would be appreciated. You can reach us at: [email protected] Enjoy your fine Snap‐Back Shuffleboard®! 4 To Purchase This Item, Visit BMI Gaming | www.bmigaming.com | (800) 746-2255 | +1.561.391.7200
SNAP‐BACK SHUFFLEBOARD RULES OF THE GAME The object of the game is to reach the Game Goal before your opponent. HOW TO START: ‐ A coin toss decides who starts the game. The winner of the coin toss also decides if the game will start from the left or the right. ‐ The first weight (Blue) is slid from the front of the table towards the back, so that it bounces from the back bumper onto the other side of the playing surface. ‐ The opponent then slides his/her weight (Red) so that it bounces from the back bumper to try to bump off the blue weight or to place his/her weight beyond the Blue. ‐The players continue to take turns until all the 8 weights are played. ‐ At this point, the players determine which team scores and add the score from this round to the game score. ‐ The game then continues from the other side, with the player who scored last starting the play in the next round. ‐ Play continues by alternating sides until the total game score of one of the opponents reaches or exceeds the Game Goal. SCORING OF POINTS: Snap‐Back Shuffleboard® is normally played to a Game Goal of 21 points, although the goal can be a different number upon mutual consent of the contestants. ‐ When a weight comes to rest on a scoring (Black) line, that weight scores the smaller number. The weight must clear the first line completely to score. ‐ If a weight comes to rest before entering the scoring surface area, it must be removed from the playing surface before the opponent plays the next weight. ‐ If a weight is overhanging the front of the playing surface (4 points area), that weight has a score of 5 points. ‐ Only one player can score points in a round. ‐ Point total for a round is the sum at the points for each weight that is closer to the front end of the playing surface than any of the opponent's weights. Example A: lf, after throwing all 8 weights, there is a Blue weight and a Red weight in the 4 point section, but the Red weight is ahead of the Blue, only the Red scores points. Example B: If there are 2 Blue weights ahead of the Red weights, the 2 Blue weights score points, and the Red weights do not score. STRATEGY: An effective strategy would be to slide your weights into scoring position, then to shield those weights from your opponent by using later turns to block them from being knocked out of scoring position. 5 To Purchase This Item, Visit BMI Gaming | www.bmigaming.com | (800) 746-2255 | +1.561.391.7200
How to install
Scoreboard
Bumper
Playing surface
Small V-shaped ramp (middle ramp)
Cradle
M8*45 Fasten scoreboard
Back shelf
M8*45 Fasten table legs
Front shelf
Legs
Leg leveler
M8*30 Fasten
shelves
To Purchase This Item, Visit BMI Gaming | www.bmigaming.com | (800) 746-2255 | +1.561.391.7200
SNAP-BACK Shuffleboard Hardware
Picture
Spec
Purpose
Qty
Leg leveler
Adjust shuffleboard height
4
6mm Allen wrench
Fasten M8 Allen screws
1
Philips screwdriver
Fasten Philips screws
1
24mm open end wrench
Adjust climatic adjuster
2
M8*45 Allen screws and washers
Fasten table legs
16
M8*45 Allen screws and washers
Fasten scoreboard
2
M8*30 Allen screws and washers
Fasten shelves
8
Pucks (Blue & Red)
8
Brush
Clean powder on the surface
1
502 glue
Reattach loose assembly
1