1
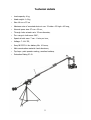
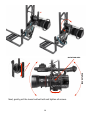
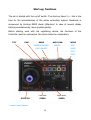
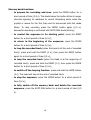
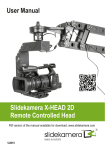
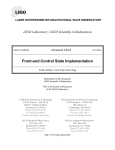
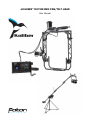
„KOLIBER” MOTORIZED PAN/TILT HEAD
User Manual
Contents
Introduction
Product features
Technical details
The contents of the set
Safety
Assembly and installation
Start-up, functions
Disassembly
Maintenance and cleaning
Transport and storage
Warranty
2
3
5
6
7
9
15
20
20
20
21
Introduction
After performing a detailed analysis of customer needs we constructed
a Head, which is extremely lightweight, durable, precise and versatile.
Through innovative solutions, we have created a product that quickly became
recognized as the best in the ranking of this type of equipment.
High quality workmanship and use of high quality materials ensure long
and trouble-free operation. The Head is dedicated mainly to the Flamingo
Duo camera crane. By using mounting holes with 3/8” thread, it works
perfectly well with other camera cranes as well.
Thank you for choosing the Koliber Head!
Foton Accessories Team
2
Product features
Koliber Head
Advanced laser treatment and the use of appropriately hard materials
helped to create a head that weighs only 1.6 kg! High precision of the
component parts made it possible to build a very compact and perfectly fitted
construction. All moving parts are based on double bearings what ensures
extremely smooth operation.
•
•
•
•
•
•
•
•
•
•
•
•
•
•
•
•
works with equipment up to 4 kg,
weighs only 1.6 kg,
internal clearance: 37 cm x 22 cm,
maximum size of mounted device in cm: 22 wide, 23 high, 42 long,
two independent rotary axis: horizontal and vertical,
through holes for steering cords, which allows to turn the head full 360 °
in both axes and completely eliminates the problem of steering cords
and power cords getting tangled; the through holes on both axes are
25 mm diameter,
rotating speed of each axis regulated from 7 s to 8 min per full turn,
the base module contains 3 assembly openings (3/8") enabling the
head assembly on any device such as camera cranes, tripods or sliders.
driving sets have easily regulated tooth belt stringing,
applied regulation lets you mount most models of camcorders, which
means that your equipment is fast and precisely balanced,
the driving wheel is coupled with tooth belts, which provides for high
performance culture,
equipped with steering and power cords organizers,
drive engines have noise-protection screens, which eliminates
undesired noises,
mains power supply - with the attached power adapter or optionally
powered by 7-14 V battery,
protective modules of engines prevent mechanical damage at work and
in transport,
equipped with a control level.
3
Condor Controller
The heart of the Controller is an advanced microprocessor set making
sure that the head works perfectly. A unique driving software manages the
energy given to engines in an outstanding manner; even at low speed and
heavy load they work optimally and smoothly.
Thanks to autocalibration feature, every time you turn on the Controller
(after 2 s) the joystick is automatically placed at 0 (resting) point. This
function effectively eliminates the so-called slow-swimming effect of the
engines at resting point of the joystick. Autocalibration further prevents an
accidental and quick start-up of the Head after the device has been turned
on.
The Head features an innovative and practical autopanorama function.
It lets you move the camera constantly and stably in horizontal 360° axis.
The speed is regulated by a knob and has a range from 7 s to 8 min per full
turn. After the parameters have been set up, you start the Head by pressing
the button on the control panel. In autopanorama function, you can adjust
the speed and turning direction in real time.
The controller also has a practical function of head movement memory,
the so-called memory bank. A registered material may be played and
rewound on demand or played in a continuous loop.
Controller functions:
• a joystick operating in both axes,
• smooth, independent regulation of each axis speed,
• quick on/off axis movement controlled by a switch,
• reverse movement direction in each axis independently,
• 5 levels of gradually regulated RAMP functions (inertial speed-up and
slow-down of the Head movement); additionally acts as a protection
from mechanical and electrical damage,
• autopanorama function,
• multifunctional memory bank,
• Linear/Logarithmic joystick switch,
• all functions are visualized by Controller diodes,
• power supply, tractor signal supply, and main switch are installed at the
back part of the casing.
4
Technical details
•
Load capacity: 4 kg,
•
Head weight: 1.6 kg,
•
Size: 48 cm x 37 cm
•
Maximum size of mounted device in cm: 22 wide x 23 high x 42 long,
•
Internal space size: 37 cm x 22 cm,
•
Through holes at each axis: 25 mm diameter,
•
Turn range in both axes: 360°,
•
Speed at both axes: 7 sec - 8 min per turn,
•
Voltage: 7-14 V DC,
•
Sony NP-F970 Li-Ion battery life: 10 hours,
•
Main construction material: hard aluminum,
•
Top layer: paint powder coating, anodized surface,
•
Protection Rating IP 41.
5
Contents of the set
1. Koliber motorized Pan/Tilt Head,
2. double
quick-release
system
for
safe
mouting,
3. 1 x 1/4" screw and 1 3/8" screw for assembly
of recording device,
4. Condor Controller with a battery handle,
7.
5. power adapter for NP-Fxxx batteries with a charger,
6. AC adapter,
7. protective bag with additional pockets for accessories,
8. Allen key for registering device balancing,
9. signal cord, 2.5 m long.
6.
1.
5.
2.
4.
8.
3.
9.
6
Safety
Read the user manual before starting work with the Koliber Head.
To avoid harm to the operator and others around the Head should be
mounted properly and securely to lifting device: crane, tripod, etc.
The Head is open mechanical system, we recommend that you keep
extreme caution. Do not put fingers or other body parts near the
movable elements of the Head when the Controller is switched on.
The operator should be aware that physical contact with moving parts of the
device while operating can result in wounds or other injuries.
The product is designed to work in interiors and exteriors as well.
Moisture can damage the device and result in danger for the
operator.
The Head is adapted to operate in 360°. The user should control the
scope of the turns and should prevent the cables to be twisted.
All cables used to work with the Head, video preview and others, should be
installed in accordance with this manual.
After assembling the Head to the camera crane it should be secured
by locking two security knobs.
The controller system has the function of informing the user of the
7
product failure or invalid status when 2 control diodes of the controller blink
simultaneously. If a failure or mechanical damage is observed, consult the
producer immediately. Otherwise, the producer is not liable for the proper
and safe usage of the Head.
There is a danger of explosion in case of using batteries other than
suggested. It is allowed to swap battery for other of the same type
(Sony, NP-Fxxx series).
Battery soul be never left in direct sun light or other heating
conditions which may warm it up or above 50° C.
8
Assembly and installation
I. Mounting the Head on the camera crane.
1. For proper and safe mounting of the Head on the camera crane, it should
be attached with double quick-release system and then secured by locking
two safety knobs.
SECURITY
KNOBS
9
2. All cables - signal, video preview, camera movement, etc. should be fixed
so operating the Head in both axes is easy and safe. Example below.
10
3. In the bottom part of the Controller there is a 1/4" thread opening allowing
the mounting it to any arm equipped with an appropriate mount.
4. Next, connect the cables in the following order:
a) main power supply cable (DC ⎓ socket),
b) signal cable (NC socket).
a
b
11
II. Mounting the Head on the tripod.
Placing the Head on the tripod is similar, except that the Head is not elevated
but mounted in the upside-down manner.
Best way to do so, is to use included fast-release socked. After attaching it to
tripod, Head mounting is instantaneous.
III. Mounting on the slider.
Mounting on the slider is similar to mounting on the tripod.
12
IV. Mounting and balancing video equipment.
The set includes two screws for mounting the camcorder or DLSR camera
with a standard 1/4" or 3/8". Optionally, Foton Accessories ADAP PRO quick
connector, Manfrotto 577 or others may be used.
Before starting work with recording equipment, it must be balanced so that
its center of gravity coincides with the through hole of the Head. Carry out
this operation once for the recording equipment.
Release the toothed belt by loosening the adjustable knob (C). Then loosen
the eight screws of the control system with an Allen key (S) and camera
mounting screw (P). After this step, the control system is released and we
determine the approximate center of gravity so that the camera can rotate
freely around the center of gravity.
13
c
ROTATION AXIS
FREE ROTATION
s
p
Next, gently pull the loose toothed belt and tighten all screws.
14
Start-up, functions
The set is started with the on/off switch. The start-up takes 2 s - this is the
time for the autocalibration of the whole controlling system. Readiness is
announced by blinking RAMP diode (Attention! In case of several diodes
blinking simultaneously, move joystick gently).
Before starting work with the registering device, the functions of the
Controller must be customized. See photo below for explanation:
TILT
PAN
RAMP
AUTO-PAN
MODE
REVERSE ON/OFF*
CANCEL*
REC*
LOOP ON/OFF*
SAVE*
PLAY*
STOP*
JOYSTICK
Left knob
Right knob
SPEED
SPEED
* memory bank features
15
TILT – block or change the movement in the vertical axis.
• to block press the button (0,5 ),
• to change the direction hold the button (2 s).
PAN – block or change the movement in the horizontal axis.
• to block press the button (0,5 s),
• to change the direction hold the button (2 s).
RAMP – 5-step function of inertial speed-up and slow-down of the Head
movement. After turning on the device, second step is default.
• to increase RAMP level press the button (0,5 s),
• to decrease RAMP level hold the button (2 s).
The diode blinking speed informs of the current step level.
AUTO-PAN – the function of automatic panorama movement of the Head.
The direction and speed of the Head turn are regulated with the SPEED
knobs. Co-works with RAMP level regulation.
In AUTO-PAN mode manual regulation of the camera bend with a joystick.
• to start hold the button (2 s),
• to stop press the button (0,5 s).
MODE – joystick work mode change:
– linear - the default setting; Head movement is proportional to the
joystick bend,
– logarithmic – in the most of the joystick range, Head movement is slow
and precise; at the highest point of joystick bent, Head speeds up
considerably.
16
• hold the button (2 s) to change the work mode
JOYSTICK – bi-axial, with an ergonomic cap for the thumb of the operator.
The camera movement speed increases when the joystick is tilted stronger.
Designed to work in both axes simultaneously.
Left SPEED knob – regulates the Head rotary speed in the vertical axis.
When AUTO-PAN is on it is responsible for the change of direction and
movement speed in the vertical axis.
Right SPEED knob – regulates the Head rotary speed in the horizontal axis.
When AUTO-PAN is on, it is responsible for speed fine adjustment.
MULTIFUNCTIONAL MEMORY BANK
The controller has a multi-function memory bank that can register both axes
movement of the head, and then play it back. Playback (Reverse) can be
performed in a single cycle back to its starting point or as a loop function
– playing the track endlessly. The memory bank can be used in various
situations: multiple repeat of one shot on film sets or employment of looping
functions as a recording device saved tracks without further operator
intervention. Rotating head can be installed on the camera crane, tripod or
mounted on other components of the film set. In this way, you can use the
additional camera shots in the edition of the material.
The bank is operated with three buttons:
MODE – save, play, stop,
AUTO PAN – memory reset,
RAMP – rewind, loop.
17
Memory bank functions:
– to prepare for recording and save: press the MODE button for a
short period of time (0,5 s). The diode below the button blinks in longer
intervals signaling its readiness to record. Recording starts when the
joystick is moves for the first time and its announced with fast diode
blinks. To stop recording press the MODE button again (0,5 s).
Successful recording is confirmed with AUTO PAN diode blinking;
– to rewind the sequence to its starting point: press the RAMP
button for a short period of time (0,5 s);
–
to return to the beginning of the sequence: press the MODE
button for a short period of time (0,5 s);
–
to loop the recorded track (when the Head is at the end of recorded
track): press and hold the RAMP (2 s); then press the RAMP button
again for a short period of time (0,5 s);
–
to loop the recorded track (when the Head is at the beginning of
recorded track): press and hold the RAMP (2 s); then press the MODE
button for a short period of time (0,5 s);
–
to switch off the looping function: press and hold the RAMP button
(2 s). The head will stop at the end of recorded track;
– to stop the sequence: press the MODE button for a short period of
time (0,5 s);
–
to fully switch off the memory bank and delete the recorded
sequence: press the AUTO PAN button for a short period of time (0,5
s).
18
Attention! Return to the beginning of recorded sequence (Revers – RAMP
button), is mirror reflection of recorded track.
Example – panoramic head movement:
Recorded sequence
Pause 2 s
120°
60°
Return to the beginning of the sequence
Pause 2 s
120°
60°
The length of the recorded track depends on the number of joystick
movements and the time of recording.
Recorded track may fill the buffer completely. This is signaled by blinking
diode below the AUTO PAN button.
19
Disassembly
The order of disassembly is reverse to the order of assembly.
Before dismounting the Head, make sure that the cables are not twisted. If
this is the case, gently turn the Head to decrease their twist.
Maintenance and cleaning
The device does not require special conservation or lubrication, etc. It is
essential, however, to keep it clean.
Transport and storage
The set includes a specially designed, practical bag which provides for safe
transport and storage of all elements.
The device must be stored in a dry place and ambient temperature.
We wish you successful usage!
20
Warranty
Koliber Head is covered by a 24 month producer's warranty, including
construction and material defects. As part of the warranty the producer
provides free repair. If the product cannot be repaired, the producer replaces
the product with a new one.
Warranty does not cover damage caused by improper use or non-compliance
with the instructions of the User Manual.
Guarantee may be void in case of:
• unauthorized repairs or interference,
• mechanical damage as a result of user interference,
• usage of the product in non-compliance with the above instructions.
The defective product should be delivered to seller with proof of purchase.
After the warranty period, we offer maintenance and spare parts.
21
Producer:
Foton Accessories
This manual may be downloaded
from our website:
www.fotonexport.com
Made in Poland
IP41
Tel.: +48 62 764 46 63
E-Mail: [email protected]
Fax: +48 62 764 46 22
[email protected]
22