1
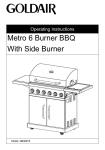
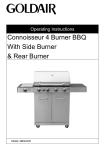
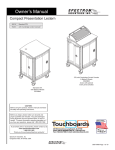
Operating Instructions
42L Chest Fridge
Model: GPF42
Read Me First
Page 1
Chest Fridge
Please read these instructions & user manual carefully.
o Before attempting to assemble your Goldair Chest Fridge, ensure all parts are
correct and contained within the box as per the components list.
o Goldair suggests laying out all components on a large flat surface and
removing any plastic or protective material before assembling your Chest
Fridge.
o It is vital for optimum use of the Chest Fridge that you Purge the gas line prior
to attempting to ignite the Chest Fridge.
o Do not dispose of packaging until completely satisfied with assembly of your
Chest Fridge
Please refer to your user manual for operating instructions, further information or
trouble shooting before you call the Customer Service number listed within the
user manual.
Failure to store appropriately, clean & maintain your Chest Fridge regularly will
consequently result in it not be covered by the warranty.
Read Me First
Page 2
Gas Leak Testing
It is important that you leak test the Gas Cylinder before first use with the Chest
Fridge and every time the gas cylinder is refilled and reconnected to the Chest
Fridge.
To complete a Leak Test:
• Make sure all the control knobs are OFF.
• In a small container, mix up a solution of water and detergent/soap.
Mix the solution well (about the same concentration as washing up water).
• Turn the cylinder ON by rotating the knob to the open position.
• Using a brush or spray bottle apply the soap solution to the gas line and each
join in the gas line including:
• The gas connection at the inlet of the Chest Fridge
• The gas hose
• The gas connection at the gas cylinder
• If bubbles appear, there is a gas leak.
• If the leak is at the connection, re-tighten and re-seal.
• If the leak is anywhere else or you cannot resolve the leak by tightening the
connection DO NOT PROCEED.
• Replace gas hose and regulator.
• Replacement hose and regulators can be purchased from your local BBQ
retail specialist.
Read Me First
Page 3
Purging The Gas Line
It is very important to purge the line free from air to get the LPG to the head unit.
o
o
o
o
o
o
o
Turn off LPG Cylinder.
Disconnect LPG Cylinder.
Turn the gas burner knob on for a minute or so releasing air from the line.
Turn off burner knob.
Reconnect the LPG Cylinder.
Turn the dial on the LPG Cylinder SLOWLY to the on position.
Press the control knob in allowing gas to come up the line and bleed it
(pressing control knob in) for not more than 1 - 2 minutes or until you smell
gas.
o A five minute complete shut off period is necessary before lighting.
If a new tank has just been connected, please allow at least one minute for the
air in the gas pipeline to purge out at the High position.
A five minute complete shut off period is necessary before lighting.
Safety Guide
ALWAYS
✔ Leave the fridge to stand for at least 4
hours before switching on to allow gas to
settle if transported horizontally.
Page 4
NEVER
✘ Do not connect the appliance to the
electricity or gas supply until all packing
materials have been removed.
✔ Supervise children to ensure they do not ✘ This appliance should not be used by
play with the appliance. Close attention is children or infirm persons without
necessary when used or placed near supervision.
children.
✘ Never move the fridge by pulling on the
✔ Use the appliance only as described in power cord or gas connection. Do not pull
this manual and only for its intended the cord to disconnect from an outlet. Keep
purpose – that is, the cooling and storing of cord away from heated surfaces and
edible foodstuffs and beverages. Use only inspect regularly for damage. If the supply
manufacturer's
supplied
and cord or gas connection is damaged, it must
recommended attachments.
be replaced by the manufacturer or its
service agent or a similarly qualified person
✔ Put the fridge away after use to prevent in order to avoid a hazard.
accidents.
✘ Do not handle the plug or appliance with
✔ Empty any water, condensation or liquid wet hands.
from the fridge after use, do not let liquid sit
in the bottom of the fridge for any length of ✘ Do not put any object into exhaust grill.
time.
Do not use this appliance if the exhaust
✔ Keep these instructions in a safe place grill is blocked. Keep grill free of dust and
for easy reference.
lint.
✔ Disconnect the fridge from power outlet ✘ Do not dispose of the appliance on a
by grasping the plug and pulling.
fire. Your appliance contains non CFC
substances in the insulation which are
potentially flammable if exposed to fire.
Suitable for camping use
The appliance may be connected to more than one energy source
The appliance must be disposed of safely. Please refer local requirement for disposal
Parts Diagram
1.Side Handles
2.Control Dials
3.Grill
4.Fridge Lid
5.12V DC Plug
6.Gas Hose & Regulator
Page 5
6
3
2
4
5
1
Transporting
•
•
•
•
This appliance should be transported only in a vertical upright position. The packing
as supplied must be intact during transportation.
If during the course of transport the appliance has been transported horizontally, it
MUST NOT be operated for at least 4 hours to allow the system to settle.
Failure to comply with the above instructions could result in damage occurring to the
appliance. Goldair will not be held responsible if these instructions are disregarded.
The appliance must be protected from rain, moisture and other atmospheric
influences.
•
IMPORTANT: This appliance is not designed for stacking with any other appliance.
•
DO NOT attempt to sit or stand on top of your appliance as it is not designed for such
use. You could injure yourself or damage the appliance. Such damage and injury is
not covered by warranty.
•
IMPORTANT: Make sure that the power cable is not caught under the appliance
during and after carrying/moving the appliance, to avoid the power cable becoming
cut or damaged.
Operating your Fridge
Page 6
This appliance is designed to keep already cold foods chilled,
not to cool down warm food.
•
•
•
•
•
•
•
•
•
•
•
•
Before using your Chest fridge for the fist time, check that:
All packing materials and transit protectors have been removed.
The appliance is on a flat, level surface
The interior is dry and air can circulate freely. Clean the interior as recommended
under “Cleaning and Care”.
Insert the plug into a power outlet and switch on the electricity supply. Set the
desired thermostat level. A neon POWER indicator light comes on.
The liquid and gases sealed within the refrigeration system may give rise to noise,
THIS IS NORMAL.
Do not immediately load the appliance when it is switched on.
Ensure there is adequate space between each item in the fridge for air circulation.
Items stored in the fridge should only be placed in if they are at room temperature.
Do not place hot items in the fridge.
Do not store explosive or flammable items in the fridge.
Always use plastic containers and bottles for storing food/beverages
Avoid placing your Chest Fridge directly alongside any heat source or in direct
sunlight as this will cause it to run for long periods. If located next to a source of heat
maintain the following minimum side clearances:
* From cookers 100mm
* From radiators 300mm
* From freezers or other refrigerators 100mm
•
Ensure that sufficient space is provided around the fridge to allow, obstruction-free air
circulation.
Operation with 240V plug
•
IMPORTANT: Never use more than one energy source at a time
•
Verify that the mains voltage corresponds to the operating voltage specified on the
technical data label at the back of the appliance.
If the electrical specifications are correct, place the plug into a wall socket.
Turn the 240V thermostat knob (left) clockwise to position MAX.
After about one hour the effects of the cooling process become visible: frost on the
inside evaporator. The thermostat enables the temperature of the chest fridge to be
adjusted. After a cooling period of approx. 5 hours, the thermostat can be set on a
desired position; this position is influenced by the surrounding temperature and the
intensity of use. At the position MIN. the cooling process is stopped. The appliance
is switched off by removing the plug from the wall socket.
•
•
•
Operating your Fridge
Page 7
Operation with 12V plug
•
•
•
•
•
•
•
•
IMPORTANT: Never use more than one energy source at a time
A safety fuse must be installed in the power supply line between the battery and the
mobile fridge.
It is not necessary to check the polarity when starting up the appliance.
Verify the voltage of the battery with the voltage indicated on the technical data label
at the back of the appliance.
When the appliance is powered by a car battery, only switch the mobile fridge on
while the car is travelling. If the appliance remains switched on when the car is
stopped, the battery charge will be drained very quickly.
When using a battery as a power source, there is no thermostatically controlled
temperature regulation.
Pre-cool the mobile fridge on the mains before starting a journey and try to put only
pre-cooled products in the mobile fridge.
To start up the unit, connect the supplied cable at the back in the 12V socket and put
the corresponding side into the cigar lighter socket of the vehicle. To disconnect,
remove the connector from the cigar lighter socket.
Operation with LPG gas bottle
•
•
•
•
•
•
IMPORTANT: Never use more than one energy source at a time
Operation on gas is prohibited in closed areas, in vehicles and on boats. The
appliance must be used in a well ventilated area when operating on gas. This means
that it can also be used under the canopy of a tent if sufficiently ventilated. In all
cases the location should be protected from rain and/or splashing.
The gas cylinder must be stored in a cool, dry, ventilated area and never in a
basement or a cellar. Protect from sunlight and do not expose to high temperatures.
The appliance cannot operate at a pressure other than the one specified on the
identification label at the back. You must therefore use the appropriate pressure
regulator.
During connection of the chest fridge to the gas cylinder, always stay clear of any sort
of ignition and do not smoke. Connect in the order gas cylinder – pressure regulator
– appliance. Excessive twisting and bending of the flexible hose must be avoided.
Check for leaks only by means of soapy water. Never check for leaks using a flame.
When changing the gas cylinder or disconnecting the hose, it is necessary to close
the valve of the gas cylinder. Always replace a damaged or porous hose.
Operating your Fridge
•
1.
2.
3.
Page 8
The gas valve knob (right hand control dial) is a combination of temperature control
and ignition. Next to this is the gas valve assembly consisting of an incorporated
safety pilot, a burner with an ignition plug and a piezo-electric ignitor. The safety
pilot automatically maintains the gas supply as long as it remains lit. It automatically
shuts off the supply of gas if the flame goes out.
Open the gas valve of the gas cylinder, press the gas valve knob in the panel, wait
approx. 15 seconds, turn the pressed knob to the right, a click of the ignitor can be
heard and the gas flame is ignited.
Hold the knob pressed in this position so that the flame remains burning. It might
be possible that this operation has to be repeated a couple of times, especially if the
appliance has not been used for a long time or if the gas cylinder has been
changed.
There can be air in the system, which has to be forced out. It is necessary to check
that the pilot is lit by looking through the orifice at the top of the unit or through the
hole at the back near the burner.
NOTE: If the flame fails to light, wait at least a minute before trying again.
•
•
Leave the knob for some time in max. position; after a sufficiently long cool down
period, a lower position can be selected.
To disconnect the mobile fridge running on gas: close the valve of the gas cylinder
and then turn the gas valve knob in the panel to position ‘press’.
Maintenance
•
•
•
•
•
•
•
•
•
•
Page 9
Ensure the chest fridge is not connected to any electrical or gas supply when
cleaning
The chest fridge must be defrosted regularly in order to ensure a correct operation.
To defrost the appliance, disconnect it, empty it and if necessary use a cloth with hot
water.
Never immerse the fridge, power cord or plug in water or any other liquid.
Ensure no liquid remains in the fridge for any length of time.
Dry and clean the inside without using abrasive products.
Never use a knife or other sharp tool to remove ice.
If the appliance is to remain unused for a longer period, disconnect it, clean it and
leave the cover slightly open during storage to prevent unpleasant odours. Put some
talcum powder in the gasket of the lid.
If after such a period the fridge does not cool down, switch it off again and leave it
turned upside down for a few hours. Put it the right way up and connect again.
To avoid the risk of electric shock, do not dismantle the fridge.
All repairs, if needed, particularly of the cooling unit or the gas burner system, can
only be carried out by a qualified electrical or gas technician.
Troubleshooting
Page 10
Issue
Resolution
Are all accessories and sources of energy
correct?
Confirm you are using the correct
accessories for the operation used
Are the various connections correct?
Unplug all connections and reconnect
correctly
Is the appliance sitting in a horizontal
position?
If not, turn the fridge off, turn it the
correct way up, leave for four hours then
turn back on
Is there sufficient ventilation around the
exterior of the fridge?
Remove any items that are blocking
airflow around the fridge
Is the 12V battery sufficiently charged?
If the battery is not charged, disconnect
fridge and re-connect to a different
battery
Is the gas cylinder sufficiently filled?
If not, fill the LPG cylinder
Has the gas valve knob been pressed long
enough when using the gas supply?
If not, turn the fridge off, leave for one
minute and repeat the ignition procedure
Has the thermostat knob been set to max
position?
If not, turn the fridge off, leave for one
minute then turn back on and turn the
thermostat to the max position
Have 2 modes of operation been selected
at the same time?
If so, turn the fridge off, leave for one
minute then turn back on and turn the
thermostat to the max position
Is there too much food inside the
appliance?
If so, remove some items of food to allow
better air circulation in the unit
One Year Warranty
Your Goldair product has been inspected,
tested and is guaranteed subject to the
following for a period to one year from the
date of purchase against defects in
workmanship and materials. During this
period, such defects will be rectified by repair
or replacement of the product purchased.
Your Warranty becomes invalid if in our
opinion the product has been misused,
incorrectly
assembled,
tampered
with,
connected to a gas supply not corresponding
with the name plate specification, or not
regularly maintained as per the “Maintenance”
notes at the end of this user manual. The
Warranty does not include any labour or other
associated expense that may be involved in
removal or installation of the product. Normal
wear & tear and any issues involving
spider/insect web build up’s inside gas lines
are expressly excluded.
If the product is to be replaced (cannot be
repaired) then that replacement will be of the
same or similar product or accessory
excluding packaging, instruction card etc.
Where a replacement product is supplied, this
shall be guaranteed for the balance of the
original Warranty period.
If your Goldair product fails to operate
satisfactorily, please contact Goldair via phone
in the first instance. To obtain a repair or
replacement product under this Warranty, you
will need to produce satisfactory evidence of
date of purchase. The completed Warranty
and purchase receipt must be presented with
the product. The Warranty should be filled out
at the time of purchase. It is in your interest to
make sure this is done.
Consumers Guarantee Act (1993).
In accordance with the above act, consumers
are advised that: The manufacturer does not
undertake that repair facilities and parts are
necessarily available for this product.
If any of the provisions of the foregoing are
contrary to any relevant legislation, then that
provision shall be deemed to be excluded from
the Warranty and the rest of the provisions will
continue to apply.
Any model that is no longer available will be
replaced by a model of a value and with such
features as we consider appropriate in the
circumstances. Goldair Ltd is not responsible
for freight forwarding charges, losses or
damage in transit.
If service is required after the Warranty period
has expired, the product should be inspected
by a qualified gas service technician. Service
outside of the Warranty period will be at your
cost.
IMPORTANT: Please retain this Warranty card
Name ……………………………………………… Purchased from …………………………………
Address …………………………………………… Date of purchase …………………………………
………………………………………………………. Name of product …………………………………
Suburb …………………………………………… Model no ……………………………………………
TECHNICAL SPECIFICATION
Model No: GPF42
Battery 12 v – 90W –7.5 A
AC Supply: 230 - 240V 50Hz 85 - 90W 0.38A
DC Supply: 12V 90W 7.5A
Mains 240v – 50Hz – 90W – 0.38 Amps
Gas Type: Butane and Propane
Total Gas Consumption: 15g/h
VOLUME NET: 42L
Refrigerant: NH385g
Class: T
Isolation: Cyclopetane
SUPPORT AND TECHNICAL ADVICE
PO Box 100707, NSMC, Auckland, New Zealand
Monday – Friday 8am-5pm
Phone: 0800 232 633
Website: www.goldair.co.nz