1
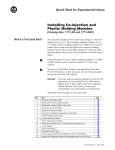
MOUNT ALLISON GEMINI OBSERVATORY
User Guide1
Draft v2.1 (Sept. 4, 2008)
More Information on Mount Allison Gemini Observatory:
The observatory opened in August 2008. It contains two identical 3.5 m diameter Sirius School
Model domes, with electrically powered rotation and shutter. The piers have Losmandy Titan German
Equatorial Mounts. A Gemini GoTo system has an object database of more than 40,000 objects. The
optical tubes are Celestron C-11 Schmidt Cassegrain telescopes equipped with carbon fibre tubes and
Starbrite XLT coatings. The telescopes have an effective diameter of 280 mm, a focal length of
2800 mm and a focal ratio of F/10.
Observatory Website:
www.mta.ca/gemini
1 Authored by R.L. Hawkes, but sections taken from the Gemini 4 User Manual by René Görlich, Michael Rudolph, and
Dave Sandage.
General Precautions
The telescope mounts are pretty robust, but there are a few cautions.
● If both domes have their lower shutter almost open, they can collide on rotation. Double check
before slewing the domes through the possible collision direction.
● You MUST park the telescopes in the CWD position at the end of an observing session before
turning off the power.
● If using the telescope in the daytime, keep covers on both the telescope and the finder scope to
make it impossible to track through sun and be damaged.
● Dust is our enemy - do not sweep inside or near the domes.
● We depend entirely on solar power, make sure that everything (shutter switches, rotation
switches, telescope motor controls, dew control devices) are turned off at end of night.
● The shutter takes a while to close. Therefore do not keep the shutter open if rain is imminent. If
it does start to rain unexpectedly cover the main telescope optics immediately (if some rain has
got on them, once the shutter is closed, take the cover off so it will evaporate).
● Never use a cloth on the main telescope optics or unfasten any screws to make the sealed part
unsealed.
Exit Checklist
Before leaving MAGO at the end of the session please check all of the following.
✔ The shutters on both domes are completely closed.
✔ The dome is rotated so that the solar panel is roughly south (to help charging).
✔ Both telescopes have been placed in their CWD (counterweight down) position.
✔ Unless it is covered with dew, the cover is placed on the telescope and the finder scope.
✔ If you have used accessories which cause the eyepiece to be removed, an eyepiece has been
placed back in to prevent dust.
✔ The AC power switch is turned to off position on the power box.
✔ Switches are turned off on both the shutter and rotation controls on both domes.
✔ Once they are here, the dew control devices are turned off.
✔ If in use, the audio alarms are re-activated.
✔ The domes are locked.
✔ If you covered the security light, that is removed.
✔ The gate is locked with padlock, and the washer has been placed over the lock.
Emergencies:
There is a telephone located on the first floor of Dunn which can be used to call 911. There is
also a 'blue light' emergency phone outside the Wu Centre. The first priority is making sure people are
safe in any emergency (only worry about equipment later). If there is a problem with the dome (e.g.
shutter won't close) R. Hawkes telephone number is 536-3600 at home.
To Begin
Generally it is best to have the dome and the outside air thermalize to reduce air currents which
make seeing far worse. Therefore in general open the shutter to the dome(s) when you first arrive.
This will also improve air quality in the domes. Note that the shutter opens in two stages - first the roll
back part and then the bottom shutter (depending on what you are watching, you may not need the
bottom part open or fully open - you can stop switch at any time). You may want to keep door open
during this first phase, although it is best to have it closed during observations to cut down on air
currents and light pollution effects.
However do not take the lens cap off the telescope until near the time when you want to use it,
as longer time will lead to more dew formation (we will install a dew prevention system shortly).
You should start the telescope a little bit before students arrive. You do this by turning the
switch to on, and then waiting (will not find GPS because we do not have one) and then when
prompted choose Warm Restart (see note below).
Rotating the Dome
To rotate the dome you flick the rotation on/off switch to on, and then use the hand controller
(on a long cord so you can control from the telescope) by holding the switch in the desired direction.
Despite our best efforts, the rotation slightly sticks in a place or two, but so far always works. Be
careful, if the shutter is open that the two domes do not collide during rotation.
If the Shutter Closes
If the shutter closes without you touching the control it means that it's battery is low enough that
it is not safe to keep it open. At the moment there is nothing which you can do except use the second
dome.
Introduction to Gemini
The Gemini system takes a little while to get used to. We cover the hand control below. The
first thing to realize is that it has two modes - Menu Mode and Telescope Control Mode. You use the
Menu button to choose between these. You use Telescope Control Mode for moving the telescope
manually (and many other things) and the Menu Mode for selecting objects to automatically go to (and
many other functions).
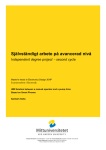
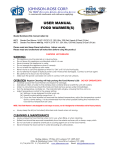
Hand Controller:
All functions of the Gemini System are accessible
using just the four diamond shaped buttons, and the MENU
button. The built-in LED display provides information
about all of the Gemini System's features and menus. In
Menu mode the DEC+/– buttons scroll through the possible
selections, the RA+ button selects items (like a computer's
'enter' key), and the RA– button usually goes back to the
previous selection (like a computer's 'back arrow'). Pressing
the MENU button again returns Gemini to Telescope
Control Mode for guiding, centering, and slewing the
telescope.
Once you are in Menu Mode, you can scroll through
the menu items using the DEC +/- buttons. To select any
displayed menu item, press the RA+ button. If the selected
menu item does not have any sub-menu items associated
with it, this will immediately execute the selected function.
However, if the selected item does have sub-menu items,
the Hand Controller will display the first item in the sub-
menu. Pressing the DEC +/- buttons will now scroll through the items in the sub-menu. Pressing the
RA- button will return you up one sub-menu level.
For some menu items, you will need to enter numeric data. This is easily accomplished using
the direction buttons on the Hand Controller. When you come to such a menu item, the far left digit (or
sign, if any) of the number will be flashing to indicate that it can be changed. To change the digit, use
the DEC+ and DEC- buttons to scroll through the digits 0-9. When the digit you want to enter is
displayed, press RA+ to move to the next digit to the right. RA- acts as a back arrow key to move back
to the previous digit. When you are finished entering the last digit, press the RA+ button again to enter
the keyed-in number.
Startup Modes
Unless you have been instructed to do otherwise, you should only use Warm Restart when you
start up the telescopes at MAGO. We have entered alignment stars which will be lost if you use Cold
Start. After the welcome message and the GPS status message, you will normally be asked to choose a
startup mode. This mode determines whether the Gemini uses the modelling data already stored in its
SRAM, or resets it and starts with new modelling data.
There are 3 options:
● Cold Start clears the current modelling data, and should be used whenever the mount has
been moved from its polar alignment after a previous observing session. The mount must be in
Startup Position during a Cold Start.
● Warm Start preserves the modelling data but not the current telescope position data. It
should be used if the mount has not been moved since the last observing session, but the
telescope has been moved on the mount. The mount must be in the Startup Position during a
Warm Start.
● Warm Restart preserves all modelling and position data. This should be used if no
movement of the mount or telescope has occurred since the last observing session. This is
especially useful for permanent installations, multi-night star parties, and daytime observing if
you aligned your mount the night before.
Finding an Object
Once you have started up, the telescope should be ready to GoTo selected objects. From Menu
Mode you select the object from the Object Database (NOT Object Search), and then submenu for the
object category you want (see details in the next section).
Catalogues
While there are other ways to go to pointing positions, such as specifying the RA and DEC,
normally we will use the Catalogue method for aiming the telescope. Gemini has 11 permanently
stored catalogues (databases) containing over 40,000 entries. To select an object from a catalogue,
simply select the Object Database menu item. You can then scroll through the catalogues using the
DEC buttons; selecting one of the catalogues then allows you to choose an object from that catalogue.
Some catalogues such as the "Messier" and "NGC" catalogues require numeric entries to choose
an object. Other catalogues such as "Bright Stars" or "Solar System" allow you to scroll through objects
and select the object you want. In the case of the "Bright Star" catalogue, it is conveniently organized
and subdivided according to the first letter of the stars names. In all cases, once the object you want is
displayed, press the RA+ button to select it. A message is displayed, containing the object's distance to
the meridian (negative in the east) in minutes of time and the elevation in degrees.
Using GoTo
After an object has been selected (either from the internal catalogues or by entering its coordinates) a new menu item appears: GoTo <object>(where <object> is the currently selected object).
Simply select this menu item to cause Gemini to slew to that object. As the telescope approaches the
object, it will ramp down from slew speed and finish pointing at centering speed. When the GoTo is
complete, the display will show FINISHED.
Manually Changing th Telescope Direction
When you are in Telescope Control Mode, you can move the telescope with the buttons on the
Hand Controller. There are three basic movement speeds: Guiding Speed (0.2 to 0.8 of the tracking
speed), Centering Speed (up to 255 times the tracking speed), and Slewing Speed, which can be
adjusted separately for manual slewing (with the Hand Controller) and slews performed by a GoTo
operation. Holding down a button causes the telescope to move. Momentarily pushing down the
opposite button while the telescope is moving causes it to accelerate to the next higher movement
speed.
Visual and Photo Modes
In visual mode, the Guiding Speed is not available. When you press a button, the telescope
moves at Centering Speed. Momentarily pushing the opposite button lets the system accelerate to the
manual slewing speed. If you are moving both axes, both will speed up. Ramping up and down in
speed occurs independently for both axes.
In Photo Mode, Guiding Speed is the principal speed, so pressing a Hand Controller directional
button moves the telescope at the selected Guiding Speed; Slewing Speed is not available. Acceleration
to Centering Speed is available in four stages (to allow easy centering of an object in the field of view
or on a CCD chip) by pressing the opposite button while Gemini is guiding: Pressing the opposite
button once changes to 1/8 of Centering Speed to allow fine centering of the target. Then, after about 2
seconds, the speed will increase to 1/4 Centering Speed, after another 2 seconds to 1/2 Centering
Speed, and finally to full Centering Speed. Pressing the opposite button twice changes to full Centering
Speed immediately.
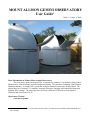
Parking Mount
At the end of a session it is critical that you park the mount in CWD (counterweight down)
position prior to turning the power off. This is accomplished by using the Quick Menu. Hold down the
Menu Button until the Quick Menu options begin to rotate through. They will be as shown below (with
the sub-options in brackets). You let up the button at the main option you want, and then use the keys to
select the sub-option (Park at CWD pos!).
● Reduced Menu/Full Menu
● Centering (Exit w/o Change, 2x through 128x Centering)
● Park Mount! (Exit w/oChange, Park at CWD, Park at Home, Stop Tracking)
● {Meridian Flip} (if possible)
● Exit w/o Change
After you select Park at CWD you should see the mount slew to the counterweight down position. It is
now safe to turn the power off on the mount control. By the way, Stop Tracking would be selected if
for some reason you want to use the telescope in a fixed direction for terrestrial viewing (e.g. in
aligning the finderscope).
Tracking Modes
Most of the time we will use the telescope in Sidereal Mode, which causes it to track objects at
the stellar rate. It can also be set to several other rates including lunar and solar. In most cases this is
not needed for the length of tracking we will do. If you do need to switch, see the complete manual for
details. Never view the sun unless a front aperture solar safe filter is attached and the finderscope is
capped. Even in this case we recommend camera display for solar work, not direct viewing.
Synchornize
After any type of startup (Cold Start, Warm Start, Warm Restart), or in the course of an
observation, Gemini may be slightly off in its pointing orientation while retaining its pointing model. In
other words, Geminis concept of where it is pointing in RA and Dec. may be slightly off from the
actual sky by a constant amount. This can occur anytime the telescope's clutches are loosened or certain
components of the optical path are moved or replaced (e.g. the star diagonal is rotated). It can also
occur as a result of imprecise polar alignment or non-orthogonality of the optical tube assembly (OTA).
The phenomenon may be noticed when, after performing several accurate GoTo operations, subsequent
GoTo slews leave the target object unexplainably uncentered in the field of view. To correct this, center
any known star (or other object) using the Hand Controller, and execute "Align Telescope:
Synchronize." Gemini responds by verifying the object by name. Now press the RA+ button, and
Gemini responds by displaying "Synchronized!" The Synchronize function does not alter the
modeling data, so it can be safely used anytime during an observing session.
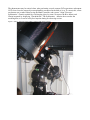
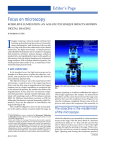
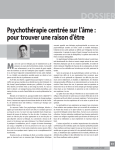
Figure 3: Shows telescope in the CWD (counterweight down) position.