1
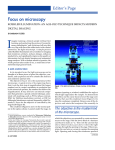
Editor’s Page
Focus on microscopy
KOEHLER ILLUMINATION: AN AGE-OLD TECHNIQUE IMPACTS MODERN
DIGITAL IMAGING
BY BARBARA FOSTER
I
magine running a clinical sample without first
learning and perfecting the protocol. Ironically,
many pathologists a and clinicians fall into that
very trap with one of the oldest tools in the clinical
l a b o r a t o r y : the light microscope. A simple pro c e s s
called Koehler illumination sets a baseline for imaging
that minimizes artifacts, reduces fatigue, enhances
productivity, and significantly improves the quality of
information fed into digital imaging and automated
image analyses. With a modest amount of practice, the
whole process takes under 45 sec, a small time investment that reaps great rewards.
a
b
c
d
f
e
A quick anatomy lesson
In its simplest form, the light microscope can be
thought of as three pieces of glass (the objective, condenser, and eyepieces) and two controls (the field iris
and condenser aperture iris).
The objective (Figure 1c) is the mastermind of the
m i c roscope. A quick review of its engraving shows
that it sets the first step of magnification (the largest
number) and is a major contributor to resolution (set
by the numerical aperture, the number that follows the
magnification). It may also have an internal component that generates a special contrast technique, annotated with markings such as PH for phase contrast,
HMC for Hoffman modulation contrast, or DIC for
differential interference contrast (frequently called Nomarksib). Focus for the objective is controlled by the
large knob (Figure 1h).
The condenser (Figure 1d and e) is the second partner in the optics scheme. Located under the stage, its
a interpupillary adjustment
b eyepiece and diopter
adjustment
c objectives
d condenser aperture control
e condenser focus
f`condenser centration screw
g fine focus
h coarse focus
i light port/field iris adjustment
g
i
h
Figure 1 The light microscope. (Image courtesy of Carl Zeiss,
Inc.)
aperture (opening or window) establishes the angle at
which light approaches the sample. To demonstrate
this effect, use the coarse focus to lower the stage comp l e t e l y, then use the condenser focus (Figure 1e) to
raise the condenser completely. Remove one of the objectives and rotate the nosepiece (the assembly in
The objective is the mastermind
of the microscope.
a
A recent proprietary survey conducted by Microscopy/Marketing
& Education indicates that over 75% of pathologists rarely or never
set Koehler illumination.
b
In the mid 1960s, Dr. Georges Nomarski discovered a special
method for cutting the prisms that are central to many DIC systems
and that made the technique commercially viable. His approach is
widely used by Carl Zeiss, Inc. (Thornwood, NY). However, other
companies may use other designs to achieve the same goal. Leica
(Bannockburn, IL),for example, uses a system designed by Francis
Smith. Despite these differences, “Nomarski” has been adopted as a
generic name, just as Kleenex is often used to refer to facial tissues.
8 JULY 2002
which the objectives are mounted) to create maximum
access to the stage. Fold the lower third of a business
card back to make an “L,” then rest the card on that
short, folded section, just above where the light
emerges through the opening in the stage. When in position, the card acts as a screen to capture the emerging
light. Opening and closing the condenser aperture
continued
EDITOR’S PAGE continued
or darkfield (D).
Eyepieces (Figure 1b) complete the trio. They are responsible for the second step of magnification (again,
the larger engraved number) and for setting the diameter of the field of view (the field number, seen as the
second engraved value, given in millimeters). To determine the maximum diameter of the field seen with
any particular objective, simply multiply the field
number by 1000 to convert to micrometers, then divide
by just the magnification of the objective. For example,
if an eyepiece bears a field number of 25 mm and you
are using a 10× objective: 25,000 divided by 10 equals a
field diameter of 2500 µm.
This information is valuable for estimating the size
of features in the field. For instance, if you estimate
that 20 cells would fit across the diameter of your
scene, divide 2500 µm by 20, indicating that each cell is
125 µm wide.
The last control is the field iris, located in the light
port in the base of the microscope (i). This control adjusts the size of the field of view and controls glare and
haze. If the sample scatters light, creating a milky image, simply move the feature of interest to the center of
the field of view and close the field iris around it. (This
step assumes that the microscope has been set up for
Koehler illumination.)
a
b
Figure 2 Cheek cells imaged with a) normal brightfield, and b)
axial illumination (40×).
control (Figure 1d) opens and closes a “cone” of light.
When closed, the beam forms a pencil of light (axial
illumination) with little or no angle. Axial illumination
enhances edges (compare Figure 2ato 2b) and increases
the depth of field, making it the logical choice for
imaging thicker samples.
Opening the condenser maximizes the angle and
produces a narrow “waist” at the sample. Providing
that the specimen is well stained, this setting is optimum for imaging fine structures such as the endoplasmic reticulum or tiny particles such as those in granulocytes. The condenser aperture control (d) is the most
powerful control on the microscope and the most often
overlooked. Judicious use of this setting significantly
improves the quality of images.
The condenser may also contribute to contrast enhancement. Universal condensers, for example, have
either sliders or rotating turrets with multiple locations for inserts for techniques such as phase contrast
(typically noted with regular numbers such as 1, 2, or
3, which correspond to markings on the objective),
HMC, DIC (typically marked with Roman numerals),
10 JULY 2002
Koehler illumination in detail
Directions for setting up Koehler are as diverse as
recipes for Mulligan stew. The instructions shown here
simplify the process, making it easy to incorporate
Koehler into the every-day work flow. They center on
two key issues: a) The sample determines the setting,
and b) the microscope has three pieces of glassware
and two controls. This discussion starts with the details then summarizes the process in four quick and
easy steps. Before we begin, make sure that the rheostat that controls the brightness of the light is set so
that the field of view is comfortably bright and not yellow. Your user’s manual will tell you which voltage is
optimum.
Eyepieces
Start by setting the binoculars to the right distancec so
that you see one, round field of view. Most microscopes
have a small scale [a] so that you can reset to this same
distance every time you sit down at a new microscope.
Check to see if the eyepieces have focusing rings
c
The interpupillary distance (IPD) is, literally, the distance in millimeters from pupil center to pupil center when you are looking
straight ahead.
EDITOR’S PAGE continued
a
b
c
d
Figure 3 Field iris closed. a) Condenser uncentered and unfocused, b) condenser focused on field iris, c) condenser centered and fo cused, d) field iris opened outside the field of view.
EDITOR’S PAGE continued
(diopter settings [b]). If so, set them both to zero or, if
there are no numbers, so that the silver, white, or black
ring just touches the eyepiece mount.
Objective
Using the nosepiece, rotate the 10× objective into
place. Put a sample on the stage. Make sure that if there
is a coverslip (a small piece of glass on the specimen) the
sample is mounted with the coverslip toward the objective. While observing the distance between the objective
and sample from outside the microscope, use the coarse
focus (h) to carefully move the stage toward the objective. Note which direction you are turning the knob.
Stop when the sample is as close as possible to the objective, then, while observing the sample through the eyepieces, focus away. That is, turn the coarse focus the
other direction until the specimen comes into sharp focus. This procedure not only avoids damage to slide and
objective, it also guarantees that you will always find the
specimen quickly, an important productivity step.
Condenser
This step encompasses four smaller steps: focusing
and centering the condenser, then setting both the condenser aperture and field irises.
Using the condenser focus control (the small knob
under the stage, [e]), raise the condenser to the back of
the slide. Again, note which direction you are turning
the knob. While the objective uses the sample as a reference for focus, the condenser uses the field iris (i) as
reference. Close the field iris (Figure 3a). Using the condenser focus, focus away until the edges of the field
iris come into sharp focus (Figure 3b).
Notice that the image of the field iris is off-center at
this point. Locate the condenser centration scre w s
( F i g u re 1f). Ty p i c a l l y, they are mounted at 5 and 7
o’clock. While peering through the microscope, use the
s c rews to “walk” the image of the field iris into the
center of the field of view (Figure 3c). At first, this
p rocess will seem awkward because these scre w s
work against each other and along the diagonals
rather than left and right, up and down. Microscopy
involves strong eye–hand–brain coordination and this
situation is one of those cases in which a little practice
will improve that coordination considerably.
Unless the sample is highly scattering, open the
field iris (i) so that it is just outside the field of view
(Figure 3d). Adjust the condenser aperture iris (d) so
that the edges of the features are crisp and the background is clean. If the condenser is set too far open, the
image will appear washed out. If it is too far closed,
the edges will be too thick and there will be rings
12 JULY 2002
EDITOR’S PAGE continued
around every little bit of dust and dirt.
Eyepieces revisited
Each of us has a dominant eye.d It is the eye that
guides us as we walk around the world and that we
use when aiming in contests such as darts, archery, or
shooting. If both eyepieces are focusable, leave the
diopter setting for your dominant eye at zero. Focus
the eyepiece for the nondominant eye so that you see
the specimen in the field of view clearly. This small adjustment compensates for each eye’s unique focus and
avoids the terrible headaches and eyestrain often experienced by people who use microscopes for a living.
Four quick steps and 45 seconds to perfection
Practice makes perfect. By the time you have practiced these steps four or five times, you should be able
to establish Koehler illumination in well under 45 sec.
1. Eyepieces.Set IPD for one, round field of view and
diopter settings to “0.”
2. Objective.Raise stage until nearly touching the
sample (view from outside), then focus away (view
through microscope) until the image of the sample is
sharp.
3. C o n d e n s e.r Raise condenser so that it bare l y
touches the back of the sample (view from outside).
Close the field iris (view through microscope), then focus away until edge of field iris is sharp. Center condenser. Open the field iris just outside of the field of
view and set the condenser aperture iris for sharp
edges and clean background.
4. Eyepieces.Adjust diopter setting for nondominant
eye until image seen with that eye is sharp.
A few final tips
Koehler illumination forms the baseline for all mic roscopy imaging. Set it first thing in the morning,
then fine-tune it whenever you change objective or
sample. These few swift adjustments are guaranteed to
p roduce better photomicrographs and significantly
improve information for automated imaging systems.
One final note: Unlike any other analytical technology,
microscopists are part of the microscope system. Establishing Koehler is also guaranteed to reduce neck
and eye strain and improve your productivity at the
microscope.
d
To find your dominant eye, make a triangular window by touching
your two index fingers together and your two thumbs. Hold the
window at arm’s length and use it to locate a distant object. Look at
the object with both eyes, then close your right eye. If the object
stays in place or only moves slightly, you are left-eye dominant. If it
moves dramatically (for example, out of the window), you are
right-eye dominant.
Ms. Foster is President of Microscopy/Microscopy Education, 125 Paridon St., Ste. 102, Springfield, MA 01118, U.S.A.;
tel .: 413-746-6931; fax: 413-746-9311; e-mail:
[email protected]. She encourages comments and inquiries about the new technologies presented in her articles.
AMERICAN CLINICAL LABORATORY 13