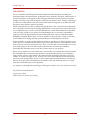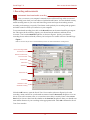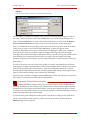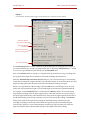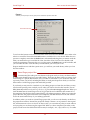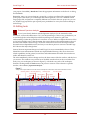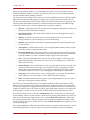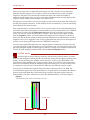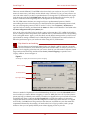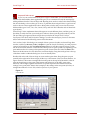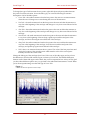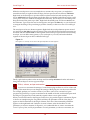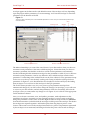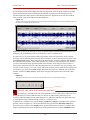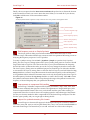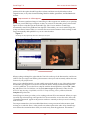
1
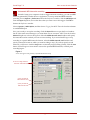
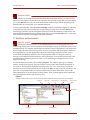
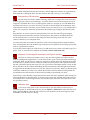
Sound Forge 7.0
learn to use the new features
i
Sound Forge 7.0
learn to use the new features
Sound Forge 7.0: learn to use the new features
Introduction ............................................................................ iii
I: Recording enhancements...................................................... 4
Automated time-based audio recording .......................................................... 4
Automated Threshold-based recording ........................................................... 5
Automated MIDI timecode recording .............................................................. 7
Prerecord buffer .......................................................................................... 8
II: Workflow enhancements ..................................................... 8
Explorer window ......................................................................................... 8
Drag-and-drop CD extraction .......................................................................10
Automatic file mixing and conversion from Explorer window .............................10
Undo past save ..........................................................................................10
Sound Forge project files .............................................................................11
III: Editing tools..................................................................... 12
Enhanced Spectrum Analysis........................................................................12
VU/PPM meters .........................................................................................14
Clip detection and marking ..........................................................................15
Improved fade curves .................................................................................16
Effect, volume, and pan automation..............................................................18
Filtered, pink, white, and brown noise generators ...........................................20
End frequency control on Simple Synthesis ....................................................21
Improvements to compressed file handling ....................................................21
Support for updated streaming file formats ....................................................21
Improvements to video support....................................................................22
Conclusion.............................................................................. 23
ii
Sound Forge 7.0
learn to use the new features
Introduction
For over a decade, Sound Forge has been the standard in audio editing for recording and
mastering studios, broadcast stations, production houses, musicians, and loyal, satisfied users of
all types and ability. Each upgrade to this amazing product has been full of pleasant surprises
that give users that “just when I thought it couldn’t get any better, it does!” feeling. Sound Forge
7.0 carries on in that tradition with new features that make working with your audio and video
files easier, more efficient, and more powerful.
This document discusses—that is, defines and explains how to use—the new features that make
the 7.0 upgrade to Sound Forge an exciting enhancement to your professional or personal studio.
As you explore the new version, you’ll find that there are several enhancements that streamline
your every-day workflow, new options for automating the mix of your audio, unparalleled
support for all of the important file formats including the latest versions of Windows Media,
RealMedia, and QuickTime formats, as well as support for 24p video files. Further, you’ll enjoy
new flexibility in recording, metering, spectrum analysis, file management, and more.
In this document, we walk you through the new features, and show you step by step how to use
them. Once you’ve finished this document, you’ll know which buttons to push and which menu
items to choose in order to use the new tools. Then, you’ll be ready to turn yourself loose on your
latest audio project to discover what’s really important: how to turn the nuts and bolts
knowledge this document gives you into new creative ideas for your projects!
Before you get started, we want to make sure you know that we’ve written this document under
the assumption that you already know the basics of using Sound Forge from your experience
with previous versions of the software. We realize that this assumption falls short of all of our
readers, so if it does not apply to you, we refer you to the on-line help files and user manuals to
get you up and running. There are also several excellent Web forums dedicated to Sound Forge
where you can get real-world information from fellow users and enthusiasts who love to help
each other use Sound Forge to solve problems.
So, whether you thought that Sound Forge couldn’t get any better or not, let’s see just how it has!
Gary Rebholz and Michael Bryant
Sony Pictures Digital
Media Software Consulting and Training
iii
Sound Forge 7.0
learn to use the new features
I: Recording enhancements
Automated time-based audio recording
Now you can use your computer’s internal clock to tell Sound Forge when to start and
stop recording even when you’re not there to click the Record button. You can schedule as many
timed recording items as you want, and Sound Forge starts and stops the recording sessions
according to the settings you specify. This feature works perfectly for recording radio programs
and other events for which you cannot be at your computer.
To use time-based recording, first click on the Record button in the main Sound Forge transport
bar. This opens the Record dialog. Specify your desired record attributes, and then choose
Automatic: Time from the Method dropdown, as shown in Figure 1. Specify your desired
recording device and record mode, and set your levels just as in earlier versions of Sound Forge.
Figure 1
Build a list of events that you want to record automatically with the new Time-based automatic recording feature.
Set the recording method
to Automatic: Time
Remove All Past Events
From List button
Delete button
Edit button
Add button
Timer Event list
Arm button
Countdown to next
scheduled recording
Click the Add button to open the Record Timer Event window (shown in Figure 2). Give the
recording a name, and choose your desired recurrence from the Recurrence dropdown. You can
choose to record a one-time event, or a source that occurs daily or weekly. Enter a date in Start
date field, or choose a date from the calendar in the Start Date dropdown. Enter you desired start
time and the duration of your recording in the appropriate fields. Click OK to dismiss the Record
Timer Event window.
4
Sound Forge 7.0
learn to use the new features
Figure 2
Enter the specifics of the new record event in the Record Timer Event dialog.
The event that you created now appears in the Timer Event list (refer back to Figure 1). Click on
the event’s name to select the event. Click the Edit button if you need to make changes to the
event. Click the Delete button to remove the event from the timer event list. Click the Remove
All Past Events From the List to clean your list of all events that have already taken place.
Once you've added all of the recording events to the events list that you want, click on the name
of the event you want to record and click the Arm button. A green box appears with a
countdown that indicates how long it will be before recording begins. When your computer's
clock reaches the time you specified to begin recording, Sound Forge automatically begins
recording, and continues recording for the duration that you specified. The green countdown box
turns flashing red to indicate that Sound Forge is recording. After the specified recording
duration, Sound Forge automatically stops recording and adds the recorded material to the open
data window.
If you have more than one event in the event list that you want to automatically record, Sound
Forge begins recording as described above. When the specified duration for the first event passes,
Sound Forge instantly begins to count down to the next recording start time in the event list.
When the clock reaches the next start time, recording begins again. This procedure repeats itself
until all of the timed recording events in the list have completed.
When all of the events have completed, click the Close button in the Record dialog to return to the
data window or windows that contain the recorded material.
Automated Threshold-based recording
Threshold-based recording enables you to set Sound Forge to monitor an input device
and begin recording only when the input level from that device reaches and exceeds a specified
threshold level. This is perfect for situations where you don't have enough disc space to record
constantly over long periods of time, yet you cannot be present to switch Sound Forge into record
mode when important audio material begins.
To set Sound Forge into Threshold recording mode, open the Record dialog as discussed above.
Set all of your familiar record options as normal, and choose Automatic: Threshold from the
Method dropdown as in Figure 3.
5
Sound Forge 7.0
learn to use the new features
Figure 3
Use the Automatic: Threshold method to trigger recording automatically at a specified input level threshold.
Set the recording method
to Automatic: Threshold
Specify the desired
input level threshold
Specify the desired
release time
Automatically rearm for
another recording event
Set a prerecord buffer
Use the Threshold fader to set the sensitivity of the Sound Forge record trigger. For example, if
you want Sound Forge to record everything louder than -8 dB, set the Threshold fader to -8.0 dB.
You can also type a threshold value directly into the Threshold field.
Next, set the Release slider to specify how long Sound Forge should wait to stop recording after
the signal from the input device falls below the threshold setting discussed above.
Select the Automatically rearm after record checkbox if you want Sound Forge to automatically
rearm after recording has stopped. Sound Forge will then continue to monitor the input level and
begin recording again when the input level passes the threshold setting once again.
When you've specified all of these settings, click the Arm button. Sound Forge is now in ready
mode, and will automatically begin to record when input level reaches the specified threshold.
For example, set the Threshold fader to -8 dB, and set the Release slider to 10 seconds. Sound
Forge begins recording when the input signal reaches -8 dB, and continues to record as long as
the input signal remains above that threshold level. Even when the input signal level falls below
the threshold setting, Sound Forge continues to record. If 10 seconds (the setting of the Release
slider) passes without the input level reaching the threshold setting, Sound Forge stops
recording. If during the 10-second release buffer the input level passes the threshold again,
Sound Forge continues to record uninterrupted. Sound Forge stops recording only when the
input level remains below the threshold setting for the length of the release setting.
6
Sound Forge 7.0
learn to use the new features
Automated MIDI timecode recording
Instead of using your computer's clock to trigger automatic recording, you can use MIDI
timecode generated by another device or application. To set up automated MIDI timecode
recording, choose Options | Preferences and in the Preferences window, click the MIDI/Sync tab.
From the Input dropdown, choose the device that you want to act as the trigger. Click OK to
dismiss the Preferences window.
Choose Options | MIDI In/Out, and then choose Trigger from MIDI Timecode from the submenu
to enable MIDI input.
Now you're ready to set up the recording. Click the Record button to open the Record window.
Set all of the usual record settings as you want them. Choose Automatic: MIDI Timecode from the
Method dropdown, as shown in Figure 4. Select the MIDI timecode start checkbox and specify
the timecode location at which you want to start recording. If you want Sound Forge to stop
recording at a specific MIDI timecode location, select the MIDI timecode end checkbox and
specify a timecode location at which you want recording to stop. (If you don't specify an end
timecode, you'll have to click the Stop button to manually stop recording.) Finally, click the Arm
button. Sound Forge now waits until it receives the specified MIDI timecode, at which point
recording begins.
Figure 4
You can also trigger recording according to specified MIDI timecode settings.
Set the recording method to
Automatic: MIDI Timecode
Specify the desired
MIDI timecode start
Specify the desired
MIDI timecode end
7
Sound Forge 7.0
learn to use the new features
Prerecord buffer
When you record in Normal and Threshold-based automatic modes, you can now set a
prerecord safety buffer to ensure that you don't miss any vital audio input that occurs just before
you to click Record or in case you've set the threshold a little too high and the beginning of the
desired audio has a level below your specified threshold.
To set a prerecord buffer, select the Prerecord buffer checkbox (refer back to Figure 3), and enter
a value between 0 and 30 seconds in the corresponding text field. Now, click the Arm button.
Sound Forge constantly records the specified amount of audio into RAM as a safety buffer, and
adds the buffered material to the recording when either you click the Record button, or the input
level reaches the threshold and triggers automatic recording.
II: Workflow enhancements
Explorer window
The Explorer window gives you an extremely helpful tool for opening files into your
Sound Forge workspace. If you've used Sony Pictures Digital's Vegas or ACID PRO, then you are
probably already very familiar with the Explorer windows in those applications, and the window
works exactly the same in Sound Forge. Even if you're not familiar with the Explorer window in
those applications, you will quickly feel at home in Sound Forge's Explorer window since it
works much like Windows Explorer. You use the Explorer window to navigate your way
through your computer's folder structure to find a specific file. You can then preview files, and
add entire files or specific regions from a file to your Sound Forge workspace so that you can
begin your editing.
To view the Explorer window, choose View | Explorer. The window opens up as a floating
window (as shown in Figure 5), but you can dock it to any side of the Sound Forge window if
you want to. The left side of the Explorer window is the Tree View, which shows you the file
structure on your local and network drives. Click on the Plus (+) signs to the left of folders in the
Tree view to expand the folders and see the entire folder structure within them. Click on the
folders themselves to see the contents of those folders. Those contents appear in the right-hand
side of the Explorer window (the Summary view).
Figure 5
The Explorer window makes it easy to find and preview your audio and video files before you open them in your workspace.
Refresh
Favorites
Start Preview
Stop Preview
Auto Preview
Views Menu
Tree View
Summary View
8
Sound Forge 7.0
learn to use the new features
The buttons at the top of the Explorer window help make this tool even more useful. Click the
Close button to close the Explorer window. The Address Bar displays the current folder. Use the
Up One Level button to navigate from the current folder in the Tree view to the next folder up in
the folder structure.
Use the Refresh button to update the folder and file structure in the Explorer window. For
example, if you have the Sound Forge Explorer window open, then go out of Sound Forge and
make changes to your folder structure (that is, you add, remove, or rename files or folders), then
come back to Sound Forge, the changes you made in Windows Explorer will not be reflected in
the Sound Forge Explorer window. In this case, click the Refresh button to update the Sound
Forge Explorer window to reflect the changes.
The Create New Folder button enables you to add folders to your computer or network drive. It's
important to remember that folders you add in the Sound Forge Explorer window are added to
your computer or network drive--just as if you had added the folders in Windows Explorer.
Similarly, when you click the Delete button in the Sound Forge Explorer window, you remove
the selected folder of file from your computer or network drive, just as if you had deleted the file
or folder from inside Windows Explorer.
Click the Favorites button to add the currently selected folder to your personalized favorites list.
Typically, you will add folders to your favorites list when you know you'll be returning to those
folders frequently, and you don't want to have to keep navigating your folder structure to find
those folders. The Favorites folder appears at the very bottom of the Tree view. Expand the
Favorites folder to see all of the folders you have added to your favorites list, and then click on the
desired folder to see its contents in the Summary view.
Once you've navigated to a folder that contains the files you are considering opening in Sound
Forge, you can use the Explorer window to preview the files. With a file selected in the List view,
click the Start Preview button to listen to the file. Click the Stop Preview button to stop listening
to the file. Click the Auto Preview button. Now when you select a file in the Summary view, it
automatically begins to play so that you can preview it. Click on another file to stop preview of
the currently previewing file and begin preview of the new file. Click the Stop Preview button to
stop previewing altogether.
Click the Browse Web button to launch an Internet browser and explore the Internet for files that
you can use in Sound Forge.
You can control the look of the Explorer window with the Views Menu button. Click the arrow
next to this button, and choose Region View. Now when you select a file in the Summary view
that contains region markers, those regions appear in the Region view. This enables you to
preview specific regions of a file. Choose Details to see detailed information about the files that
appear in the Summary view. Click the headings in the details view to resort the files by that
heading. Choose All Files if you want to see all of the files in the selected folder regardless of
whether or not those file formats can be opened in Sound Forge.
Once you've navigated to a file, you can add the file to a new data window in your Sound Forge
workspace directly from the Explorer window. If the selected file contains regions, and you are in
Regions view as discussed above, you can add specific regions from the file without adding the
entire file. To add a file or region, double-click the file or region. You can also drag the file or
region from the Explorer window directly into the workspace to open it in a new data window.
You can also add the file or region to an existing data window in your workspace. To do so, click
and drag the file or region into the existing data window, but do not release the left mouse
9
Sound Forge 7.0
learn to use the new features
button. While still holding the left mouse button, click the right mouse button to toggle between
three methods of adding the file to the data window: Mix (M), Paste (P), or Crossfade (C).
Drag-and-drop CD extraction
The new Explorer window makes extracting audio from a compact disc even easier than
it was in previous versions of Sound Forge. To extract audio from a CD, insert the CD into your
computer’s CD-ROM drive. Next, use the Explorer window to navigate to your CD-ROM drive,
and click on the drive’s icon in the Tree View. The files on the CD appear in the Summary View
of the Explorer window. The files on your CD behave just as if they were on your computer drive
in that you can preview them and open them in the Sound Forge workspace just like any other
file.
Drag the file you want to extract from the Summary View into the Sound Forge workspace.
Sound Forge extracts the audio from the CD and opens a data window containing the audio
waveform for the file. You can now edit using all of the Sound Forge tools and save a new
version of the file to your computer drive.
To extract more than one track from the CD at a time, select multiple tracks from the Summary
View and drag them all to the Sound Forge workspace in one operation. Sound Forge opens each
track in a separate data window.
You can still extract audio from a CD the way you did in previous versions of Sound Forge if you
prefer. To do so, insert the CD, and then choose File | Extract Audio From CD.
Automatic file mixing and conversion from Explorer window
The Explorer window also makes it easy to mix two files together in one data window
without opening both original files. To see how this works, open a stereo file on the Sound Forge
workspace. Then, use the Explorer window to navigate to another stereo file. Drag the second file
from the Explorer window into the workspace until your mouse points to the open data window,
but don’t release the mouse button just yet. You now have the usual three options on how to add
the second file to the first. While still holding the left mouse button, click the right mouse button
to toggle between the three choices: Paste (P), Mix, (M), and Crossfade (C). When you decide which
of the three methods you want to use, release the left mouse button, and Sound Forge adds the
second file into the data window of the first file according to the method you chose.
Sound Forge 7.0 also handles conversions between mono and stereo seamlessly when mixing two
files in the manner we just described. To see this, open a mono file, and then add a stereo file to it
as described above. Sound Forge instantly converts the stereo audio into mono and mixes it into
the open data window.
Undo past save
You now have the option to save an undo history even beyond the point where you
saved the project. To enable undo past save, choose Options | Preferences, and in the Preferences
dialog, click the File tab. Select the Allow Undo Past Save checkbox (as shown in Figure 6), and
click OK to close the Preferences dialog.
10
Sound Forge 7.0
learn to use the new features
Figure 6
The ability to undo past your last save gives you more freedom to experiment with edits.
Allow Undo Past Save
To see how this feature works, first uncheck the Allow Undo Past Save checkbox. Now make a few
edits to a sound file. Notice that the Undo button is available. Now, save the file. When the save
process is complete, notice that the Undo button is dimmed indicating that you cannot undo the
edits you made before you saved the file. Next, check the Allow Undo Past Save checkbox and
repeat the experiment. This time after you save the project, the Undo button is still available, and
you can undo the edits--even the edits you made before you saved your work.
Keep in mind that even with this option active, you will lose your undo history when you close
the data window.
Sound Forge project files
As mentioned, the undo past save feature works great until you close your data window,
at which point Sound Forge loses your undo history. There may be times when you want to close
Sound Forge or a specific data window, but you'd like to come back to your work later and pick
up exactly where you left off, including the ability to undo past the point at which you close the
data window. Sound Forge project files make this possible.
If you think you may need to come back to your editing project at a later date, and that you may
need to undo past the point at which you are when you need to close the data window, choose
File | Save As, and choose Sound Forge Project (*.frg) from the Save as type dropdown. When you
click the Save button, Sound Forge saves an .frg project file and a subfolder that contains all of
the temporary files that have been created during your editing operations. When you reopen the
project file later, the project refers back to the temporary files that had been saved, and can thus
access the entire undo history of your editing operations.
In addition, when you work in a Sound Forge project file, you do not work directly on the file in
the project data window. Instead, the project file merely contains a set of pointers to the original
file, and instructions on how to treat it. In other words, you can make any edit you want without
worrying that you are destroying the original file. When you have completed your edits on the
project, render it into the desired final file format (for example, .wav, .mp3, and so on.) To render
11
Sound Forge 7.0
learn to use the new features
your project, choose File | Render As. Enter the appropriate information in the Render As dialog,
and click Save.
Remember, since you were working in a project file, you have not affected the original file used
in the project. This means you could reopen the same original file, save it as a different Sound
Forge project file, and perform a completely different set of edits in this new project. As you can
see, Sound Forge project files open up many new possibilities for worry-free creative editing in
Sound Forge.
III: Editing tools
Enhanced Spectrum Analysis
If you’re not already familiar with the Spectrum Analysis (for the remainder of this
discussion, we’ll use the abbreviation “SA”) tool in Sound Forge, it’d be a very good idea for you
to read through the on-line help files and the Sound Forge user manual to gain some
understanding of what this powerful tool is and how to use it. While a complete discussion of the
tool is far beyond the scope of this document, this section discusses the enhancements to the tool
that have been added to Sound Forge 7.0. The SA window has received several improvements
that make it more dependable, useful, and easy to use than in previous versions of Sound Forge.
We’ll discuss the major changes here.
Some of the most important changes in Sound Forge’s SA are not immediately obvious. These
behind the scenes enhancements include new alpha-blended drawing code, more robust autorefresh capabilities, and in general, several fixes and enhancements that make SA a much more
stable, and therefore useful, tool.
The most immediately obvious change involves the basic nature of the SA window, and thus how
you access it. The window now joins the list of dockable windows that can be set to either float
freely over your workspace (as shown in Figure 7), or docked to any side of the workspace.
Instead of looking under the Tools menu as in previous versions of the software to open the
window, choose View | Spectrum Analysis.
Figure 7
The Spectrum Analysis window has received a facelift and important enhancements—both visible and behind the scenes.
Smoothing window Real Time Monitoring
Hide active plot
Clear all snapshots
FFT size
Auto Refresh
Refresh
Settings
Normal Display
Sync
Sonogram
12
Set Snapshot
Snapshots
Print
Sound Forge 7.0
learn to use the new features
Before you open the SA window, it is worthwhile to note that you no longer need to create a
selection in the data window to analyze. You can now place your cursor anywhere in the data
window without actually making a selection.
The next most obvious change involves how you access the different functions of the SA window.
Rather than the menu-driven approach to setting your options in previous versions of the SA
window, the Sound Forge 7.0 SA window utilizes a more intuitive button-driven approach. The
following table summarizes the functions of fields and buttons that where accessible through
menus in previous versions, and now appear at the top of the SA window.
•
FFT size—use this drop-down list to set the size (in samples) of the analysis window and
number of discrete frequencies analyzed.
•
Smoothing window—choose the desired window function to be applied to the input
data before analysis.
•
Settings—this button opens the Spectrum Settings dialog where you can access and
change a number of your SA settings in one convenient dialog.
•
Refresh—click this button to refresh your spectrum graph after repositioning the cursor
in your data file.
•
Auto Refresh—with this button active, your SA graph updates instantly when you click
in the data window to reposition the cursor.
•
Real Time Monitoring—activate this button to watch your SA graph update constantly
as you play the file in your data window. Click the drop-down arrow next to this button
to specify whether you want to monitor the input signal or the output signal.
•
Sync—when activated, this button syncs the top and bottom (that is, left channel and
right channel) graphs so that when you zoom in on or pan through one, you affect the
other in the same way.
•
Normal Display—Choose this button to view your SA graph in normal view mode. The
drop-down arrow on this button gives you the option to view your graph as a Single
Graph (that is, both channels show in one graph) or the default double graph, and lets
you specify whether you want to view a Line graph, a Filled Graph, or a Bar Graph.
•
Sonogram—Choose this button to view your SA graph as a sonogram. The drop-down
arrow enables you to choose either a color or black-and-white sonogram.
•
Print—this button sends the current graph to your computer printer so you can create a
hard copy of the graph for future reference.
No doubt you noticed that the previous list of fields and buttons skips several buttons. These
buttons are all related to the new snapshots feature of SA. Snapshots enable you to make quick
and accurate comparisons of graphs at various points in your data file. You can create up to four
snapshots, and show any or all of them on the SA graph while either viewing or not viewing the
current graph. Let’s take a closer look at these buttons and how the snapshot feature works.
If you haven’t already done so, click the Auto Refresh button to set SA into auto refresh mode.
Click randomly within your data window, and notice how the SA graph updates every time you
click to a new location in the data window. Now, click the Hide active plot button. This makes
the current graph invisible. Although it might not be immediately apparent, the ability to hide
the current plot comes in very handy. For now, click the Hide active plot button again so you can
see the current graph.
Now, click the Set button. This activates readies SA to take a snapshot of the current plot—much
like advancing the film in a camera so that you can take another picture. Notice that the Set
13
Sound Forge 7.0
learn to use the new features
button stays in the active or depressed position after you click it. Finally, click on the button
labeled 1. Sound Forge gives you a couple of visual cues to indicate that you have assigned a
snapshot to the button. First, the buttons number turns blue, and second, the number is
underscored. The button is also now in an active state indicating that SA currently displays that
snapshot. Finally, the Set button changes to the inactive state.
Though it may not look like it yet, two plots appear on the screen at the moment: the current plot,
and the plot assigned toSnapshot 1. At the moment, the two are identical, so you don’t necessarily
notice that they both exist on screen.
Next, click elsewhere in your data window. Now (you may need to look closely depending upon
how uniform the audio is throughout your data window) you can see that there are two different
plots shown on screen. Click the Hide Active Plot button to remove the active plot from the
screen. You can now see just the plot held by Snapshot 1. Show the active plot again, and then
click the Snapshot 1 button. You see that this button toggles the view of Snapshot 1 off and on.
Notice also that the button number remains blue with an underscore to indicate that it contains a
snapshot even if you’ve toggled its view off. By toggling either the active plot or the snapshot on
and off, you can easily pick out the locations of differences in the plots.
You can use the method described above to assign snapshots to buttons 2, 3, and 4 as well, and
you can toggle these on and off just like you can toggle button 1. If you no longer want one of the
previously assigned snapshots, either toggle its view off, or assign a new snapshot to that button.
To clear all of the snapshots simultaneously, click the Clear all snapshots button.
VU/PPM meters
Sound Forge has always had very responsive and accurate peak level meters. Use these
meters to find the highest volume peak in your audio file, and to prevent clipping (peaking above
0.0 dB.) Now Sound Forge also includes Volume Unit (VU) / Peak Program (PPM) meters. Use
these meters to help determine the overall perceived volume of your audio. They are especially
useful for level matching during the mastering stage because they give a visual cue that you use
in conjunction with your ears to ensure that two audio files are relatively equal in volume.
To show the VU/PPM meters, right click the peak meters, and choose Show VU/PPM. The
VU/PPM meters appear next to the peak meters. If your peak meters are docked in their default
position (at the right-hand edge of the Sound Forge window), drag the left edge of the peak
meters further to the left to create more room for the additional meters, as shown in Figure 8.
Figure 8
The VU/PPM meters appear next to the familiar Peak Level meters.
Peak Level meters
VU/PPM meters
14
Sound Forge 7.0
learn to use the new features
There are several different VU and PPM scales from which you can choose for your VU/PPM
meters. In most cases, you'll likely use the default scale, Traditional VU, but you may want to use
one of the other scales if you have a specialized need. To change the VU/PPM meter scale, rightclick the meter, and choose VU/PPM Scale, and then choose the desired scale from the pop-up
menu. Consult the Sound Forge help files for descriptions of the various scales.
The VU/PPM meters calculate an average level from a predetermined portion of the file
surrounding the cursor as the file plays. For the PPM scales, this predetermined portion is fixed,
but you can change the portion for the VU scales. To do so, choose Options | Preferences to
open the Preferences dialog, and then click the Other tab. Enter a value between 5 and 1,000 in the
VU meter integration time (5 to 1,000 ms) box.
Also on the Other tab of the Preferences dialog, enter a value into the O VU (+4dBu) level field (or
choose a setting from the drop-down list) to calibrate the VU/PPM meters to their corresponding
level on the peak meters. Again, you'll most likely use the default settings unless you have some
special need for setting a different level. Calibrating the VU/PPM meters at some level below O
dB on the peak meters gives you head room when using the VU/PPM meters.
Clip detection and marking
The clip detection and marking feature helps you identify--and fix--areas in your audio
file that are too loud (that is, areas where the peak level exceeds 0.0dB.) To analyze your file--or a
portion of it--for clipping, select the area you want to check (if you don't make a selection, Sound
Forge analyzes the entire file), and then select Tools | Detect Clipping to open the Detect
Clipping window, shown in Figure 9.
Figure 9
Sound Forge can analyze you file and mark any instance of clipping.
Choose a preset
Threshold setting
Clip Length setting
Choose a method of clip detection from the Preset drop-down list, or use the Threshold fader to
set a level that you want to define as clipping. A value of -60dB (the Detect all clip-related plateaus
preset) can help you identify areas where you audio was clipped before you lowered the volume
in Sound Forge. Enter a value in the Clip Length field to specify the number of consecutive
samples that must exceed the Threshold setting before Sound Forge marks the area as a clipped
area. Finally, click OK. Sound Forge analyzes the selection, and marks any area that meets the
requirements dictated by the settings you made in the Detect Clipping window with a project
marker so that you can quickly identify areas where clipping occurs in your file.
15
Sound Forge 7.0
learn to use the new features
Improved fade curves
If you’ve ever worked with envelopes in Vegas or ACID PRO, you are undoubtedly
familiar with the flexibility those applications give you to customize not only the envelope (by
adding additional nodes to the envelope and adjusting those nodes to achieve the desired effect),
but also the ability to choose the type of curve, or path that the envelope follows to get from one
node to the next. These applications refer to these paths as fades, and you can choose from six
different fade types: Linear, Fast, Slow, Smooth, Sharp, and Hold. We’ll describe each of these fade
types shortly.
Sound Forge 7.0 also implements these fade types in several different places, and this gives you
the ability to really fine tune your envelopes in order to achieve just the perfect edit in your file.
The new fade types appear in the envelopes that you find in the Graphic Fade, Envelope,
Pan/Expand, Pitch Bend, and FM Synthesis dialogs, as well as the envelopes you use to automate
effects as discussed in the following section of this document.
Let’s use the Graphic Fade dialog as an example. Select a portion of audio in a Sound Forge data
window, and choose Process | Fade | Graphic to open the Graphic Fade dialog. As with previous
versions of Sound Forge, click the Reset Envelope button to reset the orange envelope to a flat
line in the waveform window. Notice that the envelope has on point (at the very beginning). This
point indicates the Gain setting at that particular point of time in the file. Select the 100% radio
button in the Maximum Gain area below the waveform display. Drag the envelope line to the top
of the data window within the dialog box if it is not already there.
Double-click at the end of the envelope to create another point there. Drag the point you just
created (at the right end of the envelope) all the way to the bottom of the waveform window. As
Figure 10 shows, this creates a straight line from the point at the top left (Gain=100% at the 0%
point in the selection) to the point at the bottom right (Gain=0% at the 100% point in the
selection). This straight segment between the two points represents the transition from the
settings at one point (100% Gain in this example) to the settings at the next point (0% Gain). A
straight line indicates a Linear Fade, which is just one of your options.
Figure 10
A linear fade out.
16
Sound Forge 7.0
learn to use the new features
To change the type of fade between the two points, right-click the envelope anywhere between
the points. From the sub-menu, choose the fade type you want.The following list contains
descriptions of all of the fade options:
•
Linear Fade—the audio transitions from the first point to the next in a consistent manner
where the rate of change never varies during the course of the transition.
•
Fast Fade—the audio transitions from the first point to the next such that the transition is
very fast at the beginning of the envelope and changes to very slow toward the end of the
envelope.
•
Slow Fade—the audio transitions from the first point to the next such that the transition is
very slow at the beginning of the envelope and changes to very fast toward the end of the
envelope.
•
Smooth Fade—the audio transitions from the first point to the next such that the transition
is very slow at the beginning of the envelope, speeds up toward the mid point of the
envelope, and slows down again toward the end of the envelope.
•
Sharp Fade--the audio transitions from the first point to the next such that the transition is
very fast at the beginning of the envelope, slows down toward the mid point of the
envelope, and speeds up again toward the end of the envelope.
•
Hold—there is no transition between the two points. The value of the first point lasts until
exactly the location of the second point at which time the value of the second point
instantly becomes the current value.
Change the fade type of the envelope from Linear Fade to any of the other types, and try to hear
the difference in how the fade sounds. Figure 11 shows a Smooth Fade. The audible differences
between each of these fade types can be subtle, but you’ll be surprised at how often you’ll be glad
you have these different options once you get used to the individual characteristics of each. When
you’re done experimenting, reset the fade type to Linear Fade.
Figure 11
A Smooth Fade has been applied to the fade envelope.
17
Sound Forge 7.0
learn to use the new features
While the envelope we use in our example above contains only two points, you might have
noticed that when you right-click the envelope, the first option in the sub-menu is Add Point.
Right-click on the envelope at a spot about half-way between the first and second point, and
choose Add Point from the sub-menu (recall that earlier you double-clicked the envelope to add
a new point—these two methods accomplish the same task). The envelope now has three points.
Drag the first and last points up to 100%. Right-click the middle point, and choose Set To from
the sub-menu. Type 25 into the text box that appears, and press the Enter key on your keyboard
to instigate the change. The point changes position vertically so that it now has a Gain setting of
25%.
The envelope now has two distinct segments. Right-click the envelope between points one and
two and choose Fast Fade from the sub-menu. Then, right-click the envelope between points two
and three and choose Slow Fade for that segment of the envelope. Figure 12 shows the resulting
envelope. You can add as many points to your envelopes as you want, and each individual
segment of the envelope can have a different fade type.
Figure 12
Each segment in an envelope can have its own fade type independent of all other segments.
Finally, right-click anywhere on the envelope and choose Flip All Points from the sub-menu to
change the envelope to its exact opposite shape.
Effect, volume, and pan automation
You can now automate the settings of some DirectX plug-in effects as well as volume and
panning. This means that you can change the settings of these plug-ins over the course of the file.
For example, perhaps you want the volume of your file to start out at a certain level, grow
progressively quieter up to a point somewhere in the middle of the file, and from that point until
the end grow progressively louder until the original volume is once again reached.
When you select the button in the Plug-in Chainer for a plug-in that supports automation (Figure
13 shows an example using the Flange/Wah-wah filter), the parameter controls of the plug-in
appear on the left-hand side of the Plug-In Chainer, and a list of the automatable parameters
appears on the right-hand side. Under the Automate column, select the checkbox for each
parameter you want to automate. In Figure 13, we’ve indicated that we want to automate the
Center Frequency, Rate, and Depth parameters. For each parameter you choose to automate, an
18
Sound Forge 7.0
learn to use the new features
envelope appears in the data window (the default location of the envelope will vary depending
upon the plug-in and the parameter you are automating). You'll use this envelope to control the
parameter over the duration of the file.
Figure 13
The Plug-in Chainer now shows you all of the automatable parameters of a filter. Here you can choose which parameters you
intend to automate.
Show
Parameter name
Parameter adjustment area
Automate
Enable
Parameter automation selection area
The Show column helps you control the visual clutter of your data window when you choose to
automate several parameters of the same or different plug-ins. Notice that when you choose to
automate a parameter, the checkbox in the Show column for that parameter is automatically
checked, indicating that the automation envelope for that parameter is visible. If you've chosen to
automate several parameters, it can be very difficult to know which envelope controls which
parameter. To make things clear, uncheck the box in the Show column for every parameter except
for the one or two that you are currently working with. Doing so hides the envelope for those
parameters. In Figure 13, we’ve deselected the Show checkboxes for Rate and Depth, thus hiding
their envelopes so we can focus on the envelope for the Effect parameter.
The Enable column provides a way for you to protect a given parameter envelope from
unintentional changes. If you don't want to change the settings of an envelope, yet you still want
to view it in your data window, uncheck that parameter's Enable box. Essentially, this locks the
envelope so that you cannot make any changes to it. In Figure 13, we’ve left all of the appropriate
Enable checkboxes selected.
Once you've chosen to automate, view, and enable a parameter, make adjustments to that
parameter's envelope to automate your mix. Drag the envelope to a new location in the file to
change the parameter over the course of the file. Right-click the envelope and choose Add Point
from the shortcut menu (or double-click the envelope) to add a point to the envelope. This breaks
the envelope into separate segments. Add another point, then drag the new point to a new
location. This creates a curve in the envelope between the two points. The parameter represented
by the envelope is now automated, and changes from the first point to the second according to
19
Sound Forge 7.0
learn to use the new features
the curve between the points. Right-click the curved portion of the envelope, and choose a fade
type from the shortcut menu to determine the method of getting from the first point to the
second. Explore the other options in the shortcut menu too. Figure 14 shows our data window
after we made some of the adjustments described here.
Figure 14
This figure shows our data window with the Center Frequency automation envelope. Notice that the Rate and Depth envelopes are
not visible since we deselected their Show buttons.
Right-click a point on the envelope to access a shortcut menu of options related to the point. For
example, you can delete the point, or set the point's value to a specific level.
Use the Envelope Tool in the main Sound Forge toolbar (shown in Figure 15) to work with the
envelope without affecting the data in the file. For instance, to move several points together, click
the Envelope Tool button. Then, drag across the data window to create a selection that includes
the desired envelope points. Notice that with this tool you do not select the data in the window;
you only select the envelope points included in the selection. Now drag one of the points to a
new location, and notice that all of the selected points move in relation to the one you drag. You
can also use the Envelope Tool to cut or copy and paste envelope points. Select the envelope points
you want to copy, then choose Edit |Copy. Reposition the cursor to a different area of the data
window, and choose Edit | Paste to paste the envelope points back into the sound file at that
location.
Figure 15
The Envelope Tool enables you to select and move envelopes without affect your Sound Forge data window.
Envelope Tool
Filtered, pink, white, and brown noise generators
Sound Forge 7.0 includes four new noise generators: Filtered, Pink, White, and Brown. Use
these generators to create sound files that you can use for audio testing, analyzing room
acoustics, and performing acoustic measurements. Or, add filters and effects to generated noise
to create special effects and interesting sounds for a variety of uses.
To generate any of these noises, choose Tools | Synthesis | Simple to open the Simple Synthesis
window, shown in Figure 16. Choose the desired noise type from the Waveform shape dropdown list Type a value into the Length field to specify the duration for which you want Sound
Forge to generate the noise. Set the peak level of the generated noise with the Amplitude fader.
20
Sound Forge 7.0
learn to use the new features
Finally, choose an option from the Insert new waveform at drop-down list to dictate the location
in the current file to which you want to insert the noise. When you’ve made all of your choices,
click OK to add the noise to the current data window.
Figure 16
The Simple Synthesis window to generate a variety of noises for use in tuning a room or creating special effects.
Choose a waveform shape
Choose a waveform length
Choose a beginning frequency
Choose an ending frequency
Create a log sweep
Choose an insertion location
Choose an amplitude setting
End frequency control on Simple Synthesis
The Simple Synthesis dialog now includes modifications that make it easy to create
synthesis sweeps. This makes Sound Forge even more useful for operations like tuning a room or
analyzing the frequency response of a set of speakers.
To create a synthesis sweep, choose Tools | Synthesis |Simple to open the Simple Synthesis
dialog. The Start Frequency setting replaces the Frequency setting from previous versions of Sound
Forge. Refer back to Figure 16. The value in the Start Frequency text field dictates the frequency
that will be used to synthesize the audio, just as the Frequency settings from earlier versions did.
The Start Frequency setting serves an additional purpose in Sound Forge 7.0. Select the checkbox
to activate the End Frequency setting. Enter a value into the End Frequency text field. Select the Log
Sweep checkbox to create a sweep that transitions from the start frequency to the end frequency
in a logarithmic fashion where the transition starts out slowly, then speeds up the closer it gets to
the end frequency. Deselect the Log Sweep checkbox to create a linear sweep. Click OK to create
the synthesis, and notice that the audio sweeps through the range of frequencies from the start
frequency to the end frequency that you specified in the dialog.
Improvements to compressed file handling
Sound Forge 7.0 handles compressed file formats (for instance, .mp3, .wma, .wmv, and
.pca files) more seamlessly than previous versions. The application no longer builds proxy files
for these compressed file formats. This saves you both time and disc space when working on
compressed source files. You don’t have to do anything special to take advantage of this feature.
Just use your favorite method to add a compressed file to the Sound Forge workspace. The data
window opens quickly, and you can get right to editing the file.
Support for updated streaming file formats
Sound Forge now features full support for both import and export of Windows Media 9
series files (.wma and .wmv) as well as QuickTime 6 files (.mov). You can also create RealMedia 9
files with Sound Forge. This means that you can add .wma and .mov files to the workspace,
21
Sound Forge 7.0
learn to use the new features
perform all of the regular Sound Forge edits on them, and then save the files either to their
original format, or any other format including Windows Media, QuickTime, and RealMedia file
formats.
Improvements to video support
The most significant change to Sound Forge’s video support now enables you to open 24p
DV files in your Sound Forge workspace so that you can work on the audio portion of those files.
Figure 17 shows a 24p file open in the Sound Forge Video Preview window. Sound Forge
automatically removes the pulldown from 24p files. This enables you to work with footage shot
in 24p in its native format. When you view the files in an external monitor while working, Sound
Forge automatically adds pulldown so you can view the video.
Figure 17
Sound Forge now fully supports 24p video files on both import and export.
24p framerate display
When working with 24p files, right-click the Time Ruler at the top of the data window, and choose
SMPTE Film Sync (24fps) from the drop-down menu so that your ruler accurately reflects the time
location of your project cursor.
Once you’ve edited the 24p file, you can quickly transcode the audio to any of the audio formats
that Sound Forge supports. You can also save the file back to the 24p format inserting either 2-3
or 2-3-3-2 pulldown. To save the file as a 24p file with the desired pulldown, choose File | Save
As, and choose Video For Windows (.avi) from the Save as type drop-down list. Then, choose
NTSC DV 24p (inserting 2-3 pulldown) or NTSC DV 24p (inserting 2-3-3-2 pulldown) from the
Template drop-down list.
Sound Forge now alerts you when you’re working with non-DV source material. When you open
a non-DV clip in Sound Forge, and open the Video Preview window to view the video, the words
“Frame Recompressed” appear in the preview window to remind you that you are not working
with a DV file.
Two improvements have also been added that relate to using an external video monitor while
working on a video file. First, a video preroll now reduces jitter in the video. Also, Sound Forge
now releases the external monitor when you switch away from the application. This makes it
22
Sound Forge 7.0
learn to use the new features
easy to switch between working on a video file in Sound Forge to working on video in Vegas or
ACID Pro even when you are using the external monitor in all three applications. Keep two
exceptions to this feature in mind. First, Sound Forge does not release the external monitor if you
switch away from the application while the file is still playing. Second, you can override this
feature if you choose to. To do so, choose Options | Preferences, and click the File tab. Select the
Keep media files locked checkbox. Now Sound Forge does not release the external monitor
when you switch away from the application.
Conclusion
Sound Forge 7.0 reflects the commitment that Sony Pictures Digital has made to ensure that the
tools you have grown to trust and depend upon only continue to get better and better. The new
features that you’ve learned about here will make Sound Forge an even more indispensable tool
than ever before.
23