1
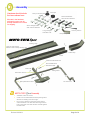
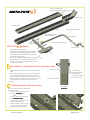
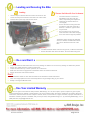
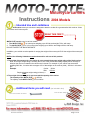
Instructions 2004 Models
Intended Use and Limitations
MOTO-TOTE motorcycle carriers are designed to attach to a class III or greater trailer hitch receiver. Class
III receivers are 2 inches square.
READ THIS FIRST!
MOTO-TOTE carriers come in various models:
1. The MOTO-TOTE
is for motorcycles weighing up to 450 lbs. and weighs 75 lbs. with ramp.
Sport
2. The MOTO-TOTE
is for motorcycles weighing up to 600 lbs. and weighs 90 lbs. with ramp.
DO NOT EXCEED THE ABOVE WEIGHTS.
In addition, your vehicle must be capable of carrying the weight of the motorcycle PLUS the weight of the motorcycle
carrier.
BOTH of the following limitations must be observed for safe use of this product:
1. The weight of the motorcycle + the carrier is not to exceed the tongue weight rating of the hitch receiver.
Note: The tongue weight rating is normally about 10% of the vehicle total towing capacity and is normally labeled on the receiver or stated in the vehicle user’s manual. For example: If your vehicle can tow a trailer
weighing 5000 lbs., it must be able to support 10% of that weight on the receiver (hitch) - 500 lbs. in this example.
Example:
Carrier
90 lbs.
Bike
+370 lbs.
Required tongue weight rating (minimum) =
460 lbs
AND
2. The weight of the motorcycle is not to exceed the capacity of the carrier.
The capacity of the MOTO-TOTE
is 450 lbs.
The capacity of the MOTO-TOTE
Sport is 600 lbs.
Additional items you will need (not included in box)
One 11/16” wrench or socket
Revised 4/2/2004
Four tie-down straps
Page 1 of 4
Assembly
Hardware should include
the items shown here.
End caps
Linch pin and lanyard
Socket-head bolts
with nuts and washers
Most are in the hardware
package but some may be
already installed on the carrier
for shipping.
Short carriage bolts
with nuts and washers
Hex key wrench
Long carriage
bolts with nuts
Ramp keeper tab
MOTO-TOTE Sport
Loading ramp
Linch pin and lanyard
Attach to side of ramp with key ring
Wheel stop
Track
Vertical socket-head bolt
Zero-Wobble hitch
attachment bolt
Main tube
Tubing frame
Outer tube section
Ramp attachment stud
Tie down arm
MOTO-TOTE Sport Assembly
•
•
•
Assemble carrier as shown.
Carrier can be assembled with track pointing either
direction for loading from left or right.
Do not use a washer on the head of the vertical
socket-head bolt. The bolt head should go thru the
hole in the short outer tube section and rest against
the main tube.
Revised 4/2/2004
Page 2 of 4
Linch pin and lanyard
Attach to side of ramp with key ring
MOTO-TOTE
Wheel stop
Loading ramp
Track
Ramp attachment stud
Zero-Wobble hitch
attachment bolt
Main tube
MOTO-TOTE
•
•
•
•
Tubing frame
Vertical socket-head bolt
Assembly
Tie down arm
Assemble carrier as shown.
Carrier can be assembled with track pointing
either direction for loading from left or right.
Assembly of the m3 is similar to the Sport but
with simpler tubing frame.
Do not use a washer on the head of the vertical
socket-head bolt. The bolt head should go thru
the hole in the short outer tube section and rest
against the main tube.
Zero-Wobble (tm) Attachment to Hitch—All carrier models
•
•
Slide main tube of the carrier into the hitch receiver
tube.
Secure main tube to receiver with the Zero-Wobble
hitch attachment bolt, washer and nut as shown
here. Do not put a washer at the bolt head. The bolt
head should be recessed into the receiver hole and
resting against the main tube of the carrier as
shown.
Stowing the Ramp—All carrier models
Receiver tube
The head of the
Zero-Wobble hitch
attachment bolt
should be recessed
into receiver hole.
Main Tube of carrier
TOP VIEW
Stow the ramp next to the carrier track
as shown so that:
• the ramp keeper tab protrudes
thru the slot in the ramp
AND
• the ramp attach stud protrudes
thru the round hole.
• Clip the linch pin on the stud to
hold the ramp in place.
• Attach the linch pin to the loading ramp with the lanyard and
key ring so it won’t get lost.
Revised 4/2/2004
Page 3 of 4
Loading and Securing the Bike
Loading
•
•
Secure the bike with four tie-downs:
Use the ramp to load the bike. Be sure the two hooks on the
end of the ramp are inserted into the slots in the carrier track.
Roll the bike up the ramp and onto the carrier.
•
•
•
Use two tie-downs to secure the
handlebars to the two loops provided, compressing the suspension
sufficiently so that the bike is secured tightly.
Secure the rear tire using the holes
provided on each side of the rail. If
desired, a “wheel tie” type tie down
may be used.
Run a tie-down from one foot peg
under the track to the other foot peg,
then cinch down as tight as possible.
The MOTO-TOTE carriers are designed
so that, if desired, an additional tie down
arm can be attached at the rear of the
bike.
After loading:
• The bike should be about vertical to the ground, not tilted to either side.
• Secure the loose ends of the tie-downs. Do not let them hang free.
Do s and Don’t s
Do:
•
•
•
•
•
Inspect the MOTO-TOTE before each use for any damage or defects. Do not use if any damage or defects are present.
Always use quality tie downs made for motorcycles.
Inspect tie downs for fray or wear. If present, do not use them.
Make sure to tie the foot pegs down to the MOTO-TOTE as well as the back tire.
Always secure the ends of the tie downs.
Don’t:
•
•
•
Use the MOTO-TOTE for other than intended use as described in these Instructions.
Haul more weight (bike and carrier combined) than the tongue weight rating of your vehicle.
Modify or change the MOTO-TOTE.
One Year Limited Warranty
For one year from the date of retail purchase, D&D Design, Inc. will, at its option, repair or replace any part or parts
found to be defective in material or workmanship. This covers products which have been operated in accordance with these
instructions, and which have not been subject to misuse, abuse, commercial use, neglect, accident, improper maintenance or
alterations. Warranty service is available, with proof of purchase, through D&D Design, Inc. by contacting D&D Design, Inc. at
(888) 333-4621, [email protected].
Revised 4/2/2004
Page 4 of 4