1
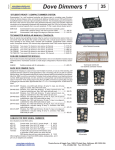
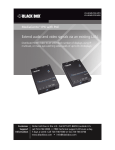
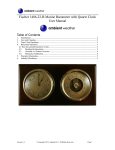
Revised 03-15-2014
Copyright 2014 D&D Design, Inc. All rights reserved
MotoTote is a registered trademark of D&D Design, Inc.
If you need assistance please contact us at
[email protected] or in the US call 888-333-4621
In Australia [email protected]
The Easiest way to haul your Bike.
INSTRUCTIONS LED TAIL LIGHT KIT
In the Box:
Light kit assembly
4 mounting screws
Black nylon ties
Australian version
has 7-pin plug and
amber turn signals
You will need:
Flathead and philips head screwdrivers
Scissors or knife to cut nylon ties
If you purchased your MotoTote before April 2014
you will also need a drill with a 5/32” or 4mm bit
1
SEPARATE FROM BEZEL
Separate light from bezel (base) with a flat
head screwdriver as shown leaving the cable
running through bezel.
2
ATTACH BEZELS
IDENTIFY left/right light by labels on back.
Attach bezel to MTX Platform tube with
screws provided and pre-punched holes.
NOTE: If you bought your MotoTote before April 2014 you will need to drill two more holes in the MTX Platform tube (one for each light). First drive screw in outer hole as shown in step 2 above, then use bezel as
guide to drill the additional inboard hole.
3
PRESS INTO BEZEL
Press light into bezel with palm of hand as
shown until it “snaps” into place.
5
4
SECURE cables
Run the cables along the underside of the
MotoTote toward center then forward toward vehicle. Secure with the nylon ties.
connect and check
Australian connector
Plug into vehicle connector and check for
proper operation as described at right.
Check for proper operation of brake, turn
signal, and tail lights. Apply brakes and use
turn signals with the headlights on. Repeat
with the headlights off (tail lights will be off
but brake and turn signals should work).