1
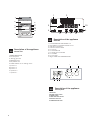
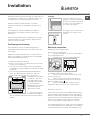
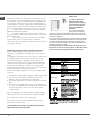
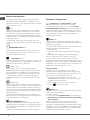
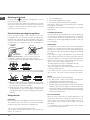
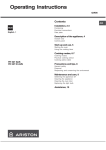
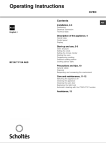
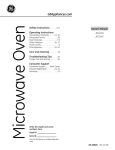
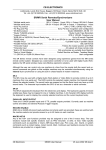
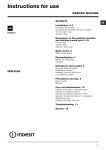
A64IMCA1/ AUS GB GB English Operating Instructions COOKER AND OVEN Contents Operating Instructions,1 Warnings,1 Description of the appliance-Overall view,2 Description of the appliance-Control Panel,2 Installation,3 Start-up and use,5 Cooking modes,6 Using the hob,9 Precautions and tips,14 Care and maintenance,16 Assistance,18 Warnings WARNING: The appliance and its accessible parts become hot during use. Care should be taken to avoid touching heating elements. Children less than 8 years of age shall be kept away unless continuously supervised. This appliance can be used by children aged from 8 years and above and persons with reduced physical, sensory or mental capabilities or lack of experience and knowledge if they have been given supervision or instruction concerning use of the appliance in a safe way and understand the hazards involved. Children shall not play with the appliance. Cleaning and user maintenance shall not be made by children without supervision. WARNING: Unattended cooking on a hob with fat or oil can be dangerous and may result in fire. NEVER try to extinguish a fire with water, but switch off the appliance and then cover flame e.g. with a lid or a fire blanket. Do not use harsh abrasive cleaners or sharp metal scrapers to clean the oven door glass since they can scratch the surface, which may result in shattering of the glass. The internal surfaces of the compartment (where present) may become hot. Keep children away from the appliance during the automatic cleaning cycle as surfaces may become very hot. Never use steam cleaners or pressure cleaners on the appliance. Do not place metal objects (knives, spoons, pan lids, etc.) on the hob as they may become hot. Remove any liquid from the lid before opening it. Do not close the glass cover (if present) when the gas burners or electric hotplates are still hot. After use, switch off the hob element by its control and do not rely on the pan detector. WARNING: Ensure that the appliance is switched off before replacing the lamp to avoid the possibility of electric shock. ! When you place the rack inside, make sure that the stop is directed upwards and in the back of the cavity . 1 1 2 2 3 4 5 6 7 8 9 10 11 3 10 4 9 5 5 GB GB Description of the appliance Overall view 1.Glass ceramic hob 2.Control panel 3..Sliding grill rack 4.DRIPPING pan 5.Adjustable foot 6.GUIDE RAILS for the sliding racks 7.position 5 8.position 4 9.position 3 10.position 2 11.position 1 7 8 Description of the appliance DISPLAY 1. LOW TEMPERATURE MODE icon 2. AUTOMATIC COOKING MODE icons 3. Indicator Preheating 4. indicator DOOR LOCK 5. icon STOP 6. icon DURATION 7. icon END OF COOKING 8. icon TIMER 9. icon CLOCK 10.digits TIME and TEMPERATURE 5 1 2 GB 3 6 4 Description of the appliance Control panel 1.DISPLAY 2.OVEN LIGHT button 3.TIMER button 4.TIME SETTING button 5 SELECTOR knob 6.THERMOSTAT knob 2 6 Installation ! Please keep this instruction booklet in a safe place for future reference.. Make sure the booklet remains with the appliance if it is sold, given away or moved. Levelling If it is necessary to level the appliance, screw the adjustable feet into the positions provided on each corner of the base of the cooker (see figure). ! Please read this manual carefully: it contains important information on installation, operation and safety. The legs* fit into the slots on the underside of the base of the cooker. ! The appliance must be installed by a qualified professional in accordance with the instructions provided. ! Any necessary adjustment or maintenance must be performed after the cooker has been disconnected from the electricity supply. Positioning and levelling ! The appliance may be installed alongside any cupboards whose height does not exceed that of the hob surface. ! Make sure that the wall which is in contact with the back of the appliance is made from a non-flammable, heat-resistant material (T 90°C). 420 mm. Min. min. 650 mm. with hood min. 700 mm. without hood 420 mm. Min. To install the appliance correctly: • Place it in the kitchen, the dining room or the studio flat (not in the bathroom). • If the top of the hob is higher than the cupboards, the appliance must be installed at least 600 mm away from them. • If the cooker is installed underneath a wall cabinet, there must be a minimum distance of 420 mm between this cabinet and the top of the hob. This distance should be increased to 700 mm HOOD if the wall cabinets are Min. 600 mm. flammable (see figure). • Do not position blinds behind the cooker or less than 200 mm away from its sides. • Any hoods must be installed in accordance with the instructions listed in the relevant operating manual. Electrical connection Mounting a Power Supply Cable Opening the terminal board: • Using a screwdriver, prise on the side tabs of the terminal board cover; • Pull open the cover of the terminal board. N L To install the cable, proceed as follows: • Remove the wire clamp screw and the three contact screws L-N• Fasten the wires beneath the heads of the screws using the following color scheme : Blue (N) Brown (L) Yellow-Green • Fasten the supply cable in place with the clamp and close the cover of the terminal board. Electrical connection Ovens with a three-pole power supply cable are designed to operate with alternated current at the supply frequency and voltage indicated on the data plate (at the bottom of the oven dashboard). The earthing conductor of the cable is the yellow-green conductor. Connecting the power supply cable to the mains. Fit a normalized plug to the cable, which corresponds to the load indicated on the data plate; if the cooker is connected directly to the mains, an omnipolar circuit 3 GB GB Safety Chain -breaker with a minimum opening of 3 mm between the contacts, suitable for the load indicated and complying with current directives, must be installed between the appliance and the mains (the earthing wire must not be interrupted by the circuit-breaker). The power supply cable must be positioned so that it does not exceed room temperature by 50°C at any point of its length. Before making the connection check that: • the limiter valve and the home system can support appliance load (see data plate); • the power supply system has an efficient earthing connection which complies with the provisions of current regulations and the law; • there is easy access to the socket or the omnipolar circuit-breaker once the cooker has been installed. ! Do not use reducers, adapters or shunts as these could cause heating or burning. Connecting the supply cable to the electricity mains Install a standardised plug corresponding to the load indicated on the appliance data plate (see Technical data table). The appliance must be directly connected to the mains using an omnipolar switch with a minimum contact opening of 3 mm installed between the appliance and the mains. The switch must be suitable for the charge indicated and must comply with current electrical regulations (the earthing wire must not be interrupted by the switch). The supply cable must be positioned so that it does not come into contact with temperatures higher than 50°C at any point. Before connecting the appliance to the power supply, make sure that: • The appliance is earthed and the plug is compliant with the law. • The socket can withstand the maximum power of the appliance, which is indicated by the data plate. • The voltage falls between the values indicated on the data plate. • The socket is compatible with the plug of the appliance. If the socket is incompatible with the plug, ask an authorised technician to replace it. Do not use extension cords or multiple sockets. ! Once the appliance has been installed, the power supply cable and the electrical socket must be easily accessible. ! The cable must not be bent or compressed. ! The cable must be checked regularly and replaced by authorised technicians only. ! The manufacturer declines any liability should these safety measures not be observed. 4 ! In order to prevent accidental tipping of the appliance, for example by a child climbing onto the oven door, the supplied safety chain MUST be installed! The cooker is fitted with a safety chain to be fixed by means of a screw (not supplied with the cooker) to the wall behind the appliance, at the same height as the chain is attached to the appliance. Choose the screw and the screw anchor according to the type of material of the wall behind the appliance. If the head of the screw has a diameter smaller than 9mm, a washer should be used. Concrete wall requires the screw of at least 8mm of diameter, and 60mm of length. Ensure that the chain is fixed to the rear wall of the cooker and to the wall, as shown in figure, so that after installation it is tensioned and parallel to the ground level. TABLE OF CHARACTERISTICS Oven dimensions (HxWxD) Volume 58 Useful measur ement s relating to the oven compartm ent Voltage and frequenc y ENERGY LABEL Eco Start-up and use Setting the clock ! The clock may be set when the oven is switched off or when it is switched on, provided that the end time of a cooking cycle has not been programmed previously. button several times until the icon 1. Press the and the first two numerical digits on the display start to flash. 2. Turn the TIMER KNOB towards “+” and “-” to adjust the hour value. button again until the other two digits 3. Press the on the DISPLAY begin to flash. 4. Turn the TIMER KNOB towards “+” and “-” to adjust the minute value. button again to confirm. 5. Press the Setting the timer ! This function does not interrupt cooking and does not affect the oven; it is simply used to activate the buzzer when the set amount of time has elapsed. 1. Press the button several times until the icon and the three numerical digits on the DISPLAY begin to flash. 2. Turn the TIMER KNOB towards “+” and “-” to adjust the minute value. button again to confirm. 3. Press the The display will then show the time as it counts down. When this period of time has elapsed the buzzer will be activated. a buzzer sounds the preheating process is complete: you may now place the food in the oven. 4. During cooking it is always possible to: - Change the cooking mode by turning the SELECTOR knob. - Change the temperature by turning the THERMOSTAT knob. - Set the cooking duration and the cooking end time (see Cooking modes). - Stop cooking by turning the SELECTOR knob to the “0” position. 5. The cooking time may be modified (see Cooking Modes). 6. If a blackout occurs while the oven is already in operation, an automatic system within the appliance will reactivate the cooking mode from the point at which it was interrupted, provided that the temperature has not dropped below a certain level. Programmed cooking modes which have not started will not be restored and must be reprogrammed. ! There is no preheating stage for the ROASTING and BARBECUE modes. ! Never put objects directly on the bottom of the oven; this will prevent the enamel coating from being damaged. ! Always place cookware on the rack(s) provided. Oven light When the oven is not in operation, the lamp can be switched on at any time by pressing the Oven light button Using the oven ! Before operating the product, remove all plastic film from the sides of the appliance. ! The first time you use your appliance, heat the empty oven with its door closed at its maximum temperature for at least half an hour. Make sure that the room is well ventilated before switching the oven off and opening the oven door. The appliance may emit a slightly unpleasant odour caused by protective substances used during the manufacturing process burning away. 1. Select the desired cooking mode by turning the SELECTOR knob. 2. The oven begins its preheating stage and the preheating indicator lights up. The temperature may be changed by turning the THERMOSTAT knob 3. When the preheating indicator switches off and 5 GB GB Manual cooking modes ! All cooking modes have a default cooking temperature which may be adjusted manually to a value between 40°C and 250°C as desired. In the SPIT ROAST mode, the default power level value is 270°C. ECO The back heating element and the fan is activated, which allows for a gentle and even distribution of the heat inside the oven cavity. This program is suitable for slow cooking of each type of foods with adjustable temperatures up to a maximum of 200 ° C, for keeping the food warm as well as for completing cooking. It is particularly useful for slow cooking of fish and meats, making the foods delicate and at the same ensuring energysaving. TRADITIONAL OVEN mode When using this traditional cooking mode, it is best use to one cooking rack only. if more than one rack is used, the heat will be distributed unevenly. MULTILEVEL mode Since the heat remains constant throughout the oven, the air cooks and browns food in a uniform manner. A maximum of two racks may be used at the same time. GRILL mode The top heating element is activated. By turning the THERMOSTAT knob, the different power levels which may be set will appear on the DISPLAY; these range between 5% and 100%. The high and direct temperature of the grill is recommended for food which requires a high surface temperature. Always cook in this mode with the oven door closed. GRATIN mode The top heating element is activated and the fan begins to operate. During part of the cycle the circular heating element is also activated. This combination of features increases the effectiveness of the unidirectional thermal radiation provided by the heating elements through forced circulation of the air throughout the oven. This helps prevent food from burning on the surface and allows the heat to penetrate right into the food. Always cook in this mode with the oven door closed. LOW TEMPERATURE modes This type of cooking can be used for proving, defrosting, preparing yoghurt, heating dishes at the required speed and slow cooking at low temperatures. The temperature options are: 40, 65, 90 °C. enabled, the rotisserie spit will stop if the door is opened. 6 Automatic cooking modes ! The temperature and cooking duration are preset values, guaranteeing a perfect result every time - automatically. These values are set using the C.O.P.® (Programmed Optimal Cooking) system. The cooking cycle stops automatically and the oven indicates when the dish is cooked. The cooking duration may be modified by a period of several minutes, as specified in the description of the individual functions below. PIZZA mode Use this function to make pizza. Please see the following chapter for further details. It will only be possible to adjust the duration by -5/+5 minutes. To achieve the best possible results, we recommend that you carefully observe the instructions below: • Follow the recipe. • The weight of the dough should be between 500 g and 700 g. • Lightly grease the dripping pan and the baking trays. Place the food inside the oven while it is still cold. If you wish to place the food in the oven after it has been preheated, immediately following a high-temperature cooking programme, the text “Hot” will appear on the display until the temperature of the oven has fallen to 120°. At this point it will be possible to place the pizza in the oven. Recipe for PIZZA: 1 Dripping pan on a low shelf level, hot or cold oven Recipe for 3 pizzas weighing approximately 550 g: 1000 g flour, 500 ml water, 20 g salt, 20 g sugar, 100 ml olive oil, 20 g fresh yeast (or 2 sachets of powder yeast) • Leavening at room temperature: 1 hour, or LOW TEMPERATURE manual function set to 40°. Leave to rise for approximately 30-45 minutes. • Place the food inside the oven while it is still cold. • Start the PIZZA cooking mode. BREAD mode To obtain the best results, we recommend that you carefully observe the instructions below: • Follow the recipe. • Do not exceed the maximum weight of the dripping pan. • Remember to pour 100 ml of cold water into the baking tray in position 5. Place the food inside the oven while it is still cold. If you wish to place the food in the oven after it has been preheated, immediately following a high-temperature cooking programme, the text “Hot” will appear on the display until the temperature of the oven has fallen to 40°. At this point it will be possible to place the bread in the oven. Recipe for BREAD: 1 Dripping pan weighing 1000 g max placed on a low shelf level Recipe for 1000 g of dough: 600 g flour, 360 g water, 11g salt, 25 g fresh yeast (or 2 sachets of powder yeast) Method: • Mix flour and salt in a large bowl. • Dilute yeast in lukewarm water (approximately 35 degrees). • Make a small well in the mound of flour. • Pour in water and yeast mixture. • Knead dough by stretching and folding it over itself with the palm of your hand for 10 minutes until it has a uniform consistency and is not too sticky. • Form the dough into a ball shape, place it in a large bowl and cover it with transparent plastic wrap to prevent the surface of the dough from drying out. Select the manual LOW TEMPERATURE function on the oven and set the temperature to 40°C. Place the bowl inside and leave the dough to rise for approximately 1 hour (the dough should double in volume). • Cut the dough into equal sized loaves. • Place them in the dripping pan on oven paper. • Cover the loaves with flour. • Make incisions on the loaves. • Remember to pour 100 ml of cold water into the baking tray in position 5. For cleaning purposes, we recommend the use of water and vinegar. • Place the loaves inside the oven while it is still cold. BREAD cooking mode. • Start the • Once baked, leave the loaves on one of the grill racks until they have cooled completely. BAKED CAKES mode This function is ideal for baking cakes. Place the food inside the oven while it is still cold. The dish may also be placed in a preheated oven. It will only be possible to adjust the duration by -10/+10 minutes. Programming cooking ! A cooking mode must be selected before programming can take place. Programming the cooking duration button several times until the icon and 1. Press the the three digits on the DISPLAY begin to flash. 2. Turn the TIMER KNOB towards “+” and “-” to adjust the duration. button again to confirm; 3. Press the 4. When the set time has elapsed, the text END appears on the DISPLAY, the oven will stop cooking and a buzzer sounds. • For example: it is 9:00 a.m. and a time of 1 hour and 15 minutes is programmed. The programme will stop automatically at 10:15 a.m. Setting the end time for a cooking mode ! A cooking duration must be set before the cooking end time can be scheduled. 1. Follow steps 1 to 3 to set the duration as detailed above. button until the icon and the two 2. Next, press the digits on the DISPLAY begin to flash. 3. Turn the TIMER KNOB towards “+” and “-” to adjust the hour value. button again until the other two digits on the 4. Press the DISPLAY begin to flash. 5. Turn the TIMER KNOB towards “+” and “-” to adjust the minute value. button again to confirm. 6. Press the 7. When the set time has elapsed, the text END appears on the DISPLAY, the oven will stop cooking and a buzzer sounds. • For example: it is 9:00 a.m. and a time of 1 hour and 15 minutes is programmed, while the end time is set to 12:30. The programme will start automatically at 11:15 a.m. Programming has been set when the and buttons are illuminated. The DISPLAY shows the cooking end time and the cooking duration alternately. To cancel programming, turn the SELECTOR knob to the “0” position. Practical cooking advice ! Do not place racks in position 1 and 5 during fan-assisted cooking. This is because excessive direct heat can burn temperature sensitive foods. ! In the SPIT ROAST and ROASTING cooking modes, place the dripping pan in position 1 to collect cooking residues (fat and/or grease). MULTILEVEL • Use positions 2 and 4, placing the food which requires more heat on 2. • Place the dripping pan on the bottom and the rack on top. PIZZA • Use a light aluminium pizza pan. Place it on the rack provided. For a crispy crust, do not use the dripping pan as it prevents the crust from forming by extending the total cooking time. • If the pizza has a lot of toppings, we recommend adding the mozzarella cheese on top of the pizza halfway through the cooking process. 7 GB GB WARNING! The oven is provided with a stop system to extract the racks and prevent them from coming out of the oven. (1) As shown in the drawing, to extract them completely, simply lift the racks, holding them on the front part, and pull (2). Co ok in g mo de s Foods We ig ht (in kg ) Ra ck po si tion sta ndard gu id e ra il s Traditional Duc k Chi cken Roas t veal or beef Roas t pork Bi scu its (shor tcrust pas try) Pi es / Tarts 1, 5 1, 5 1 1 1 2 2 2 2 2 2 Prehatin g Re co mm ended temper atur e (° C) Co ok in g durat io n (min utes) sli ding gu id e ra ils 1 1 1 1 1 1 Ye s Ye s Ye s Ye s Ye s Ye s 200-210 200-210 200 200-210 180 180 70-80 60-70 70-75 70-80 15-20 30-35 Multil ev el* Grill Gr atin* Low temper atur e Au toma tic pizz a Au toma tic brea d Au toma tic bak ed ca ke s ! ECO FUNCTION: this program can be used for slow cooking of each type of dish with adjustable temperatures up to a maximum of 200 ° C, for heating of food, and for the completions of cooking. 8 Start-up and use Description of the appliance Control panel 6 3 1 2 5 4 The control panel described in this manual is only a representative example: it may not exactly match the panelon your appliance. When using the touch control pannel panel: Do not use gloves Use a clean finger Touch the glass smoothly 1 INCREASE POWER/ TIME button - controls the power and time 2 REDUCE POWER/ TIME button controls the power and time. 3 COOKING ZONE SELECTOR button is used to select the desired cooking zone 4 ON/OFF button switches the appliance on and off. 5 CONTROL PANEL LOCK button prevents accidental changes to the hob settings and shows the control panel has been locked. 6 HEATER DISPLAY -shows the cooking zone selected, power level, preset time of cooking, booster funcition activated. ! For detailed information on the control panel functions refer to “Start-up and use” section. ! This product complies with the requirements of the latest European Directive on the limitation of power consumption of the standby mode. If no operations are carried out for a period of 2 minutes, after the residual heat indicator lights turn off and the fan stops (if present), the appliance automatically switches to the .off mode.. The appliance resumes the operating mode once the ON/OFF button is pressed. ! Depending on the number of heaters/cooking zones on the hob the COOKING ZONE SELECTOR BUTTONS may vary between and Start-up and use GB Before connecting the appliance to the power supply, make sure that: • The appliance is earthed and the plug is compliant with the law. • The socket can withstand the maximum power of the appliance, which is indicated on the data plate located on the appliance itself. • The voltage falls within the range of values indicated on the data plate. • The socket is compatible with the plug of the appliance. If the socket is incompatible with the plug, ask an authorised technician to replace it. Do not use extension cords or multiple sockets. ! Once the appliance has been installed, the power supply cable and the electrical socket must be easily accessible. ! The cable must not be bent or compressed. ! The cable must be checked regularly and replaced by authorised technicians only. ! The manufacturer declines any liability should these safety measures not be observed. ! Do not remove or replace the power supply cable for any reason. Its removal or replacement will void the warranty and the CE marking. INDESIT does not assume liability for accidents or damage arising from replacement/ removal of the original power supply cable. Replacement can only be accepted when carried out by personnel authorised by INDESIT and using an original spare part. ! The glue applied on the gaskets leaves traces of grease on the glass. Before using the appliance, we recommend you remove these with a special non-abrasive cleaning product. During the first few hours of use there may be a smell of rubber which will disappear very quickly. ! A few seconds after the hob is connected to the electricity supply, a buzzer will sound. The hob may now be switched on. Types of noise during normal hob operation: • Buzz: due to the vibration of the metallic parts that make up the induction element and the pot; it is generated by the electromagnetic field required for heating and increases as the power of the induction element increases. • Soft whistle: heard when the pot placed on the heating zone is empty; the noise disappears once food or water is placed into the pot. • Crackle: produced by the vibration of materials on the bottom of the pot due to the flow of parasitic currents caused by electromagnetic fields (induction); can be more or less intense depending on the material making up the bottom of the pot, and decreases as the pot dimensions increase. 9 GB • Loud whistle: heard when two induction elements of the same group function simultaneously at maximum power and/or when the booster function is set on the larger element while the other is auto-adjusted. Noise is reduced by decreasing the power level of the auto-adjusted induction element; pot bottom layers made of different kinds of materials are among the main causes of this noise. • Fan noise: a fan is necessary to ensure the hob functions correctly and to safeguard the electronic unit from possible overheating. The fan functions at maximum power when the large induction element is at maximum power or when the booster function is on; in all other cases, it works at average power depending on the temperature detected. Furthermore, the fan may continue to work even after switching the hob off, if the temperature detected is high. The types of noise listed above are due to induction technology and are not necessarily operational faults. ! If the (-) or (+)button is pressed for an extended period of time, the display scrolls quickly though the power levels and timer minutes. Initial Light Conditions When power is initially applied to the Cooktop, the touch control conducts a calibration process for the touch keys, which requires a low level of ambient light in the area of the touch keys. If during this calibration process excessive ambient lighting is detected the User Interface displays „FL” (Infrared Ambient Light Error) and the control calibration process is suspended. In order to rectify the process any lighting that could effect the calibration process should be switched off (e.g. halogen cooker hood lighting). The error will disappear when satisfactory ambient lighting is detected and the touch control calibration procedure will now complete satisfactorily. -The „FL” error can only be generated within approx 3s of initial power being applied to the cooktop. -We recommend that the user switches off all cooker hood lighting and lighting directed towards the cooktop when power is initially applied to the cooktop. -After the touch control has conducted its initial calibration process, (approx 3s) any cooker hood or other lighting can be switched on as normal and will not affect the operation of the touch control. Switching on the hob When power is initially applied to the Cooktop, the touch control conducts a calibration process for the touch keys, which requires a low level of ambient light in the area of the touch keys. If excessive ambient lighting is detected, the User Interface displo ays „FL” error and the calibration is suspended. The error will disappear when satisfactory ambient lighting is detected and the touch control calibration procedure will now complete satisfactorily 10 After connecting the hob to the electricity mains, the touch pannel might be automatically locked. To unclock the pannel press and hold the Control Panel Loock button . . To switch the hob on, press and hold the for approximately one second. button The cooktop is switched On when a beep sound is emmited and all the cooking zones displays show the digit point. When the cooktop is OFF, after 5 sec the control . switches off the KEYLOCK LED to reduce the power consumption. As soon as we touch a key, the KEYLOCK LED goes ON and we can continue to use the cooktop, unlocking the keyboard. Switching off the cooktop is signalled by 3 beep sound Setting the Power Management The cooktop maximum power limit is 7200W. This power limit can be reduced by the user to 2800W, 3500W or 6000W. The sequence to set a new Cooktop Power Limit is: ·During the first 30 seconds after plugging the appliance ·The Touch has to be unlocked and all Heaters Off ·Press at the same time Heater 1 and Heater 3 selection keys ·Once this is done, a beep sounds and the actual Cooktop Power Limit will be shown in the heater displays. For selecting a new Power Limit: ·With the (+) and (-) keys, the Power Limit is increased. The selectable powers are: 2800W, 3500W, 6000W or 7200W. When the power is 7200W, if the [+] or [-] key is touched the power changes to 2800W. The sequence to finish recording the new Cooktop Power Limit is: ·Press at the same time Heater 1 and Heater 3 selection keys ·Once this is done, new Cooktop Power Limit is recorded and there is a system reset. To finish without recording changes: ·If during 60 seconds there is no action, changes are not recorded and there is a system reset. Switching on the cooking zones Each cooking zone is controlled using a selector button and a power adjustment device consisting of a double(-) and (+) button. 7R EHJLQ RSHUDWLQJ D FRRNLQJ ]RQH SUHVV WKH corresponding control button and set the desired power level (between 0 and 9) using the buttons (-) or (+) Press and hold the (-) button to set the power level immediately at “9” Press and hold (+) and (-) buttons simultaneously to return to power level “0” If the power level is “0” press and hold the (+) button to increase the power level quickly 7KHFKRLFHRIDFRRNLQJ]RQHLVVLJQDOOHGE\DEHHS VRXQGDQGWKHQWKHSRZHUOHYHOLVVKRZQRQWKH display ,IWKHVHOHFWLRQRIDKHDWHULVQRWGRQHLQVHFRQGV the cooktop will be turned off automatically. Fast Boil- “Booster” function 7KHERRVWHUIXQFWLRQIRUVRPHRIWKHFRRNLQJ]RQHVPD\EH used to shorten heating-up times. It may be activated by pressing the (+) button over level 7KLVIXQFWLRQERRVWVWKHSRZHUWR:RU: depending on the size of the relevant cooking zone. 7KHDFWLYDWLRQRIRIWKHERRVWHULVVLJQDOOHGE\DEHHS VRXQGDQGWKHOHWWHU¨3©DSSHDULQJRQWKHGLVSOD\ 7KH ERRVWHU ZRUNV IRU PD[ PLQXWHV $IWHU WKHVH minutes a beep sounds and the cooking zone will return to level “9” :LWK WKH KHDWHU DW %RRVWHU OHYHO LI WKH >@ NH\ LV 7RXFKHG DQ HUURU EHHS VRXQGV DQG WKH FRRNVHW GRHVQ©WFKDQJH:LWKWKHKHDWHUDW%RRVWHUOHYHOLIWKH >@NH\LV7RXFKHGDEHHSVRXQGVDQGWKHFRRNVHWLV reduced to 9. Switching off the cooking zones 7RVZLWFKRIIDFRRNLQJ]RQHVHOHFWLWXVLQJWKHFRUUHVSRQGLQJ selector button and: 3UHVVWKHEXWWRQWKHSRZHURIWKHFRRNLQJ]RQHZLOO progressively decrease until it is switched off. 2QFH WKH FRRNLQJ ]RQH LV VHOHFWHG WKH KHDWHU FDQ DOVR EH VZLWFKHG RII E\ WRXFKLQJ WKH >@ DQG >@ NH\V VLPXOWDQHRXVO\$EHHS sounds and the corresponding display shows “0”. Using the Timer ! $OO WKH FRRNLQJ ]RQHV PD\ EH SURJUDPPHG VLPXOWDQHRXVO\IRUDGXUDWLRQEHWZHHQDQGPLQ 1. Select the cooking zone using the corresponding selector button. $GMXVWWKHSRZHUOHYHORIWKHFRRNLQJ]RQH :KHQUHTXLUHGSRZHUOHYHOLVVHOHFWHGWRXFKLQJDJDLQ WKHFRUUHVSRQGLQJKHDWLQJ]RQHVHOHFWRUEXWWRQDEHHS VRXQGVDQGD¨W©OHWWHUZLWKGRWSRLQWDSSHDUVRQWKHKHDWHU GLVSOD\7KHUHPDLQLQJWLPHZLOOEHGLVSOD\HGLQWKHRSSRVLWH SDUWRIWLPHGKHDWHU,IWLPHGKHDWLQJ]RQHLVIRUH[DPSOH LQWKHGRZQSDUWWLPHGWLPHZLOODSSHDULQXSGLVSOD\V 4. Set the cooking duration using the (-) and the(+) buttons 7KH (-) and the(+) buttons touched simultaneously result| in returning to the 0 value. ,IWKHWLPHLVQRWVHOHFWHGEHIRUHVHFRQGVRULIWKH selected time is 0 after 10 seconds the last touch over WKHRUWKHEXWWRQWKHWLPHULVVZLWFKHGRII Starting Timer countdown. 7KHFRXQWGRZQVWDUWVZKHQWKHWLPHUYLVXDOL]DWLRQLV finished touching any cooking zone key or automatically 10 seconds after the last touch over WKH>@RU>@NH\V$EHHSVRXQGVDQGWKHKHDWHU display will show the power level and the dot point showing that the heater is timed. 7RFKDQJHWKHWLPHIRUDWLPHGKHDWHUUHSHDWWKH SURFHVVH[SODLQHGDERYH !Pressing and holding the + and - keys increases the speed of time selection End of Timer countdown. :KHQWKHUHPDLQLQJWLPHKDVUXQRXWWKHWLPHGKHDWHU LVVZLWFKHGRIIWKHKHDWHUGLVSOD\VKRZVDEOLQNLQJ¨© and the timer alarm beeps for one minute 7KHDODUPZLOOEHFDQFHOOHGE\SUHVVLQJDQ\NH\RIWKH touch control. Control panel lock :KHQWKHKRELVVZLWFKHGRQLWLVSRVVLEOHWRORFNWKHRYHQ controls in order to avoid accidental changes being made to WKHVHWWLQJVE\FKLOGUHQGXULQJFOHDQLQJHWF button to lock the control panel: -the icon Press the will illuminate and an audible beep sound will be emmited. 7R XVH DQ\ RI WKH FRQWUROV HJ WR VWRS FRRNLQJ \RX button for must switch off this function. Press the D IHZ PRPHQWV WKH LFRQ ZLOO VWRS LOOXPLQDWLQJ DQG WKH lock function will be removed. $OOWKHNH\VRQWKHFRRNLQJ]RQHVHOHFWLRQZLOOEHORFNHG LIWKHFRRNWRSLVRII if the Control Panel Lock is activated or if an error on a cooktop occurs. 11 GB GB Switching off the hob Press the button to switch off the appliance - do not rely solely on the pan sensor. If the control panel lock has been activated, the controls will continue to be locked even after the hob is switched on again. In order to switch the hob on again, you must first remove the lock function. Practical advice on using the appliance ! Use cookware made from materials which are compatible with the induction principle (ferromagnetic material). We especially recommend pans made from: cast iron, coated steel or special stainless steel adapted for induction. Use a magnet to test the compatibility of the cookware. SUITABLE UNSUITABLE * Cast iron Enamelled steel Special stainless steel Copper, Aluminium, Glass, Earthenware, Ceramic, non magnetic Stainless steel In addition, to obtain the best results from your hob: 8VHSDQVZLWKDWKLFNIODWEDVHLQRUGHUWRIXOO\XWLOLVHWKH cooking zone. $OZD\VXVHSDQVZLWKDGLDPHWHUZKLFKLVODUJHHQRXJK to cover the hotplate fully, in order to use all the available heat. 0DNHVXUHWKDWWKHEDVHRIWKHFRRNZDUHLVDOZD\VFOHDQ and dry, in order to fully utilise and extend the life of both the cooking zones and the cookware. $YRLGXVLQJWKHVDPHFRRNZDUHZKLFKKDVEHHQXVHG on gas burners: the heat concentration on gas burners may distort the base of the pan, causing it not to adhere correctly. Safety devices Pan sensor Each cooking zone is equipped with a pan sensor device. The hotplate only emits heat when a pan with suitable measurements for the cooking zone is placed on it. The “u” sign on the display appears if after selecting the cooking zone the pan is not placed on a heater , or in case of: 12 $QLQFRPSDWLEOHSDQ $SDQZKRVHGLDPHWHULVWRRVPDOO 7KHSDQKDVEHHQUHPRYHGIURPWKHKRWSODWH $IWHUVHFZLWKQRSDQRQWKHKHDWLQJ]RQHDZDUQLQJ beep signal is emmited. $IWHUVHFZLWKQRSDQRQWKHKHDWLQJ]RQHWKHKHDWHU switches off. Overheating protection If the electronic elements overheat, the number signalizing the power level starts flashing, and the letter “c” appears on the display. When the temperature has reached a suitable level, this message disappears and the hob may be used again. Safety switch The appliance has a safety switch which automatically switches the cooking zones off after they have been in operation for a certain amount of time at a particular power level. When the safety switch has been triggered, the display shows “”. For example: the right rear hotplate is set to 5 and will switch off after 5 hours of continuous operation, while the front left hotplate is set to 2 and will switch off after 8 hours. When one or more keys are activated for more than VHFWKHWRXFKFRQWUROVZLWFKHVRII $ZDUQLQJEHHSVRXQGVLVHPPLWHGHYHU\ sec., while the key/s is/are activated. :LWK DOO KHDWHUV DW ]HUR SRZHU GXULQJ VHF WKH Cooktop is switched off. If the switching off is due to an accidental activation of keys, the touch control actuates as above. Buzzer This can also indicate several irregularities: $QREMHFWDSDQFXWOHU\HWFKDVEHHQSODFHGRQWKH FRQWUROSDQHOIRUPRUHWKDQVHFRQGV 6RPHWKLQJKDVEHHQVSLOWRQWKHFRQWUROSDQHO $EXWWRQKDVEHHQSUHVVHGIRUWRRORQJ$OORIWKHDERYH situations may cause the buzzer to sound. Remove the cause of the malfunction to stop the buzzer. If the cause of the problem is not removed, the buzzer will keep sounding and the hob will switch off. Errors and Alarms When an error is detected, the whole appliance or the heater/s are switched off, a beep sounds (only if one or more heaters are active) and all displays show a ‘F’ letter and the error code (an index number or a letter) alternately. If the problem does not disappear by itself, please FRQWDFWWKH7HFKQLFDO6HUYLFH Hobs GB Power level Maximum operating time in hours 1 9 2 8 Back Left I 1200 - B1600 3 7 Back Right I 1500 - B 2000 4 6 Front Left I 1500 - B 2000 Front Right I 1200 - B1600 Total power 7200 5 6 4 7 3 8 2 9 1 Very low-flame cooking Low-flame cooking Medium-flame cooking High-flame cooking Very high-flame cooking 5 ª ¶ ¶ § § S S ¢ ¢ £ ™ ™ ¡ Cooking zone Pressure cooking Pressure cooker Frying Grilling Boiling Crêpes Cooking on a high flame and browning (roasts, steaks, escalopes, fish fillets, fried eggs) Power (W) Fast thickening (liquid juices) Boiling water (pasta, rice, vegetables) Milk Slow thickening (dense juices) Bain-marie cooking Low-flame cooking (stews) Chocolate sauce Pressure cooking after whistle Reheating dishes Keeping food hot 13 Precautions and tips GB ! This appliance has been designed and manufactured in compliance with international safety standards. The following warnings are provided for safety reasons and must be read carefully. General safety • These instructions are only valid for the countries whose symbols appear in the manual and on the serial number plate located on the appliance. • The appliance was designed for domestic use inside the home and is not intended for commercial or industrial use. • The appliance must not be installed outdoors, even in covered areas. It is extremely dangerous to leave the appliance exposed to rain and storms. • Do not touch the appliance while barefoot, or with wet or damp hands and feet. • The appliance must be used by adults only for the preparation of food, in accordance with the instructions outlined in this booklet. Any other use of the appliance (e.g. for heating the room) constitutes improper use and is dangerous. The manufacturer may not be held liable for any damage resulting from improper, incorrect and unreasonable use of the appliance. • The instruction booklet accompanies a class 1 (insulated) or class 2 - subclass 1 (recessed between 2 cupboards) appliance. • Do not touch the heating elements or certain parts of the oven door when the appliance is in use; these parts become extremely hot. Keep children well away from it and do not touch the hot parts yourself. • Make sure that the power supply cables of other electrical appliances do not come into contact with the hot parts of the oven. • The openings used for ventilation and heat dispersal must never be covered. • Do not use unstable or misshapen pans on the cooking zones; this will help to avoid accidental spills. Make sure pan handles are turned towards the centre of the hob in order to avoid accidental burns. • Always use oven gloves when placing cookware in the oven or when removing it. • Do not use flammable liquids (alcohol, petrol, etc...) near the appliance while it is in use. • Do not place flammable material in the lower storage compartment or in the oven itself. If the appliance is switched on accidentally, the materials could catch fire. • Always make sure the knobs are in the o position when the appliance is not in use. 14 • When unplugging the appliance, always pull the plug from the mains socket; do not pull on the cable. • Never perform any cleaning or maintenance work without having disconnected the appliance from the electricity mains. • If the appliance breaks down, under no circumstances should you attempt to perform the repairs yourself. Repairs carried out by inexperienced individuals may cause injury or further malfunctioning of the appliance. Contact the Assistance Service. • Do not rest heavy objects on the open oven door. • The internal surfaces of the compartment (where present) may become hot. • The glass ceramic hob is resistant to mechanical shocks, but it may crack (or even break) if struck with a sharp object such as a utensil. If this happens, disconnect the appliance from the electricity mains immediately and contact a Service Centre. • If the surface of the hob is cracked, switch off the appliance to prevent electric shocks from occurring. • Remember that the cooking zones remain relatively hot for at least thirty minutes after they have been switched off. An indicator light provides a warning when residual heat is present (see Start-up and use). • Keep any object which could melt away from the hob, for example plastic and aluminium objects, or products with a high sugar content. Be especially careful when using plastic film and aluminium foil or packaging: if placed on surfaces which are still hot, they may cause serious damage to the hob. • Always make sure that pan handles are turned towards the centre of the hob in order to avoid accidental burns. • When unplugging the appliance, always pull the plug from the mains socket; do not pull on the cable. • Never perform any cleaning or maintenance work without having disconnected the appliance from the electricity mains. • Do not place metal objects (knives, spoons, pan lids, etc.) on the hob as they may become hot. • The appliance should not be operated by people (including children) with reduced physical, sensory or mental capacities, by inexperienced individuals or by anyone who is not familiar with the product. These individuals should, at the very least, be supervised by someone who assumes responsibility for their safety or receive preliminary instructions relating to the operation of the appliance. • Do not let children play with the appliance. • If the cooker is installed on a pedestal, take all necessary precautions to ensure that the appliance does not slide off this pedestal. • For the attention of wearers of pacemakers or other active implants: The hob complies with all current standards on electromagnetic interference. Your induction hob is therefore perfectly in keeping with legal requirements (89/336/CEE directives). It is designed not to create interference on any other electrical apparatus being used on condition that the apparatus in question also complies with this legislation. Your induction hob generates short-range magnetic fields. To avoid any interference between your induction hob and a pacemaker, the latter must be designed to comply with relevant regulations. In this respect, we can only guarantee our own product conformity. Please consult the pacemaker manufacturer or your doctor concerning its conformity or any possible incompatibility. • After using the hob, switch it off using the corresponding control device; do not rely solely on the pan sensor. • If the cooker is placed on a pedestal, take the necessary precautions to prevent the cooker from sliding off the pedestal itself. Disposal • When disposing of packaging material: observe local legislation so that the packaging may be reused. • The European Directive 2002/96/EC relating to Waste Electrical and Electronic Equipment (WEEE) states that household appliances should not be disposed of using the normal solid urban waste cycle. Exhausted appliances should be collected separately in order to optimise the cost of re-using and recycling the materials inside the machine, while preventing potential damage to the atmosphere and to public health. The crossed-out dustbin is marked on all products to remind the owner of their obligations regarding separated waste collection. For further information relating to the correct disposal of exhausted household appliances, owners may contact the public service provided or their local dealer. GB Respecting and conserving the environment • You can help to reduce the peak load of the electricity supply network companies by using the oven in the hours between late afternoon and the early hours of the morning. The cooking mode programming options, and particularly the “delayed cooking” mode (see Cooking modes), make this possible. • Always keep the oven door closed when using the SPIT ROAST and ROASTING modes. this will achieve improved results while saving energy (approximately 10%). • Check the door seals regularly and wipe them clean to ensure they are free of debris so that they adhere properly to the door, thus avoiding the dispersal of heat. ! This product complies with the requirements of the latest European Directive on the limitation of power consumption of the standby mode. OVEN; If no operations are carried out for a period of 2 minutes, the appliance automatically switches to the “Clock button”. The standby mode is visualised by the low luminosity „Watch Icon”. As soon as interaction with the machine resumes, the system’s operating mode is restored. HOB: If no operations are carried out for a period of 2 minutes, after the residual heat indicator lights turn off and the fan stops (if present), the appliance automatically switches to the “off mode”. The appliance resumes the operating mode once the ON/OFF button is pressed. 15 Care and maintenance GB Switching the appliance off Disconnect your appliance from the electricity supply before carrying out any work on it. Cleaning the oven ! Never use steam cleaners or pressure cleaners on the appliance. • Clean the glass part of the oven door using a sponge and a non-abrasive cleaning product, then dry thoroughly with a soft cloth. Do not use rough abrasive material or sharp metal scrapers as these could scratch the surface and cause the glass to crack. • The stainless steel or enamel-coated external parts and the rubber seals may be cleaned using a sponge which has been soaked in lukewarm water and neutral soap. Use specialised products for the removal of stubborn stains. After cleaning, rinse and dry thoroughly. Do not use abrasive powders or corrosive substances. • The inside of the oven should ideally be cleaned after each use, while it is still lukewarm. Use hot water and detergent, then rinse well and dry with a soft cloth. Do not use abrasive products. • The accessories can be washed like everyday crockery, and are even dishwasher safe. • Dirt and grease should be removed from the control panel using a non-abrasive sponge or a soft cloth. • Stainless steel can be marked by hard water that has been left on the surface for a long time, or by aggressive detergents that contain phosphorus. We recommend that the steel surfaces are rinsed well then dried thoroughly. Inspecting the oven seals Check the door seals around the oven regularly. If the seals are damaged, please contact your nearest Aftersales Service Centre. We recommend that the oven is not used until the seals have been replaced. ! Do not use the oven lamp as/for ambient lighting. Replacing The Oven Light Bulb 1. After disconnecting the oven from the electricity mains, remove the glass lid covering the lamp socket (see figure). 2. Remove the light bulb and replace it with a similar one: voltage 230 V, wattage 25 W, cap E 14. 3. Replace the lid and reconnect the oven to the electricity supply. 16 Cleaning the glass ceramic hob ! Do not use abrasive or corrosive detergents (for example, products in spray cans for cleaning barbecues and ovens), stain removers, anti-rust products, powder detergents or sponges with abrasive surfaces: these may scratch the surface beyond repair. • It is usually sufficient simply to wash the hob using a damp sponge and dry it with absorbent kitchen roll. • If the hob is particularly dirty, rub it with a special glass ceramic cleaning product, then rinse well and dry thoroughly. • To remove more stubborn dirt, use a suitable scraper (this is not supplied with the appliance). Remove spills as soon as possible, without waiting for the appliance to cool, to avoid residues forming crusty deposits. You can obtain excellent results by using a rustproof steel wire sponge - specifically designed for glass ceramic surfaces - soaked in soapy water. • If plastic or sugary substances have accidentally been melted on the hob, remove them immediately with the scraper, while the surface is still hot. • Once it is clean, the hob may be treated with a special protective maintenance product: the invisible film left by this product protects the surface from drips during cooking. This maintenance should be carried out while the appliance is warm (not hot) or cold. • Always remember to rinse the appliance well with clean water and dry it thoroughly: residues can become encrusted during subsequent cooking processes. GB Removing and fitting the oven door: 1.Open the door 2.Make the hinge clamps of the oven door rotate backwards completely (see photo) WARNING! Oven must not be operated with inner door glass removed! WARNING! When reassembling the inner door glass insert the glass panel correctly so that the text written on the panel is not reversed and can be easily legible. 7.Replace the profile, a click will indicate that the part is positioned correctly. 8.Open the door completely. 9.Close the supports (see photo). 3.Close the door until the clamps stop (the door will remain open for 40° approx.) (see photo) 10.Now the door can be completely closed and the oven can be started for normal use. 4.Press the two buttons on the upper profile and extract the profile (see photo) 5.Remove the glass sheet and do the cleaning as indicated in chapter: „Care and maintenance”. 6.Replace the glass. 17 GB ARISTON PRIORITY SERVICE If you are not completely satisfied with your appliance or require service call: Australia Phone: 1300 815 589 New Zealand Phone: (09) 306 1020 GENUINE ACCESSORIES & SPARE PARTS A wide range of genuine accessories are available for your appliance call: Australia Phone: 03 9768 0888 New Zealand Phone: (09) 306 1020 AUSTRALIA ARISIT PTY LIMITED 40-44 Mark Anthony Drive, Dandenong South, VIC 3175, Australia Fax: Service & Sales (03) 9768 0838 Email: [email protected] NEW ZEALAND ARISIT PTY LIMITED PO Box 68-140 Newton, Auckland 1145, New Zealand Fax: (09) 302 0077 Email: [email protected] 18 GB 19 08/2013- 195116249.00 XEROX FABRIANO GB 20