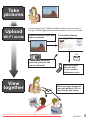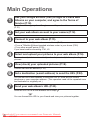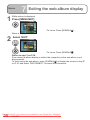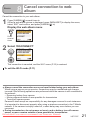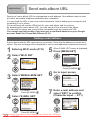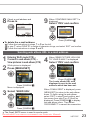
1
Operating Instructions
Digital Camera
Wi-Fi mode
Model No.
DMC-TZ50
Before connecting, operating or adjusting this product, please read the instructions
completely.
For USA assistance, please call: 1-800-211-Pana(7262) or, contact us via the web at: http://www.panasonic.com/contactinfo
P
Downloaded From camera-usermanual.com Panasonic Manuals
VQT1R37-1
FCC RF Exposure Statement
The available scientific evidence does not show that any health problems are associated
with using low power wireless devices. There is no proof, however, that these low power
wireless devices are absolutely safe. Low power wireless devices emit low levels of
radio frequency energy (RF) in the microwave range while being used. Whereas high
levels of RF can produce health effects (by heating tissue), exposure to low-level RF
that does not produce heating effects causes no known adverse health effects. Many
studies of low-level RF exposures have not found any biological effects. Some studies
have suggested that some biological effects might occur, but such findings have not been
confirmed by additional research. DMC-TZ50 has been tested and found to comply with
FCC radiation exposure limits set forth for an uncontrolled equipment and meets the FCC
radio frequency (RF) Exposure Guidelines in Supplement C to OET65. Please refer to the
SAR test report that was uploaded at FCC website. This device should not be co-located
or operated in conjunction with any other antenna or transmitter.
Downloaded From camera-usermanual.com Panasonic Manuals
2
VQT1R37
FCC Note:
This equipment has been tested and
found to comply with the limits for a
Class B digital device, pursuant to
Part 15 of the FCC Rules. These limits
are designed to provide reasonable
protection against harmful interference
in a residential installation. This
equipment generates, uses, and can
radiate radio frequency energy and, if
not installed and used in accordance
with the instructions, may cause harmful
interference to radio communications.
However, there is no guarantee that
interference will not occur in a particular
installation. If this equipment does
cause harmful interference to radio
or television reception, which can be
determined by turning the equipment off
and on, the user is encouraged to try to
correct the interference by one or more
of the following measures:
• Reorient or relocate the receiving
antenna.
• Increase the separation between the
equipment and receiver.
• Connect the equipment into an outlet
on a circuit different from that to which
the receiver is connected.
• Consult the dealer or an experienced
radio/TV technician for help.
Declaration of Conformity
Trade Name:
Panasonic
Model No.:
DMC-TZ50
Responsible party: Panasonic
Corporation of North
America
One Panasonic Way,
Secaucus, NJ 07094
Support Contact: Panasonic Consumer
Electronics Company
1-800-211-PANA (7262)
This device complies with Part 15 of the
FCC Rules. Operation is subject to the
following two conditions: (1) This device
may not cause harmful interference,
and (2) this device must accept any
interference received, including
interference that may cause undesired
operation.
DMC-TZ50
FCC Caution: To assure continued
compliance, follow the
attached installation
instructions and use only
shielded interface cables
with ferrite core when
connecting to computer or
peripheral devices.
Any changes or modifications not
expressly approved by the party
responsible for compliance could void
the user’s authority to operate this
equipment.
Downloaded From camera-usermanual.com Panasonic Manuals
VQT1R37
3
What you can do in Wi-Fi mode
The camera’s wireless LAN communication function that uses Wi-Fi allows you to use
‘Picasa Web Albums’ as web albums and share the pictures you have taken with others.
This camera supports the T-Mobile HotSpot Wi-Fi service. Web albums can also be
accessed using T-Mobile @Home branded wireless router.
Upload pictures to your web album and view with your friends
‘Picasa Web Albums’ is an online photo sharing service provided by Google.
Upload the pictures you have taken to your web album, using your camera’s Wi-Fi mode.
You can share your pictures by sending your web album URL to your friends. You can
also change your web album’s privacy setting on your computer between ‘Only people I
have informed can view (Unlisted)’ and ‘Anyone can view (Public)’. For more details, see
the following website.
http://picasaweb.google.com (correct as of April 2008)
Upload your pictures at home or on the move
You can access ‘Picasa Web Albums’ using any of the following.
Using T-Mobile HotSpot locations around town
T-Mobile HotSpot locations can be found in places such as hotels, bookstores and
airports.
A valid T-Mobile account (user ID and password) is needed for this service (charges
apply).
For more details, see the following website.
http://hotspot.t-mobile.com/ (Address correct as of April 2008)
Using a T-Mobile @Home branded wireless router
Appropriate settings (P.26) will need to be made on your camera.
Depending on the operating conditions, you will need to set the access point in your
camera (P.26). (This function cannot be used in an environment where connection to
the Internet is made using a proxy server.)
Using other access points (home, external)
Appropriate settings (P.30) will need to be made on your camera when you sign up to
other services.
(Contact the appropriate operating companies for details on individual services.)
'Picasa Web Albums' and T-Mobile HotSpot services and/or locations may be altered at
any time without prior notification.
Downloaded From camera-usermanual.com Panasonic Manuals
4
VQT1R37
Take
pictures
Upload
Wi-Fi mode
Send pictures from T-Mobile HotSpot locations around town or
using a T-Mobile @Home branded wireless router in your home.
Send pictures to your web
album (upload).
Picasa Web Albums
URL
Check your uploaded
pictures (pictures can
also be deleted)
View
together
Send your web
album’s URL
to your mobile
telephone or etc.
Add a message and send
your web album’s URL to
your friends and family
Downloaded From camera-usermanual.com Panasonic Manuals
VQT1R37
5
Main Operations
1
Use your Google account (free) to login to Picasa Web
Albums on your computer, and agree to the Terms of
Service (P.12).
You will need to sign up for a Google account if you do not have one already
(P.12).
2
3
Set your web album account to your camera (P.12).
Connect to your web album (P.15).
• From T-Mobile HotSpot locations around town (P.15)
• From a T-Mobile @Home branded wireless router in your home (P.26)
• From other access points (P.30)
If you have trouble connecting: P.41, 43
4
Select and upload your pictures to your web album (P.16).
The number of pixels is automatically reduced (= resized) before uploading the
pictures.
5
View (check) your uploaded pictures (P.18).
Pictures can also be deleted (P.19).
6
Set a destination (e-mail address) to send the URL (P.22).
You can set one e-mail address to send the URL to, such as your mobile
telephone or your computer address. (This operation need not be repeated once
the destination is originally set.)
7
Send your web album’s URL (P.23).
Send the URL to the e-mail address set in step 6 .
You can forward this URL to your friends and view your pictures together.
Downloaded From camera-usermanual.com Panasonic Manuals
6
VQT1R37
Contents
Before use
Main Operations .............................6
Before Using ...................................8
• Wireless LAN function ..................9
Basics
1
2
3
4
5
6
7
8
Wi-Fi mode basic
operations .......................... 10
• Entering Wi-Fi mode ........ 10
• Exiting Wi-Fi mode ..........11
• Character input .................11
Setting up a web album
account ............................... 12
• Obtain a web album
account and login ............ 12
• Make account settings on
your camera..................... 12
Connect to web album ...... 15
Uploading pictures to web
album .................................. 16
View pictures in web
album .................................. 18
Delete pictures from web
album .................................. 19
Exiting the web album
display ................................ 20
Cancel connection to web
album .................................. 21
Applications
1
2
3
4
5
6
7
8
Send web album URL ........ 22
• Setting e-mail address ..... 22
• Sending web album URL
to e-mail address ............. 23
Change size of pictures
to upload ............................ 24
Using T-Mobile @Home
branded wireless router .... 26
• Registering access point .. 26
• Connecting to web album.. 29
Adding or changing access
points .................................. 30
• Registering access point .. 30
• Connecting to web album.. 33
Protecting Wi-Fi mode ...... 34
• Setting Wi-Fi password.... 34
• Changing Wi-Fi password .. 35
• Canceling Wi-Fi password
setting .............................. 36
• Resetting Wi-Fi settings... 37
Updating T-Mobile HotSpot
settings ............................... 38
Automatic connection
settings ............................... 39
Checking the MAC address .. 40
Others
Message displays .........................41
Q&A................................................43
Specifications ...............................45
Index ..............................................47
• T-Mobile and HotSpot and design are federally registered trademarks of Deutsche
Telekom AG.
• Other names, company names, and product names printed in these instructions are
trademarks or registered trademarks of the companies concerned.
Downloaded From camera-usermanual.com Panasonic Manuals
VQT1R37
7
Before Using
Important disclaimers
• Panasonic will in no way be liable for any damages resulting from the abuse, misuse,
modification, disassembly, or repair of the camera by the user, or from its use under
any other abnormal conditions; or liable for any incidental damages resulting from
the use of the camera or from the failure or inability of the camera to operate.
• This camera is not intended to be used in medical equipment, life-support systems,
aircraft traffic control equipment or other equipment, devices and systems which
affect or endanger life. As such, Panasonic will in no way be liable for any damages
resulting from the use of the camera in such equipment, devices or systems.
• The pictures and other data stored in the camera may be changed or lost at such times
when the camera has been operated incorrectly by the user or a third party, when the
camera has been adversely affected by static electricity or other types of noise or when
the camera has been repaired or malfunction has occurred. To protect valuable pictures
and data from unexpected trouble, please read the advice given in ‘Before Using’ (P.8-9).
About this manual
Product illustrations and screens may differ from the actual product.
Operating the cursor buttons
• To select direction
Up▲
The correct
button to press
◄Left
Right► will be shaded
grey and labeled
with ▲▼◄►, as
shown here.
Down▼
• To return to previous screen
Display at bottom Button to
left of screen
press
Be aware of copyrights and image rights
• Pictures taken may not be used without the permission of rights holders except for
individual enjoyment.
• The taking of pictures even for personal usage may be subject to restrictions in some cases.
• Recording and making available images of another person’s appearance without
their consent may be a violation of their image rights.
Personal information management and disclaimer
• To protect your personal information, using ‘Setting Wi-Fi password’ (P.34) is recommended.
• Always keep a copy of important information. (There is a space for writing memos on
the reverse of this manual.)
Information containing personal information, such as wireless LAN connection settings,
which has been registered or set to the product by the user, may be altered or lost through
erroneous operation, static electricity, accidents, faults, repairs, or other modes of handling.
Panasonic shall accept no responsibility for any direct or indirect damage or financial loss
resulting from the alteration or loss of such information through no fault of its own.
• When requesting repair, always take a copy of your personal information and
then delete the information.
Downloaded From camera-usermanual.com Panasonic Manuals
8
VQT1R37
• Always delete personal information before relinquishing/disposing of this product.
When requesting repair or relinquishing/disposing of this product, always delete
personal information, such as wireless LAN connection settings, which has been
registered or set to the product by the user, by performing a ‘RESET Wi-Fi SET’ from
‘Wi-Fi SET’, or a ‘RESET Wi-Fi SET’ from the Setup Menu.
(Selecting from setup menu: Set mode dial to anything other than Wi-Fi mode → press [MENU/SET] →select tab)
• No compensation shall be paid in the event of damage resulting from theft or loss.
Panasonic shall accept no responsibility for any demands for connection charge payment or other
damage caused by illegal third party access to non-protected wireless LANs, or for any damage
caused by illegal usage of e-mail addresses set to the product, which results from this product
being lost or stolen. In these cases, contact your communications service provider immediately.
This product may not be exported to or brought into countries subject to
United States export embargoes*
This product contains American-originating encryption software and is therefore subject to U.S. Export
Administration Regulations (EAR). (* Cuba, Iran, Iraq, Libya, etc. (correct as of February 2008))
Wireless LAN function
Using this product as a wireless LAN device
When using in devices or computer systems requiring a higher level of reliability than
wireless LAN devices, ensure that sufficient and appropriate measures are taken to
ensure safety and prevent damage to the system.
Panasonic shall accept no responsibility for any damage caused when using this
product for purposes other than as a wireless LAN device.
This wireless LAN function is designed for use in the United States
This product’s wireless LAN function is designed for use in the United States, and cannot be used outside of the
country. Attempting to use this function outside of the United States may violate related national regulations, for
which Panasonic shall accept no responsibility. (Other functions may be used in other countries.)
Data transmitted wirelessly may be intercepted
Be aware that data transmitted wirelessly may be intercepted by third parties.
Do not use in locations where interference from magnetic fields, static
electricity, or electromagnetic waves is likely
• Do not use in locations where interference from magnetic fields, static electricity, or electromagnetic
waves is likely, such as close to microwave ovens. Wireless connection may be lost.
• When using this product close to other products using frequencies of around 2.4
GHz, both products may suffer a drop in processing speed.
Do not use with wireless networks for which you do not have usage authority
This product automatically searches for wireless network environments when the
wireless LAN function is used. Do not connect to any wireless networks (SSID) displayed
for which you do not have usage authority, as this may be considered illegal access.
SSID: This refers to the name used by the wireless LAN to identify a specific network.
Communication is possible when the equipment at both ends have the same SSID.
Downloaded From camera-usermanual.com Panasonic Manuals
VQT1R37
9
Basics
1 Wi-Fi mode basic operations
This page explains how to enter and exit Wi-Fi mode, and how to input characters.
When using Wi-Fi mode, use a sufficiently charged battery. If you are using the
camera at home, for instance, use of the AC adapter (DMW-AC5PP, sold separately)
is recommended.
Entering Wi-Fi mode
1
Turn on the power
3
Set to
4
When ‘ENTER Wi-Fi MODE’ is
displayed
(Operation display lamp illuminated
for approx. 1 sec)
2
Set to
(play)
Press [MENU/SET]
Wi-Fi mode opens after the Wi-Fi
logo is displayed. Then Wi-Fi menu is
displayed.
When Wi-Fi mode is protected by a password:
When the ‘PLEASE INPUT Wi-Fi PASSWORD’ message has appeared after step 4
Press [MENU/SET].
Enter the Wi-Fi password which you have set (P.34), and select ‘EXIT’ to confirm.
(Character input → P.11)
Downloaded From camera-usermanual.com Panasonic Manuals
10
VQT1R37
Exiting Wi-Fi mode
1
Set to any mode other
than
2
When ‘EXIT Wi-Fi MODE’ is displayed
Press [MENU/SET]
Wi-Fi mode closes.
3
Turn off the power
Character input
Use the following method to input information such as accounts, passwords, and e-mail addresses into your camera.
Press
several times to scroll through the types of
characters
(
lower/upper case alphabet,
symbols/numbers)
Select character with
(repeat)
Select ‘EXIT’ with
and press
and press
to confirm
to confirm
• The maximum number of characters you can enter will vary with each function you are configuring.
• When inputting passwords, characters are shown as ‘******’.
• Using
, the input position cursor can be moved or characters can be scrolled
when there are many characters.
Downloaded From camera-usermanual.com Panasonic Manuals
VQT1R37
11
Basics
2 Setting up a web album account
Information
First of all, use a Google Gmail account to login to Picasa Web
Albums and agree to the Terms of Service (see below). Without
this agreement, you cannot use web albums.
Obtain a web album account and login
• Before you begin you’ll need to have a Google Gmail account. If you don’t already have
one, visit www.gmail.com and create an account; it’s free!
• Next, you’ll need to associate this account with a Picasa Web Album account; this is
also free! To do so, simply click on the ‘Photos’ link on the Gmail web page.
Alternatively, access http://picasaweb.google.com and login to Picasa Web Albums
using your Gmail address and password.
• Finally, you’ll also need to agree to the Terms of Service agreement. Without this
agreement, you cannot use the web album function.
Make a note of the ‘Email’ and ‘Password’ of your Google account for Picasa Web
Albums, as these will be required when making settings on your camera. (There is a
space for writing memos on the reverse of this manual.)
*
You cannot use the ‘Send web album URL’ function (P.23) if you have set a nonGmail address as your Google account ‘Email’ for Picasa Web Albums.
These details and services are correct as of April 2008 and may be altered without prior notice.
URLs are correct as of April 2008.
For information on how to use Picasa Web Albums, please view the Picasa Web Albums website.
Make account settings on your camera
Input your web album ‘Account’ into your camera.
Please note that the e-mail addresses and passwords are case sensitive. They
must be entered exactly as you created the account, or your camera's Wi-Fi
function may not work correctly. Also, do not input ‘spaces’ where they don't exist.
1
2
Entering Wi-Fi mode (P.10)
Select ‘Wi-Fi SET’
Downloaded From camera-usermanual.com Panasonic Manuals
12
VQT1R37
3
Select ‘WEB ALBUM SET’
• To return: Press [Q.MENU/ ]
4
Select ‘LOGIN SET’
• To return: Press [Q.MENU/ ]
5
When LOGIN SET screen is displayed
Press [MENU/SET]
• To return: Press [Q.MENU/ ]
6
Go to input screen
• To return: Press ◄
7
Input login ID (e-mail address) and select ‘EXIT’ to confirm
(Character input → P.11)
Downloaded From camera-usermanual.com Panasonic Manuals
VQT1R37
13
Basics
8
2
Setting up a web album
account (Continued)
Check login ID (e-mail address)
Press ►
• To return: Press ◄
9
Go to input screen
• To return: Press ◄
10
Enter password and select ‘EXIT’ to confirm
(Character input → P.11)
11
Press ►
• To return: Press ◄
12
When ‘CONFIRM LOGIN SET?’ is displayed
Select ‘YES’ and confirm
• To return: Press [Q.MENU/ ]
Account settings are complete.
Downloaded From camera-usermanual.com Panasonic Manuals
14
VQT1R37
Basics
3 Connect to web album
This page explains how to connect to your web album using T-Mobile HotSpot locations (P.4).
See http://hotspot.t-mobile.com (correct as of April 2008) for a list of T-Mobile HotSpot locations.
See P.26 if using a T-Mobile @Home branded wireless router, or P.30 if adding or
changing access points.
1
2
Entering Wi-Fi mode (P.10)
Select ‘WEB ALBUM’
Wi-Fi menu
The T-Mobile HotSpot (tmobile) already registered at the time of purchase is displayed.
3
Select ‘tmobile’
The signal strength is displayed.
Out of service area Weak
Strong
The signal strength display reflects the strength status when
the access point was detected: as such, it may not reflect the
current strength. To check the current signal strength, press
[DISPLAY], and search the access point again. (Communication
may take longer if the signal strength is weak.)
• To return: Press [Q.MENU/ ]
Displays
signal
strength
during
connection
*
When using public
wireless LAN only
Connection is made with your web album, and the web album menu (P.16) is
displayed.
During transmission, do not remove or insert card or battery, turn off camera
power, or move camera outside of area possible for transmission.
If you cannot connect with your album, the signal strength may be weak, the user ID
for the access point may have expired or some other such factor may be to blame. For
details, refer to ‘Message displays’ (P.41) or ‘Q&A’ (P.43).
To disconnect (P.21)
Downloaded From camera-usermanual.com Panasonic Manuals
VQT1R37
15
Basics
4
Uploading pictures to web
album
Send pictures from your camera to your web album. You can upload pictures individually
or several at a time. Motion pictures and clipboard pictures cannot be uploaded.
Images uploaded to your web album can be displayed and deleted with your camera.
Always make back-ups of important pictures.
1
2
Entering Wi-Fi mode (P.10) → Connect to web album (P.15)
Select ‘UPLOAD TO WEB ALBUM’
WEB ALBUM menu
LUMIX ALBUMS numbered from 1 to 5 will be
created automatically. LUMIX ALBUM is the
name of the web albums your camera will use
for ‘UPLOAD TO WEB ALBUM’ and ‘DISPLAY
WEB ALBUM’. We recommend not changing the
names of these web albums with your computer,
as doing so would make them no longer able to
be recognized by your camera.
3
Select LUMIX ALBUM to upload
4
Select ‘SINGLE SELECT’ or ‘MULTI SELECT’
(Unlisted): Only users who have been told
of the LUMIX ALBUM URL can
browse your pictures.
(Public): Even users who do not know the
LUMIX ALBUM URL can browse
your pictures.
• Disclosure settings cannot be changed via the
camera. Make settings via your computer.
• To return: Press [Q.MENU/ ]
• To return: Press [Q.MENU/ ]
Next, select the pictures to be uploaded.
Time required for sending (approximate) (P.25)
Image sizes are reduced before sending (P.24). However, pictures which have ‘TEXT
STAMP’ will not be reduced.
When using pictures with audio and pictures with ‘TITLE EDIT’ or DPOF settings made
with the camera, only the basic original pictures can be sent. (Pictures with ‘TEXT
STAMPS’ will be sent with the stamped text included.)
Downloaded From camera-usermanual.com Panasonic Manuals
16
VQT1R37
SINGLE SELECT
5
Select picture and confirm
Destination Lumix album name
MULTI SELECT (up to 10)
5
Select picture and confirm
Destination Lumix album name
• To return: Press [Q.MENU/ ]
6
Indicates picture is selected
• Repeat this operation to select
multiple pictures.
• To return: Press [Q.MENU/ ]
When ‘UPLOAD THIS PICTURE?’ is
displayed
Select ‘YES’ and confirm
6
7
When selection is complete
Press [MENU/SET]
When ‘UPLOAD # PICTURES TO
WEB ALBUM?’ is displayed
Select ‘YES’ and confirm
• To return: Press [Q.MENU/ ]
• To cancel during sending:
Press [MENU/SET]
• To return: Press [Q.MENU/ ]
• To cancel during sending:
Press [MENU/SET]
Pictures will be sent to your Lumix album
If [MENU/SET] is pressed when ‘UPLOAD COMPLETED’ is displayed, the screen in
step 4 on the left is restored. To finish using the web album, press [Q.MENU/ ] twice to
display the screen in step 2, and select ‘DISCONNECT’ to cancel the connection.
Depending on the signal strength, it may not be possible to complete the uploading.
Pictures taken with other cameras may not be able to be sent, even if they are viewable on this camera.
It may not be possible to upload pictures if they have been edited or processed using a personal computer.
Uploaded pictures may also be checked on your computer.
‘AUTO LCD OFF’ will not operate in Wi-Fi mode.
In addition, ‘POWER SAVE’ will not operate during connection to access points (e.g.
when sending pictures) or during text input.
Downloaded From camera-usermanual.com Panasonic Manuals
VQT1R37
17
Basics
5 View pictures in web album
Pictures uploaded to your web album can be viewed on your camera.
1
2
Entering Wi-Fi mode (P.10)→Connect to web album (P.15)
Select ‘DISPLAY WEB ALBUM’
LUMIX ALBUMS numbered from 1 to 5 will be
created automatically. (P.16)
WEB ALBUM menu
3
Select the LUMIX ALBUM you wish to view
4
Picture is displayed
(Unlisted): Only individuals who have been told of the
LUMIX ALBUM URL can browse your pictures.
(Public): Even individuals who do not know the LUMIX
ALBUM URL can browse your pictures.
• Disclosure settings cannot be changed via the
camera. Make settings via your computer.
• To return: Press [Q.MENU/ ]
Lumix album name
Indicates Lumix album picture
Current picture/total pictures in
Lumix album
Displays the most recently uploaded picture (only one picture can be displayed at a time).
Previous picture
Next picture
• To scroll quickly: Only picture numbers will scroll when holding down ◄ or ►
- release button when desired picture number is reached.
• Delete information on screen:
Press
Canceled when the open Lumix album is
closed.
In some cases, only pictures taken with this camera may be viewable.
Downloaded From camera-usermanual.com Panasonic Manuals
18
VQT1R37
Basics
6
Delete pictures from web
album
You can use your camera to delete pictures uploaded to your web album.
(Example screen illustrating case where e-mail address settings (P.22) have already been
made.)
1
2
Entering Wi-Fi mode (P.10)→Connect to web album (P.15)→
View pictures in web album (P.18)
While the picture to be deleted is displayed
Press [MENU/SET]
• To return: Press [Q.MENU/ ]
Menu is displayed.
3
Select ‘DELETE PICTURE’
• To return: Press [Q.MENU/ ]
4
When ‘DELETE PICTURE FROM WEB ALBUM?’ is displayed
Select ‘YES’ and confirm
• To return: Press [Q.MENU/ ]
Pictures will be deleted from your web album.
Press [MENU/SET] when ‘PICTURE DELETED’ is displayed to return to picture
displays. To finish using the web album, select ‘EXIT’ in step 2 and confirm, and the
screen from step 3 on P.18 will be displayed. Press [Q.MENU/ ] to display the web
album menu. Then select ‘DISCONNECT’ to cancel the connection.
Only one picture can be deleted at a time. Use your personal computer to delete
groups of pictures.
The pictures inside the camera are not deleted.
Downloaded From camera-usermanual.com Panasonic Manuals
VQT1R37
19
Basics
1
7 Exiting the web album display
While picture is displayed
Press [MENU/SET]
• To return: Press [Q.MENU/ ]
Menu is displayed.
2
Select ‘EXIT’
• To return: Press [Q.MENU/ ]
Return to step 3 on P.18.
Even when the album display is exited, the connection to the web album is not
disconnected.
To finish using the web album, press [Q.MENU/ ] to display the screen in step 2
on P.18, and select ‘DISCONNECT’ to cancel the connection.
Downloaded From camera-usermanual.com Panasonic Manuals
20
VQT1R37
Basics
8
Cancel connection to web
album
Cancel the connection to your web album.
1
Press [Q.MENU/ ] several times to
(When a web album picture is displayed, press [MENU/SET] to display the menu,
select ‘EXIT’ and confirm, and press [Q.MENU/ ] to)
Display the web album menu
Press
several
times
2
WEB ALBUM menu
Select ‘DISCONNECT’
The connection is canceled, and the Wi-Fi menu (P.15) is restored.
To exit the Wi-Fi mode (P.11)
Always cancel the connection once you have finished using your web album.
When using a pay-as-you-go service, connections may be maintained and charges
incurred if the following operations are performed while the camera is still connected to
the network.
• Removing battery from camera
• Moving camera outside of area possible for transmission
• Turning off camera power
Panasonic shall accept no responsibility for any damages occurred in such instances.
It is important to disconnect properly after using a wireless connection to the T-Mobile
network. If the camera is simply turned off, a short delay may occur before you can
reconnect.
During transmission, do not remove or insert card or battery, turn off camera
power, or move camera outside of area possible for transmission.
Downloaded From camera-usermanual.com Panasonic Manuals
VQT1R37
21
Applications
1 Send web album URL
Send your Lumix album URL to a designated e-mail address. One address may be used
at a time, but mobile telephone addresses are compatible.
You can send the URL to your own mobile telephone, before adding your comments and
forwarding it on to others.
The e-mail sent will contain URLs both for your web album and for pictures.
By accessing the Lumix album URL, you can see all of the pictures in the album.
You can also let others see your pictures immediately just by sending the URL.
You cannot use this function if you have set a non-Gmail address as your Google
account ‘Email’ for Picasa Web Albums (P.12).
Setting e-mail address
Anyone that knows the URL can browse your pictures. Check that the address you have set is
correct. (No error messages will be displayed or sent if e-mail addresses entered are incorrect.)
1
2
Entering Wi-Fi mode (P.10)
5
When E-MAIL SET screen is displayed
Press [MENU/SET]
Select ‘Wi-Fi SET’
• To return:
Press [Q.MENU/ ]
3
Select ‘WEB ALBUM SET’
6
Go to input screen
• To return: Press ◄
• To return:
Press [Q.MENU/ ]
4
Select ‘E-MAIL SET’
• To return:
Press [Q.MENU/ ]
7
Enter e-mail address and
select ‘EXIT’ to confirm
(Character input → P.11)
Downloaded From camera-usermanual.com Panasonic Manuals
22
VQT1R37
8
Check e-mail address and
Press ►
9
When ‘CONFIRM E-MAIL SET?’ is
displayed
Select ‘YES’ and confirm
• To return: Press ◄
• To return:
Press [Q.MENU/ ]
To delete the e-mail address
Follow the instructions in steps 1 to 6 on the left.
In step 7, select ‘DELETE’ to delete all character strings, and select ‘EXIT’ and confirm.
Follow the instructions in steps 8 and 9.
Sending web album URL to e-mail address
1
2
Entering Wi-Fi mode (P.10)→
Connect to web album (P.15)→
View pictures in web album (P.18)
4
Select ‘YES’ and confirm
While picture is displayed
Press [MENU/SET]
• To return:
Press [Q.MENU/ ]
The Lumix album URL now
displayed is sent to the mail
address which has been set.
• To return:
Press [Q.MENU/ ]
Menu is displayed.
3
When ‘SEND PICTURE URL LINK
TO YOUR E-MAIL?’ is displayed
Select ‘SEND URL’
• To return:
Press [Q.MENU/ ]
When ‘E-MAIL SENT’ is displayed, press
[MENU/SET] to return to the web album
menu. To finish using the web album,
select ‘EXIT’ in step 2 and confirm, and
the screen from step 3 on P.18 will be
displayed. Press [Q.MENU/ ] to display
the web album menu. Then select
‘DISCONNECT’ to cancel the connection.
The Gmail SMTP server is used to send e-mails.
Downloaded From camera-usermanual.com Panasonic Manuals
VQT1R37
23
Applications
2
Change size of pictures to
upload
Reduce the size of any large pictures before sending, as it will take longer to send large
pictures to your web album.
With the default settings, pictures with 4:3 aspect ratios are reduced to 3M, 3:2 to 2.5M,
and 16:9 to 2M before sending.
1
2
3
Entering Wi-Fi mode (P.10)
Select ‘RESIZE’ or
‘ORIGINAL’
Select ‘Wi-Fi SET’
Select ‘WEB ALBUM SET’
• To return:
Press [Q.MENU/ ]
4
5
Select ‘PICTURE SIZE SET’
• To return:
Press [Q.MENU/ ]
• To return:
Press [Q.MENU/ ]
‘RESIZE’ : Reduce picture size
‘ORIGINAL’ : Send in original size
6
(When ‘RESIZE’ selected)
Select size and confirm
• To return:
Press [Q.MENU/ ]
Pictures of larger sizes will be
reduced to the selected size before
sending.
Pictures of smaller sizes than that
selected will not be resized.
(Pictures which have ‘TEXT STAMP’
will not be reduced.)
Downloaded From camera-usermanual.com Panasonic Manuals
24
VQT1R37
Time required to send one picture (estimated) (unit: second)
Size of pictures when they are uploaded
Size of pictures when
they are shot (4:3)
7M
5M
3M
2M
9M
40 - 60
7M
–
5M
–
–
3M
–
–
–
2M
–
–
–
–
0.3M
–
–
–
–
Size of pictures when
they are shot (3:2)
6M
4.5M
2.5M
ORIGINAL
8.5M
35 - 55
35 - 50
30 - 45
ORIGINAL
40 - 70
25 - 40
20 - 30
40 - 60
15 - 20
35 - 50
25 - 40
20 - 30
–
15 - 20
35 - 60
6M
–
4.5M
–
–
2.5M
–
–
–
30 - 40
Size of pictures when
they are shot (16:9)
5.5M
3.5M
2M
ORIGINAL
7.5M
30 - 50
5.5M
–
3.5M
–
–
2M
–
–
30 - 40
0.3M
30 - 40
35 - 55
30 - 45
35 - 55
25 - 30
30 - 50
30 - 40
–
25 - 30
• The signal strength affects the time it takes to send pictures. Encryption settings may
make connection slower.
• Normally, a picture size of 2M to 3M is recommended.
• Depending on connection conditions, sending ten pictures will take approximately ten
times as long. (Approx. 3-7 mins for ten 2-3M pictures)
Estimated maximum battery life (when sending pictures continuously with a fully
charged battery):
Approx. 180 min
Battery life is affected by signal reception, usage conditions, and usage environment.
Battery life may be particularly reduced when using in cold climates.
Even when you have resized and uploaded pictures, the sizes of the original pictures
inside the camera will remain unchanged.
Downloaded From camera-usermanual.com Panasonic Manuals
VQT1R37
25
Applications
3
Using T-Mobile @Home
branded wireless router
Connect to your web album using a T-Mobile @Home branded wireless router.
Read your router’s operating instructions thoroughly.
Registering access point
Get Security Key (using secure button of T-Mobile @Home branded wireless router)
1
2
3
4
Entering Wi-Fi mode (P.10)
Select ‘Wi-Fi SET’
Select ‘ACCESS POINT
SET’
• To return:
Press [Q.MENU/ ]
5
6
7
Select ‘T-Mobile @Home’
• To return:
Press [Q.MENU/ ]
Select ‘Get Security Key’
• To return:
Press [Q.MENU/ ]
After pressing secure button of T-Mobile
@Home branded wireless router
Press ►
Select ‘T-Mobile ACCESS
POINT’
• To return:
Press [Q.MENU/ ]
8
• To return: Press ◄
When ‘COMPLETED T-Mobile @
Home SETTING’ is displayed
Press [MENU/SET]
Access point is registered.
Downloaded From camera-usermanual.com Panasonic Manuals
26
VQT1R37
If Get Security Key does not work
After step 7 on left
8
Press [MENU/SET]
11
After pressing secure button of
T-Mobile @Home branded wireless
router
Press ►
Begins scanning access points.
9
When ‘SELECT THE T-Mobile @
Home ACCESS POINT’ is displayed
Press ►
• To return: Press ◄
12
When ‘COMPLETED T-Mobile @
Home SETTING’ is displayed
Press [MENU/SET]
• To return: Press ◄
10
Select desired access point
Access point is registered.
• To return: Press ◄
Downloaded From camera-usermanual.com Panasonic Manuals
VQT1R37
27
Applications
3
Using T-Mobile @Home
branded wireless router (Continued)
MANUAL SET
After steps 1-5 on P.26
6
Select ‘MANUAL SET’
7
When ‘SET THIS ACCESS POINT’ is
displayed
Press ►
Skip to step 11 if no encryption has
been set.
8
Go to input screen
9
Enter encryption key and
select ‘EXIT’ to confirm
(Character input → P.11)
10
Press ►
• To return: Press ◄
11
When ‘REGISTER SETTINGS?’ is
displayed
Select ‘YES’
• To return: Press ◄
• To return:
Press [Q.MENU/ ]
Access point is registered.
Downloaded From camera-usermanual.com Panasonic Manuals
28
VQT1R37
Connecting to web album
Perform steps 1-2 on P.15
Select desired access point in step 3 on P.15
Downloaded From camera-usermanual.com Panasonic Manuals
VQT1R37
29
Applications
4
Adding or changing access
points
Public LAN access points may be added, but please note that successful internet
connection with this camera via non-T-Mobile services cannot be guaranteed.
When using a wireless LAN router, please use one that is compliant with either the IEEE
802.11g or the IEEE 802.11b standard.
First, register your access point, then select it from the list to connect.
For information security reasons, we strongly recommend making encryption settings on your router
when using a home wireless LAN. Fixed IP address settings cannot be made on the camera itself.
Registering access point
You can register up to eight access points, including the ‘tmobile’ which comes preset.
Depending on the setting of the access point used, the screen requiring no settings may
not be displayed.
Check with your provider or network administrator if you do not know the ‘SSID’ (network
name), ‘network certification’ or ‘encryption key.’
1
2
3
Entering Wi-Fi mode (P.10)
Signal strength (P.15)
Select ‘Wi-Fi SET’
Select ‘ACCESS POINT SET’
• To return:
Press [Q.MENU/ ]
4
5
Selecting an access point
Select ‘OTHER ACCESS POINT’
• To return:
Press [Q.MENU/ ]
Unregistered
Registered
(PUBLIC
Wi-Fi LAN)
(HOME
Wi-Fi LAN)
• To return: Press ◄
• To scan again:
Press [DISPLAY]
• To change page:
Turn zoom lever
If the access point to be registered
on the list is not displayed, select
MANUAL INPUT.’
‘
• The signal strength display reflects
the strength status when the access
point was detected: as such, it may
not reflect the current strength. To
check the current signal strength,
press [DISPLAY], and search the
access point again.
Downloaded From camera-usermanual.com Panasonic Manuals
30
VQT1R37
6
Select access point type
• To return: Press [Q.MENU/ ]
7
If the displayed SSID (network name) is correct
Press ►
When ‘MANUAL INPUT’ has been selected,
press [MENU/SET], input SSID (up to 32 singlebyte alphanumerics), and select ‘EXIT’ and
confirm. (Character input → P.11) Press ► to
proceed to step 8.
• To return: Press ◄
Go to step 10 if selecting a unregistered access point.
8
Select network certificate type
(Only displayed when ‘MANUAL INPUT’ or registered access point selected)
• To return: Press [Q.MENU/ ]
Network certification : Certification system for wireless LAN access
points
Encryption scheme : This is the system for encrypting the data. The
system which can be set will depend on the
network certification setting.
Network certificate
Available encryption scheme
OPEN
WITHOUT ENCRYPTION, or WEP
SHARED KEY
WEP
WPA-PSK
AES / TKIP
WPA2-PSK
AES / TKIP
When using a ‘PUBLIC Wi-Fi LAN’, select the settings supplied by the
provider you are using for the ‘network certification,’ ‘encryption scheme’
and ‘encryption key’ settings; when using of a ‘HOME Wi-Fi LAN’, select
the same settings as the wireless LAN router settings.
Downloaded From camera-usermanual.com Panasonic Manuals
VQT1R37
31
Applications
9
4
Adding or changing access
points (Continued)
Select encryption scheme
(Only displayed when ‘MANUAL
INPUT’ or registered access point
selected)
12
Press ►
• To return: Press ◄
(Screen displayed if ‘OPEN’
selected in step 8)
• To return:
Press [Q.MENU/ ]
10
Go to input screen
When selecting ‘HOME Wi-Fi LAN’
in step 6
When ‘REGISTER SETTINGS?’ is
displayed
Select ‘YES’ and confirm
• To return: Press ◄
• Steps 10-12 are skipped if
‘WITHOUT ENCRYPTION’ is
selected in step 9.
11
13
Enter encryption key and
select ‘EXIT’ to confirm
(Character input → P.11)
• To return:
Press [Q.MENU/ ]
Access point is registered.
Finish at step 13.
When selecting ‘PUBLIC Wi-Fi
LAN’ in step 6
Go to input screen
• If ‘EXIT’ cannot be selected,
the number of characters in the
encryption scheme and encryption
key may not match. Input the
characters correctly.
• To return: Press ◄
Go to step 14.
Downloaded From camera-usermanual.com Panasonic Manuals
32
VQT1R37
14
Enter user ID and select
‘EXIT’ to confirm
(Character input → P.11)
15
Check user ID and
Press ►
17
Enter password and select
‘EXIT’ to confirm
(Character input → P.11)
18
Press ►
• To return: Press ◄
• To return: Press ◄
16
Go to input screen
19
When ‘REGISTER SETTINGS?’ is
displayed
Select ‘YES’ and confirm
• To return: Press ◄
• To return:
Press [Q.MENU/ ]
Access point is registered.
To delete an access point which has been registered
Follow the instructions in steps 1 to 4 on P.30.
In step 5, select the access point to be deleted using ▲ and ▼
Press [Q.MENU/ ]
When ‘CANCEL A REGISTRATION?’ is displayed, select ‘YES’ using ▲, and then
press [MENU/SET].
Connecting to web album
Perform steps 1-2 on P.15
Select desired access point in step 3 on P.15
Downloaded From camera-usermanual.com Panasonic Manuals
VQT1R37
33
Applications
5 Protecting Wi-Fi mode
Setting a password is recommended, to avoid Wi-Fi usage through erroneous
operation or by third parties, and to protect your personal information.
Always reset Wi-Fi settings when relinquishing or disposing of your camera, so that your
personal information is not used by others.
Setting Wi-Fi password
Make password entry necessary when entering Wi-Fi mode. Any password consisting of
1 to 16 characters can be set.
1
2
3
Entering Wi-Fi mode (P.10)
Select ‘Wi-Fi PASSWORD
SET’
Select ‘SET PASSWORD’
• To return:
Press [Q.MENU/ ]
4
5
When ‘INPUT NEW PASSWORD’ is
displayed
Press [MENU/SET]
6
Enter password and select
‘EXIT’ to confirm
(Character input → P.11)
When ‘INPUT NEW PASSWORD
AGAIN’ is displayed
Press [MENU/SET]
75
Enter the password in step
again, and select ‘EXIT’
and confirm.
(Character input → P.11)
• If ‘WRONG PASSWORD’ is
displayed, press [MENU/SET], and
repeat the operation from step 4.
Downloaded From camera-usermanual.com Panasonic Manuals
34
VQT1R37
8
When ‘Wi-Fi PASSWORD SET’ is displayed
Press [MENU/SET]
Password is set.
Always make a note of your password. If you forget your password, you can reset it
by performing a ‘RESET Wi-Fi SET’ from the Setup Menu, but doing this will also reset
all information set by the user in Wi-Fi mode, including for access points other than
‘tmobile’ and for web album login (user ID, passwords, etc.). (‘tmobile’ settings will be
reset to default.)
(Selecting from setup menu: Set mode dial to anything other than Wi-Fi mode → press
[MENU/SET] →select tab)
Changing Wi-Fi password
Change your current password.
After steps 1-3 on left
When ‘INPUT CURRENT PASSWORD’ is displayed
Press [MENU/SET]
Enter the current password, select ‘EXIT’ and confirm, and then proceed with operation
from step 4 on left.
To enter Wi-Fi mode with password protection (P.10)
Downloaded From camera-usermanual.com Panasonic Manuals
VQT1R37
35
Applications
5 Protecting Wi-Fi mode
(Continued)
Canceling Wi-Fi password setting
After step1 and 2 on P.34
3
Select ‘CANCEL PASSWORD’
• To return: Press [Q.MENU/ ]
4
5
6
When ‘INPUT CURRENT PASSWORD’ is displayed
Press [MENU/SET]
Enter current password and select ‘EXIT’ to confirm
(Character input → P.11)
When ‘Wi-Fi PASSWORD CANCELED’ is displayed
Press [MENU/SET]
The Wi-Fi password is released, and the Wi-Fi menu screen is restored.
Downloaded From camera-usermanual.com Panasonic Manuals
36
VQT1R37
Resetting Wi-Fi settings
Reset Wi-Fi settings from your camera. ‘Wi-Fi settings’ refers to all information set by the
user in Wi-Fi mode.
Always reset Wi-Fi settings before relinquishing or disposing of your camera to
ensure that your personal information is not erroneously used by others.
When requesting repair, always take a copy of your personal information and then
reset Wi-Fi settings. (There is a space for writing memos on the reverse of this
manual.)
1
2
Entering Wi-Fi mode (P.10)
4
When ‘DELETE ALL Wi-Fi RELATED
DATA FOR THIS CAMERA?’ is
displayed
Select ‘YES’ and confirm
Select ‘Wi-Fi SET’
• To return:
Press [Q.MENU/ ]
3
Select ‘RESET Wi-Fi SET’
5
When ‘ALL Wi-Fi RELATED DATA
HAS BEEN RESET FOR CAMERA’
is displayed
Press [MENU/SET]
• To return:
Press [Q.MENU/ ]
All information set by the user in Wi-Fi mode, including for access points other than
‘tmobile’ and for web album login (user ID, passwords, etc.), will also be reset. (‘tmobile’
settings will be reset to default.)
Downloaded From camera-usermanual.com Panasonic Manuals
VQT1R37
37
Applications
6
Updating T-Mobile HotSpot
settings
When your complimentary access to T-Mobile HotSpot ends, to continue to upload photos
from T-Mobile HotSpot locations you will need to purchase a T-Mobile HotSpot account
and update the account settings in your camera with this new account information.
Always take a copy of the information for T-Mobile HotSpot accounts you have
purchased, as this will need to be re-inputted after repairs. (There is a space for
writing memos on the reverse of this manual.)
Please note that the user IDs and passwords are case sensitive. They must be
entered exactly as you created the account, or your camera's Wi-Fi function may
not work correctly. Also, do not input ‘spaces’ where they don't exist.
Perform steps 1 - 3 on P.30
4
Select ‘T-Mobile ACCESS POINT’
8
Check user ID and
Press ►
• To return: Press [Q.MENU/ ]
5
Select ‘T-Mobile HotSpot’
• To return: Press [Q.MENU/ ]
6
Go to input screen
• To return: Press ◄
9
Go to input screen
• To return: Press ◄
10
11
Enter password and select
‘EXIT’ to confirm
(Character input → P.11)
12
When ‘REGISTER SETTINGS?’ is
displayed
Press ►
• To return: Press ◄
7
Enter user ID and select
‘EXIT’ to confirm (Character
input → P.11)
• To return: Press ◄
Select ‘YES’ with ▲ and
confirm with [MENU/SET]
Downloaded From camera-usermanual.com Panasonic Manuals
38
VQT1R37
Applications
7 Automatic connection settings
Designate the registered access points you use most often to enable automatic
connection.
1
2
3
Entering Wi-Fi mode (P.10)
Select ‘Wi-Fi SET’
Select ‘AUTO CONNECT SET’
• To return: Press [Q.MENU/ ]
4
Select an access point
• To return: Press [Q.MENU/ ]
5
Select ‘ON’
• To return: Press [Q.MENU/ ]
If multiple access points have been set to ‘ON’, the camera will connect to the one with
the strongest reception.
If connection could not be established automatically, a list of the available access
points will be displayed for you to select from.
Downloaded From camera-usermanual.com Panasonic Manuals
VQT1R37
39
Applications
8 Checking the MAC address
Display the MAC address which has been set in the camera.
The ‘MAC address’ is a fixed address to identify network devices.
1
2
3
Entering Wi-Fi mode (P.10)
Select ‘Wi-Fi SET’
Select ‘MAC ADDRESS’
• To return:
Press [Q.MENU/ ]
• To return:
Press [Q.MENU/ ]
Check the MAC address, and press [MENU/SET] to exit.
Downloaded From camera-usermanual.com Panasonic Manuals
40
VQT1R37
Message displays
Others
Meanings and ways to respond to the main messages displayed on the LCD monitor.
Message
Get Security Key
FAILED. CHECK THE
T-Mobile ROUTER
SETTINGS.
ACCESS POINT
CONNECTION WAS
FAILED.
CONNECTION WAS
FAILED.
Remarks
Check and update the access point settings. (P.26)
• The access point information set to your camera is
incorrect. Check the certificate format, the encryption
format, and the encryption key. (P.31-32)
• Access point reception is poor. Try moving closer to the
access point.
• The access point is switched off.
• The access point selected is not supported by this
camera.
CANNOT DISPLAY
Picture cannot be played back on this camera.
CANNOT SEND E-MAIL
• The selected picture does not exist.
• Check the destination e-mail address.
• Could not establish communication. Try again later.
CANNOT SET TO THIS
PICTURE
Motion pictures cannot be uploaded.
DISCONNECTED
• Access point reception is poor. Try moving closer to the
access point.
• With certain access points, connection may be
automatically canceled once a fixed period of time has
elapsed. In such cases, connect to the network again.
FAILED TO
COMMUNICATE
• Access point reception is poor. Try moving closer to the
access point.
• No response from the server, or communication has
timed out. Try again later.
FAILED TO DELETE
IMAGE
The picture you have tried to delete does not exist.
Downloaded From camera-usermanual.com Panasonic Manuals
VQT1R37
41
Message displays (Continued)
Others
Message
Remarks
FAILED TO LOGIN
• Public wireless LAN user ID and/or password are
incorrect.
• This public wireless LAN service may not be supported
on this camera.
• A communication error occurred during web album
login due to poor wireless reception.
Please try again later.
IP ALLOCATION WAS
FAILED.
• The access point DHCP function is not working. Check
the wireless LAN router.
• There is no response from the access point. Check the
access point settings.
LOGIN ERROR:
ACCOUNT EXPIRED
OR INVALID. CONTACT
T-Mobile HotSpot @
877-822-SPOT
Either your T-Mobile HotSpot complimentary access
period has expired, or the T-Mobile HotSpot user ID and
password you have entered is invalid. Input a valid TMobile HotSpot user ID and password into your camera.
(P.38)
LOGIN ID/PASSWORD
AUTHORIZATION
FAILED.
Check web album login ID and password.
MAXIMUM NUMBER
OF IMAGE UPLOADS
REACHED.
• Upload your pictures to a different Lumix album.
• Delete unneeded pictures from your web album (P.19).
MAXIMUM STORAGE
SPACE REACHED ON
WEB ALBUM.
Delete unneeded pictures from your web album (P.19).
NO PICTURE TO
DISPLAY
• There are no pictures in your Lumix album.
• If you have changed the name of your Lumix album,
you will no longer be able to view it with your camera.
PLEASE SET
ACCESS POINT.
Make access point settings in ‘Wi-Fi SET’ → ‘ACCESS
POINT SET’. (P.30)
WEB ALBUM NOT
FOUND
LUMIX ALBUM# NOT
FOUND.
Try again. If your Lumix album still cannot be found, it
may have been deleted, or the album name may have
been changed.
Downloaded From camera-usermanual.com Panasonic Manuals
42
VQT1R37
Q&A
Others
Problem
Access Point
I cannot register access
points
No access points are
displayed. I cannot
connect to an access
point
Web Album
I have forgotten my
Picasa Web Albums
password
I want to swap between
the card and the internal
memory when sending
pictures
Pictures cannot be sent
to/displayed in/deleted
from my web album
Sending pictures to my
web album takes a long
time
Remarks
Has the maximum number of access points been
reached? (Maximum of 8 access points, including
default ‘tmobile’)
• If you are unable to use T-Mobile HotSpot having
successfully used the service before, it is possible
that your complimentary usage period has expired.
If that is the case, you may purchase a T-Mobile
HotSpot account and make the appropriate
changes to the settings on your camera to use the
service again. Contact T-Mobile HotSpot at 877822-SPOT (7768) for details.
(Updating settings → P.38)
• Check that the access point you wish to connect to
is currently open for use.
• It may not be possible to display or connect to an
access point if the signals from that access point
are weak or otherwise inadequate.
• Depending on their settings, some access points
may not be displayed even if reception is available.
Check the access point settings.
• Try the following
- Bring the camera (particularly the antenna grip
part) closer to the access point
- Remove any obstacles between the camera and
the access point
- Point the camera in different directions
• This camera does not support channel 12 or
channel 13.
See the following URL for a guide to password
reissues from Picasa Web Albums.
http://picasa.google.com/support/bin/answer.py?answ
er=39549&topic=10750
(correct as of April 2008)
You cannot swap between the card and the internal
memory during communication. You can only
use the card (or internal memory) in use when
communication with the access point is established.
It is possible that the web album server or the
connection line is busy. Try again later.
Are your pictures particularly large?
Resize your pictures using ‘Change size of pictures
to upload’ (P.24).
Downloaded From camera-usermanual.com Panasonic Manuals
VQT1R37
43
Q&A (Continued)
Others
Problem
I cannot view the
pictures that should be
uploaded to my web
album
Web Album
I cannot see my Lumix
album any more
Older pictures are
displayed first when
viewing web album
pictures
I want to change my
Lumix album ‘Unlisted’/
‘Public’ settings
Others
E-mails containing the
URL are not delivered/
I cannot send e-mails
Remarks
• Upload may not have been completed if connection
was lost during picture transmission.
• According to server conditions, pictures may take
a little time to be displayed in web albums after
uploading. Please wait a little before trying again.
If you change the name of your Lumix album via
your computer, you will be unable to view it with your
camera. For example, if after using your computer
to change the name of ‘LUMIX ALBUM1’ to ‘MY
ALBUM’, you use your camera to upload pictures or
to display pictures from your albums, it will not be
able to find a ‘LUMIX ALBUM1’ and will automatically
create a new ‘LUMIX ALBUM1’, making it impossible
to access pictures within ‘MY ALBUM’ via your
camera. (You will still be able to access pictures via
your computer.)
The date of pictures edited on your computer will be
the date of editing, not the date the pictures were
taken.
Display orders may be affected by web album picture
management rules.
Your Lumix album can be set to either ‘Only people
I have informed can view (Unlisted)’ or ‘Anyone can
view (Public)’, but this setting cannot be changed via
your camera. Change the setting with your computer.
• Check that the e-mail address has been set
correctly (P.22).
• This function can only be used if a Gmail (e-mail
service supplied by Google) address has been set
as your Google account ‘Email’ (P.12).
I can only select one
picture to send, even
when using ‘MULTI
SELECT’
Web album picture or data capacity is full.
Delete unneeded pictures from your web album
(P.19).
I have forgotten my WiFi mode password
Perform a ‘RESET Wi-Fi SET’ from the Setup Menu.
(Selecting from setup menu: Set mode dial to
anything other than Wi-Fi mode → press [MENU/
SET] →select tab)
Note that all information set by the user in Wi-Fi
mode, including for access points other than ‘tmobile’
and for web album login (user ID, passwords, etc.),
will also be reset. (‘tmobile’ settings will be reset to
default.)
Downloaded From camera-usermanual.com Panasonic Manuals
44
VQT1R37
Others
Specifications
Wireless transmitter
Standards
IEEE 802.11 b/g (standard wireless LAN protocol)
ARIB STD-T66 (low power data transmission system standards)
Communications
protocols
IEEE 802.11b: DSSS
IEEE 802.11g: OFDM
Communication
distance
(approximate)
Approx. 50 m
* Communication distance may be affected by obstacles and
weather conditions.
Frequency range
(center frequency)
2412 MHz-2462 MHz (11 channels)
Data transmission
speeds
(standard values)
IEEE 802.11b: 11M/5.5M/2M/1M (bps)
IEEE 802.11g: 54M/48M/36M/24M/18M/12M/9M/6M (bps)
Security
128/64 bit WEP, TKIP, AES
Access format
Infrastructure mode
This product contains OpenSSL software developed by OpenSSL Project, which is used subject to the
following license conditions.
LICENSE ISSUES
The OpenSSL toolkit stays under a dual license, i.e. both the conditions of the OpenSSL License
and the original SSLeay license apply to the toolkit. See below for the actual license texts. Actually
both licenses are BSD-style Open Source licenses. In case of any license issues related to OpenSSL
please contact [email protected].
OpenSSL License
Copyright (c) 1998-2004 The OpenSSL Project. All rights reserved.
Redistribution and use in source and binary forms, with or without modification, are permitted provided
that the following conditions are met:
1. Redistributions of source code must retain the above copyright notice, this list of conditions and the
following disclaimer.
2. Redistributions in binary form must reproduce the above copyright notice, this list of conditions and
the following disclaimer in the documentation and/or other materials provided with the distribution.
3. All advertising materials mentioning features or use of this software must display the following
acknowledgment:
"This product includes software developed by the OpenSSL Project for use in the OpenSSL Toolkit.
(http://www.openssl.org/)"
4. The names "OpenSSL Toolkit" and "OpenSSL Project" must not be used to endorse or promote
products derived from this software without prior written permission. For written permission, please
contact [email protected].
5. Products derived from this software may not be called "OpenSSL" nor may "OpenSSL" appear in
their names without prior written permission of the OpenSSL Project.
6. Redistributions of any form whatsoever must retain the following acknowledgment:
"This product includes software developed by the OpenSSL Project for use in the OpenSSL Toolkit
(http://www.openssl.org/)"
Downloaded From camera-usermanual.com Panasonic Manuals
VQT1R37
45
THIS SOFTWARE IS PROVIDED BY THE OpenSSL PROJECT ''AS IS'' AND ANY EXPRESSED OR
IMPLIED WARRANTIES, INCLUDING, BUT NOT LIMITED TO, THE IMPLIED WARRANTIES OF
MERCHANTABILITY AND FITNESS FOR A PARTICULAR PURPOSE ARE DISCLAIMED. IN NO
EVENT SHALL THE OpenSSL PROJECT OR ITS CONTRIBUTORS BE LIABLE FOR ANY DIRECT,
INDIRECT, INCIDENTAL, SPECIAL, EXEMPLARY, OR CONSEQUENTIAL DAMAGES (INCLUDING,
BUT NOT LIMITED TO, PROCUREMENT OF SUBSTITUTE GOODS OR SERVICES; LOSS OF
USE, DATA, OR PROFITS; OR BUSINESS INTERRUPTION) HOWEVER CAUSED AND ON ANY
THEORY OF LIABILITY, WHETHER IN CONTRACT, STRICT LIABILITY, OR TORT (INCLUDING
NEGLIGENCE OR OTHERWISE) ARISING IN ANY WAY OUT OF THE USE OF THIS SOFTWARE,
EVEN IF ADVISED OF THE POSSIBILITY OF SUCH DAMAGE.
This product includes cryptographic software written by Eric Young ([email protected]). This product
includes software written by Tim Hudson ([email protected]).
Original SSLeay License
Copyright (C) 1995-1998 Eric Young ([email protected])
All rights reserved.
This package is an SSL implementation written by Eric Young ([email protected]).
The implementation was written so as to conform with Netscapes SSL.
This library is free for commercial and non-commercial use as long as the following conditions are
adhered to. The following conditions apply to all code found in this distribution, be it the RC4, RSA,
lhash, DES, etc., code; not just the SSL code. The SSL documentation included with this distribution is
covered by the same copyright terms except that the holder is Tim Hudson ([email protected]).
Copyright remains Eric Young's, and as such any Copyright notices in the code are not to be removed.
If this package is used in a product, Eric Young should be given attribution as the author of the parts of
the library used. This can be in the form of a textual message at program startup or in documentation
(online or textual) provided with the package.
Redistribution and use in source and binary forms, with or without modification, are permitted provided
that the following conditions are met:
1. Redistributions of source code must retain the copyright notice, this list of conditions and the
following disclaimer.
2. Redistributions in binary form must reproduce the above copyright notice, this list of conditions and
the following disclaimer in the documentation and/or other materials provided with the distribution.
3. All advertising materials mentioning features or use of this software must display the following
acknowledgement:
"This product includes cryptographic software written by Eric Young ([email protected])"
The word 'cryptographic' can be left out if the routines from the library being used are not
cryptographic related :-).
4. If you include any Windows specific code (or a derivative thereof) from the apps directory
(application code) you must include an acknowledgement:
"This product includes software written by Tim Hudson ([email protected])"
Downloaded From camera-usermanual.com Panasonic Manuals
46
VQT1R37
THIS SOFTWARE IS PROVIDED BY ERIC YOUNG ''AS IS'' AND ANY EXPRESS OR IMPLIED
WARRANTIES, INCLUDING, BUT NOT LIMITED TO, THE IMPLIED WARRANTIES OF
MERCHANTABILITY AND FITNESS FOR A PARTICULAR PURPOSE ARE DISCLAIMED. IN NO
EVENT SHALL THE AUTHOR OR CONTRIBUTORS BE LIABLE FOR ANY DIRECT, INDIRECT,
INCIDENTAL, SPECIAL, EXEMPLARY, OR CONSEQUENTIAL DAMAGES (INCLUDING, BUT NOT
LIMITED TO, PROCUREMENT OF SUBSTITUTE GOODS OR SERVICES; LOSS OF USE, DATA,
OR PROFITS; OR BUSINESS INTERRUPTION) HOWEVER CAUSED AND ON ANY THEORY OF
LIABILITY, WHETHER IN CONTRACT,
STRICT LIABILITY, OR TORT (INCLUDING NEGLIGENCE OR OTHERWISE) ARISING IN ANY WAY
OUT OF THE USE OF THIS SOFTWARE, EVEN IF ADVISED OF THE POSSIBILITY OF SUCH
DAMAGE.
The license and distribution terms for any publically available version or derivative of this code
cannot be changed. i.e. this code cannot simply be copied and put under another distribution license
[including the GNU Public License.]
Index
ACCESS POINT SET ...................... 30 - 33
AUTO CONNECT SET ........................... 39
Character input ........................................11
DELETE PICTURE ................................. 19
DISCONNECT ........................................ 21
DISPLAY WEB ALBUM .......................... 18
E-MAIL SET ..................................... 22 - 23
ENCRYPTION SCHEME
(AES/TKIP/WEP) .................................... 31
HOME Wi-Fi LAN ............................ 30 - 33
LOGIN SET ..................................... 12 - 14
MAC address .......................................... 40
MANUAL INPUT .............................. 30 - 33
NETWORK CERTIFICATION
(OPEN/ SHARED KEY/ WPA-PSK/
WPA2-PSK) ............................................ 31
Picasa Web Albums................. 4, 6, 12 - 14
PUBLIC Wi-Fi LAN ...................... 4, 30 - 33
RESET Wi-Fi SET ................................. 37
RESIZE............................................ 24 - 25
SEND URL ...................................... 22 - 23
SSID ................................................... 9, 31
T-Mobile @Home ............................ 26 - 29
T-Mobile HotSpot .......................... 4, 15, 38
UPLOAD PICTURE SIZE ................ 24 - 25
UPLOAD TO WEB ALBUM ............. 16 - 17
URL .................................................... 4, 22
Wi-Fi ......................................................... 4
Wi-Fi PASSWORD SET ............ 10, 34 - 35
Downloaded From camera-usermanual.com Panasonic Manuals
VQT1R37
47